Traits
Traits are used in KDSmart to record (score) traits for trials and nurseries. Traits are usually phenotypic information, although they are used to score other data too.
It is best to manage these traits from Trial Manager in KDXplore because it serves as a central management point. However, you can also manage traits in KDSmart.
Traits are defined with validation rules to facilitate strict data capture rules to help with preventing recording errors. You can also use these rules to make scoring more efficient by minimising the required keystrokes.
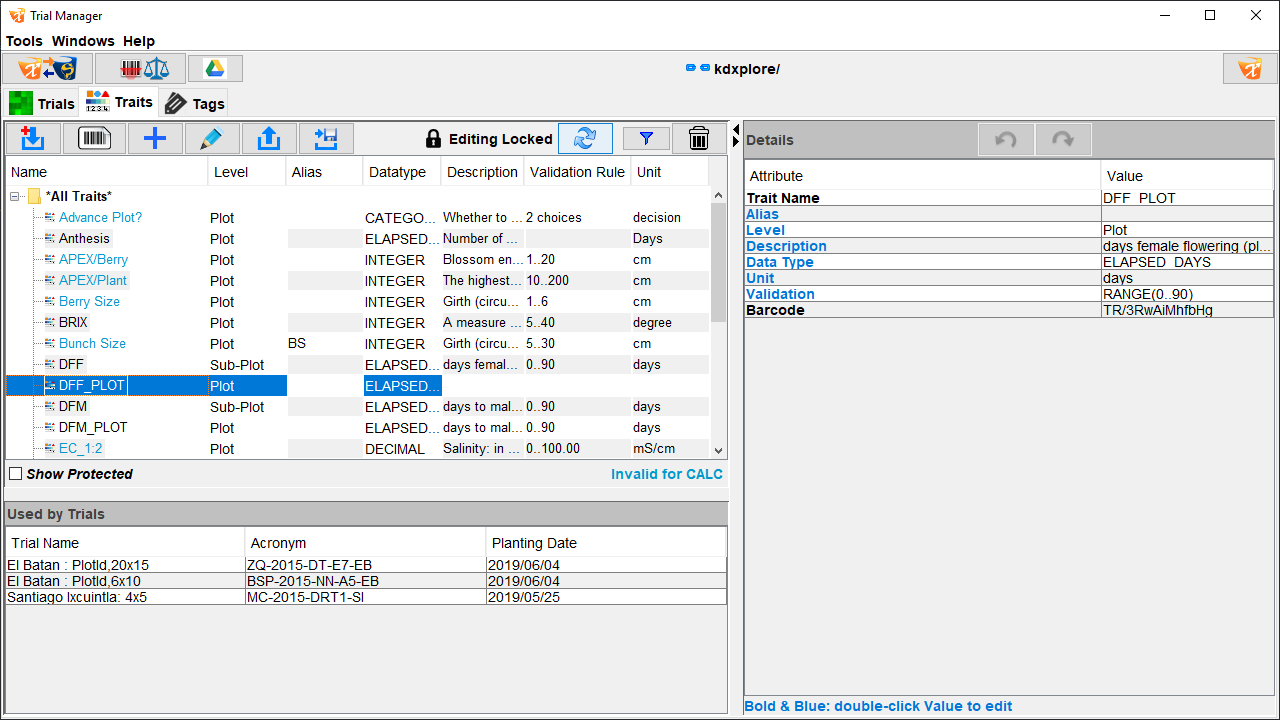
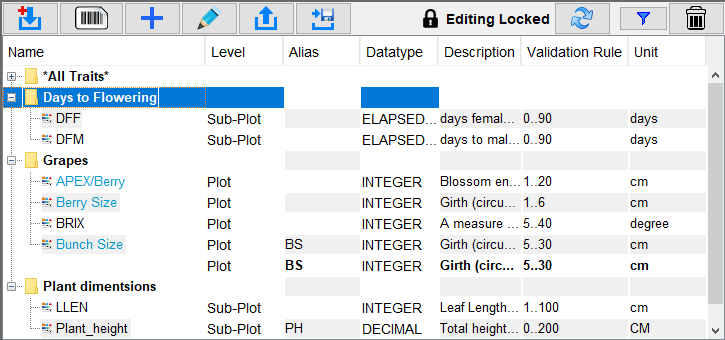
The Traits tab (pictured below) lists all available traits and options for managing traits, including importing and exporting.
What is a Trait?
Traits are the quality or characteristic being inspected, measured and recorded for the organism. Within KDSmart, traits have the following attributes and features:
User-definable;
Defined by six different data types;
Optionally lockable once scored to prevent accidental change;
Importable and exportable;
Can be grouped into bundles for easier management; and
Either plot-level or subplot-level.
Measurements for each trait instance in each plot or subplot include the:
Date and time user took the measurement;
GPS coordinates (if this is enabled); and
Value of the measurement.
Examples of traits include the height of a plant (this might be called Plant_Height) or the date a plot was irrigated (which could be called Irrigated).
Trait Attributes
Each trait contains a set of attributes that define its characteristics. The following table lists the attributes of a trait:
Attribute |
Description |
|---|---|
Trait Name |
Must be unique and short for display in the Scoring screen where space is limited on smaller devices (i.e. phones). |
Alias |
An alternative trait name that is helpful when the trait name is too long for the screen. |
Description |
An optional longer explanation of the trait to help with data entry. |
Data Type |
Constrains permitted values of traits. The types available are:
For details, refer to Trait Data Types. |
Unit |
The unit of the value to enter when scoring (e.g. measurement in millimetres or centimetres). |
Validation Rule |
A validation rule can protect against misentered data. The nature of the rule is dependent on the selection of a data type. |
Note
Unless specified in the CSV, traits loaded to KDSmart from CSV default to the TEXT data type. Once loaded, you may edit the trait definition to define its data type etc.
Trait Data Types
The following table describes the available data types for traits:
Data Type |
Description |
Data Entry Style |
Example Validation Rule |
|---|---|---|---|
TEXT |
No constraint on what you can enter. |
A text input field with a full keyboard. |
No rule is required. |
CATEGORICAL |
Value is constrained to be one from a list of allowed values. |
The user selects from a list of allowed values. |
Example: |
DATE |
Value is a date. |
A calendar where you can choose a date. |
May be left blank or specified as a date. |
ELAPSED_DAYS |
Value is the number of days since the trial’s planting date. |
A list of days around the current date are presented, and the user selects the desired value or chooses ‘Other’ to use a calendar to pick a date outside this range. |
May be left blank or specified as |
INTEGER |
Integer numeric values in a range specified. |
If the number of values is ‘small’, then the entry is similar to the categorical data type. Otherwise, a numeric keypad is presented (excluding a decimal point key). |
Specify the range of values as: |
DECIMAL |
Specify a lower and upper bound and whether or not the bounds are included in the range, and the number of digits of precision that will be recorded. |
Enter data using a numeric keypad that includes the decimal point. |
RANGE(min..max) |
CALC |
Calculated or Derived Trait. |
Data entry is not permitted for this type. |
A simple calculated or derived trait is: |
Calculated or Derived Traits
The validation rule has either one or two components (with a comma separating them if required):
The first component provides a formula that may reference other traits (by the trait name), using the operators and functions listed below.
If present, the second component indicates the number of decimal digits to retain in the computed result.
The functions available are in a table below. Arithmetic operators are:
* / % (the last is the modulo operation)
+ - (unary minus is also supported)
^ ** (for exponentiation).
Note
The comparison operators: < <= = != > >= and the logical operators: && || evaluate to either 1 or 0 representing true or false respectively. This is relevant for the if(cond,a,b) function.
Functions Available For CALC Data Type
The following table describes the functions available for the CALC data type.
Function Name(s) |
Description |
Example |
|---|---|---|
sin cos tan asin acos atan |
Trigonometric functions |
|
sinh cosh tanh |
Hyperbolic functions |
|
abs round floor ceil sqrt exp ln log sign |
Unary mathematical functions: |
round(1.5) returns 2.0 |
pow min max |
Binary mathematical functions |
pow(2,3) returns 8.0 |
rnd deg(radians) rad(degrees) |
Other functions: |
rnd(10) will return a value y satisfying: |
if(expr , a , b) |
Conditional expression: |
if(PH_CM <= 5 , 1 , 2) |
Tip
Why can’t I import my CALC trait?!
Ensure validation rules using comma’s (e.g. CALC( max(PH_CM/5,1) , 1 )) are wrapped by double quotes (e.g. “CALC( max(PH_CM/5,1) , 1 )”). Excel handles this automatically.
Ensure the number of opening and closing brackets match (It’s an easy thing to miss at a glance).
Trait names that use white spaces in their names cannot be used for derived CALC traits.
Categorical Traits
At times during scoring, the precision level required can vary. This depends on a few factors, e.g. sheer volume of specimens, time frame for data collection, reduced/limited people to perform the scoring, etc. In these instances, the Categorical data type may be helpful.
Typically Categorical is used for constraining the data entered to a predefined list of values, such as the following definitions:
CHOICE(BLUE | YELLOW | RED); and
CHOICE(White | Yellow | Purple | Variegated | Brown | Orange yellow | Mottled | White top | Red | Sun red | Blue | Other).
A categorical other trait is one where an other field can be used as a text field.
Note
In these examples, the pipe character ‘|’ is shown with a space character on either side to improve legibility.
Using Categorical Traits
In some situations, using a categorical data type may be more beneficial as this facilitates the use of selection ranges instead of data entry.
The following table illustrates the collection of plant height using both methods:
Trait Defined as Integer |
Trait Defined as Categorical |
|
|---|---|---|
Entry Method |
Plant height entered by selecting a value button. |
Plant height entered by selecting a value range from a list. |
Conditions |
Trait validation with a minimum of 5 and a maximum of 50 |
Trait validation with six ranges defined (e.g. The unit of measure may be 5 centimetres). |
Validation Rule |
5 <= x <= 50 |
CHOICE(5-10 | 10-15 | 15-20 | 20-25 | 25-30 | 30++). |
Key Presses |
Minimum 2 button press per subplot (single digit) then Accept button. |
Minimum 1 button press per subplot, unless a long condition list requires scrolling. |
Note
For a categorical trait, the number of choices may be limited to suit the circumstances of the trial stage.
Trait Management
Traits in Trial Manager are managed from the Traits tab which is outlined on the Trial Manager Overview page. You can perform the following actions in the Traits tab:
Create new traits;
Edit traits;
Delete traits;
Bundle traits;
Import traits from a CSV file; and
Export selected traits to a CSV file.
Creating Traits
Traits can either be created in Trial Manager or imported. Follow the instructions below to create a new trait.
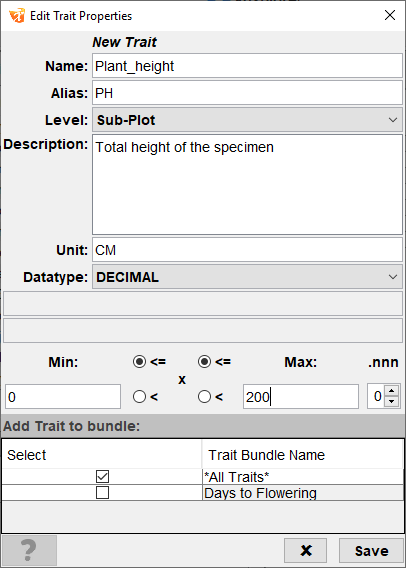
Step |
Action |
|---|---|
1. |
From the Traits tab, select the Add button |
2. |
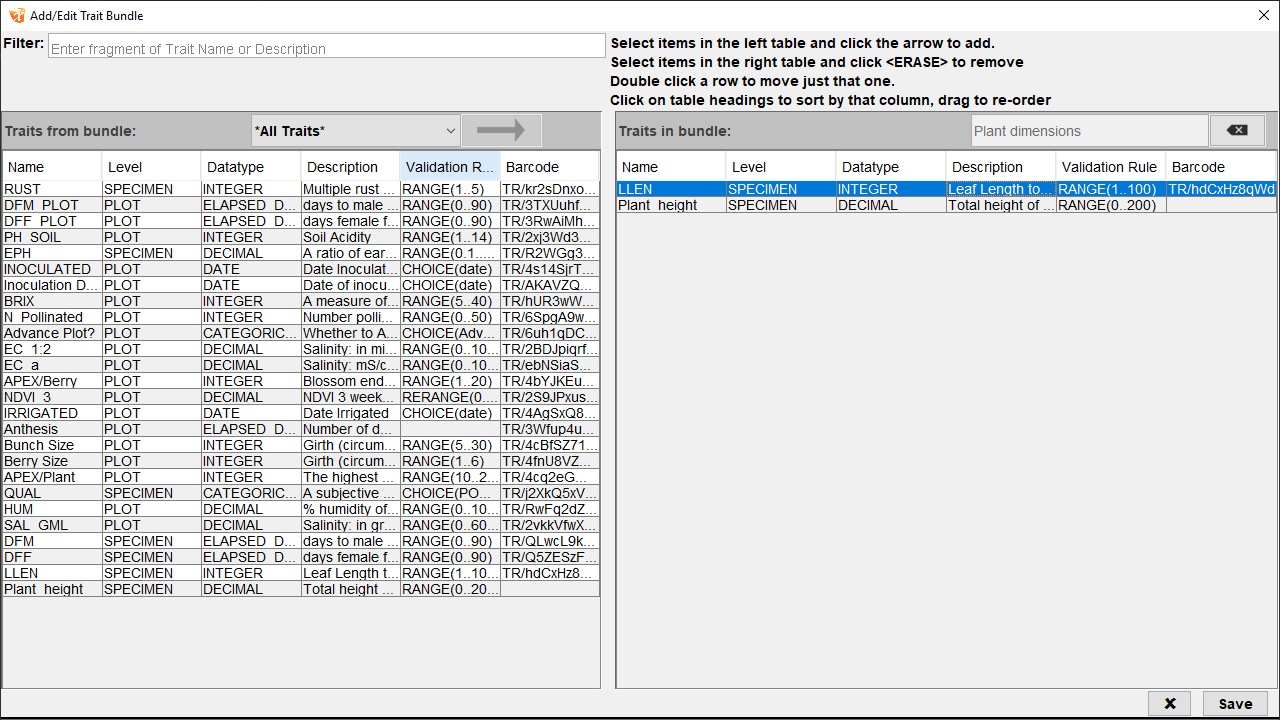
Enter all trait attributes for the new trait, including its name, datatype, and validation rules. The above example demonstrates creating a trait called Plant_height that is measured in centimetres. See the Trait Attributes section above for more information. |
3. |
Use the checkboxes in the Add Trait to Bundle panel to add the new trait to any existing trait bundles. All new traits will automatically be added to the All Traits bundle. |
4. |
Select the Save button to save the new trait. |

Note
You can also create traits in KDSmart, so it is not always necessary to organise traits before exporting trials to be scored. However, a trait created on a KDSmart device will need to be imported into Trial Manager so that other KDSmart devices can use the trait.
Editing Traits
Any trait in Trial Manager can also be edited. By default, trait editing is locked to ensure data integrity. In this case the Lock button  appears locked. Double+click the button to unlock it if you want to edit traits. See the below information for instructions on editing:
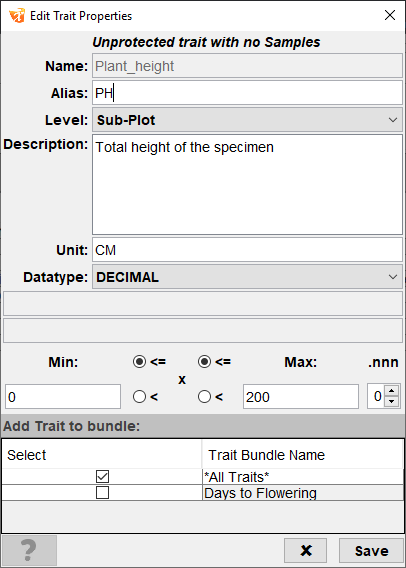
Step |
Action |
|---|---|
1. |
From the Traits panel, ensure that trait editing is not locked. If it is, select the Lock button |
1. |
Double+click the trait to be edited. This will open the Edit Trait Properties window. |
2. |
The Edit Trait Properties window will be the same as when creating a trait, except the trait name will be disabled as it’s not possible to change a trait name. Any other trait attributes can be edited. |
3. |
After editing all required fields, select the Save button. The trait will now be updated. |
Note
Be careful with editing traits that are currently being used to score trials.
Deleting Traits
Traits that are not needed can be deleted. One or more traits can also be deleted at once. See the instructions below for more information:
Step |
Action |
|---|---|
1. |
From the Traits panel, select one or more traits to be deleted and select the Delete button |
2. |
Select the Delete Traits option. |
3. |
There will be a confirmation dialogue that will ask for confirmation to delete the selected trait/s. Either select the Yes button to confirm the deletion or the No button to cancel the deletion of the traits. |

Trait Bundle Management
Traits can be grouped into bundles to help with the management. Trait bundles can be created in Trial Manager and imported/exported from other devices as well. KDSmart always automatically creates a bundle called All Traits. The image of the Traits panel below contains trait bundles such as Grapes and Plant dimensions.
See the sections below for trait bundle management.
Creating Trait Bundles
The steps below are an example of how to create a new trait bundle:
Step |
Action |
|---|---|
1. |
Select the Add button |
2. |
To add a trait to the new bundle, either double-click a trait or select it with a single-click, then select the Add To Bundle Button |
3. |
Enter a name for the bundle in the field at |
4. |
Ensure that all necessary traits have been added, and then select the Save button. |

Editing Trait Bundles
You can also edit trait bundles to change the bundle name and add or remove traits from the bundle.
Step |
Action |
|---|---|
1. |
From the Traits panel, select a trait bundle to be edited and then select the Edit button |
2. |
To remove traits from a bundle, select one or more traits from the bundle (listed in the Traits In Bundle panel) to be deleted and select the Remove button |
3. |
You can also add more traits to the bundle. To add traits, select one or more traits from the Traits From Bundle panel and then the Add To Bundle button |


Deleting Trait Bundles
Trait bundles that aren’t needed are deletable from Trial Manager. Deleting trait bundles is done in the same way as deleting individual traits.
Step |
Action |
|---|---|
1. |
From the Traits panel, select a trait bundle to be deleted and select the Delete button |
2. |
Select the Delete Trait Bundles option. |
3. |
There will be a confirmation dialogue which that will ask for confirmation to delete the selected trait/s. Either select the Yes button to confirm the deletion or the No button to cancel the deletion of the traits. |