Tutorial 1 - KDManage
The KDManage application is essential for managing data within the KDDart platform. Its key uses for your trial data stored in KDDart are:
- KDDart administration;
- Security and access;
- Configuration;
- Integration; and
- Quality management.
The following tutorial can be performed using our training instance of KDDart. No software installation is required to access KDManage, only an internet connection and any current web browser.
Select the following link kdman-t.diversityarrays.com which will open KDManage in another tab.
This tutorial provides a brief introduction to KDManage. On conclusion, you should be able to:
- Log into KDDart using KDManage;
- Navigate the KDManage application;
- Create KDDart user accounts and groups;
- Load genotypes into KDDart;
- Load specimens into KDDart;
- Generate a trial design in KDDart;
When completed, further tutorials can be undertaken for using the KDXplore and KDSmart applications to manage trials and collect data.
Table of Contents
Note
Select any heading to expand/display  or contract
  the section.
Step 1 - Logging into KDManage
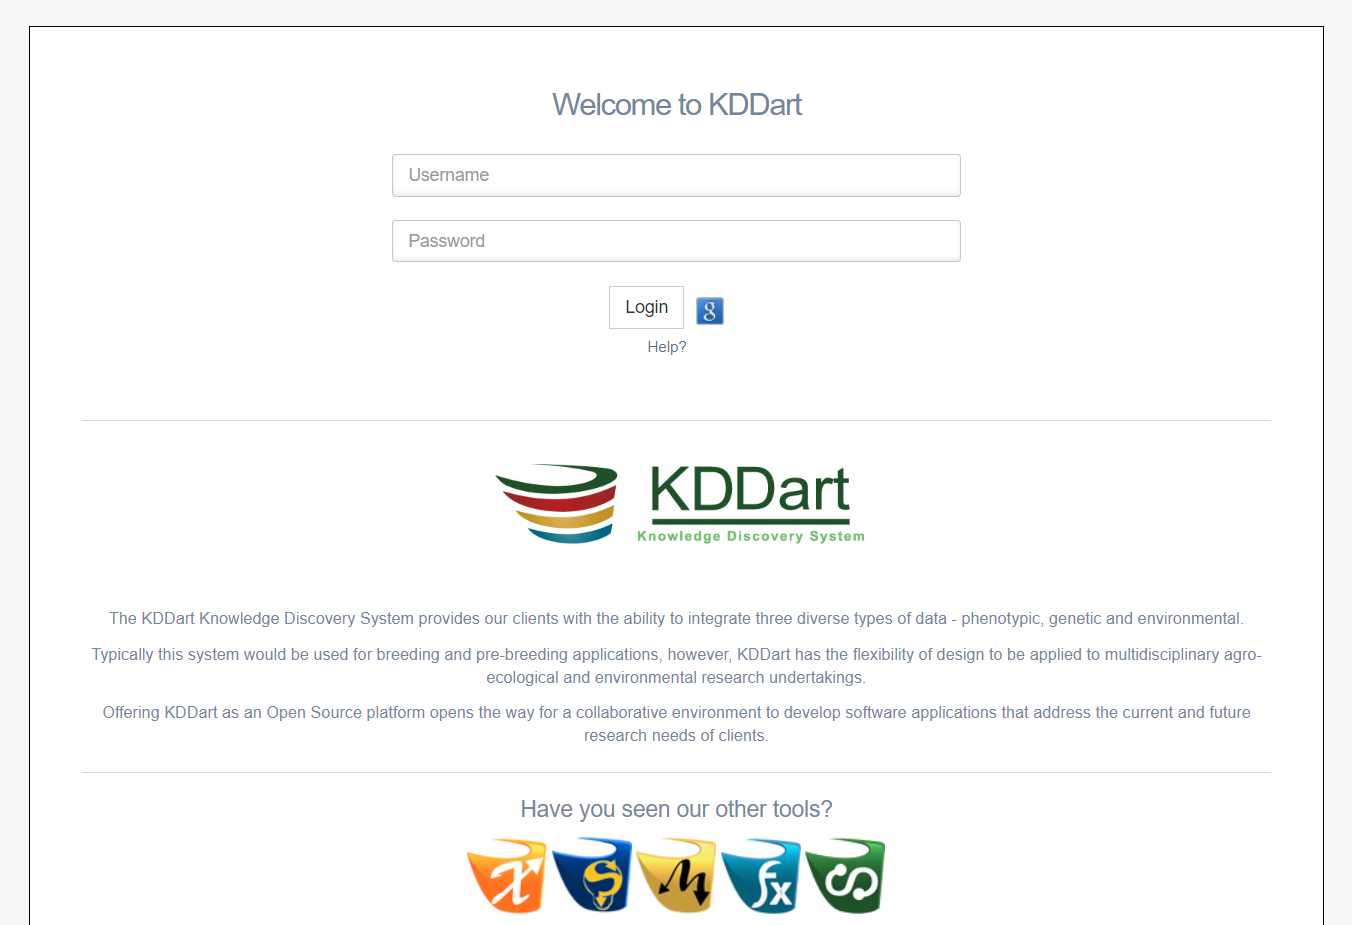
The first step to using KDManage is to open a web browser and navigate to the following URL to display the KDDart login window (will open in a new tab): kdman-t.diversityarrays.com
A login window similar to the following illustration will appear:
Note
Training usernames and passwords for the kdman-t.diversityarrays.com site are provided on the tutorial home page at Training Sample Data.
Enter a valid username and password and select the Login Button.
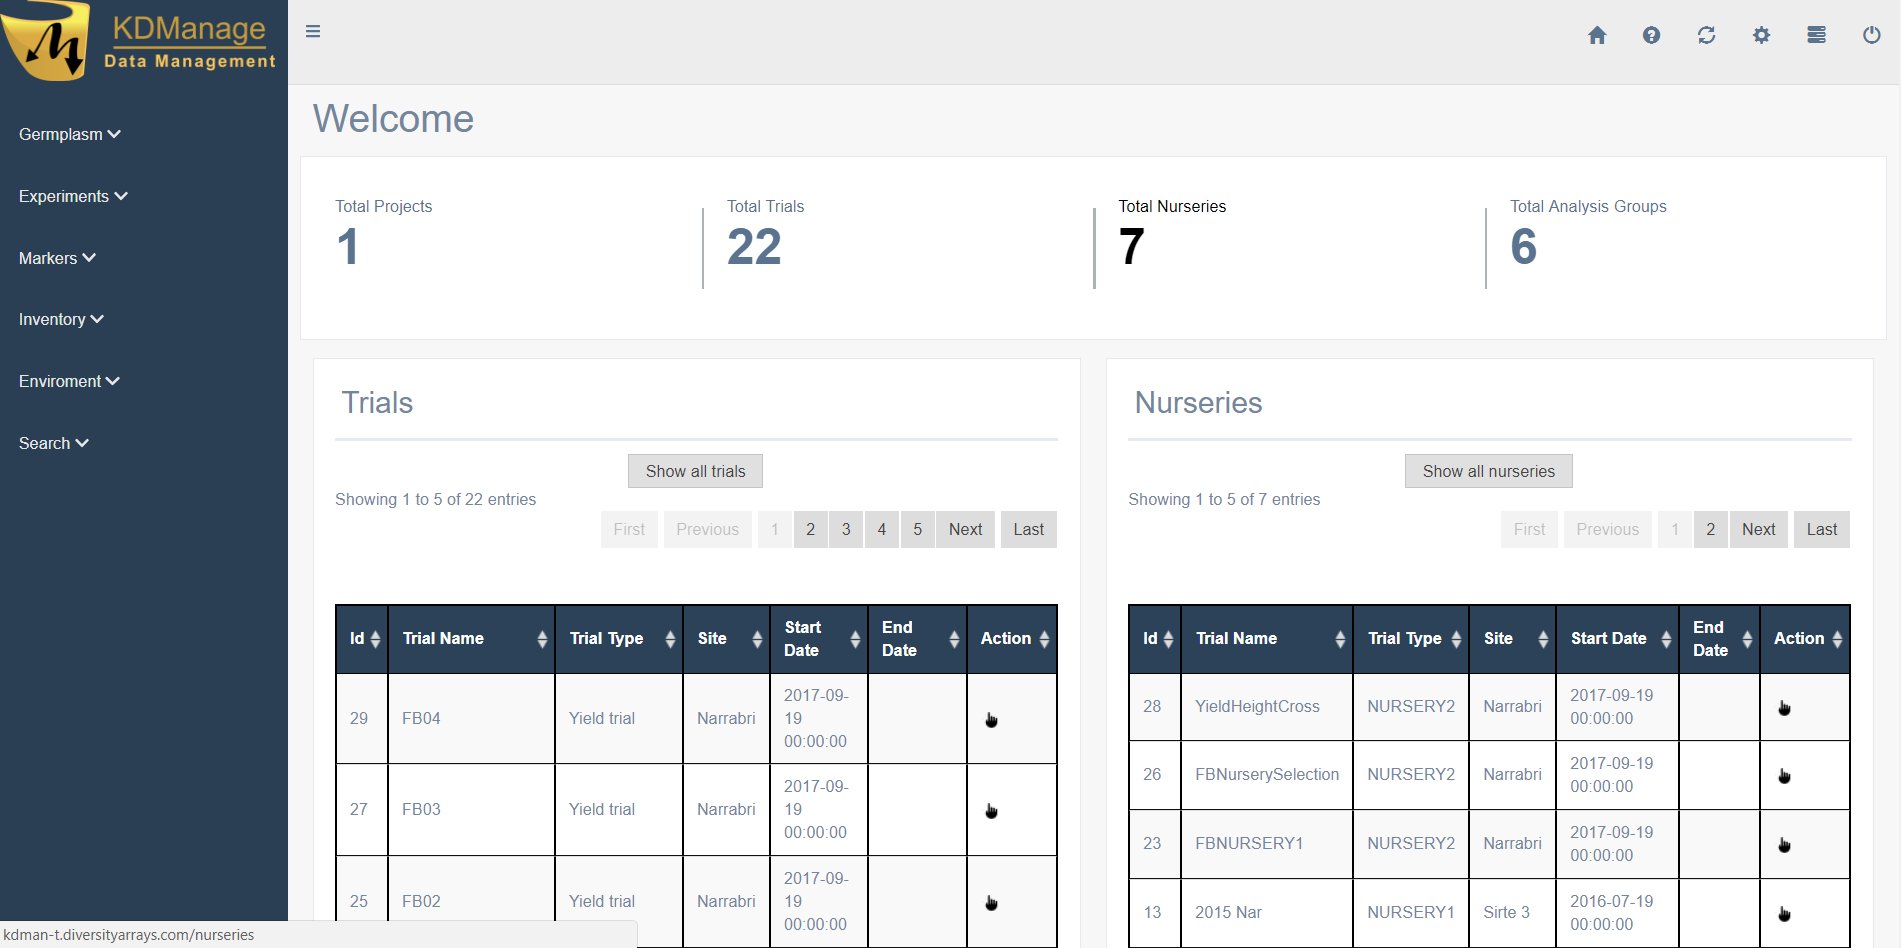
The main KDManage Window will then be displayed, similar to the following image.
Todo
Try logging in to KDManage and become familiar with the application by choosing various tools and looking to see what can be done. When ready, please move onto the next step.
Step 2 - Creating KDDart User Accounts and Groups
Trial administrators can use KDManage to create new user accounts and groups which users can be added to.
Once logged in to KDManage, the Main Screen is displayed which provides basic information on data and tools that can be used. The following image and steps outline how to navigate this screen and create new user accounts:
| Step | Action |
|---|---|
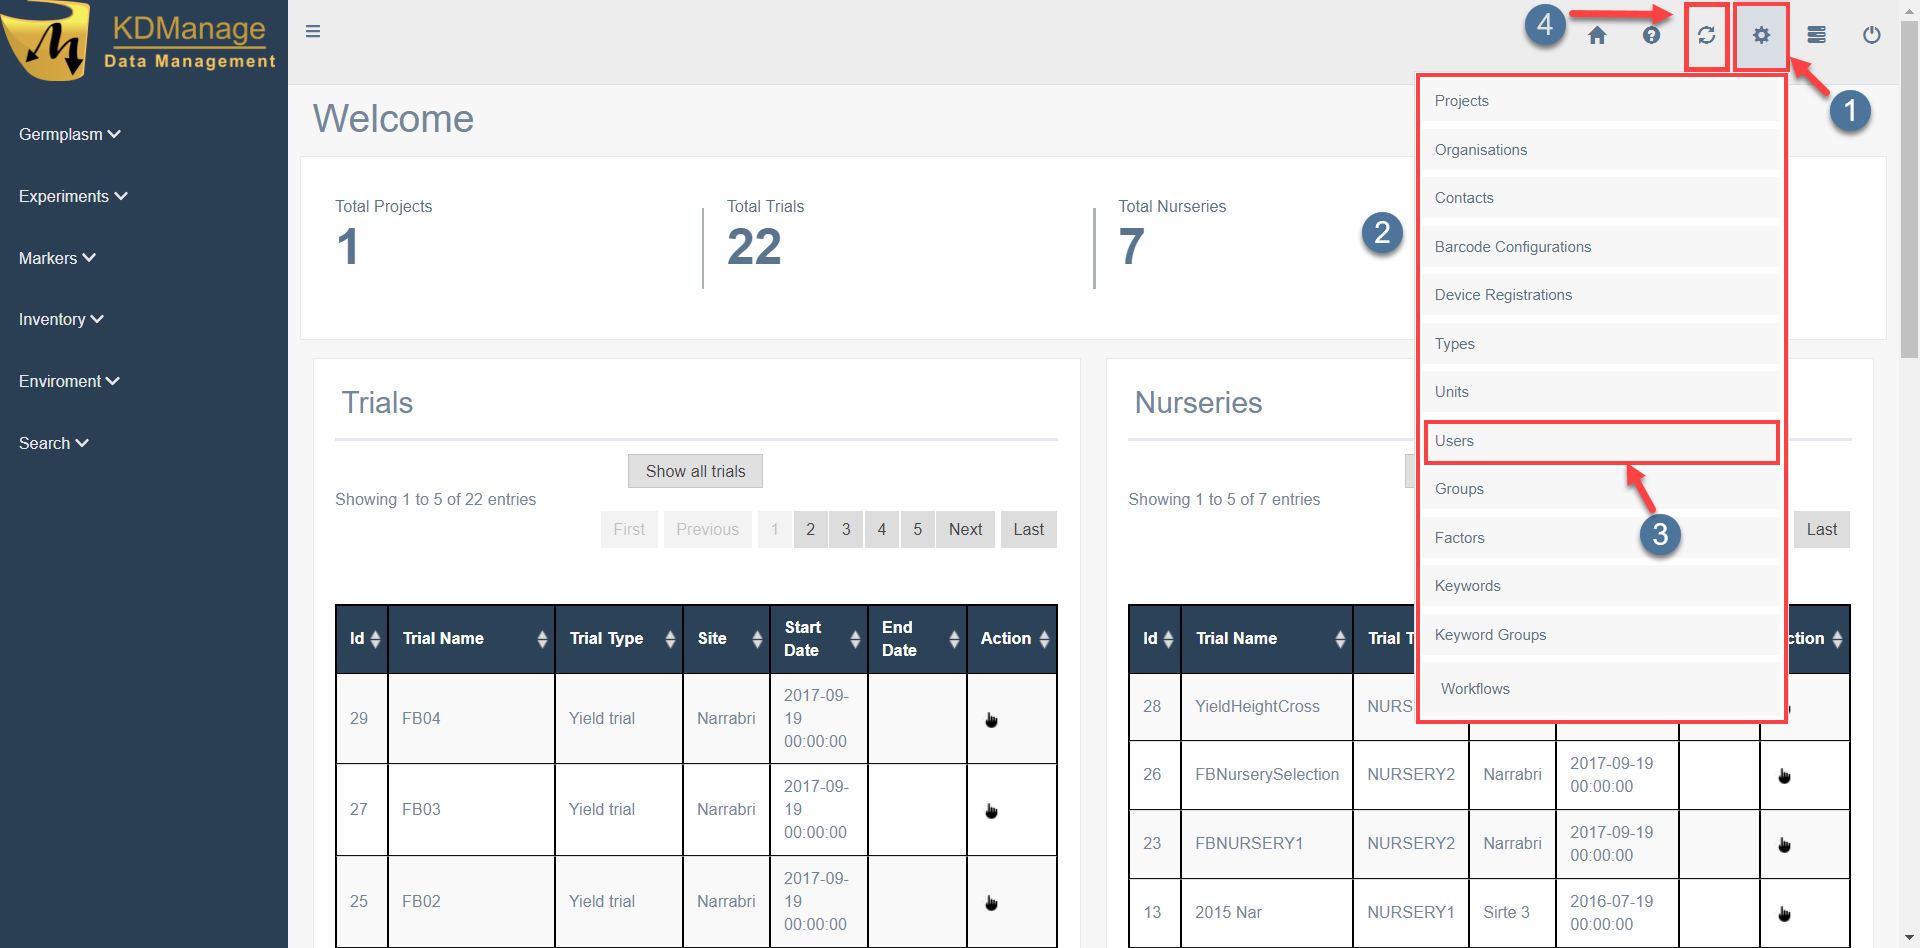
| 1. | Select the Administrative Settings Icon at  to open the Administrative Tools Menu at to open the Administrative Tools Menu at  . . |
| 2. | Select Users at  to navigate to the Users Window as seen in the following image. to navigate to the Users Window as seen in the following image. |
| 3. | Users can be in multiple groups at once. Select the Switch Button at  to switch between these groups. to switch between these groups. |
| Step | Action |
|---|---|
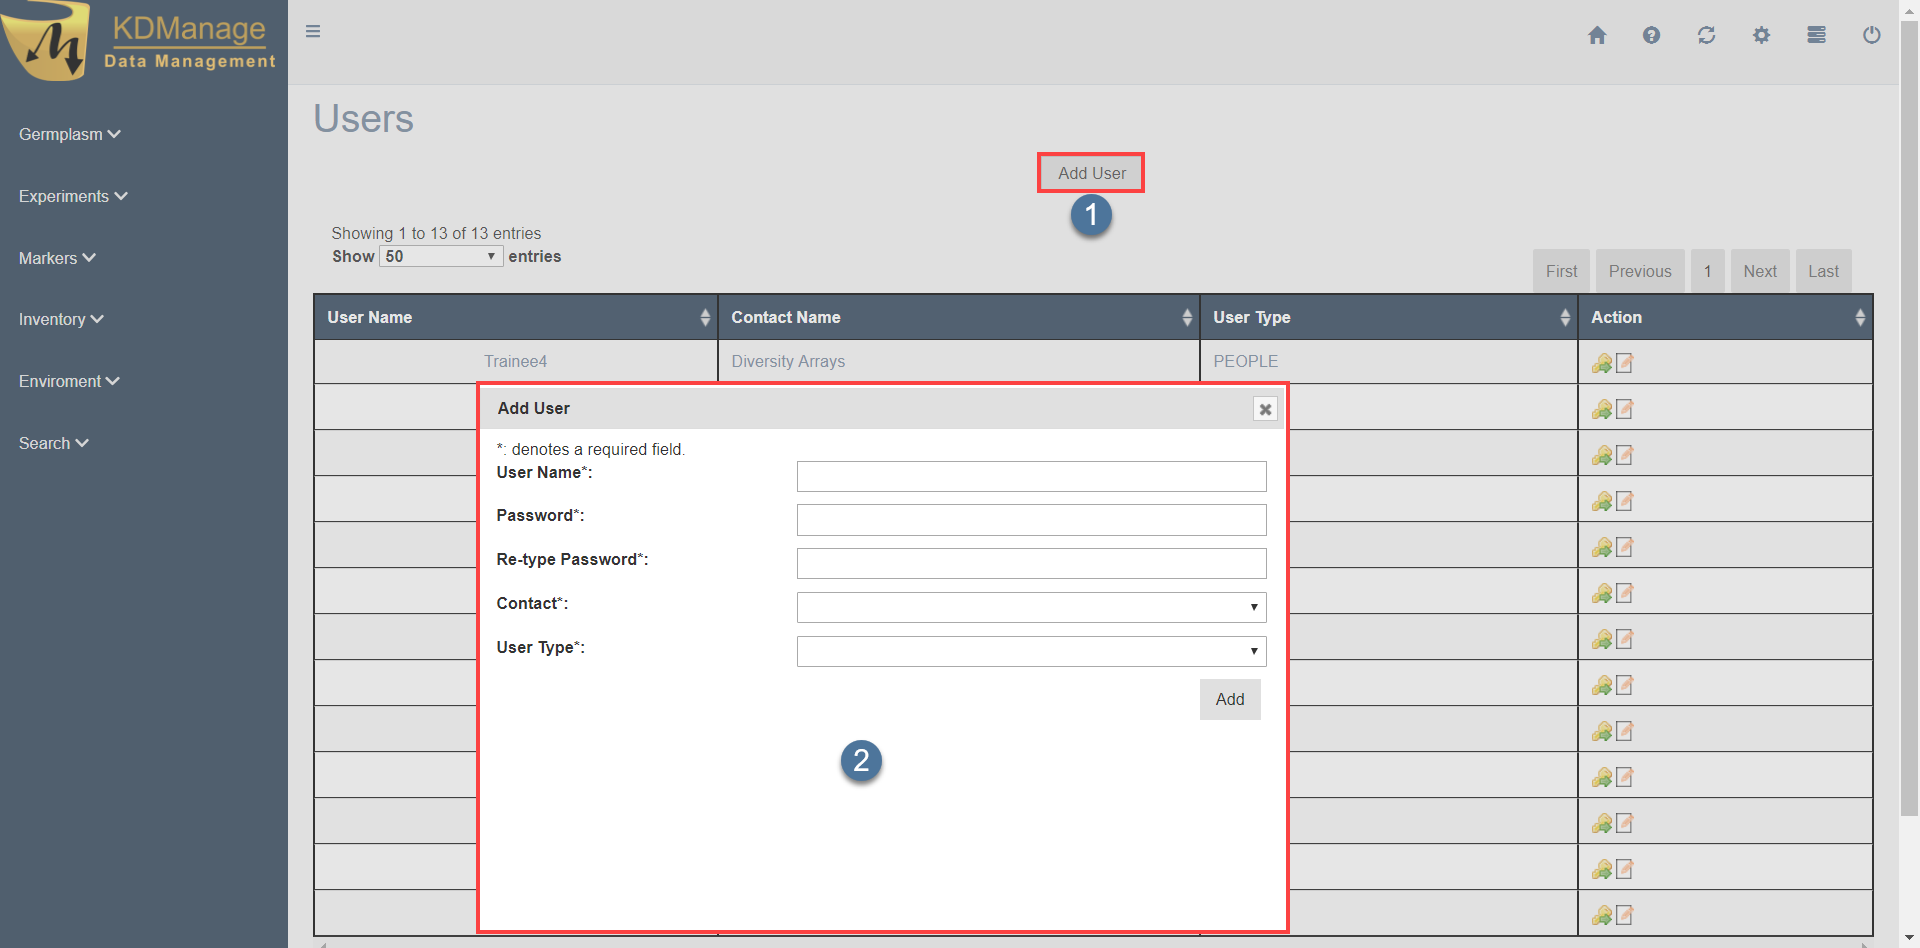
| 1. | Select the Add Users Button at . This displays the Add User Window at . |
| 2. |
|
Tip
The contact and user type must already exist. In KDManage Help, refer to the Contact page to create contacts and the Types page page to create user types if the required user type does not already exist.
User groups can be created as a way of organising user profiles.
Select the Administrative Settings Icon, then the Groups option to navigate to the Group Tool. Then follow the steps below to create a group:
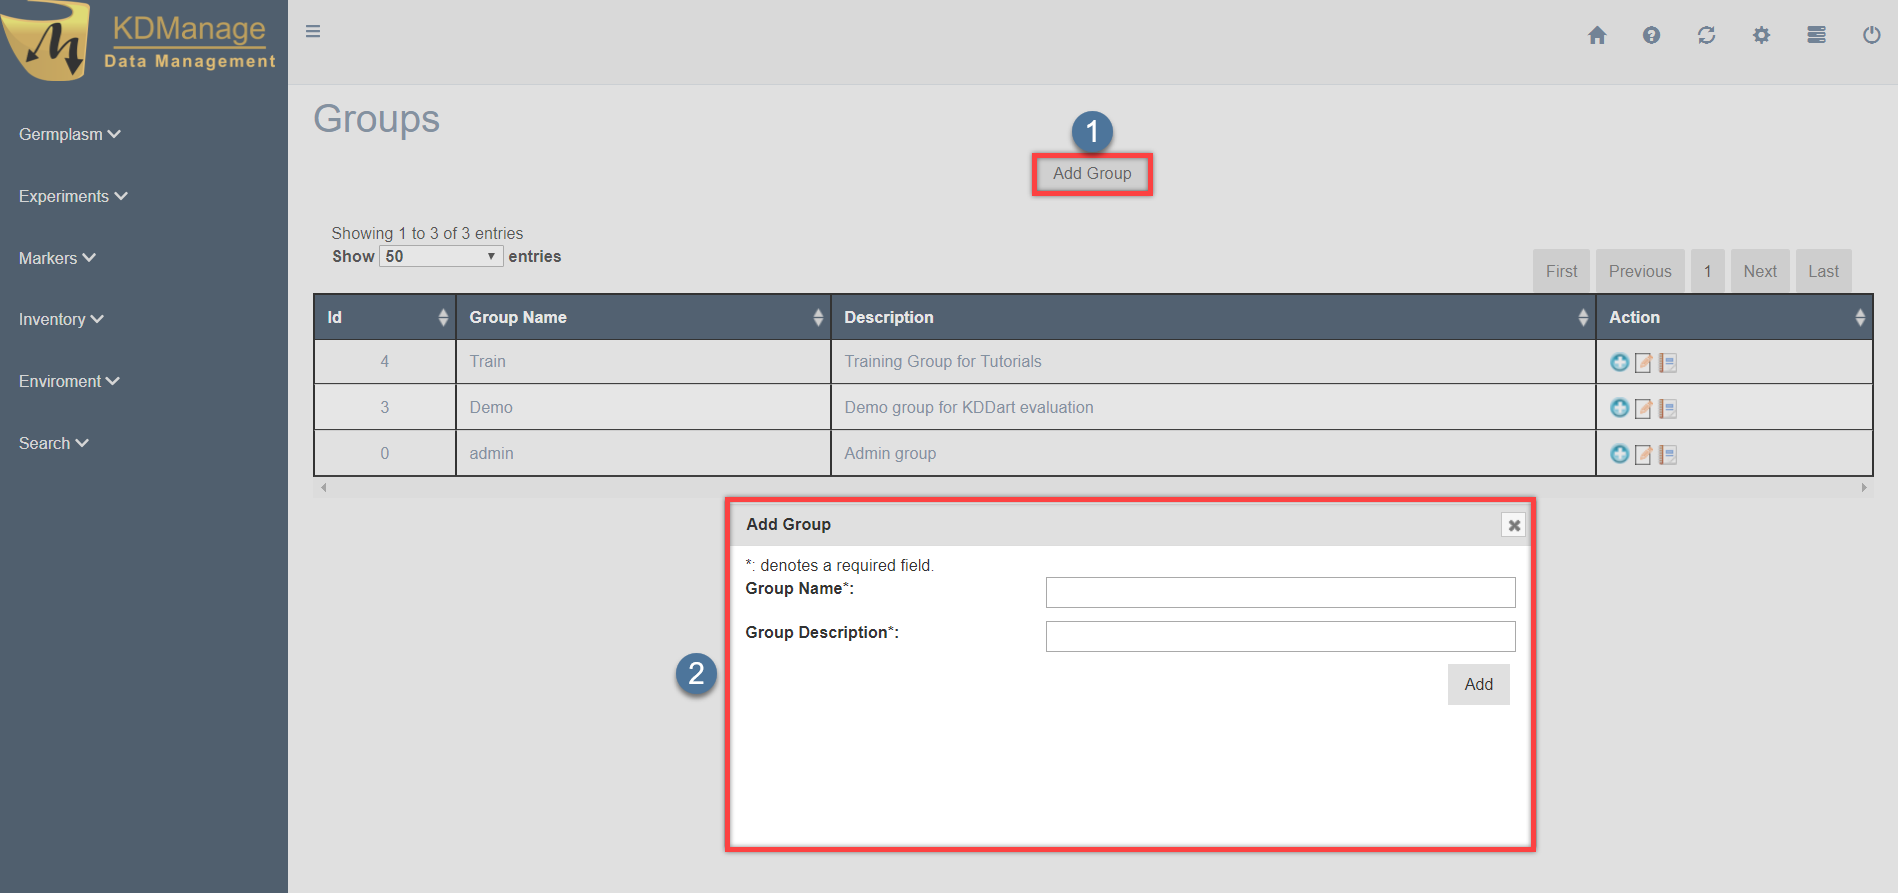
| Step | Action |
|---|---|
| 1. | Select the Add Group Button at in the Groups Window. This will display the Add Group Window at . |
| 2. | Choose a Group Name and Group Description. |
The Groups Tool is added to the list once the group has been created. The following list defines the tools that are available:
- Add new users to the group.
- Edit details of the group.
- Display a list of users that are currently in the group.
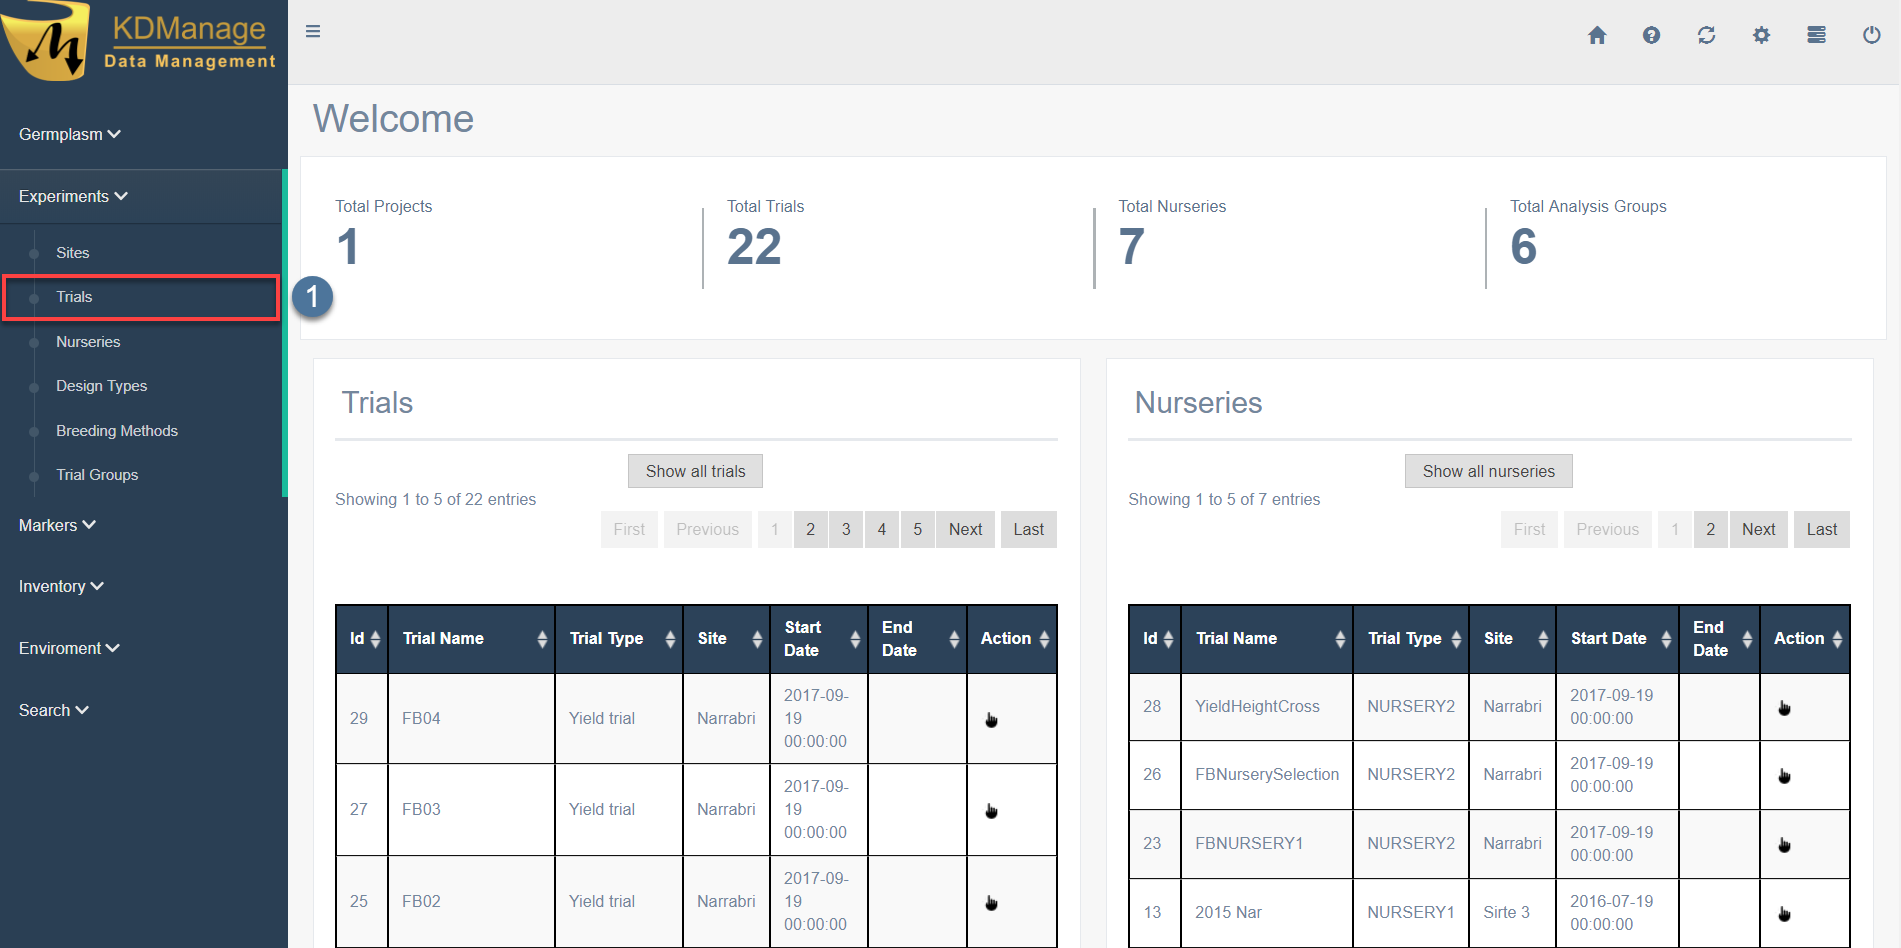
Step 3 - Creating a New Trial
The demo database contains many pre-existing trials that are available to view and use within KDManage to assist with learning how the application works. New trials can also be added to KDDart.
The following steps outline how to create a new trial using KDManage and provides guidance below for field descriptions.
A trial will be needed for the following steps. A new trial can be created with the following steps.
| Step | Action |
|---|---|
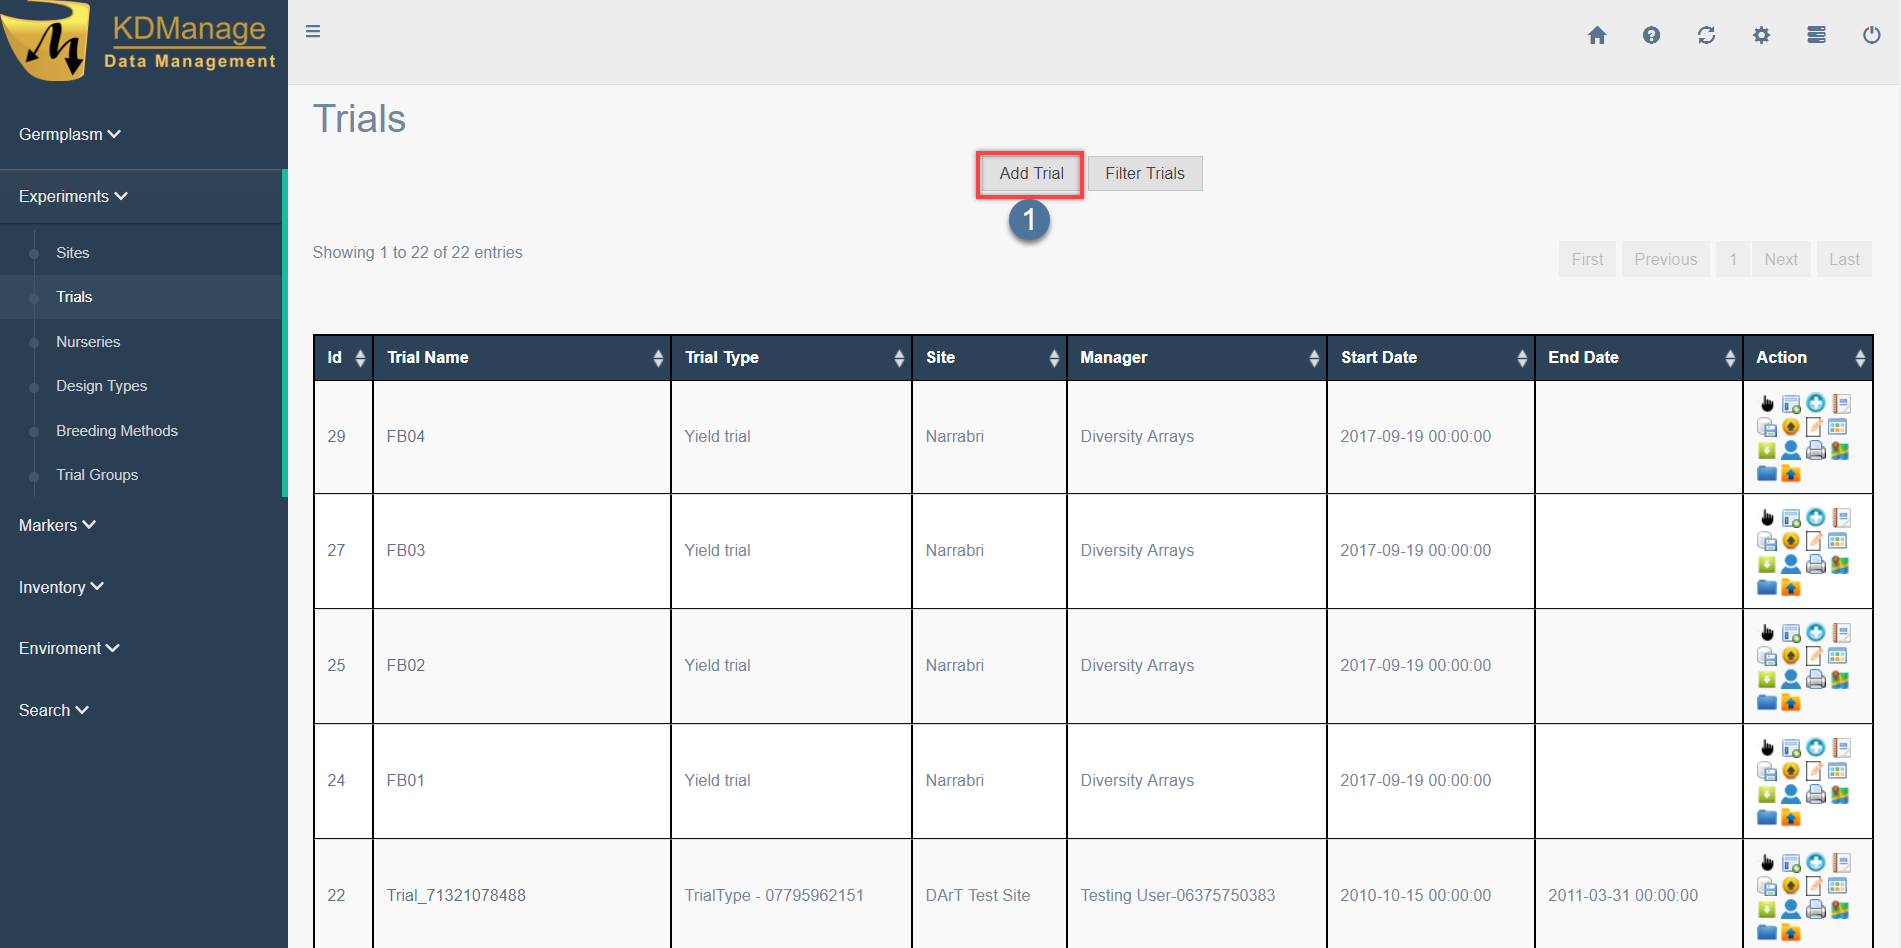
| 1. | Open the Trials Page which can be found in the Experiments Tab of the menu from any page ( in the above image). |
| 2. | The Trials Page is demonstrated in the below image and contains a list of all available trials. Select the Add Trial Button at
|
| 3. | This displays the following Add Trial Window as seen below. Enter the fields in the window then select the Add Trial Button to finalise the new trial. 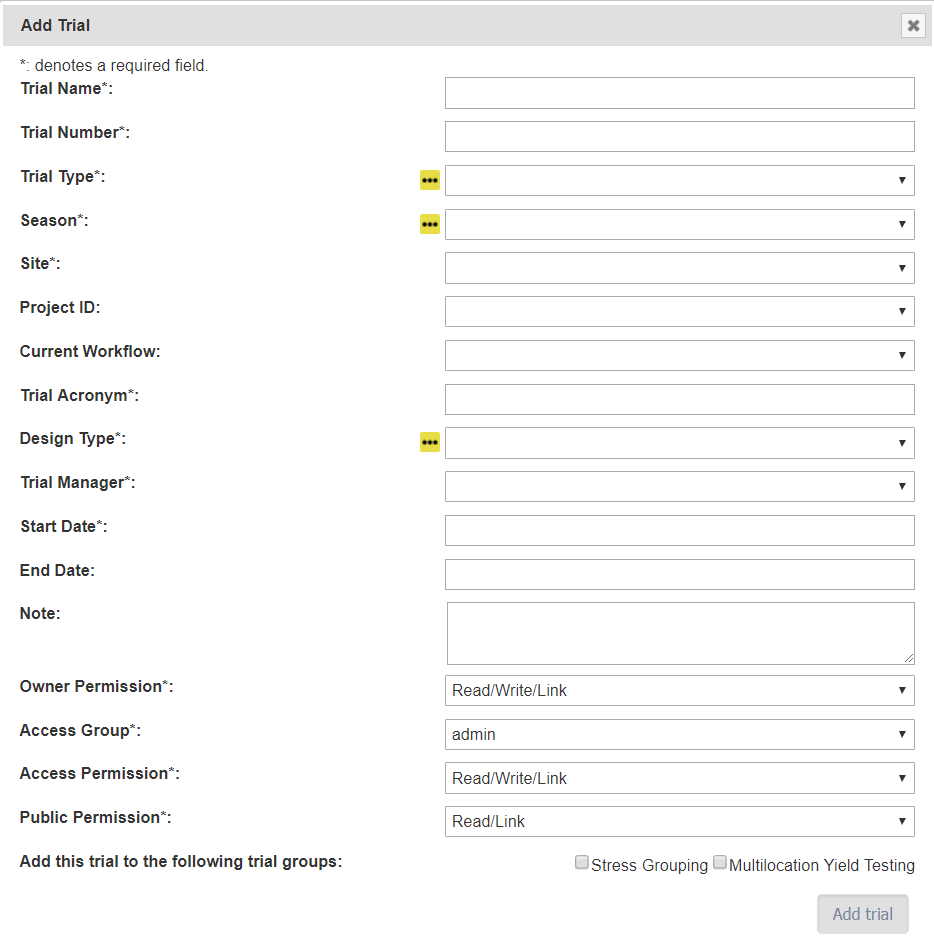
|
The fields for the Add Trial Window are described in the following table:
Field Description Trial Name The name of the trial. A naming convention is suggested (e.g. a concatenation of site, type, date, number). Trial Number The number of the trial, which could be sequentially assigned. Trial Type Select from the list of trial types (A general type as opposed to design type which is a trial specific definition). Season The season that the trial starts in. Site Select from the list of sites to specify where the trial is to occur. Trial Acronym An alternative abbreviated name for the trial. Design Type Select a design type that identifies the trial design. Trial Manager Someone currently managing the trial and defined in Contacts although they are not necessarily a system user. Start Date The date the trial commenced (Format YYYY-MM-DD). End Date The date the trial has/will end (Format YYYY-MM-DD). Note Descriptive notes for the trial. Access Fields Access Settings & Permissions
Note
The  icon next to some of the fields can be used to create a new entry for that field e.g. The icon next to the Season field can be used to create a new season entry such as Spring.
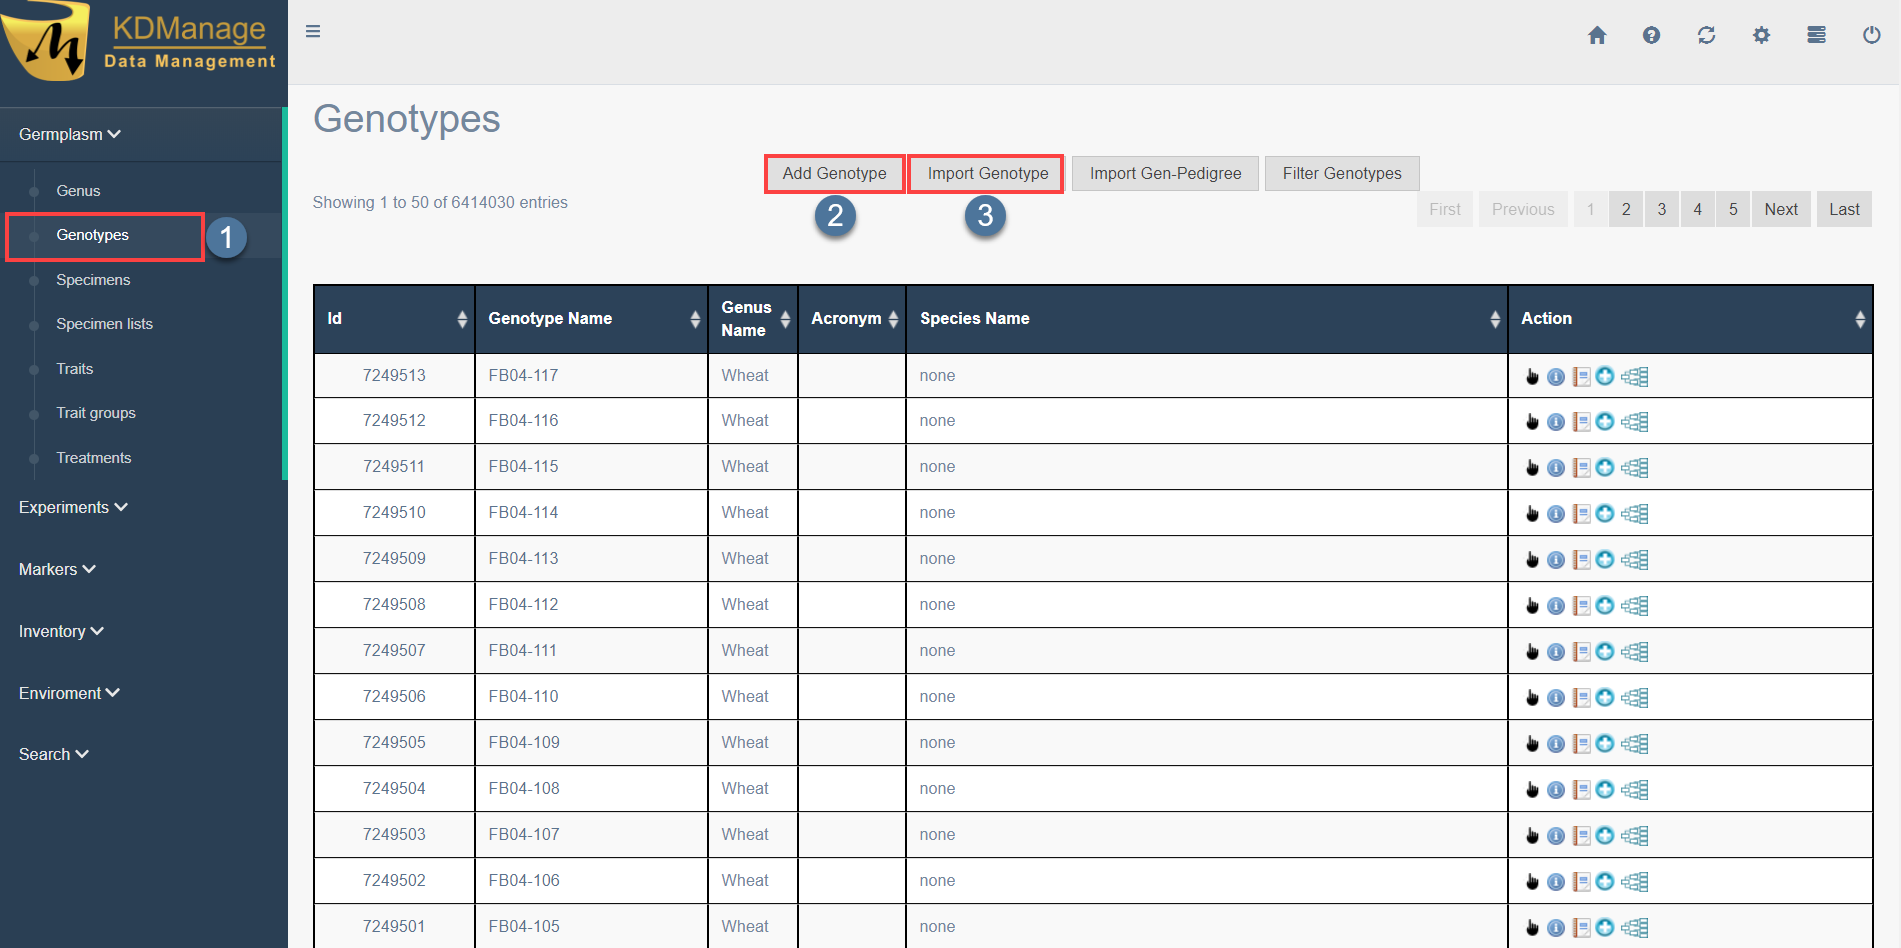
Step 4 - Loading Genotypes
Genotypes and specimens are core elements of KDDart’s multi genus database which stores your trial or nursery data.
To commence creating a new trial, the genotypes for the trial need to be added to KDDart if they don’t already exist. The following image and instructions outline the methods of loading genotypes into KDDart.
| Step | Action |
|---|---|
| 1. | Select Genotype located at on the left KDManage menu. |
| 2. | Select the Add Genotype Button (at 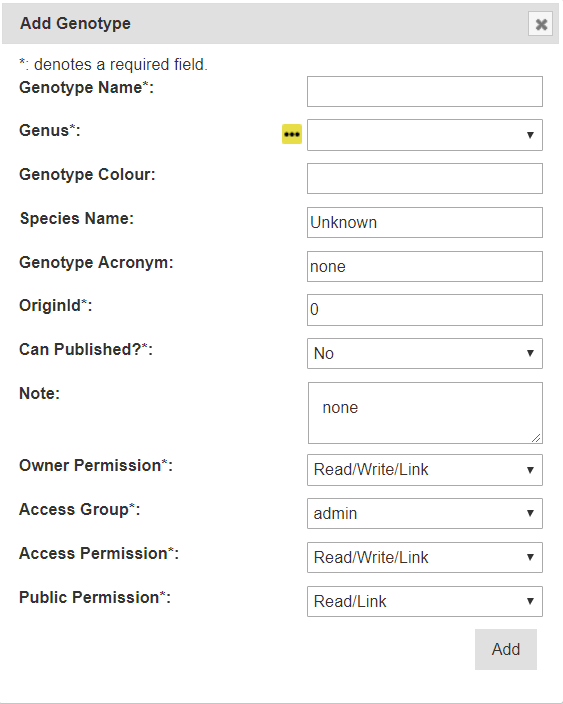
|
| Step | Action |
|---|---|
| 1. | Select Genotype from the KDManage menu located at . |
| 2. | Select the Import Genotype Button at 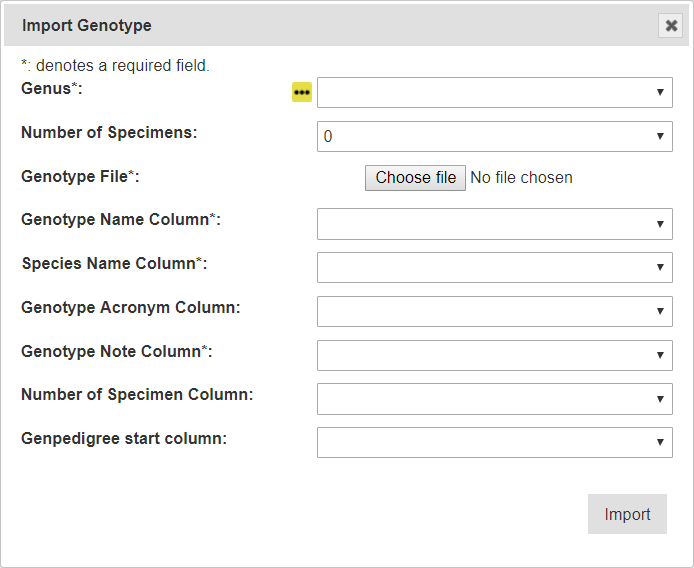
|
| 3. | Select the Choose File option and then choose a CSV file with genotype information. This will automatically populate some of the fields as seen in the image below. 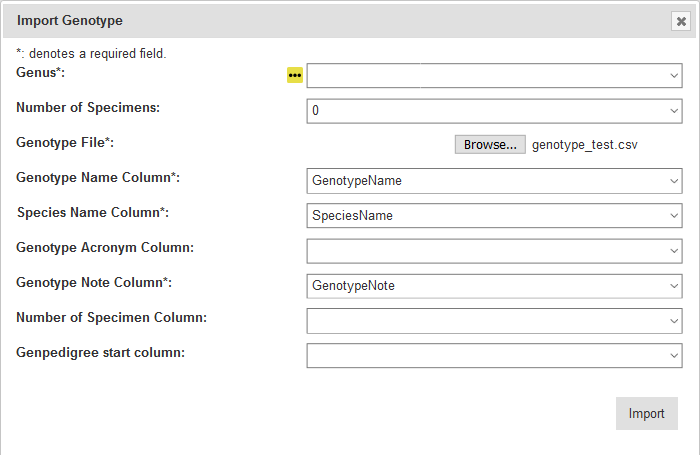
|
| 4. | The other fields can then be chosen by selecting each field. This displays a list of options to choose from. Select the Import option to complete the genotype import.
|
Todo
Try creating a new genotype to gain some understanding into the how the application works.
Note
For more information on genotypes and the information that is required to create one, please see the full guide at Genotype Information.
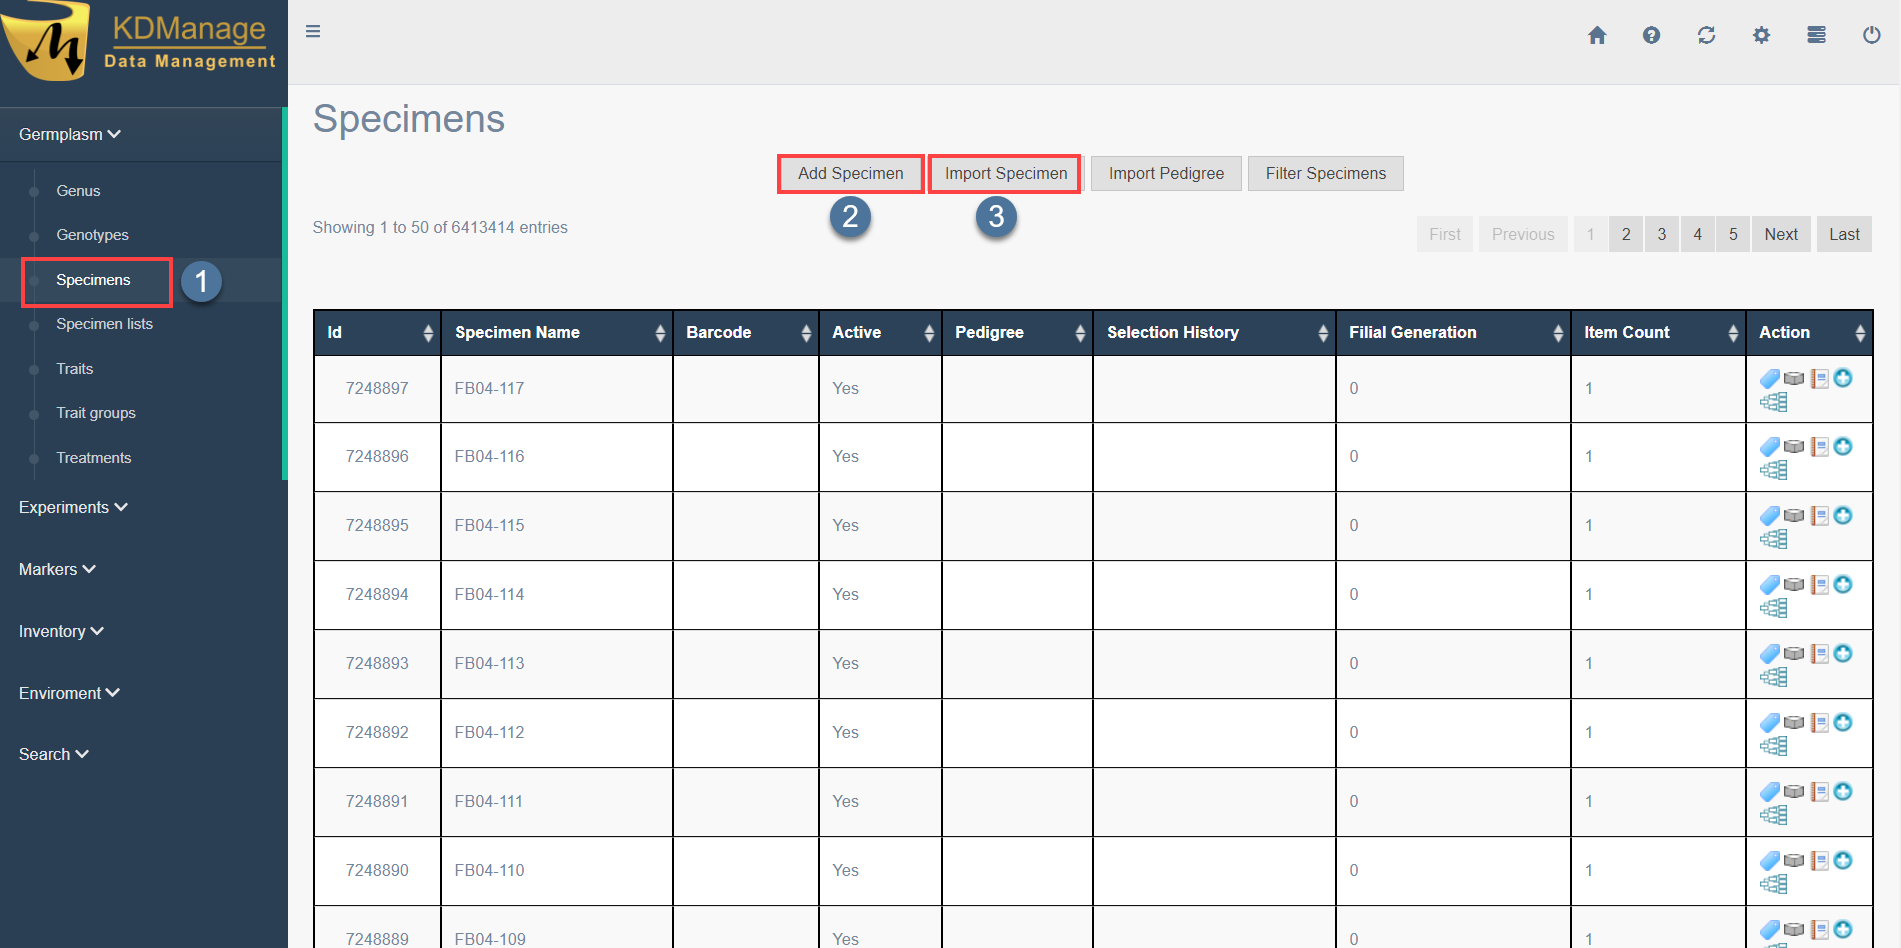
Step 5 - Loading Specimens
The term specimen in KDDart refers to a single unit or individual that is under investigation and the traits of interest recorded. Similarly to genotypes, specimens can be added or imported into KDDart. The following image and instructions outline how to do that.
| Step | Action |
|---|---|
| 1. | Select the Specimen Tool from the left KDManage menu as at in the above image. |
| 2. | Select the Add Specimen Button at 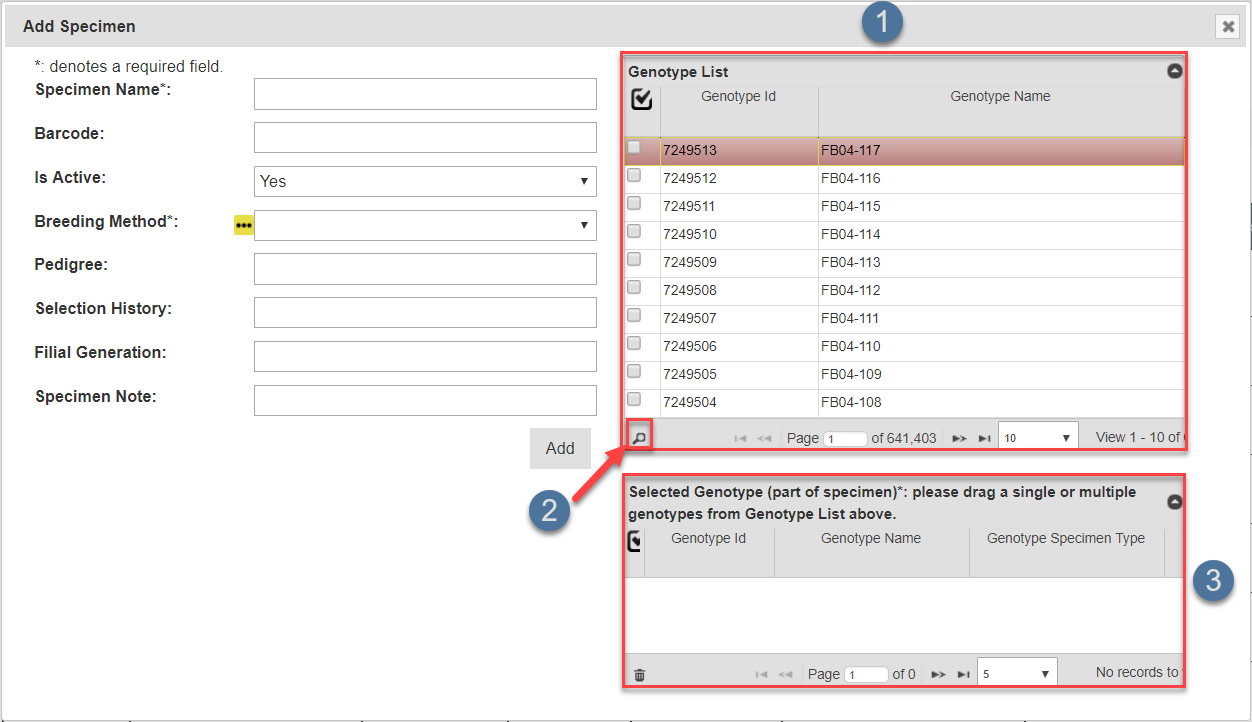
|
| Step | Action |
|---|---|
| 1. | Select the Import Specimen Button at to import a previously created specimen. |
| 2. | This displays the Import Specimen Window which requires all relevant information to be added. Once a file has been chosen, the fields that are present in that file will be available with the dropdown button in the Import Specimen Window. 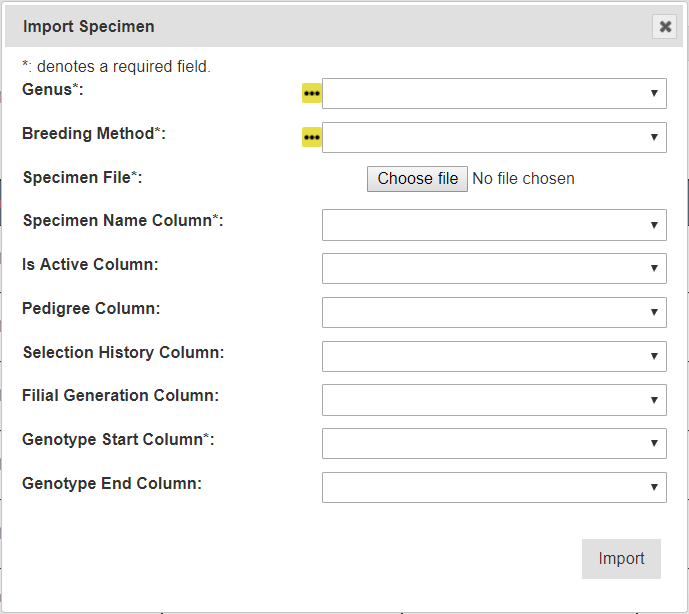
|
All items including genotypes and specimens that are added are saved by KDManage for use in the future.
Note
For more information on specimens and the information that is required to create one, please see the full guide at Specimen Information.
Step 6 - Loading Trial Design
There are several methods available to load a trial design (the trial layout) and apply it to a newly created trial.
This tutorial outlines creating a trial design in KDManage however, KDXplore can also be used. Please ensure that there is a new trial available so that a trial design can be added to it. The previous step will demonstrate how to do this.
Note
Behind the scenes, KDManage uses KDCompute to execute a trial design algorithm to perform the task.
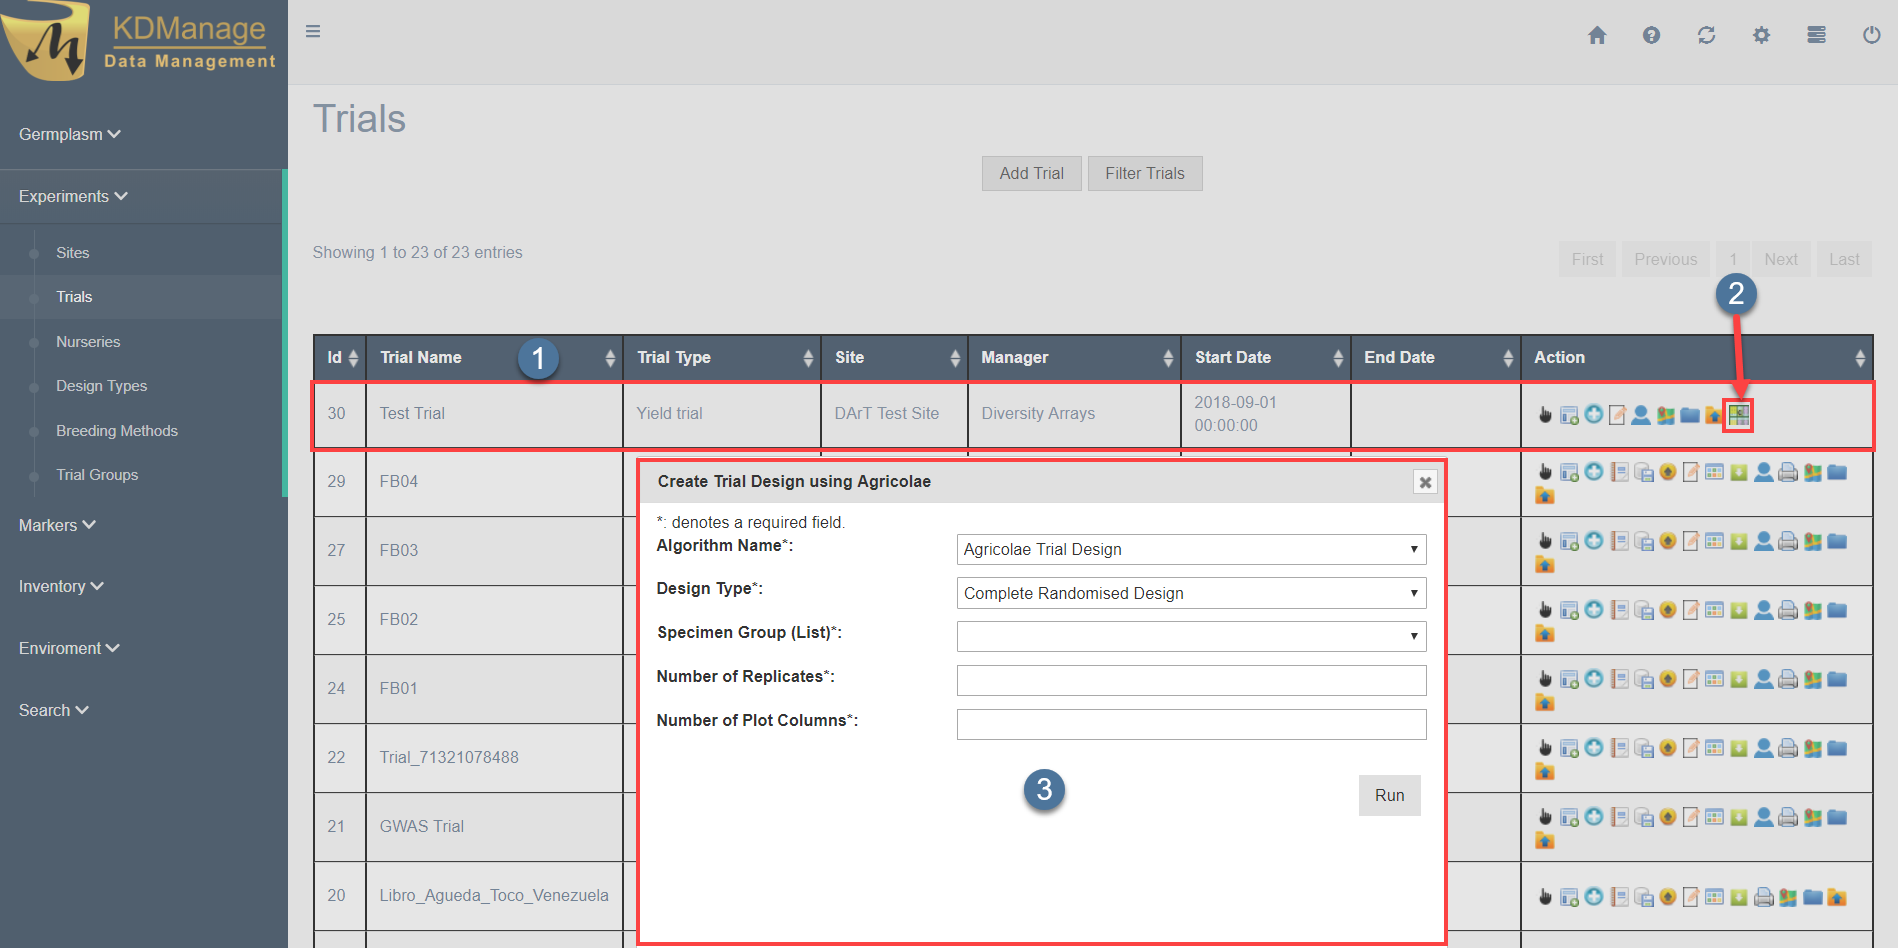
The following image and instructions outline how to generate a trial design within KDManage:
| Step | Action |
|---|---|
| 1. | Open the Trial Page under the Experiments Menu in KDManage to list the trials available on KDDart. |
| 2. | The test trial at is a new trial that has been created for this tutorial. Select the  icon at to display the Trial Design Creation Window outlined at . icon at to display the Trial Design Creation Window outlined at . |
| 3. | Select the Algorithm Name and Design Type and complete the remaining fields, then select the Run Button to generate the design. 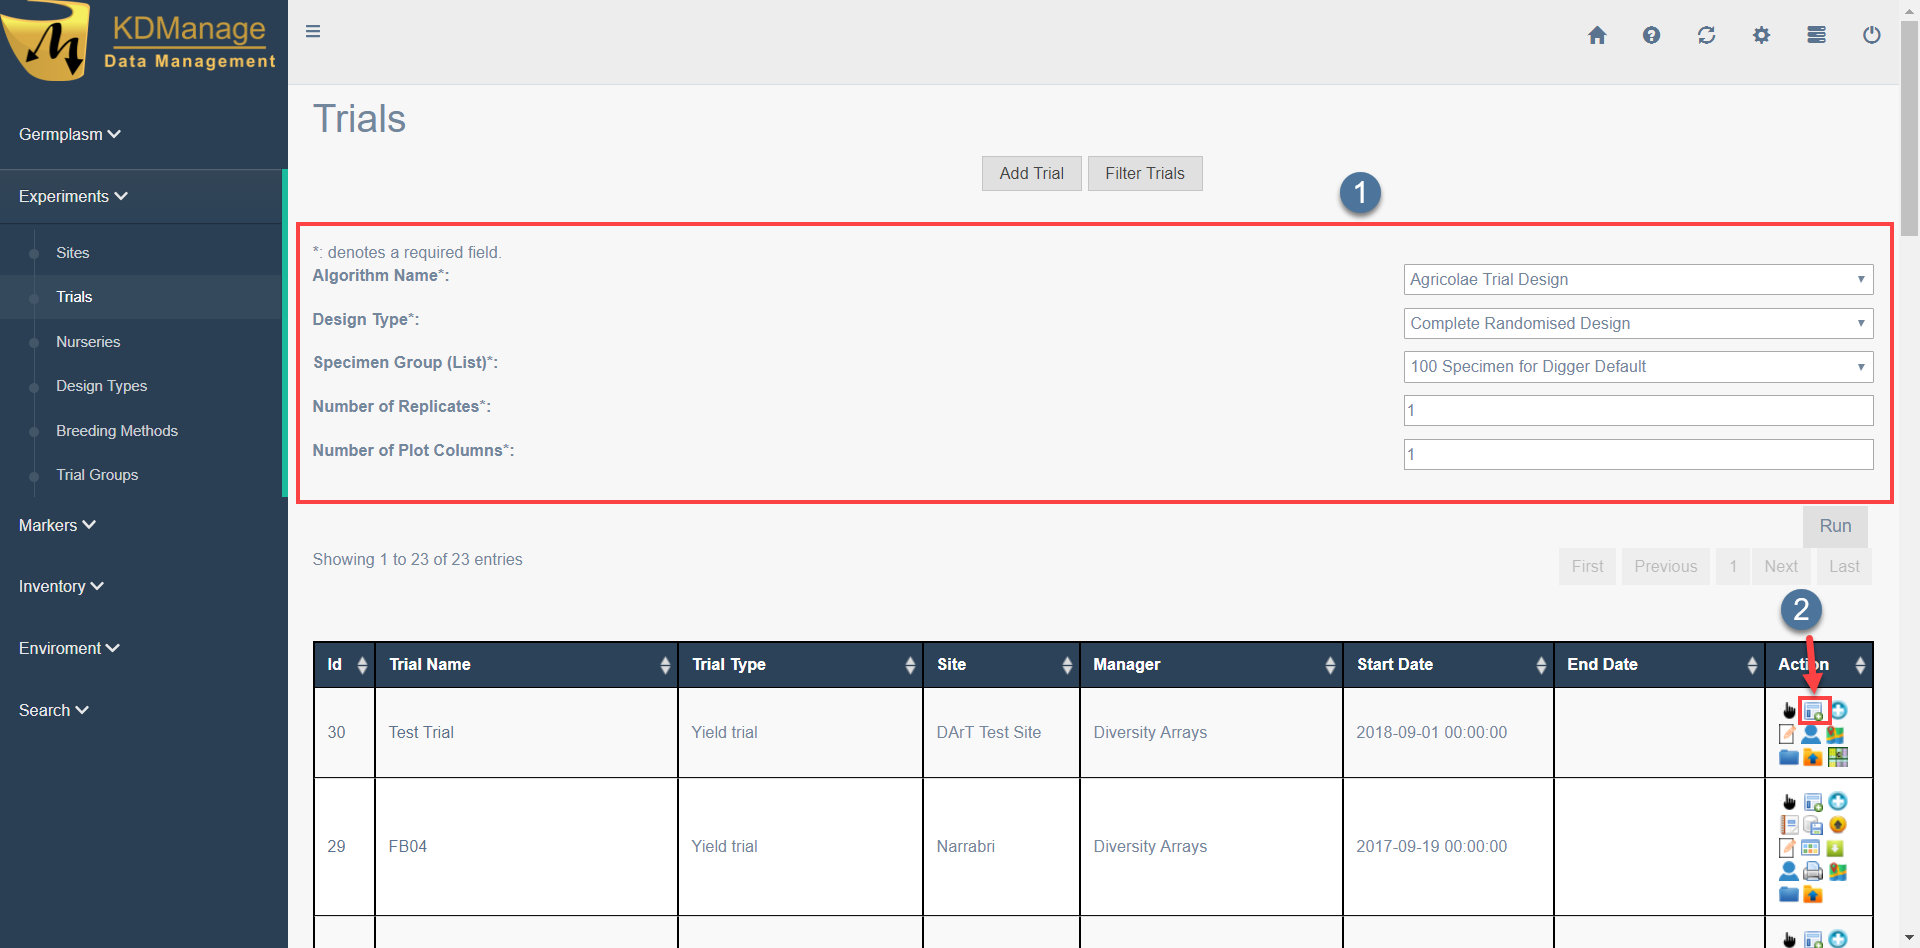
|
| 4. | KDManage will notify you once the design has been generated. Select the  icon (at in the above image) for the trial to view the design that has been created. icon (at in the above image) for the trial to view the design that has been created. |
Tip
For more information on the creation of a trial designs, see the Trial Unit Layout section of the KDManage help. For information on how to create a new trial, please see the Adding Trials guide on the full KDManage help guides.
Step 7 - Curating Data
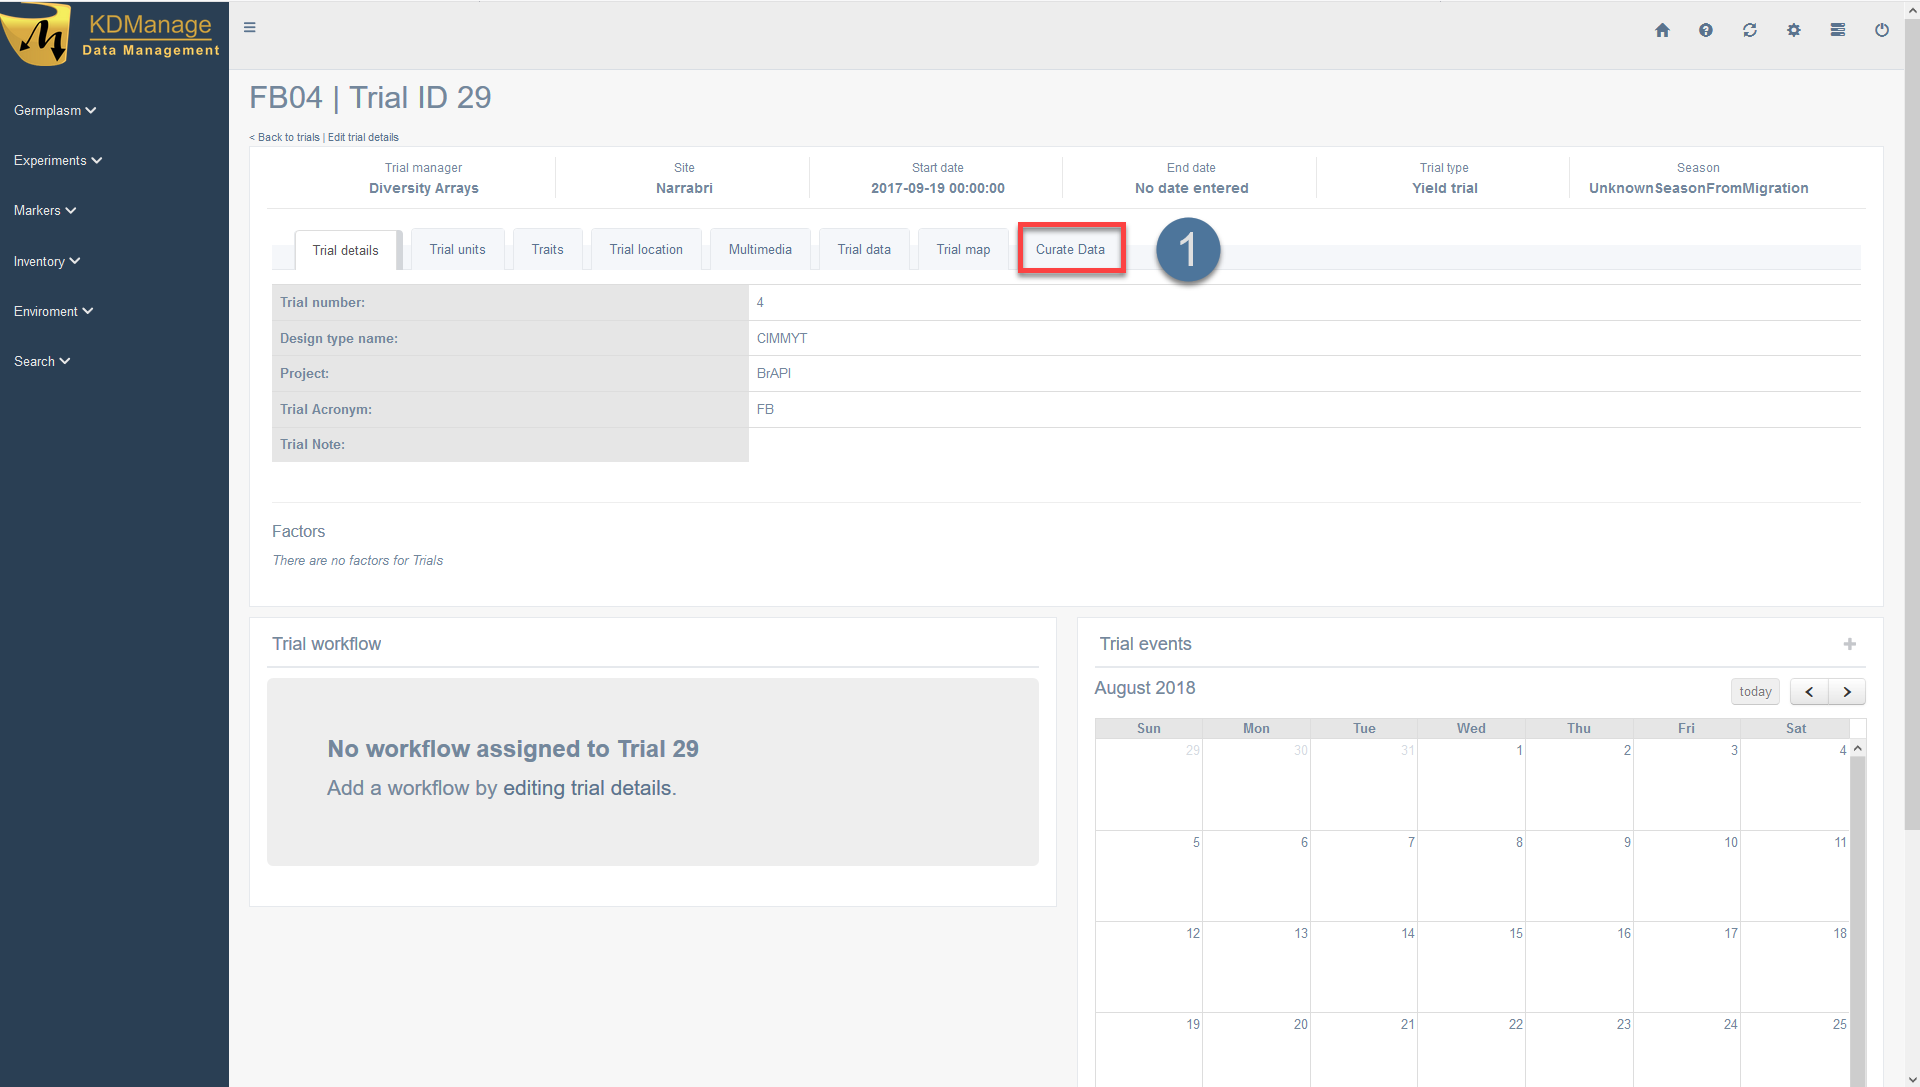
Once data has been uploaded for a trial, it can be curated within KDManage. This may be necessary if the values of particular trial units were entered incorrectly and you need to change them. To curate the data of a trial, you will first need to open a trial that has already had data uploaded. You can open any trial that is in the demo. For this part of the tutorial, the trial FB04 will be used.
| Step | Action |
|---|---|
| 1. | Once a trial has been navigated to, open up the Curation Tab such as at on the above image. |
| 2. | In the Curation Tab, you need to graph the trial data before it can be curated. The graph can be created by choosing a trait to display (at 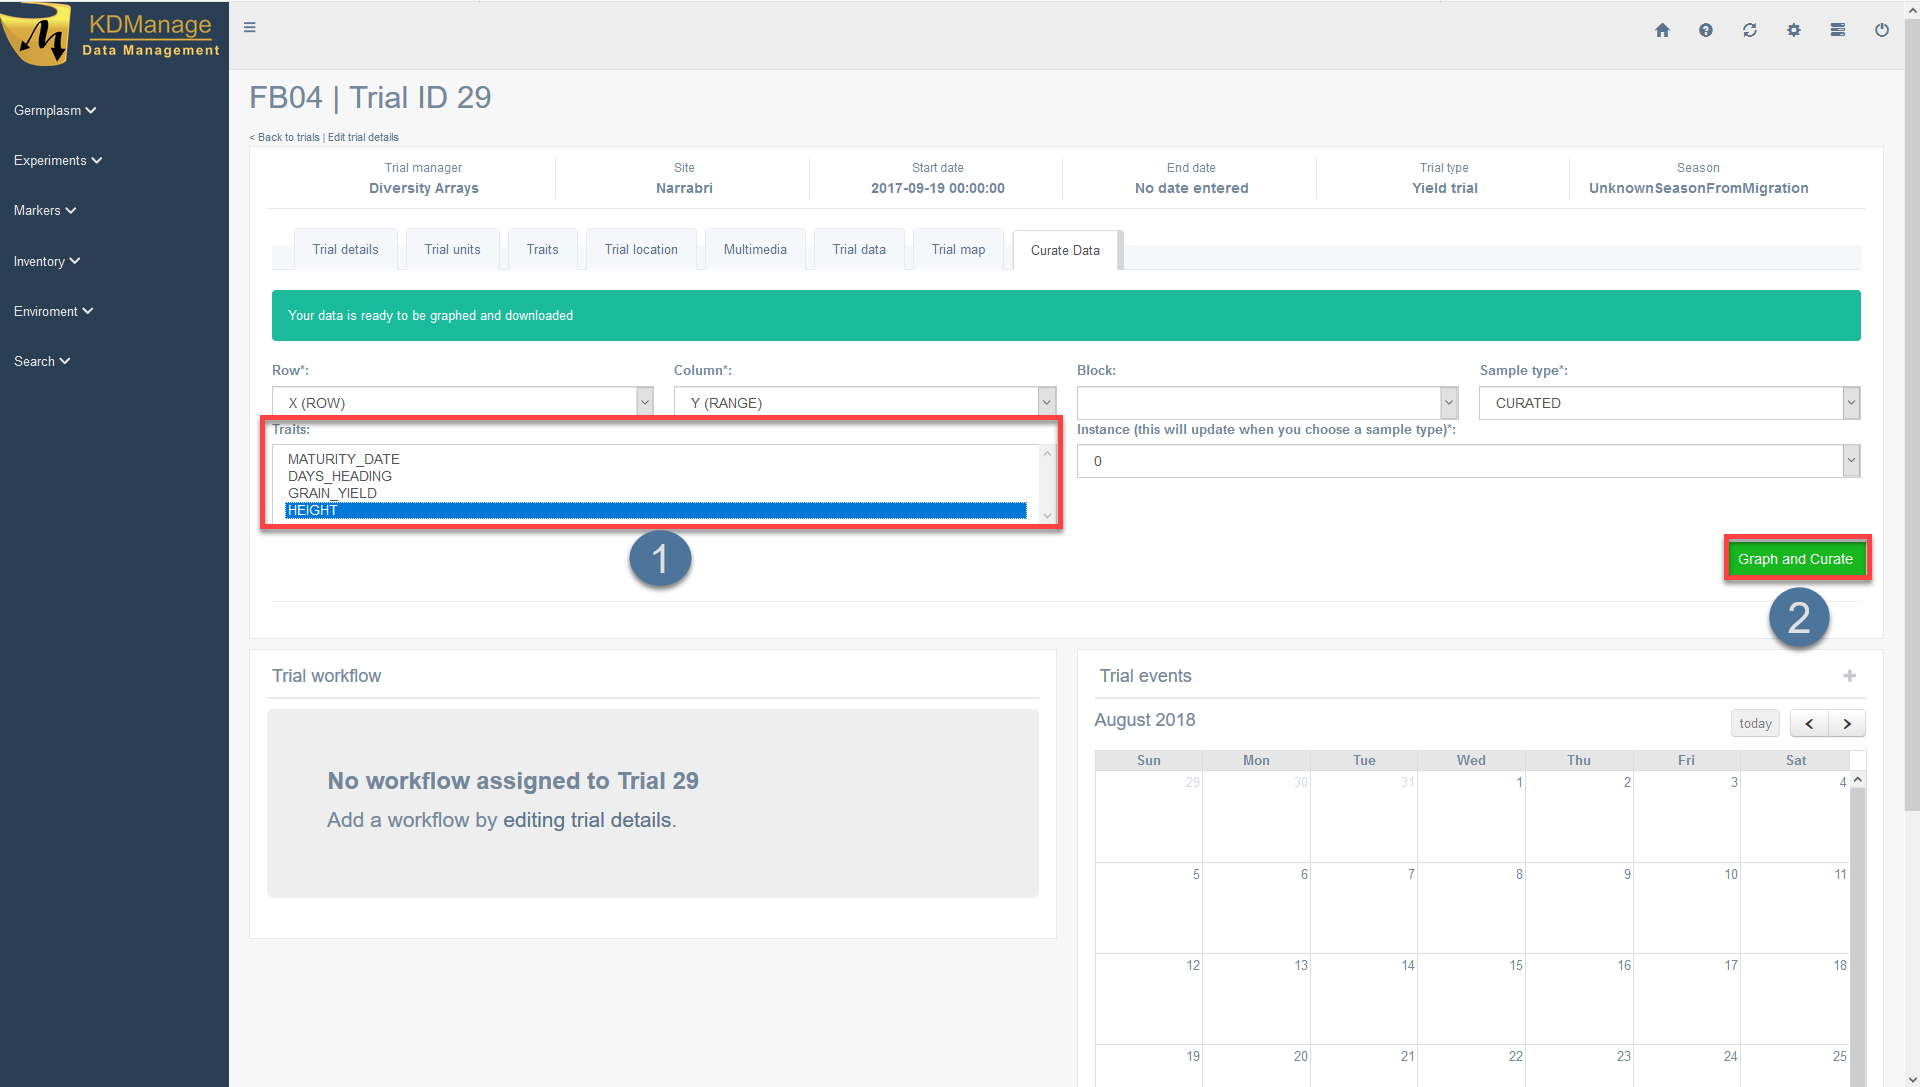
|
| 3. | Once the graph is created, scroll down so that you see the trial units listed below the graph (such as in the following image): 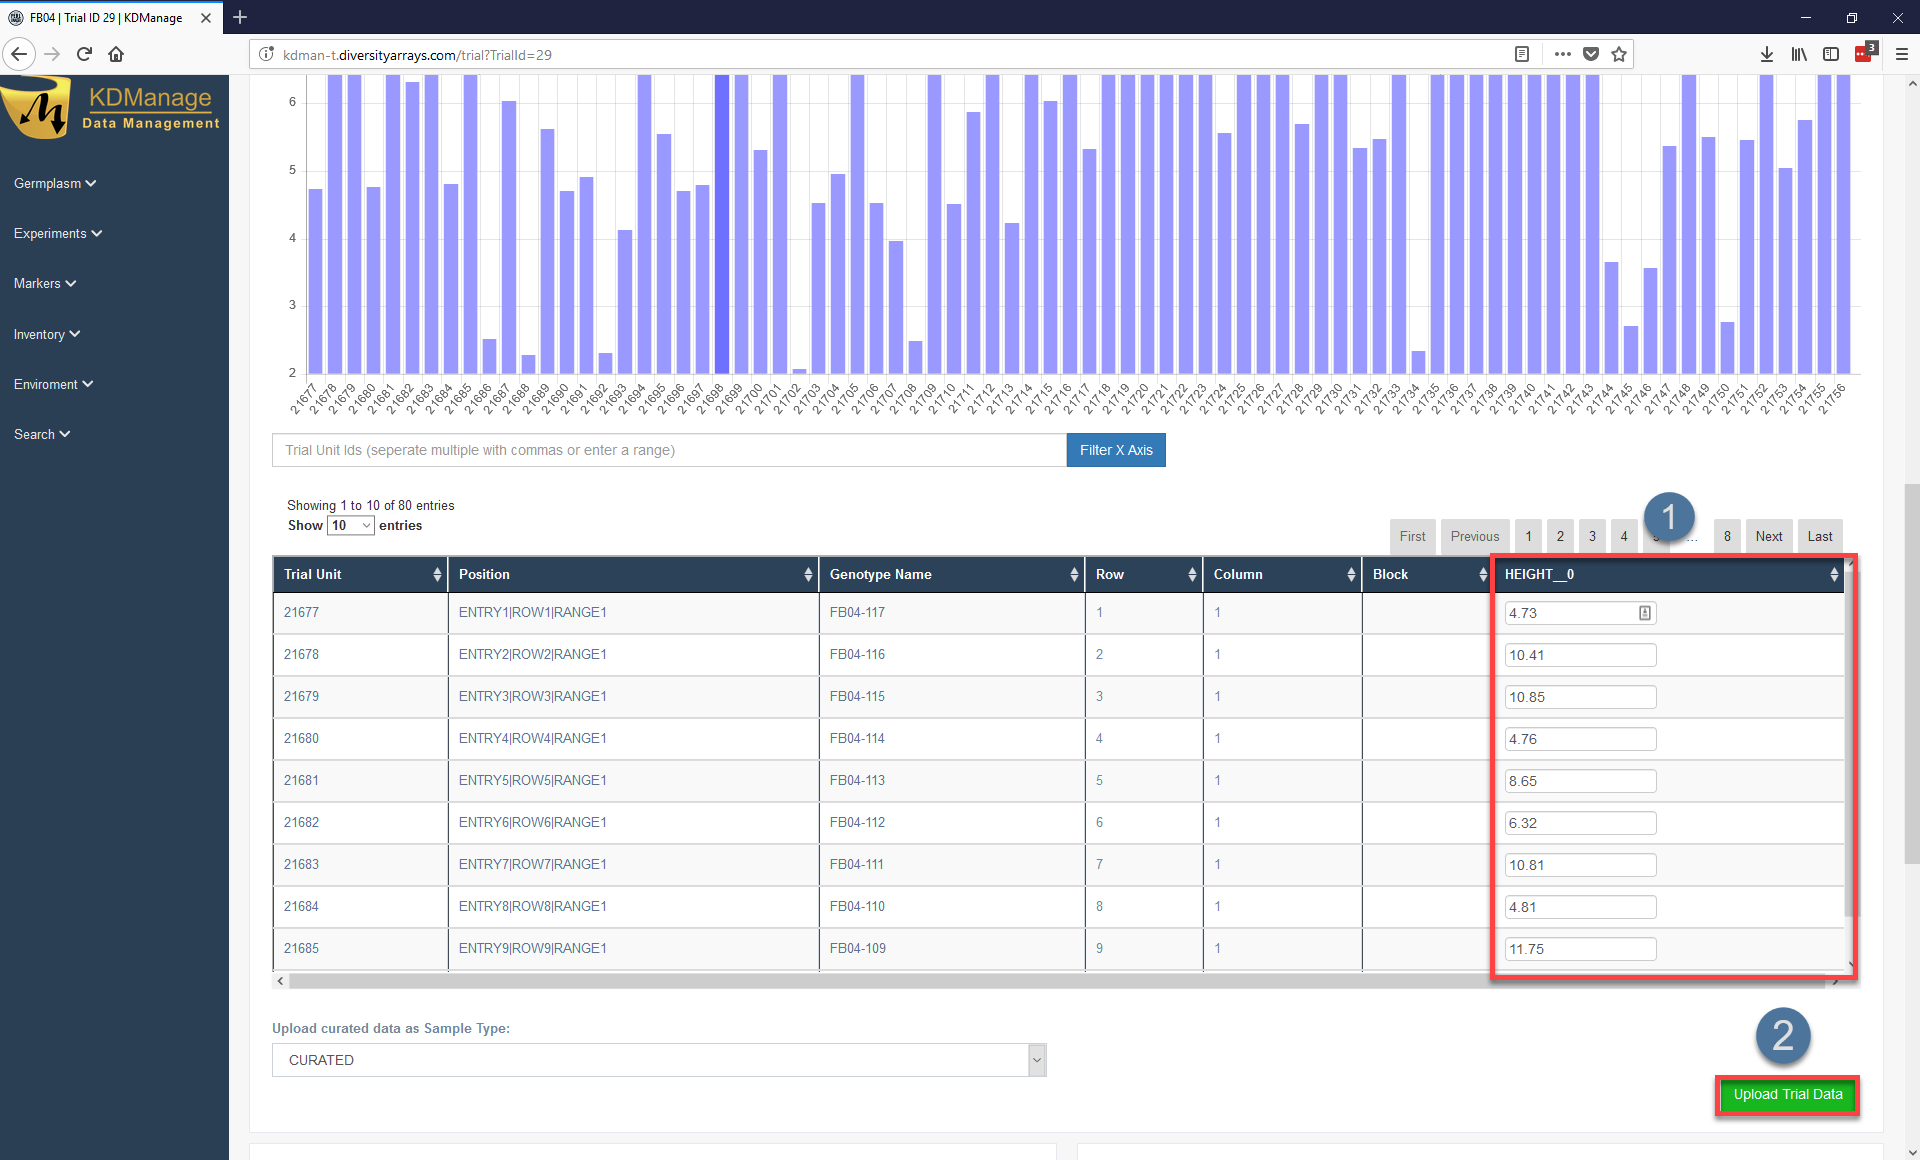
|
| 4. | Curating data involves selecting any value within and modifying the value of any trait that needs to be changed. Once finished, select the Upload Trial Data Button at . |


Summary
In completing this tutorial topic, we have covered how to:
- Log into KDDart using KDManage;
- Navigate the KDManage application;
- Create KDDart user accounts and groups;
- Load genotypes into KDDart;
- Load specimens into KDDart;
- Generate a trial design in KDDart;
Continue to investigate KDManage and see what can be done with the KDDart platform.
The demo database is reset daily at 21:00 AEST (Australian Eastern Standard Time) and is offline for approximately one hour. This means that any changes that are made to this instance of KDDart are erased so that users are free to make changes and experiment with the application.
For more information about using KDManage, please consult the KDManage Help Guide.
When ready please follow the link to continue to the next tutorial: Tutorial 2 - KDXplore.