Administrative Settings
The administrative settings for KDManage are can be found in the Admin Bar which appears at the top right of any KDManage screen. This page introduces the various administrative settings available to KDManage users. See the table and image below for more information on the Admin Bar.

UI Element |
Description |
|---|---|
Username |
Displays the username of the logged in user. |
Group |
Displays the group that user has logged in as. |
Home Button |
Navigates the user to the KDManage Main Screen |
Help Button |
Navigates the user to the KDManage User Guide (this document). |
|
Displays the Administrative Settings Menu. |
KDCompute Button |
Navigates the user to KDCompute. |
Logout Button |
Logs the user out of the current session. |

Note
The Username and Group elements are one combined button that will navigate the user to the Switch Group Page.
Satisfying Dependencies
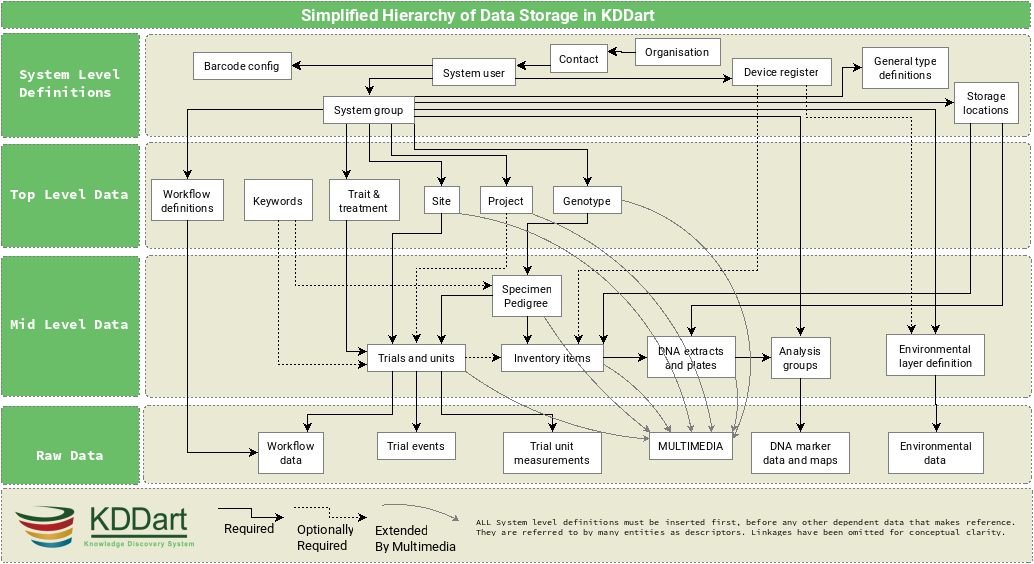
Data relationships within KDDart are hierarchical, hence data needs to be populated in a specific order to ensure it is available when needed to create other, ‘related’ elements.
The following list shows items of the Administrative Settings Menu to illustrate the order of dependency, and the diagram below provides a visual representation of data dependency:
Note
A user must have Group Administrator privileges to perform these administrative actions, otherwise actions will fail with the following error message:

Organisations
The organisation name defines an entity which may be an external or internal collaborating organisation.

To add a new organisation, select the Add Organisation Button which will open the Add Organisation Window as seen in the image below:

The organisation name can be updated by selecting the  Edit Button and then entering a new name.
Contacts
The Contacts Page defines contacts for an organisation which may include KDDart system users, collaborators, material providers, etc.
Contacts within KDDart refer to those people who have a relevant role or responsibility in relationship to the data. For example, a site manager needs to be entered as a contact as they are required to be referenced when defining a site. However, they may not necessarily be a user who logs into the KDDart system.
Select the Add Contact Button to add a new contact. See the image and table below for more information:
The following image illustrates the fields for Contacts. All fields except ‘Contact Location’ are mandatory. The map view, not illustrated, appears below the form and enables the selection of the contact’s geographic location.

Step |
Action |
|---|---|
1. |
Select the Add Contact Button to display the Add Contact Window. |
2. |
Enter all known details about the contact. The first name, last name, and organisation fields are all mandatory. |
3. |
Select the Marker Button from the map and place it on the place that the contact is located. |
The contact can also be updated after it has been created by selecting the Edit Button and then editing the details.
Note
Please note that the organisation name must already exist before contacts can be added.
Types
Types are used as part of KDDart’s global vocabulary to support classification. Each Type that is created must be assigned to a Class. An example of a type is a seed bag which belongs to the item class. The image below shows the Type Page

New types may be created within the Type Page. The following image of the Add Type Window shows the fields required for adding a new type. The Is Active field allows a type to be enabled or disabled as required.
Setting a type to Inactive removes the item from future selection lists, however, the classification remains historically present for those records still referencing it.

Types can also be updated after they have been created by selecting the Edit Button and then editing the details.
Device Registrations
Any device that is used in conjunction with KDDart must be registered within the Device Registrations Page. This could include any device which is used for measuring or capturing information such as weather instruments, scales, soil monitors, etc.
Device registration can assist with record keeping and accountability. This can later assist in identifying and if necessary, isolating the information or data that a specific instrument produced or assisted in producing.
For example, if a device was discovered to be needing recalibration, or providing questionable results it’s data can be isolated, either to ignore during analysis or to apply specific adjustments.
Devices belong to the Device Register class. They are classified with a Device Type of Device Register Class and optionally may have a specific geographic location recorded. The image below shows the Device Registration Page with the Register Device Window open:

Note
Registered devices cannot be edited after they are registered.
Barcode Configurations
The Barcode Configuration Page lists all barcode configurations available to the user and provides the ability to create new barcode configurations. Barcode configuration defines how barcodes are created for various applications.

New barcode configurations can be created by selecting the Add Barcode Configuration Button which displays the Add Barcode Configuration Window. The image below shows the window with an example of the creation of a barcode configuration used for specimens:

Projects
Project entities can be created and are designed to help with progress and file tracking for various projects your organisation may be undertaking. Project types are created via the Type Page.

New projects can be added in the Add Project Window (pictured below) which can be found by selecting the Add Project Button:

Units
Units enable the custom definition of the units of measurement for items, traits and trial events. The image below shows the Units Page:

New units can be created in the Add Unit Window which is accessed by selecting the Add Unit Button. Unit types are created via the Type Page or can also be accessed via the quick link button  without leaving the Add Unit Window (pictured below).

Groups
Users need to be assigned to appropriate groups to provide them with their required level of access.


Once a group is created, existing users can be added to the group and if needed, made an Administrator of that group. See the image and instructions below for more details:
Step |
Action |
|---|---|
1. |
On the Groups Page, select the Add Group Button. This will display the Add Group Window as seen in the above image. |
2. |
Enter a group name and a group description. |
3. |
Select the Add Button to complete the |
Groups need to have users assigned to them. See the information below on how to assign a user to a group:

Step |
Action |
|---|---|
1. |
On the Groups Page, find the required group in the list. |
2. |
Select the |
3. |
Select the username from the dropdown menu and then from the second dropdown menu, choose whether the user will be a group administrator or not. |
4. |
Select the Add Button to complete the addition of the user to the group. Repeat with more users if necessary. |

Users
An administrator of a group can create new users and assign them to the appropriate groups for their required access.
New users can be added by selecting the Add User Button on the Users Page. This will open the Add User Window as seen in the image below:

The following permission matrix table outlines what a user can perform with a selected permission setting when creating or updating the user:
Task |
Admin and a Manager |
Admin and NOT a Manager |
Manager |
User |
Guest |
|---|---|---|---|---|---|
See all records regardless of the record permission |
Yes |
Yes |
No |
No |
No |
Change record permission regardless of the permission |
Yes |
No |
No |
No |
No |
Add and remove users, add and remove groups, add and remove users from a group and reset user password |
Yes |
No |
No |
No |
No |
See their own records |
Yes |
Yes |
Yes |
Yes |
No |
Update their own records |
Yes |
Yes |
Yes |
Yes |
No |
Change permission of their own records |
Yes |
No |
Yes |
No |
No |
Add and update types, design, breeding method etc. (vocabulary entities) |
Yes |
No |
Yes |
No |
No |
See public records |
Yes |
Yes |
Yes |
Yes |
Yes |
User Passwords
Users can reset their own passwords using the Password Reset Page.
Users must use their current passsword and fulfil the requirements listed on the page.

Factors
Factors are custom fields that administrators can add to different entities.
For example, an extra field for Trials can be added for organisation specific information requirements.
Warning
Whilst an administrator can create new factors, it is recommended that factors are used sparingly with careful consideration of the KDDart schema.
To add a new factor follow these instructions:

Step |
Action |
|---|---|
1. |
Go to the Factors Page and select the Add Factor Button. This will display the Add Factor Window. |
2. |
Select the Add Factor button |
3. |
Fill in the mandatory fields. The factor name must not have any spaces and the factor validation rule must be a valid Boolean expression and regular expression. |
4. |
Select the Add Button to finalise the creation of the factor. |
Once a factor is successfully created, a new field will appear in the appropriate entity Add/Update windows.
Keywords
Keywords can be attached to trial units and specimens to assist grouping related entities together.
After a keyword is created, it can be attached to Trial Units (see Adding a Keyword to a Trial Unit).
A new keyword can be added by selecting the Add Keyword Button which will open the Add Keyword Window as seen in in the image below:

Keyword Groups
When keywords exist in KDDart they can be organised into keyword groups. A keyword can exist in multiple keyword groups if required.
The following example shows the Add Keyword Group Window and instructions on how to make a new keyword group:

Step |
Action |
|---|---|
1. |
From the Keyword Groups Page, select the Add Keyword Group Button. This will display the Add Keyword Group Window as seen in the image above. |
2. |
Enter a name for the keyword group (‘Keyword Group Example 1’ in the example above). |
3. |
Select the keywords to be included or added to the group. |
4. |
Drag the selected keywords to add to the keyword group into the New Keyword Group Panel (the lower panel). |
5. |
Select the Add Button to finalise the creation of the new keyword group. |
Workflows
KDDart provides a workflow structure which:
Enables documenting process steps or events that occur throughout parts of the trial/nursery lifecycle;
Are sharable across multiple trials/nurseries;
Cater for important activities e.g. soil preparation and conditioning before planting;
At the conclusion of a trial or nursery a historical reference of activities undertaken is maintained; and
Facilitates organisations developing their own applications, using the DAL API, to meet specific business requirements e.g. to move towards more automation or email warnings and alerts of upcoming or overdue tasks.
The order of the following sections show the dependency order for using workflows:
Create a workflow type
Create a workflow
Create the workflow definition
Assign a workflow to a trial/nursery
1. Creating a Workflow Type
A workflow type provides a means to group workflows for different purposes. These may be to associate workflows for trials vs nurseries, different crops, etc.
To add a new workflow type, follow these instructions:
Step |
Action |
|---|---|
1. |
Select the |
2. |
Select the Add Type Button. This will display the Add Type Window. |
3. |
At Class, select Workflow Type. |

|
|
4. |
Complete the mandatory fields. |
5. |
Select the Add Button to create the new Workflow type. |
2. Creating a Workflow
Once the required workflow type exists, the next step is to create the workflow entity. To create the workflow:

Step |
Action |
|---|---|
1. |
From the Workflow Page, select the Add Workflow Button. This will display the Add Workflow Window. |
2. |
Complete the required details and selecting a workflow type. |
3. |
Select the Add Button to create the workflow entity. The new Workflow entity will now appear in the list of Workflows. |
3. Creating, Updating, and Listing Workflow Definitions
Workflow definitions (which are the workflow steps) can now be created. This helps define what steps are needed in a specific workflow. To add definitions to the workflow:
Step |
Action |
|---|---|
1. |
From the Workflows Page, select the Add Workflow Step button for the workflow that you want to add a definition to. This will display the Add Step to Workflow Window. |
2. |
Enter the step name, step order and optional step note. |
3. |
Select the Add Button to finalise the creation of the definition. |
4. |
Repeat steps 2-3 as required. |
Note
Step order must be numerical. This defines what order this definition is in the workflow (i.e. users must do step 1 before step 2).
Workflow definitions can be listed for a specific workflow by selecting the List Workflow Definitions button.
4. Assign a Workflow to a Trial
At the Trial Page, a workflow can be added to an existing trial or a new trial created with a workflow (if the workflow is already defined).
To add a workflow to a trial:
Step |
Action |
|---|---|
1. |
From the Main Menu, select Experiments, then Trials to navigate to the Trials Page. |
2. |
At the required trial, select the Edit Trial button in the Action Column to display the Update Trial Window |
3. |
At the Current Workflow field select a workflow from the dropdown list. The workflow choices that are available will depend on the workflows that have already been created. |
4. |
Select the Update Button to finalise the workflow assignment. |
5. |
After the workflow has been assigned to the trial, choose “Assign a workflow to Trial” (under Edit Trial button dropdown) and choose the relevant step. |
5. |
After a workflow step has been added to a trial, users may select the |


Note
The step ID is the ID shown in the Workflow Definition Table, not the step number of the Workflow Definition*.
A workflow may also be added to a new trial as it is being created. When the user is entering the trial details, there will be a dropdown option for the workflow.