Tutorial 3 - KDSmart
KDSmart is an Android application that can be installed on mobile devices for the collection of trial or nursery data.
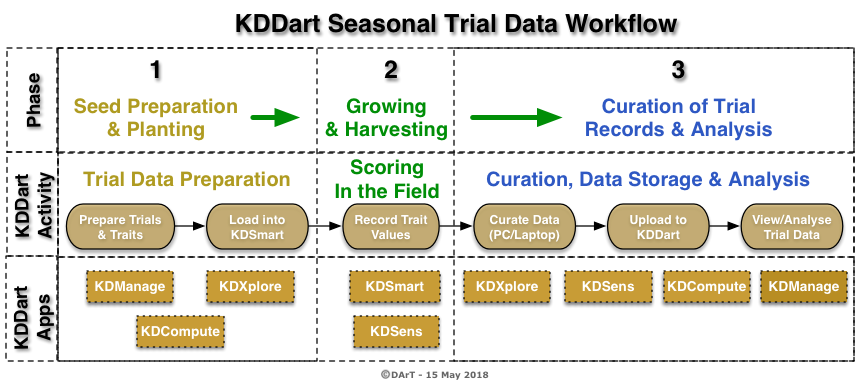
The following image illustrates the trial Data Workflow. trials can be loaded into KDSmart from KDXplore, trait data is collected using KDSmart, then the data is loaded back into KDXplore for curation, then transfer to a KDDart database for long term access and storage. For this tutorial Phase 2 is about to begin.
Please ensure the previous tutorial has been completed Tutorial 2 - KDXplore and have a trial loaded (or ready to import) into KDSmart to use in this tutorial.
By the end of this tutorial, you should be able to:
- Import a scoring set to KDSmart;
- Navigate the KDSmart application and open a trial;
- Understand traits and tags in KDSMart;
- Use different views for Scoring data; and
- Transfer scored data to KDXplore.
Note
Select any heading to expand/display  or contract
  the section.
Home Screen
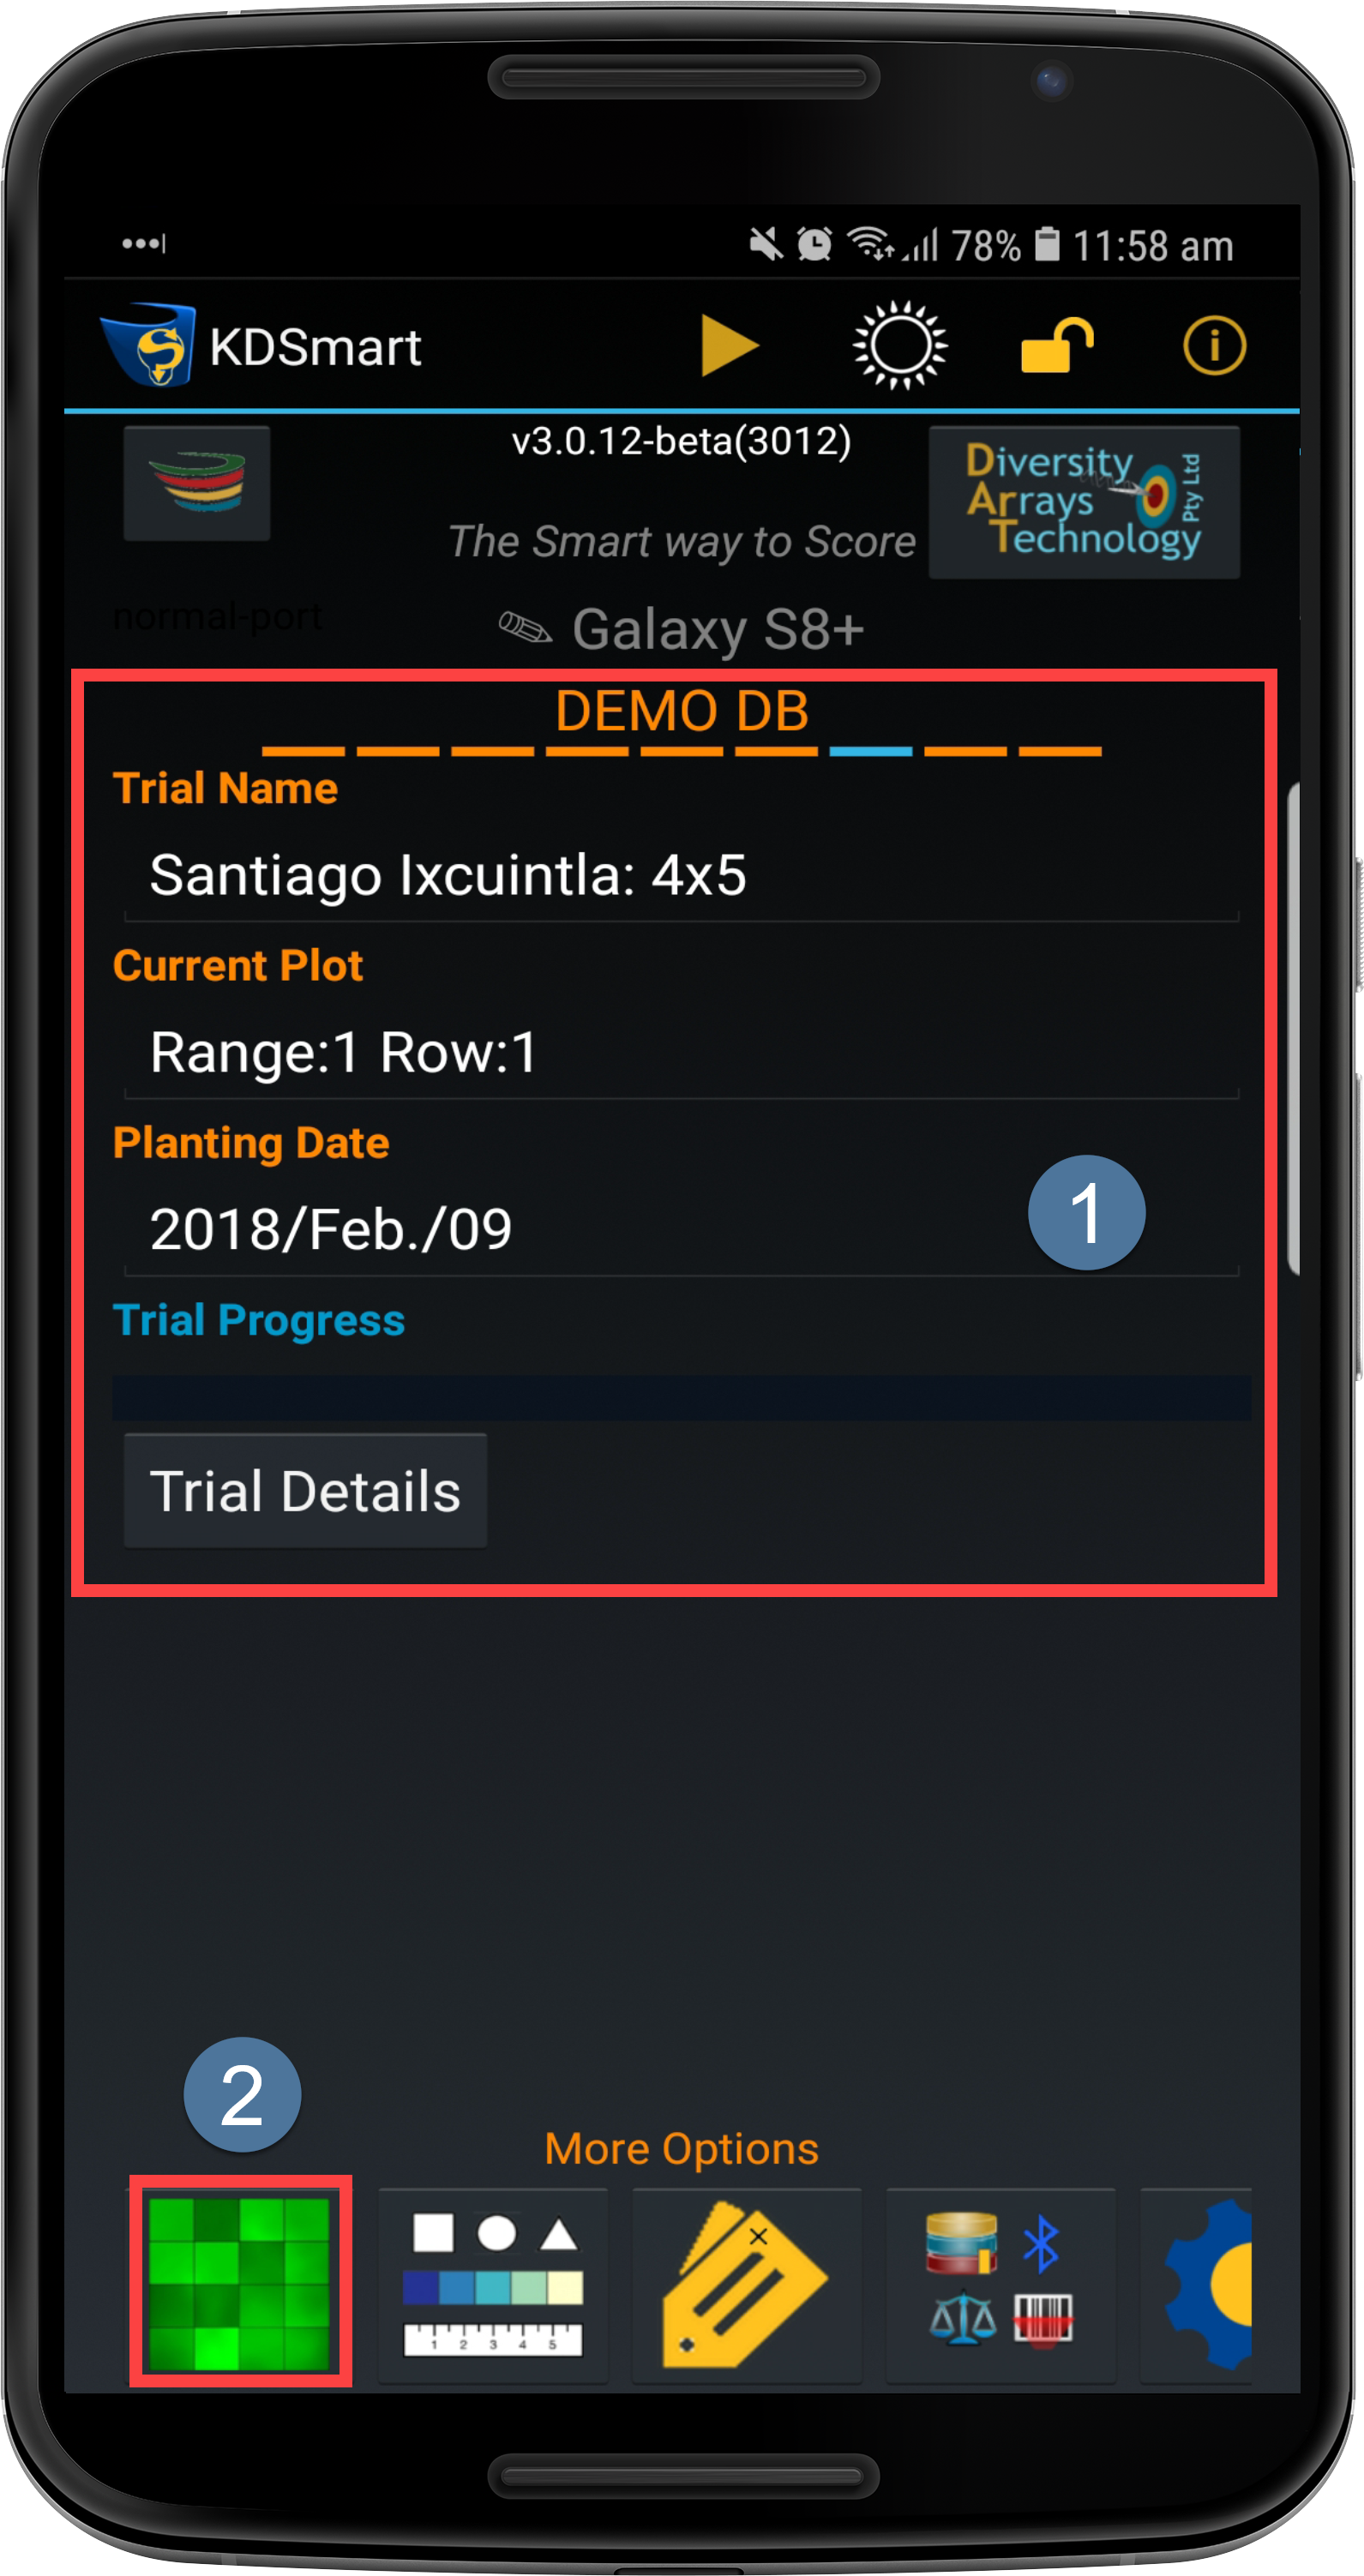
Once the KDSmart application is opened, you will see the Home Screen as in the below image. As well as menu options, the Home Screen displays important information such as the KDSmart version number, trial details, and the device name.
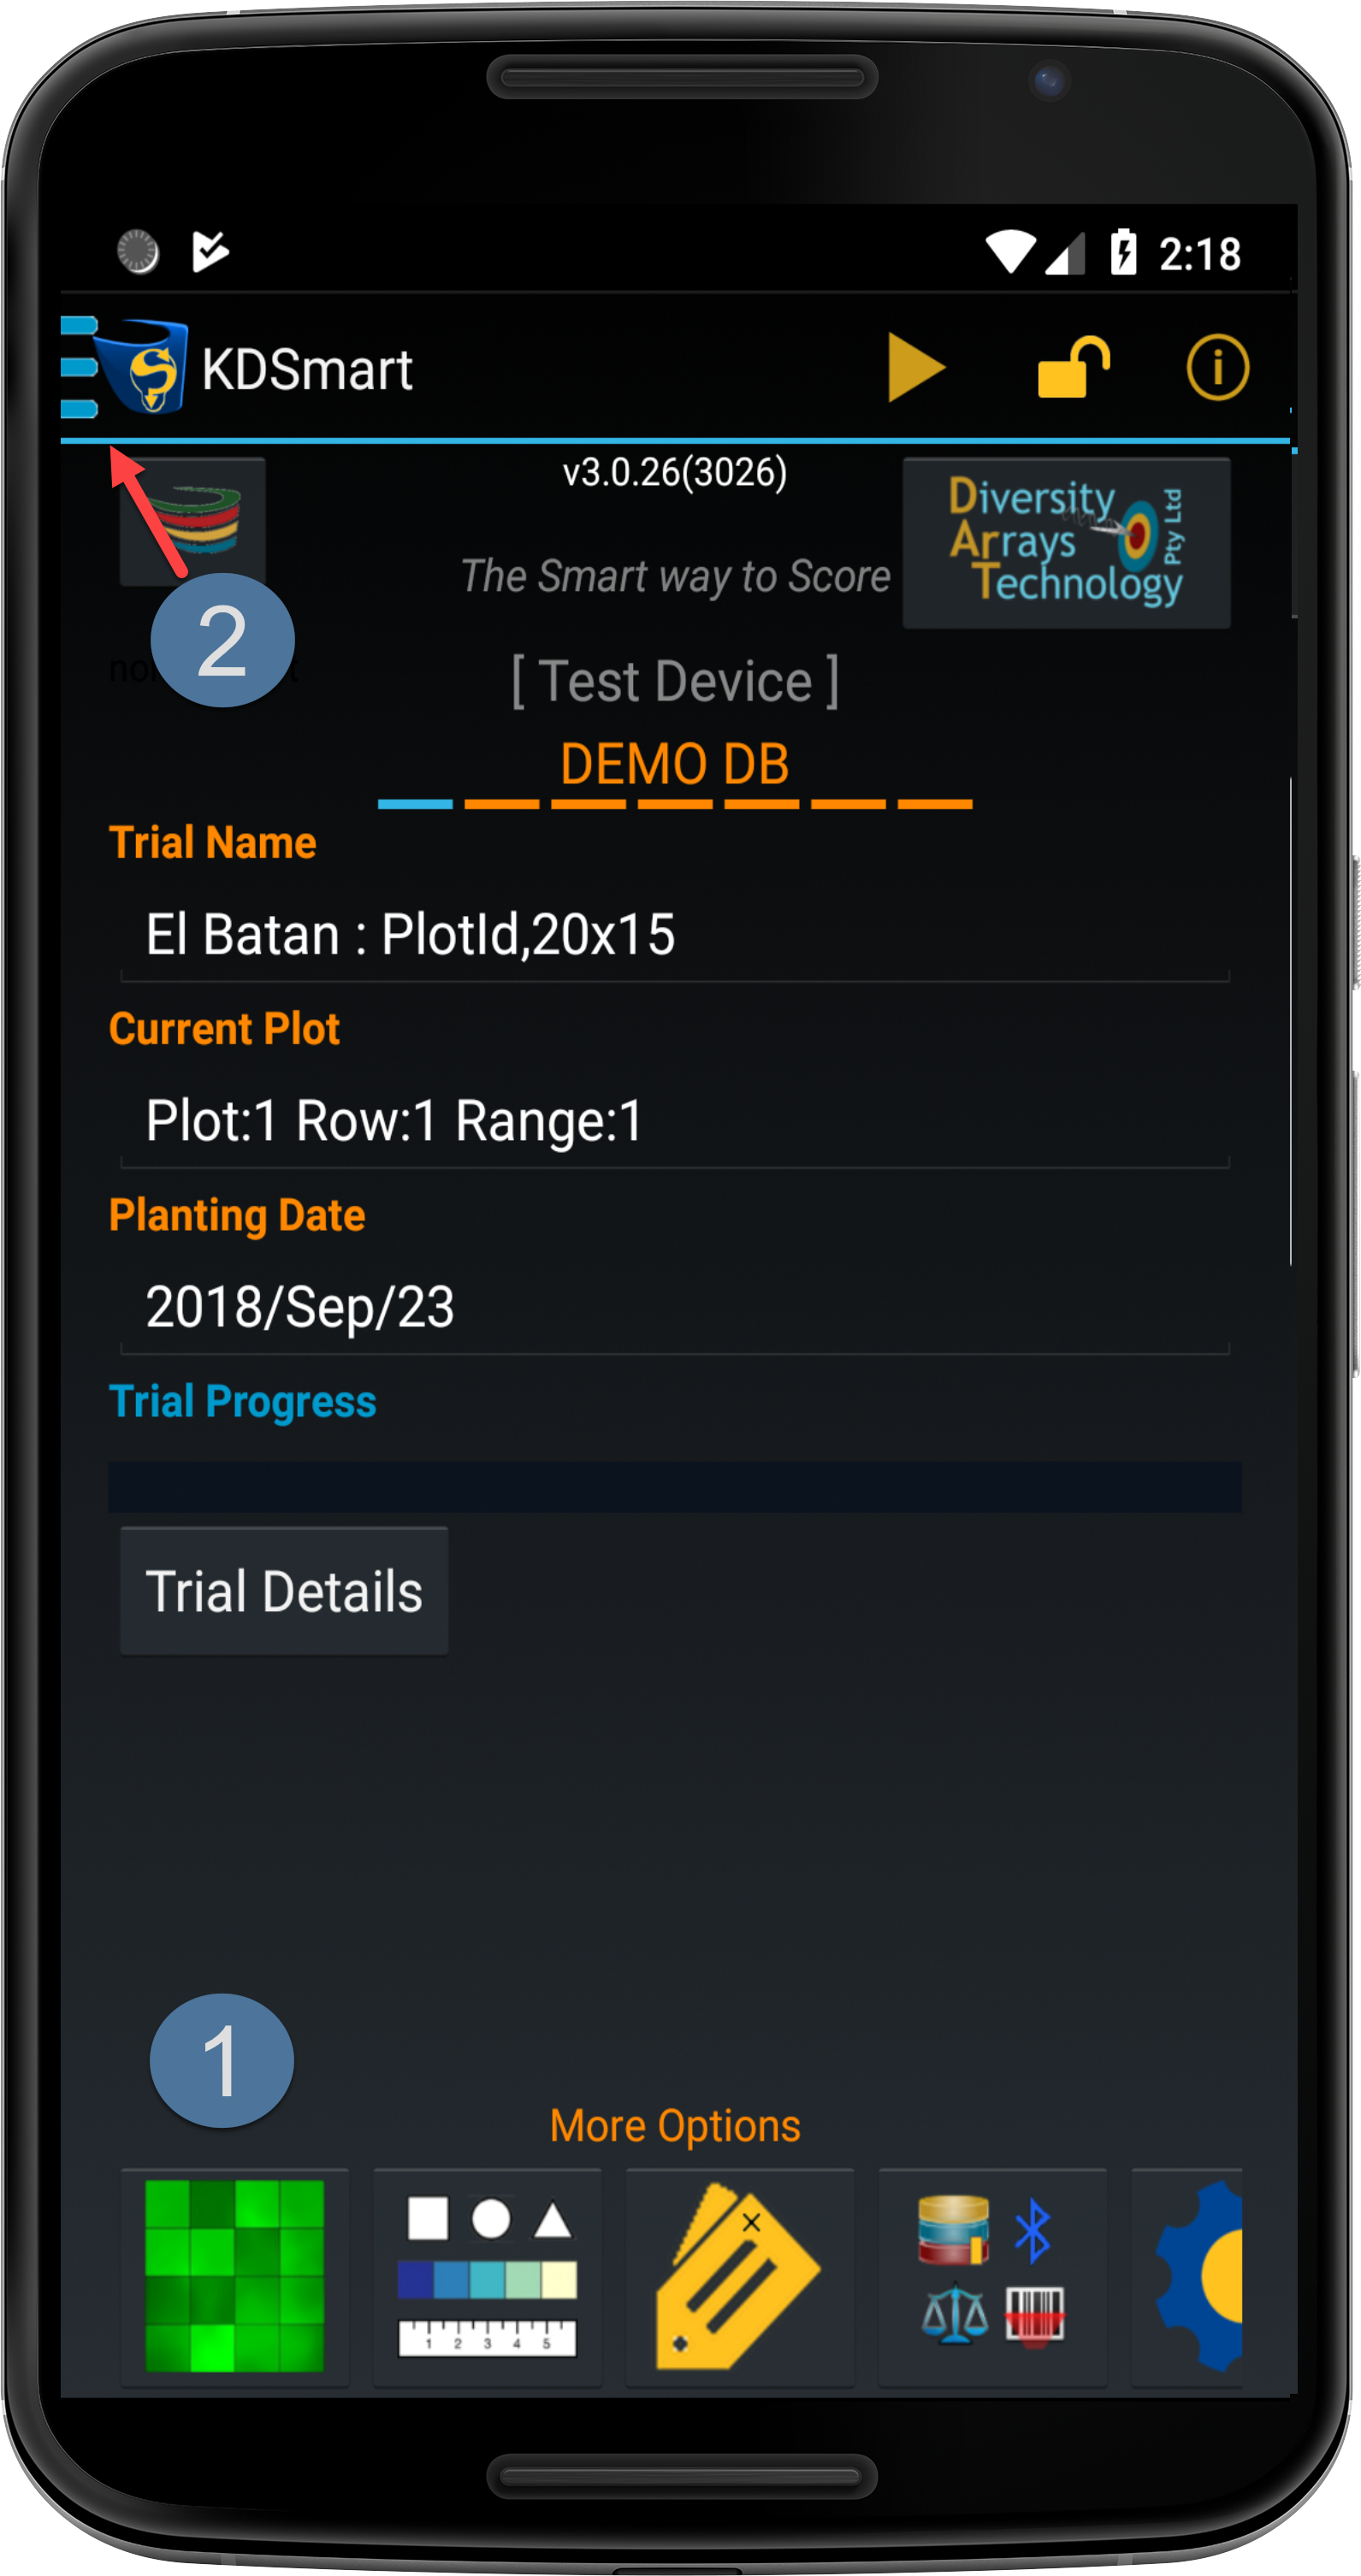
This tutorial requires you to be able to navigate to the Trials Screen which can be done by selecting the:

Trials Button; or
Menu Button, then choosing the Trials option.
Note
Please see the KDSmart Home Screen page for a comprehensive outline of the KDSmart Home Screen or continue with this tutorial to learn more.
Step 1 - Importing a Scoring Set
Whilst you can use the trials in the demo database, if you want to use your own trials then you will need to import a scoring set (a trial with a specific set of traits to be scored). When a scoring set is imported to KDSmart, the trial it is created from will be listed in the Trials Screen. The previous tutorial demonstrated how to export a scoring set to Google Drive. This tutorial will outline how to retrieve that set from Google Drive. See below for further instruction.
| Step | Action |
|---|---|
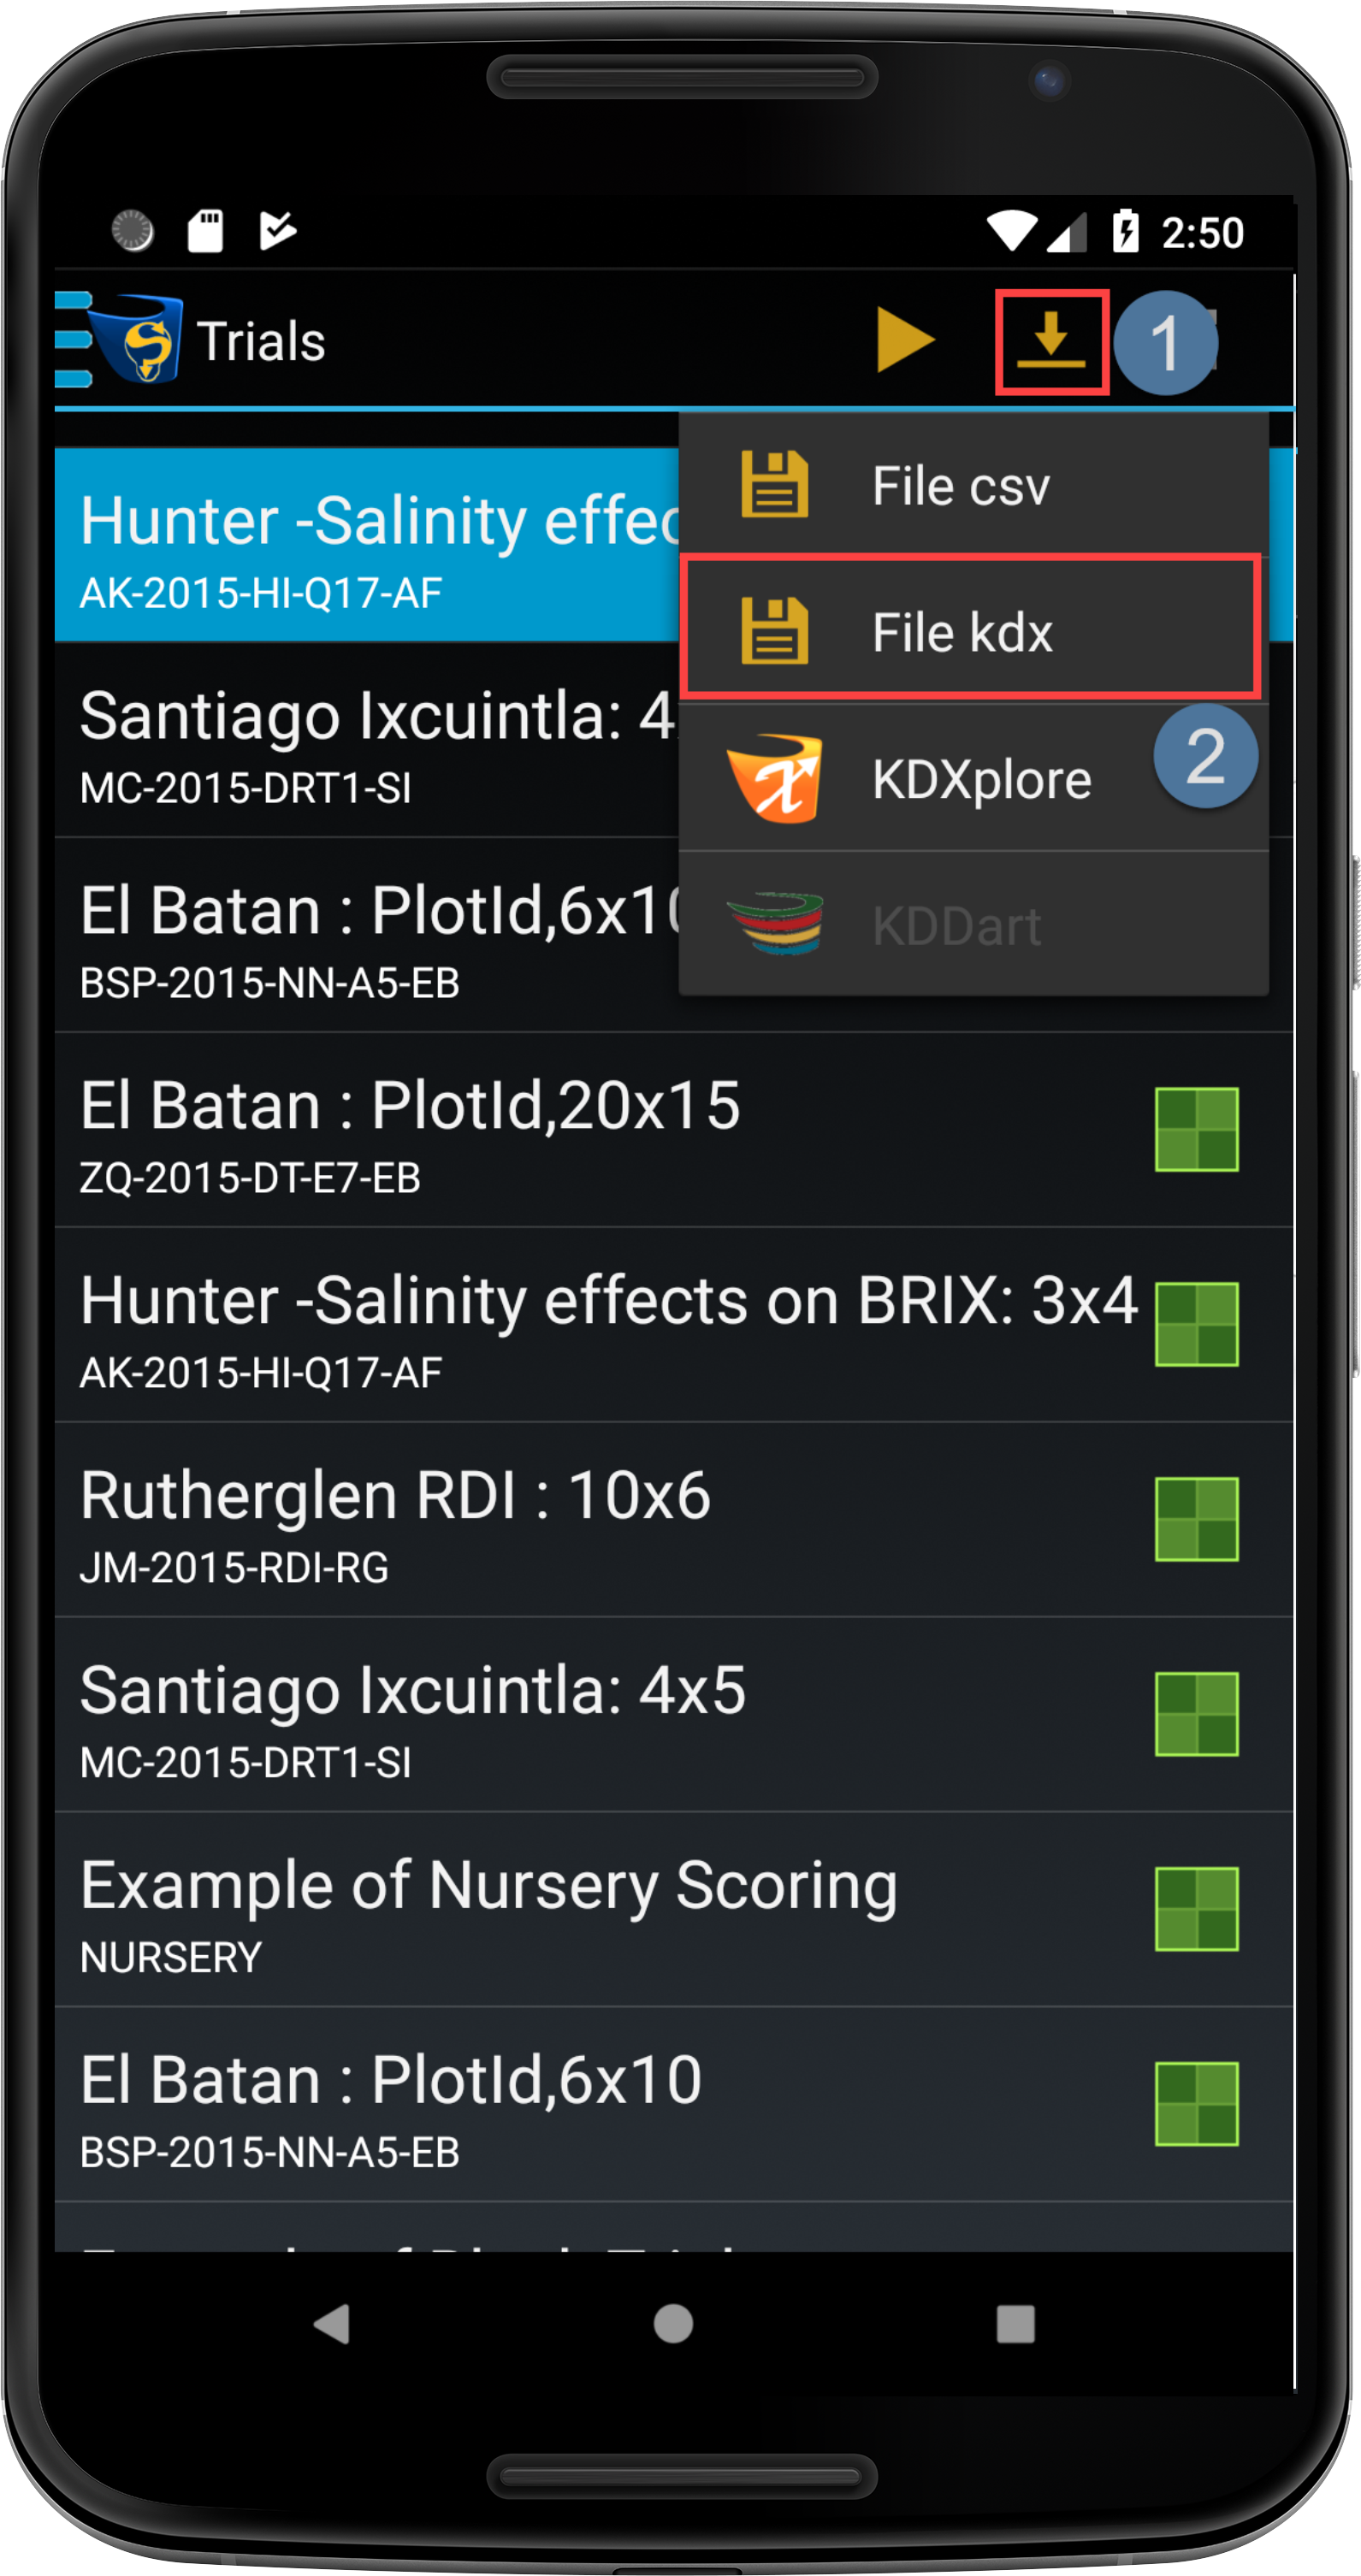
| 1. | Navigate to the trials screen and select the Import Button at . |
| 2. | Select an import option - for this tutorial choose the File KDX option at . This will open Google Drive. |
| 3. | Select the KDX file to be imported such as the one at 
|
| 4. | Successful imports result in the following screen. The attachment message indicates that there are no attachments to the trial. 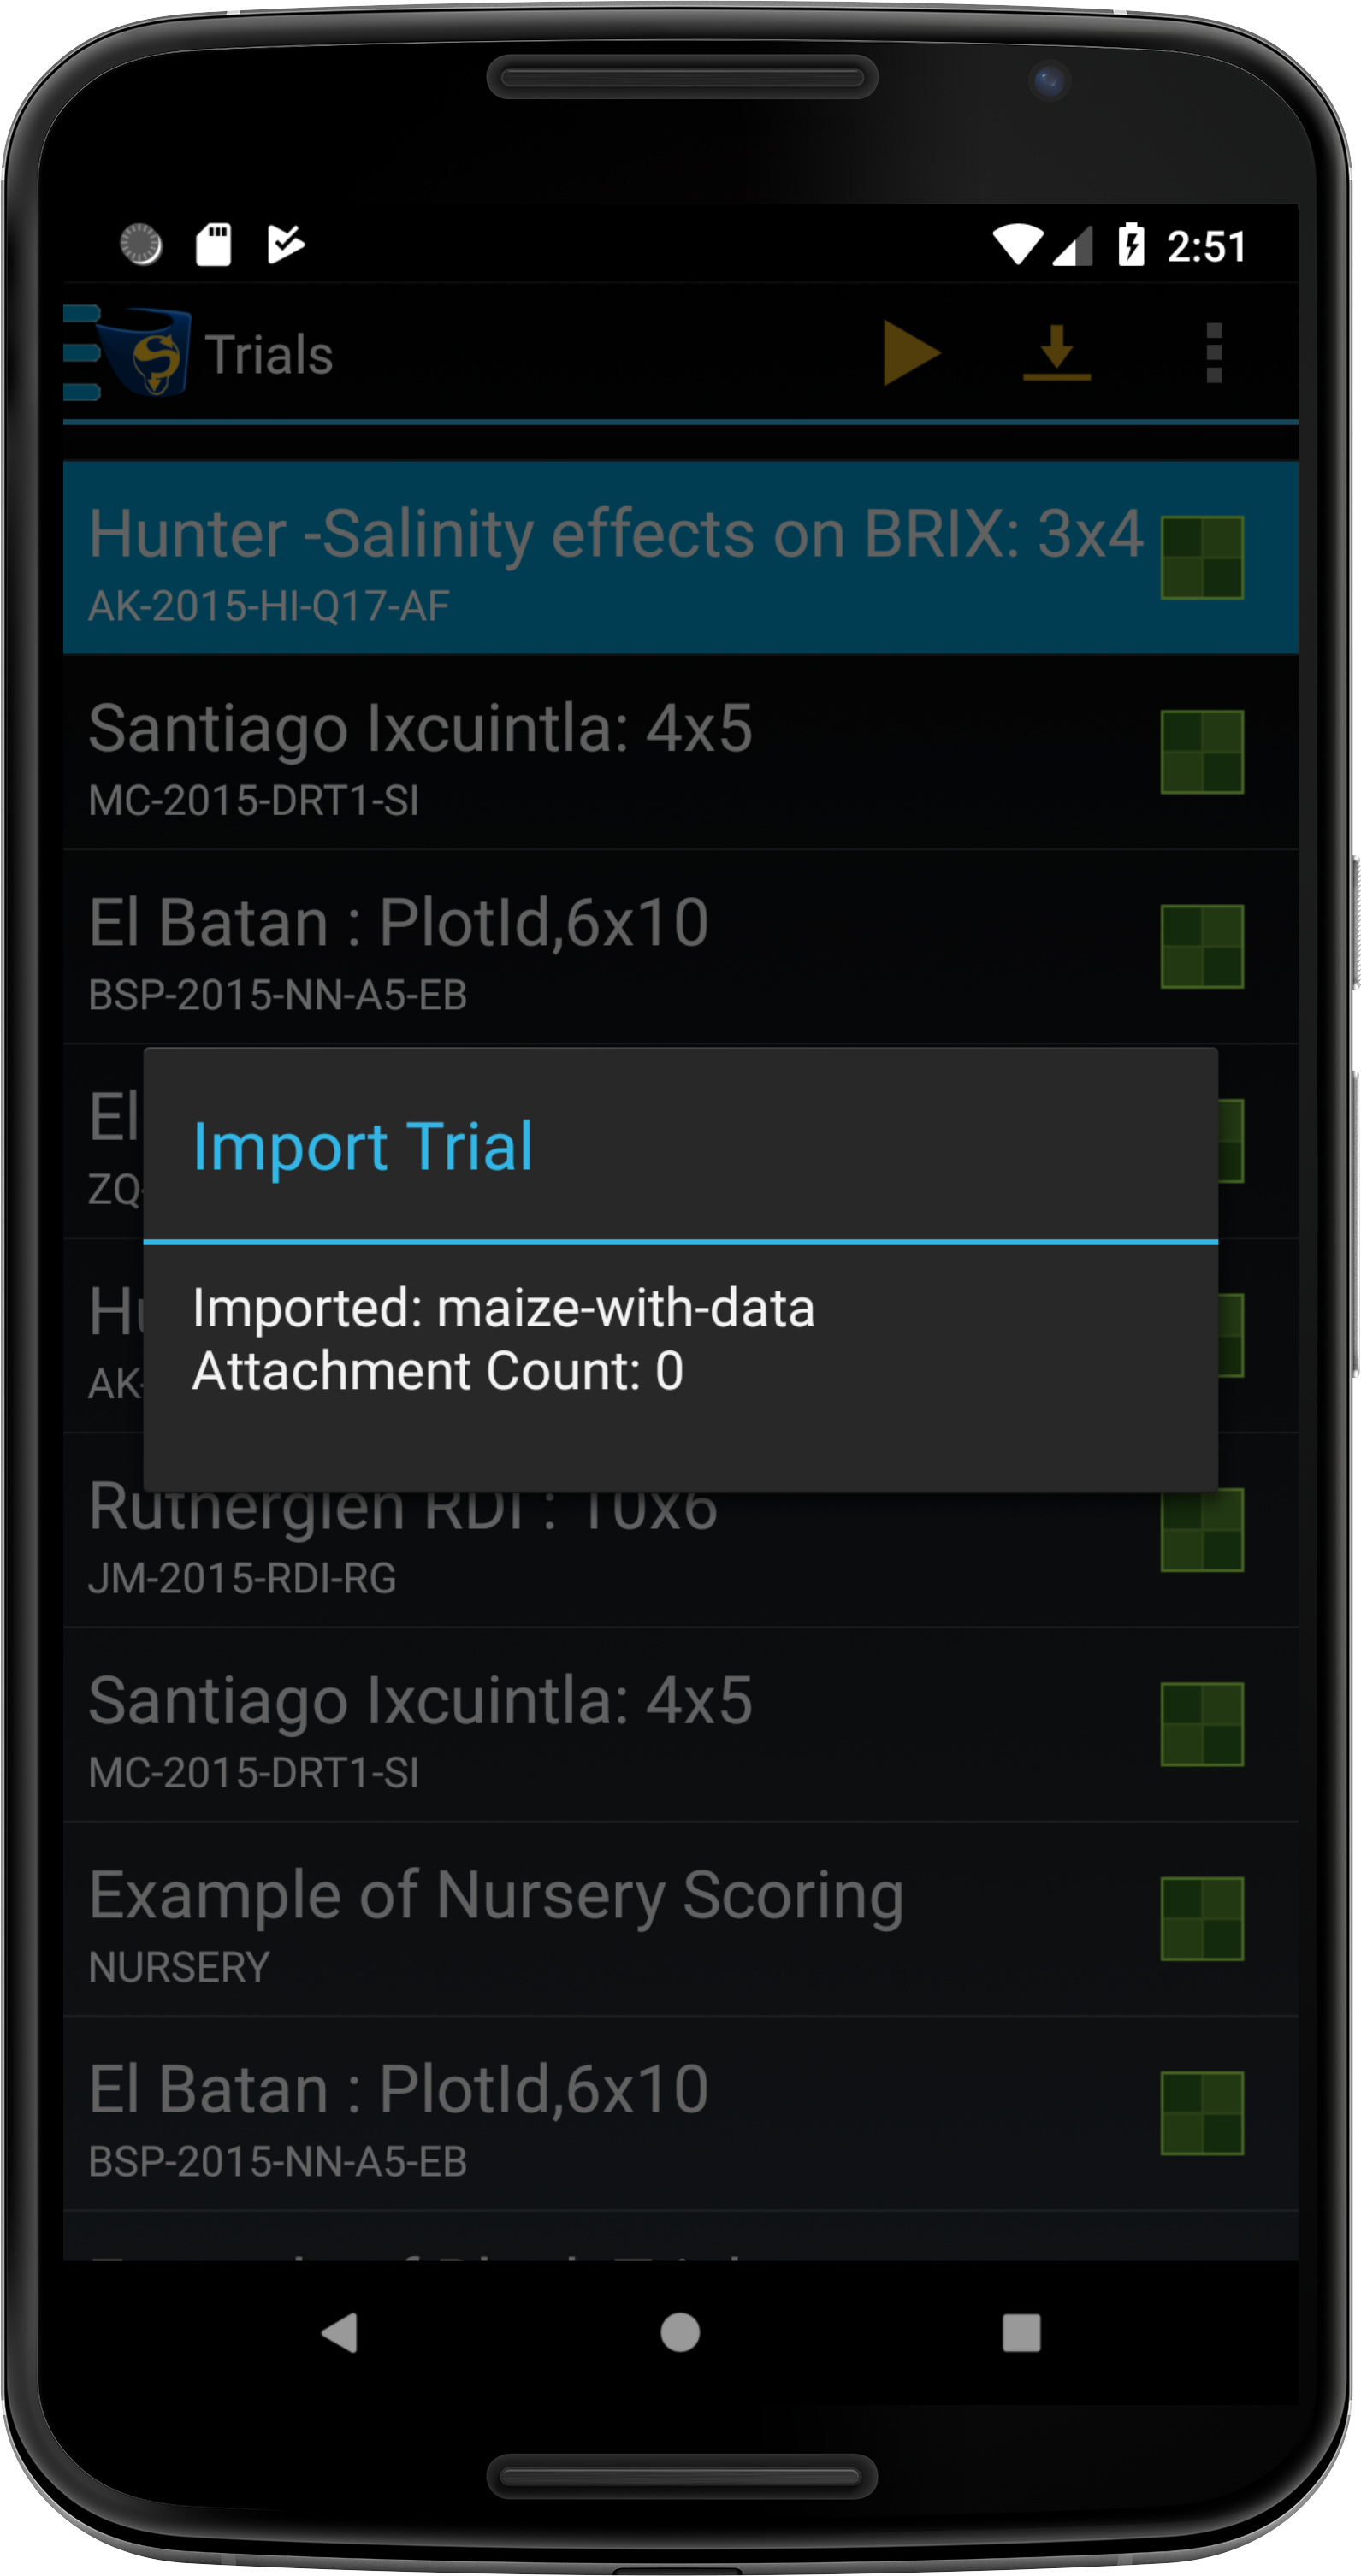
|
Step 2 - Selecting and Starting a Trial
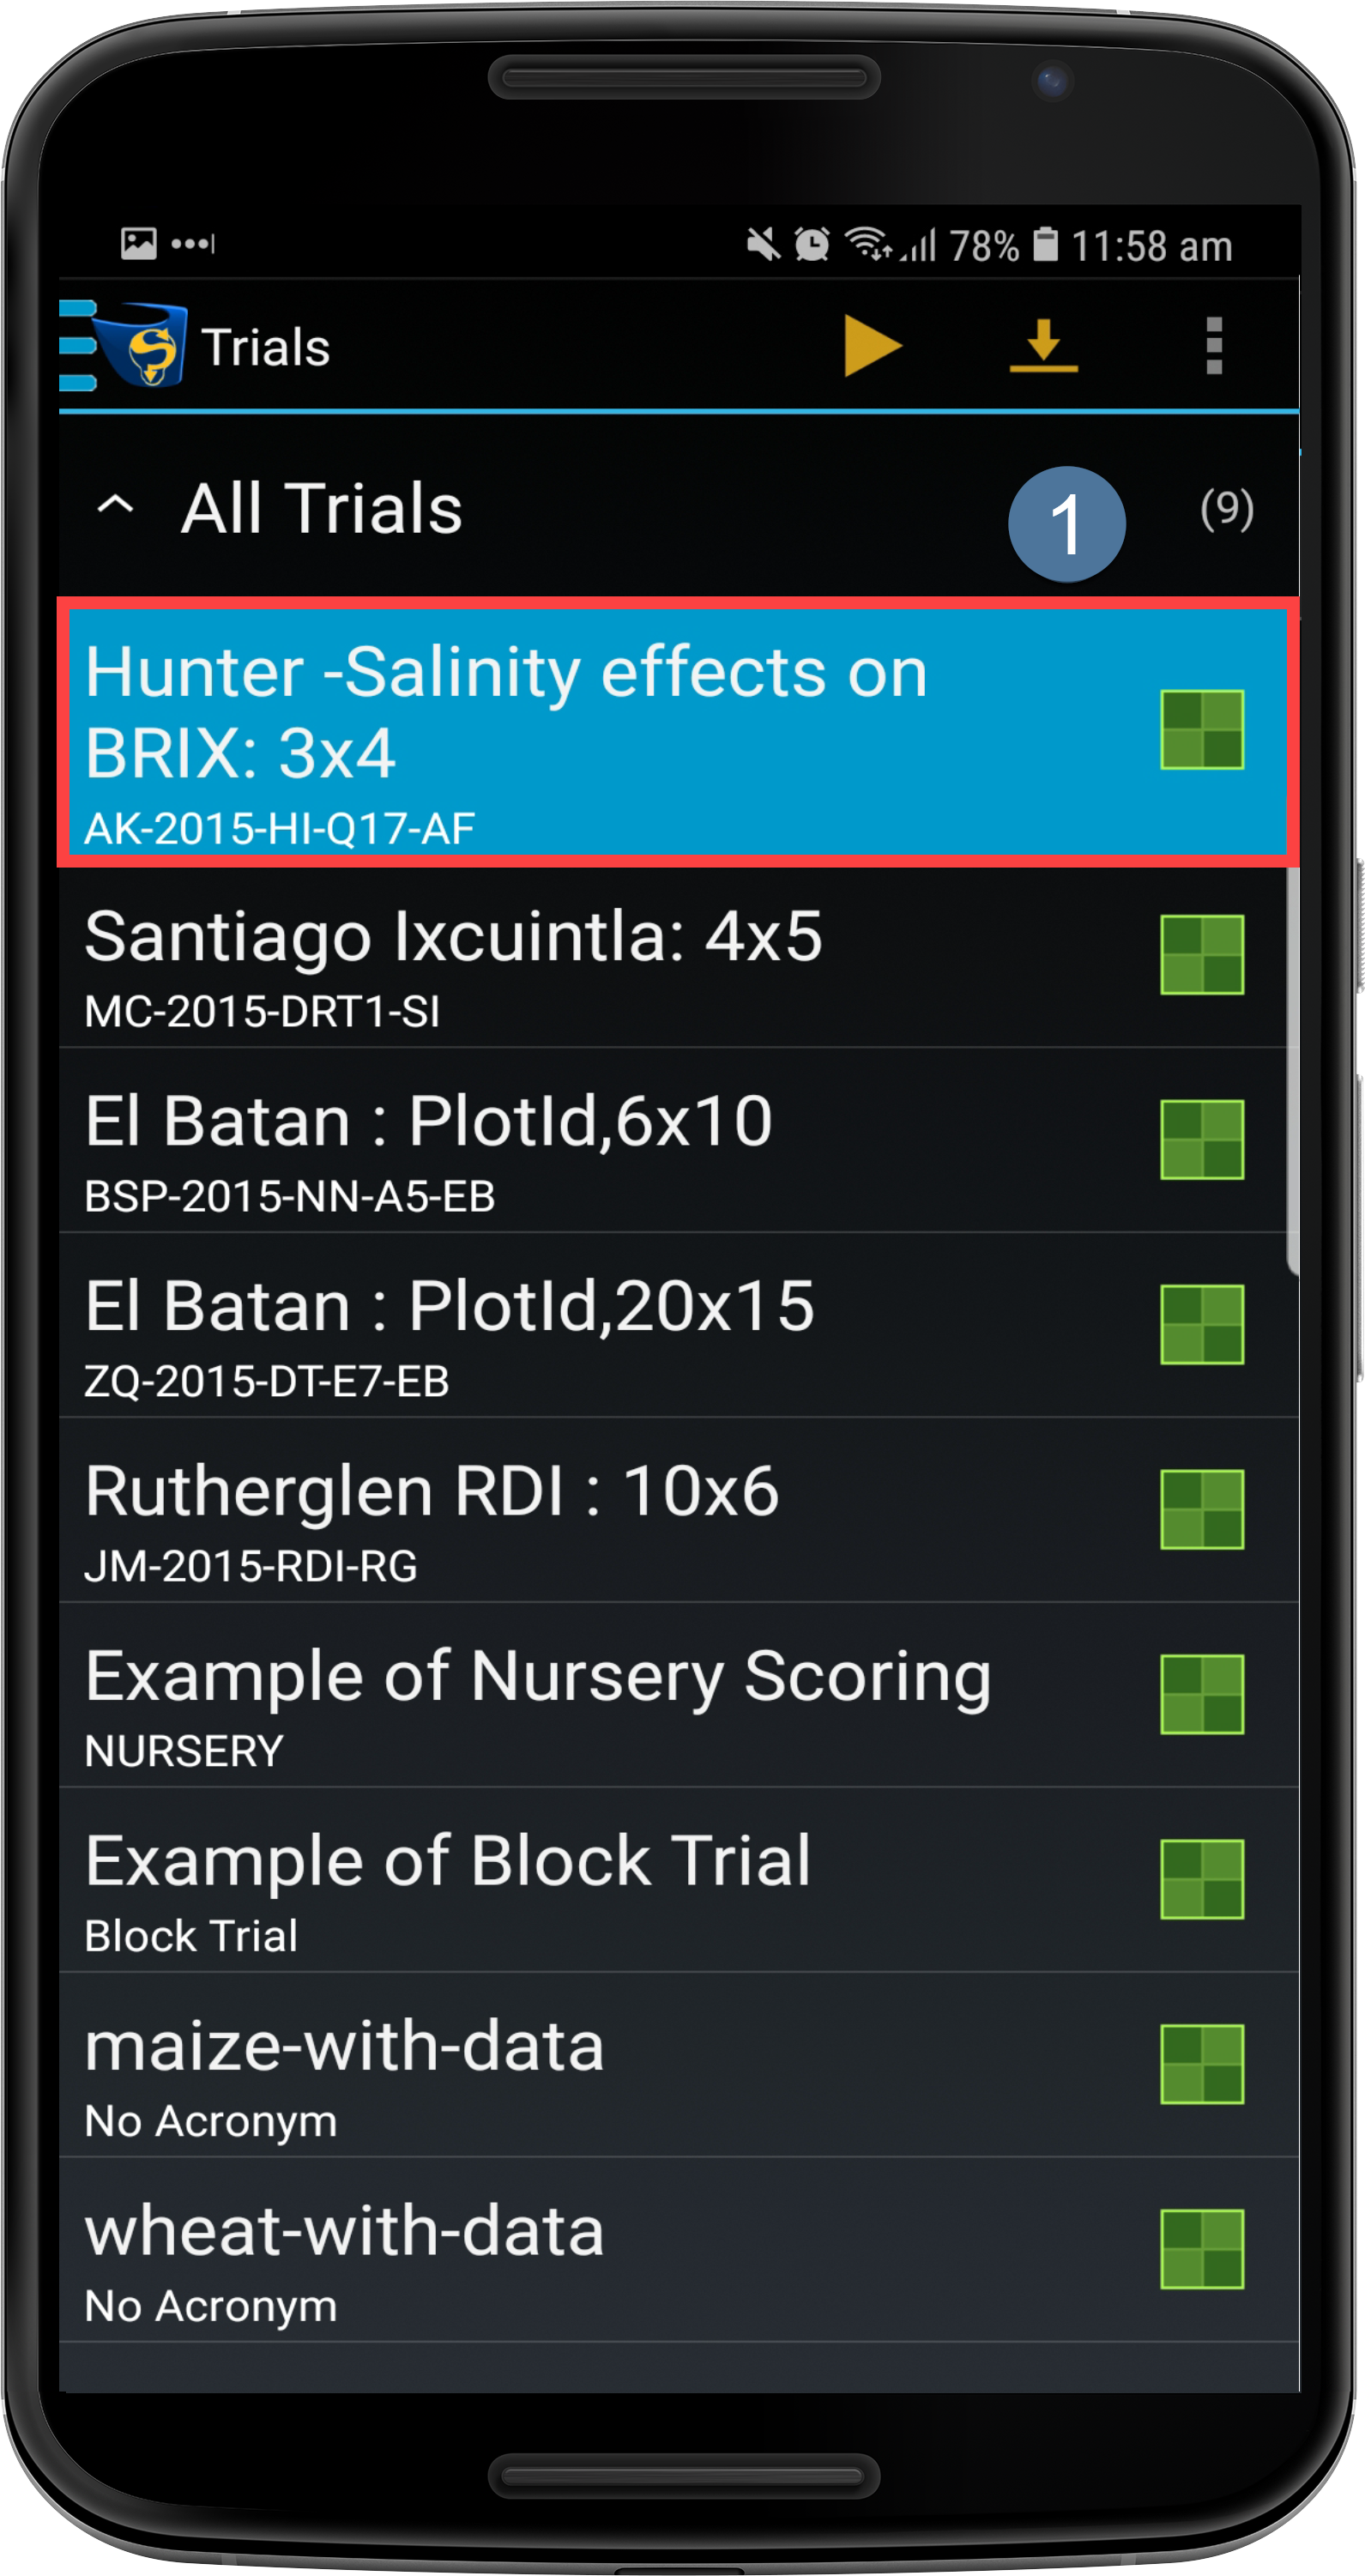
To view the names and details of trials in KDSmart, you can navigate back to the Home Screen which is outlined in the following image. Swipe left and right to browse trials. The Home Screen is displayed when the KDSmart Application is opened. This can be seen in the following image:
Start Scoring Button is selected, it will start the scoring of the selected trial.
| Step | Action |
|---|---|
| 1. | Choose a trial such as the one displayed at to save this as the current trial and navigate to the Trial Details Screen. |
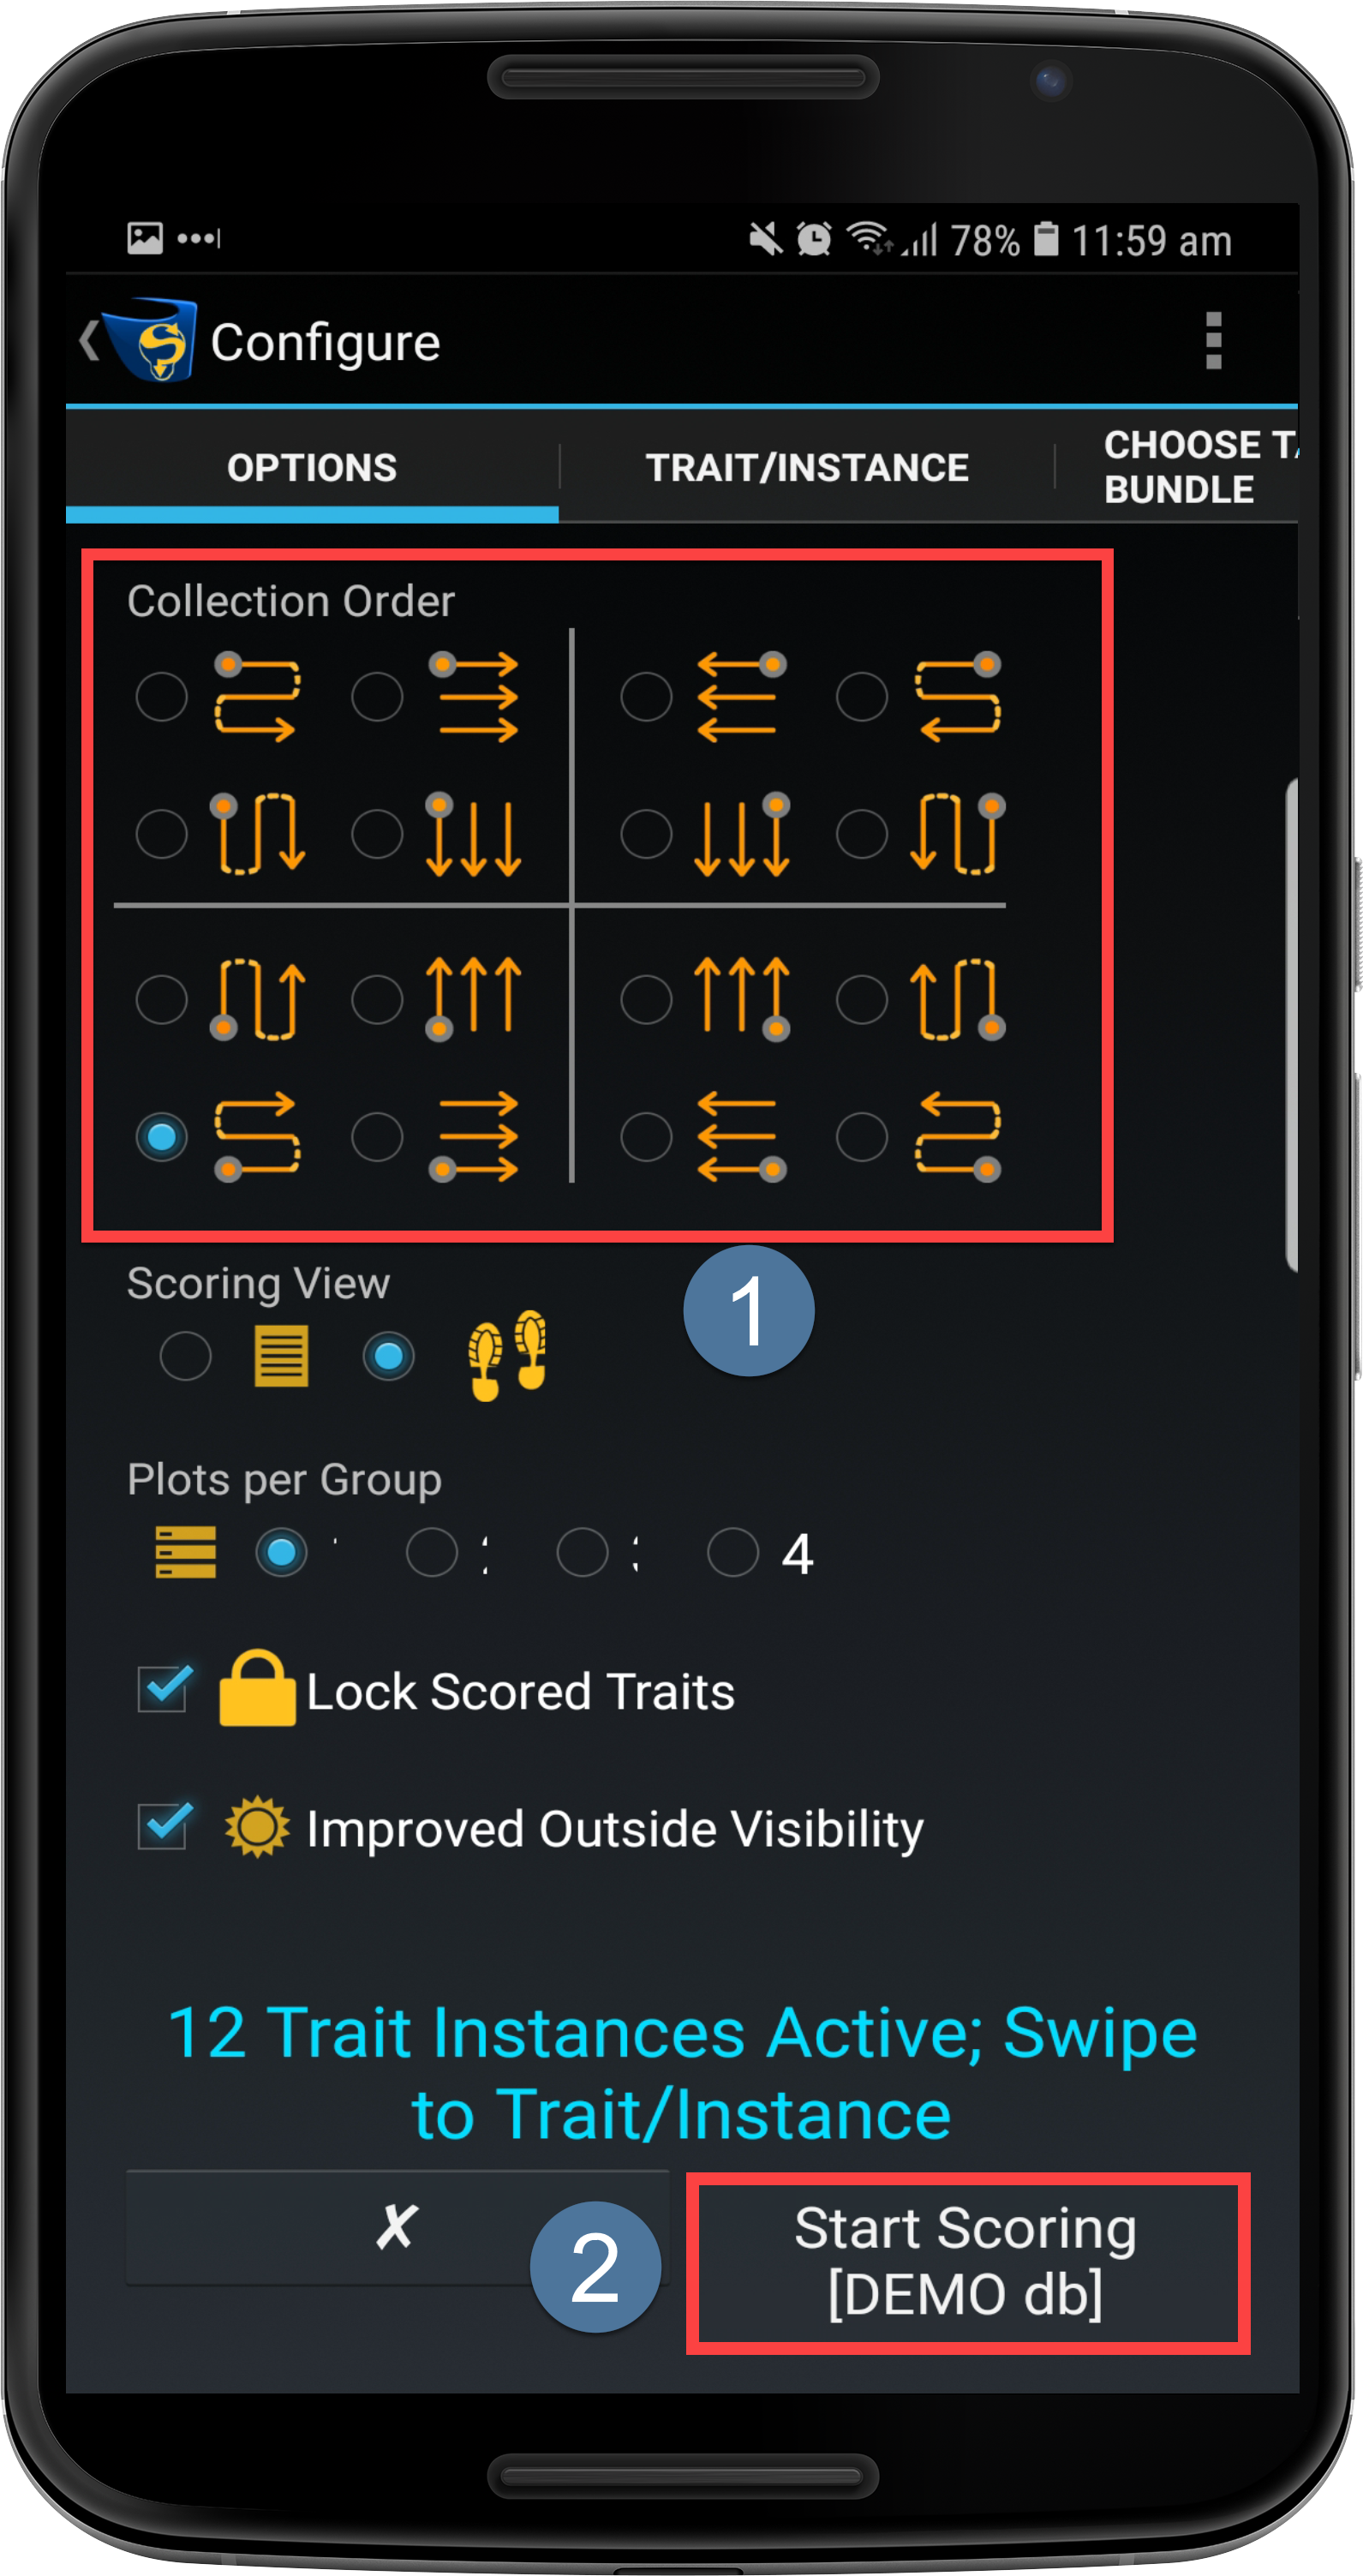
| 2. | Select the Start Scoring Button to navigate to the Configuration Screen as seen in the following image: |
| Step | Action |
|---|---|
| 3. | The Configuration Screen allows the user to choose collection options related to the collection of the data when scoring trials. There are multiple tabs which can be navigated to by dragging the screen to the left or right. The first tab which is presented is the Options Tab which allows the user to define the collection order* (at ) and other collection options. There is also the option to add tag bundles. |
| 4. | Select the Start Scoring Button at to begin data collection. |
Note
The collection order refers to the order that the user will collect data in the field which includes the starting position and the traversal pattern. More information about options can be found in the Collection Parameters and Trait/Instance Selection sections.
Step 3 - Understanding the Scoring Panel
After a trial is chosen and started, the next step is to start scoring data. The following image and table demonstrate the parts of the scoring panel that are used to score data.

| Button | Action |
|---|---|
| Select Plot |
Selecting this button will allow the user to choose the exact plot that they need to score. This is useful if the user would like to score a plot out of order from the collection order. |
Move Forward/ Back  / /  |
These buttons display the next or previous plot that is to be displayed. The Move Forward Button displays the next plot and the Move Backward Button displays the previous button. |
 Field View Field View  |
This button displays the view of the entire Field from the Experiment including the collection order and any tags that are applied to a plot. Within this window, selecting a plot and then choosing the Jump To option will take the user to the chosen plot so that it can be scored. This method of choosing plots is useful if the user does not know the actual PlotID but is familiar with the physical layout of the Field. |
 Auto Advancing Auto Advancing  |
The selection of this will start the Autoscoring function. It will present the option to auto advance either All Traits or Un-scored Traits. More on autoscoring is explained further on. |
 Trait Instance Trait Instance |
Each row such as the one outlined here is a trait instance. Selecting a trait will provide the user the ability to score it. traits can be for the entire plot or for specific sub-plots. |
 Add Media Add Media  |
Photos and audio files can be added to plots with this button. Adding media can be used as notes e.g. a photo of damage to a plant. |
 Select Tag/s Select Tag/s  |
Tags can be added and removed from each plot. |
Note
The full KDSmart Help Guides can be referred to in order to learn about scoring KDSmart - How to Score Trials and Nurseries .
Step 4 - Scoring Data
The main purpose of KDSmart is to score data. This refers to the collection of phenotypic data in the field and involves the user walking through the experiment plots and entering data to KDSmart after observing specimens. This step will outline how to enter trait and tag data into KDSmart.
Traits
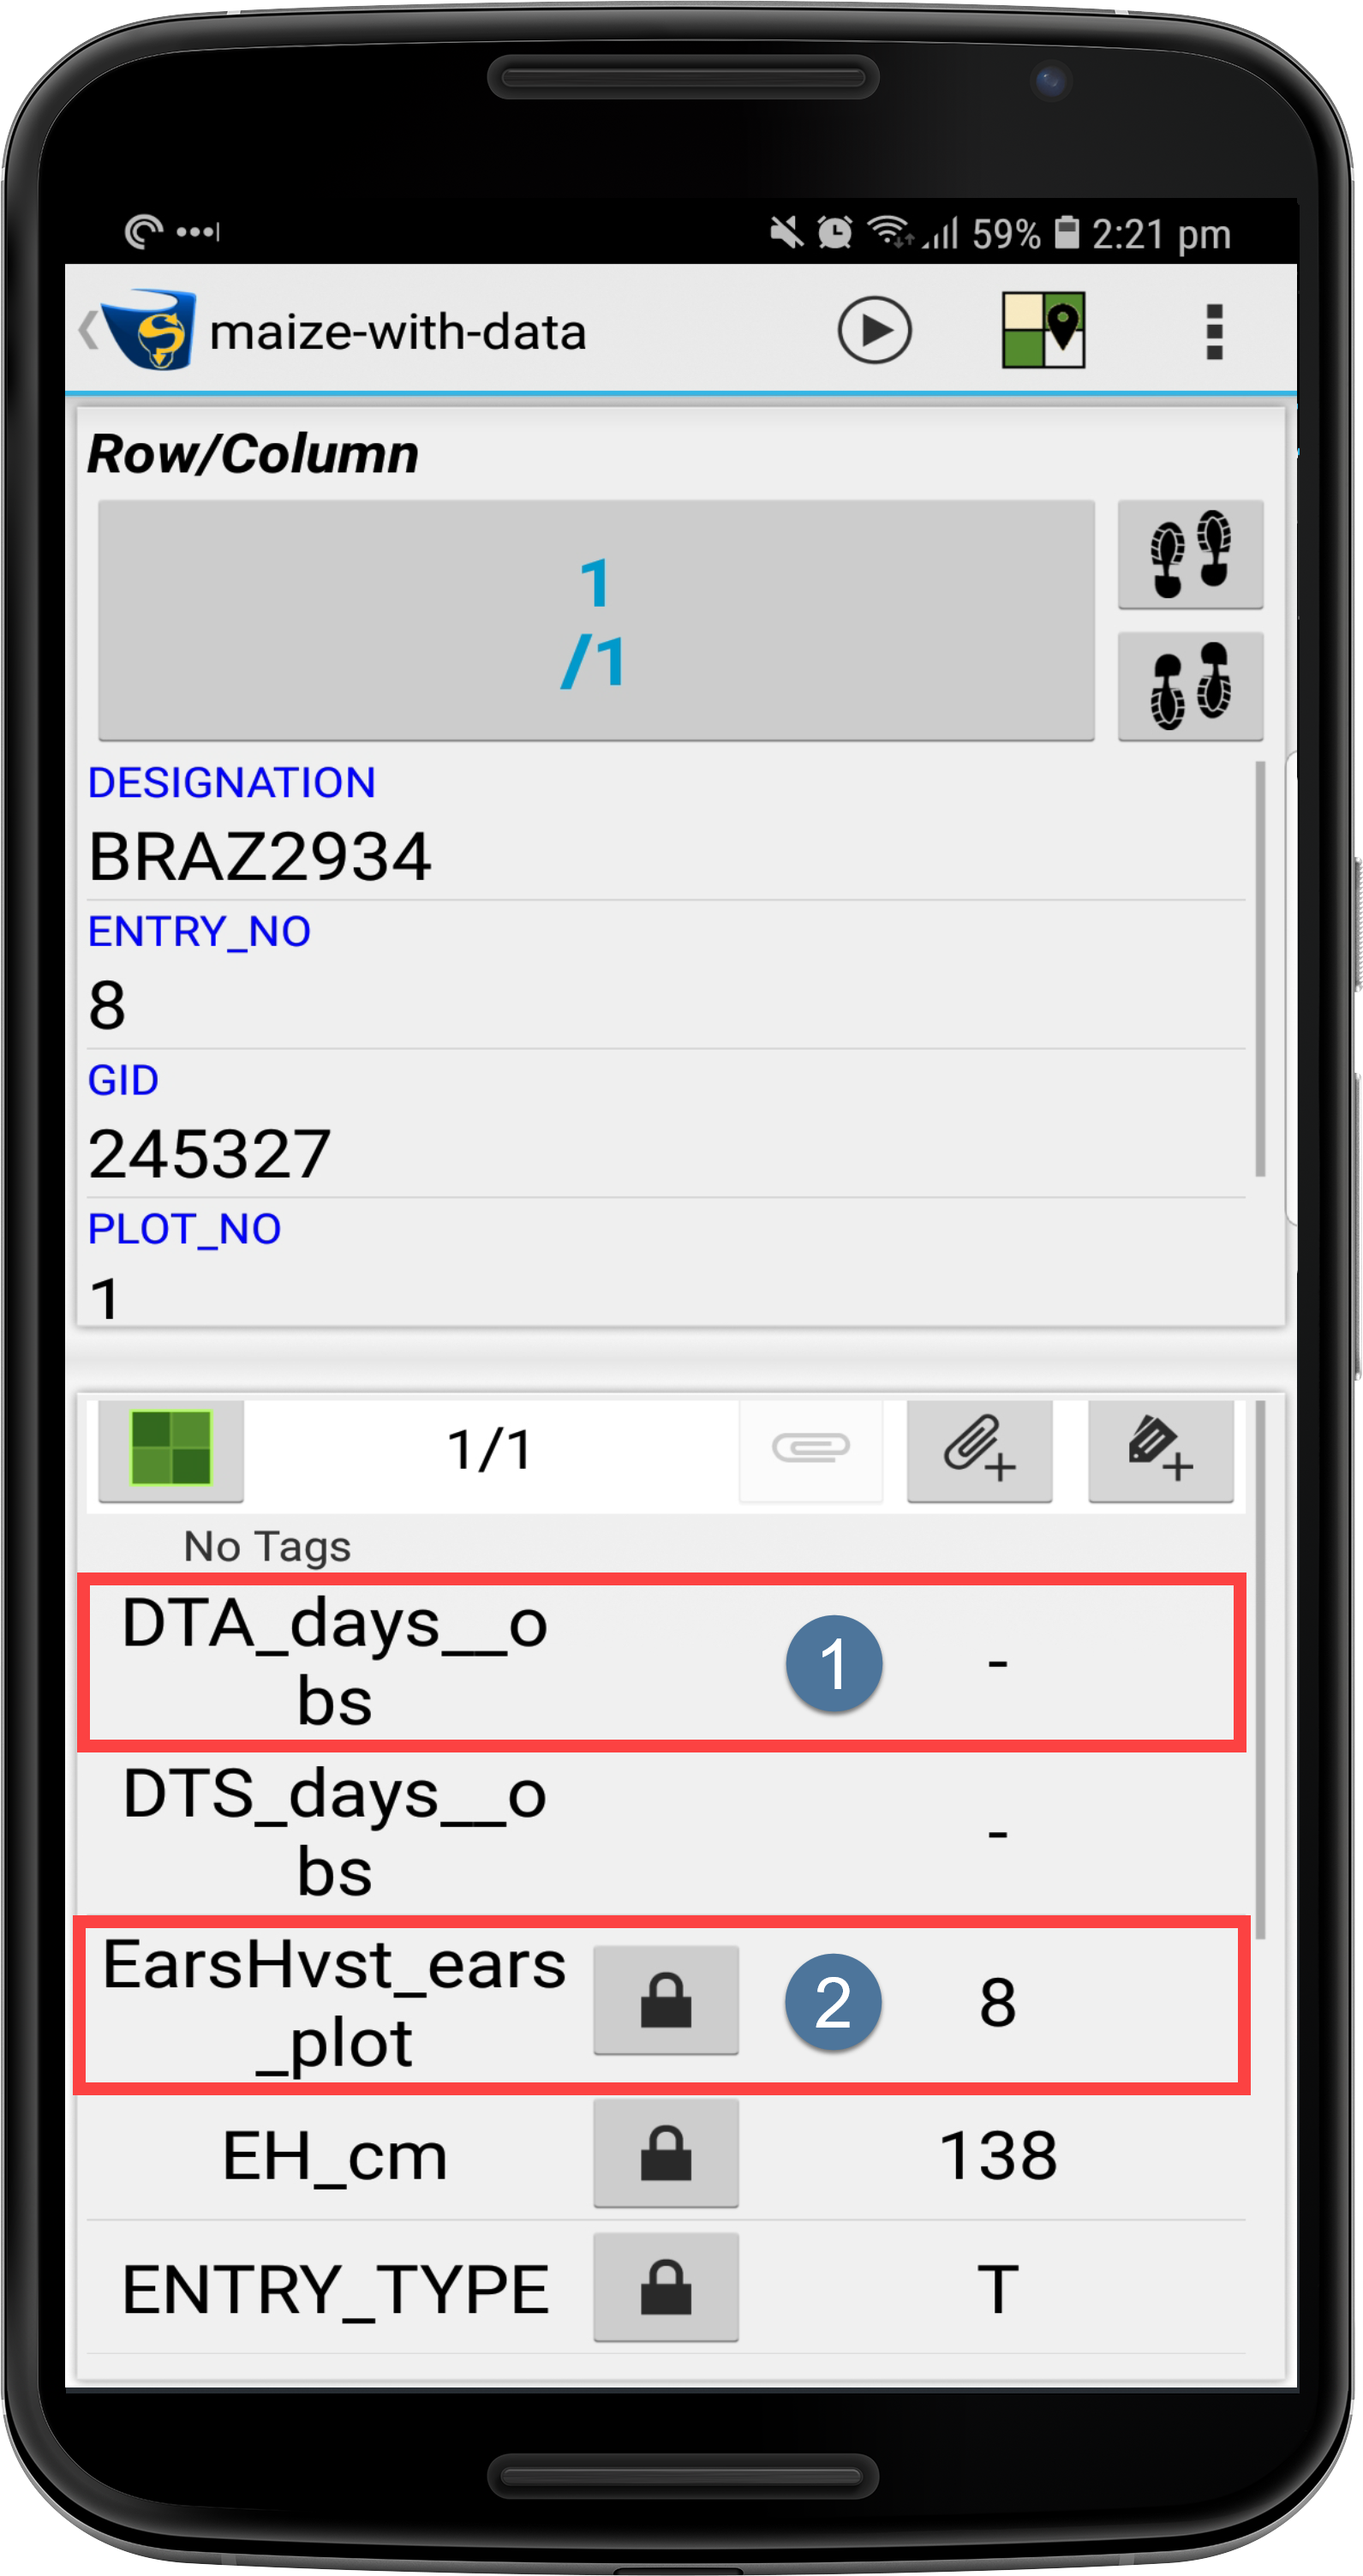
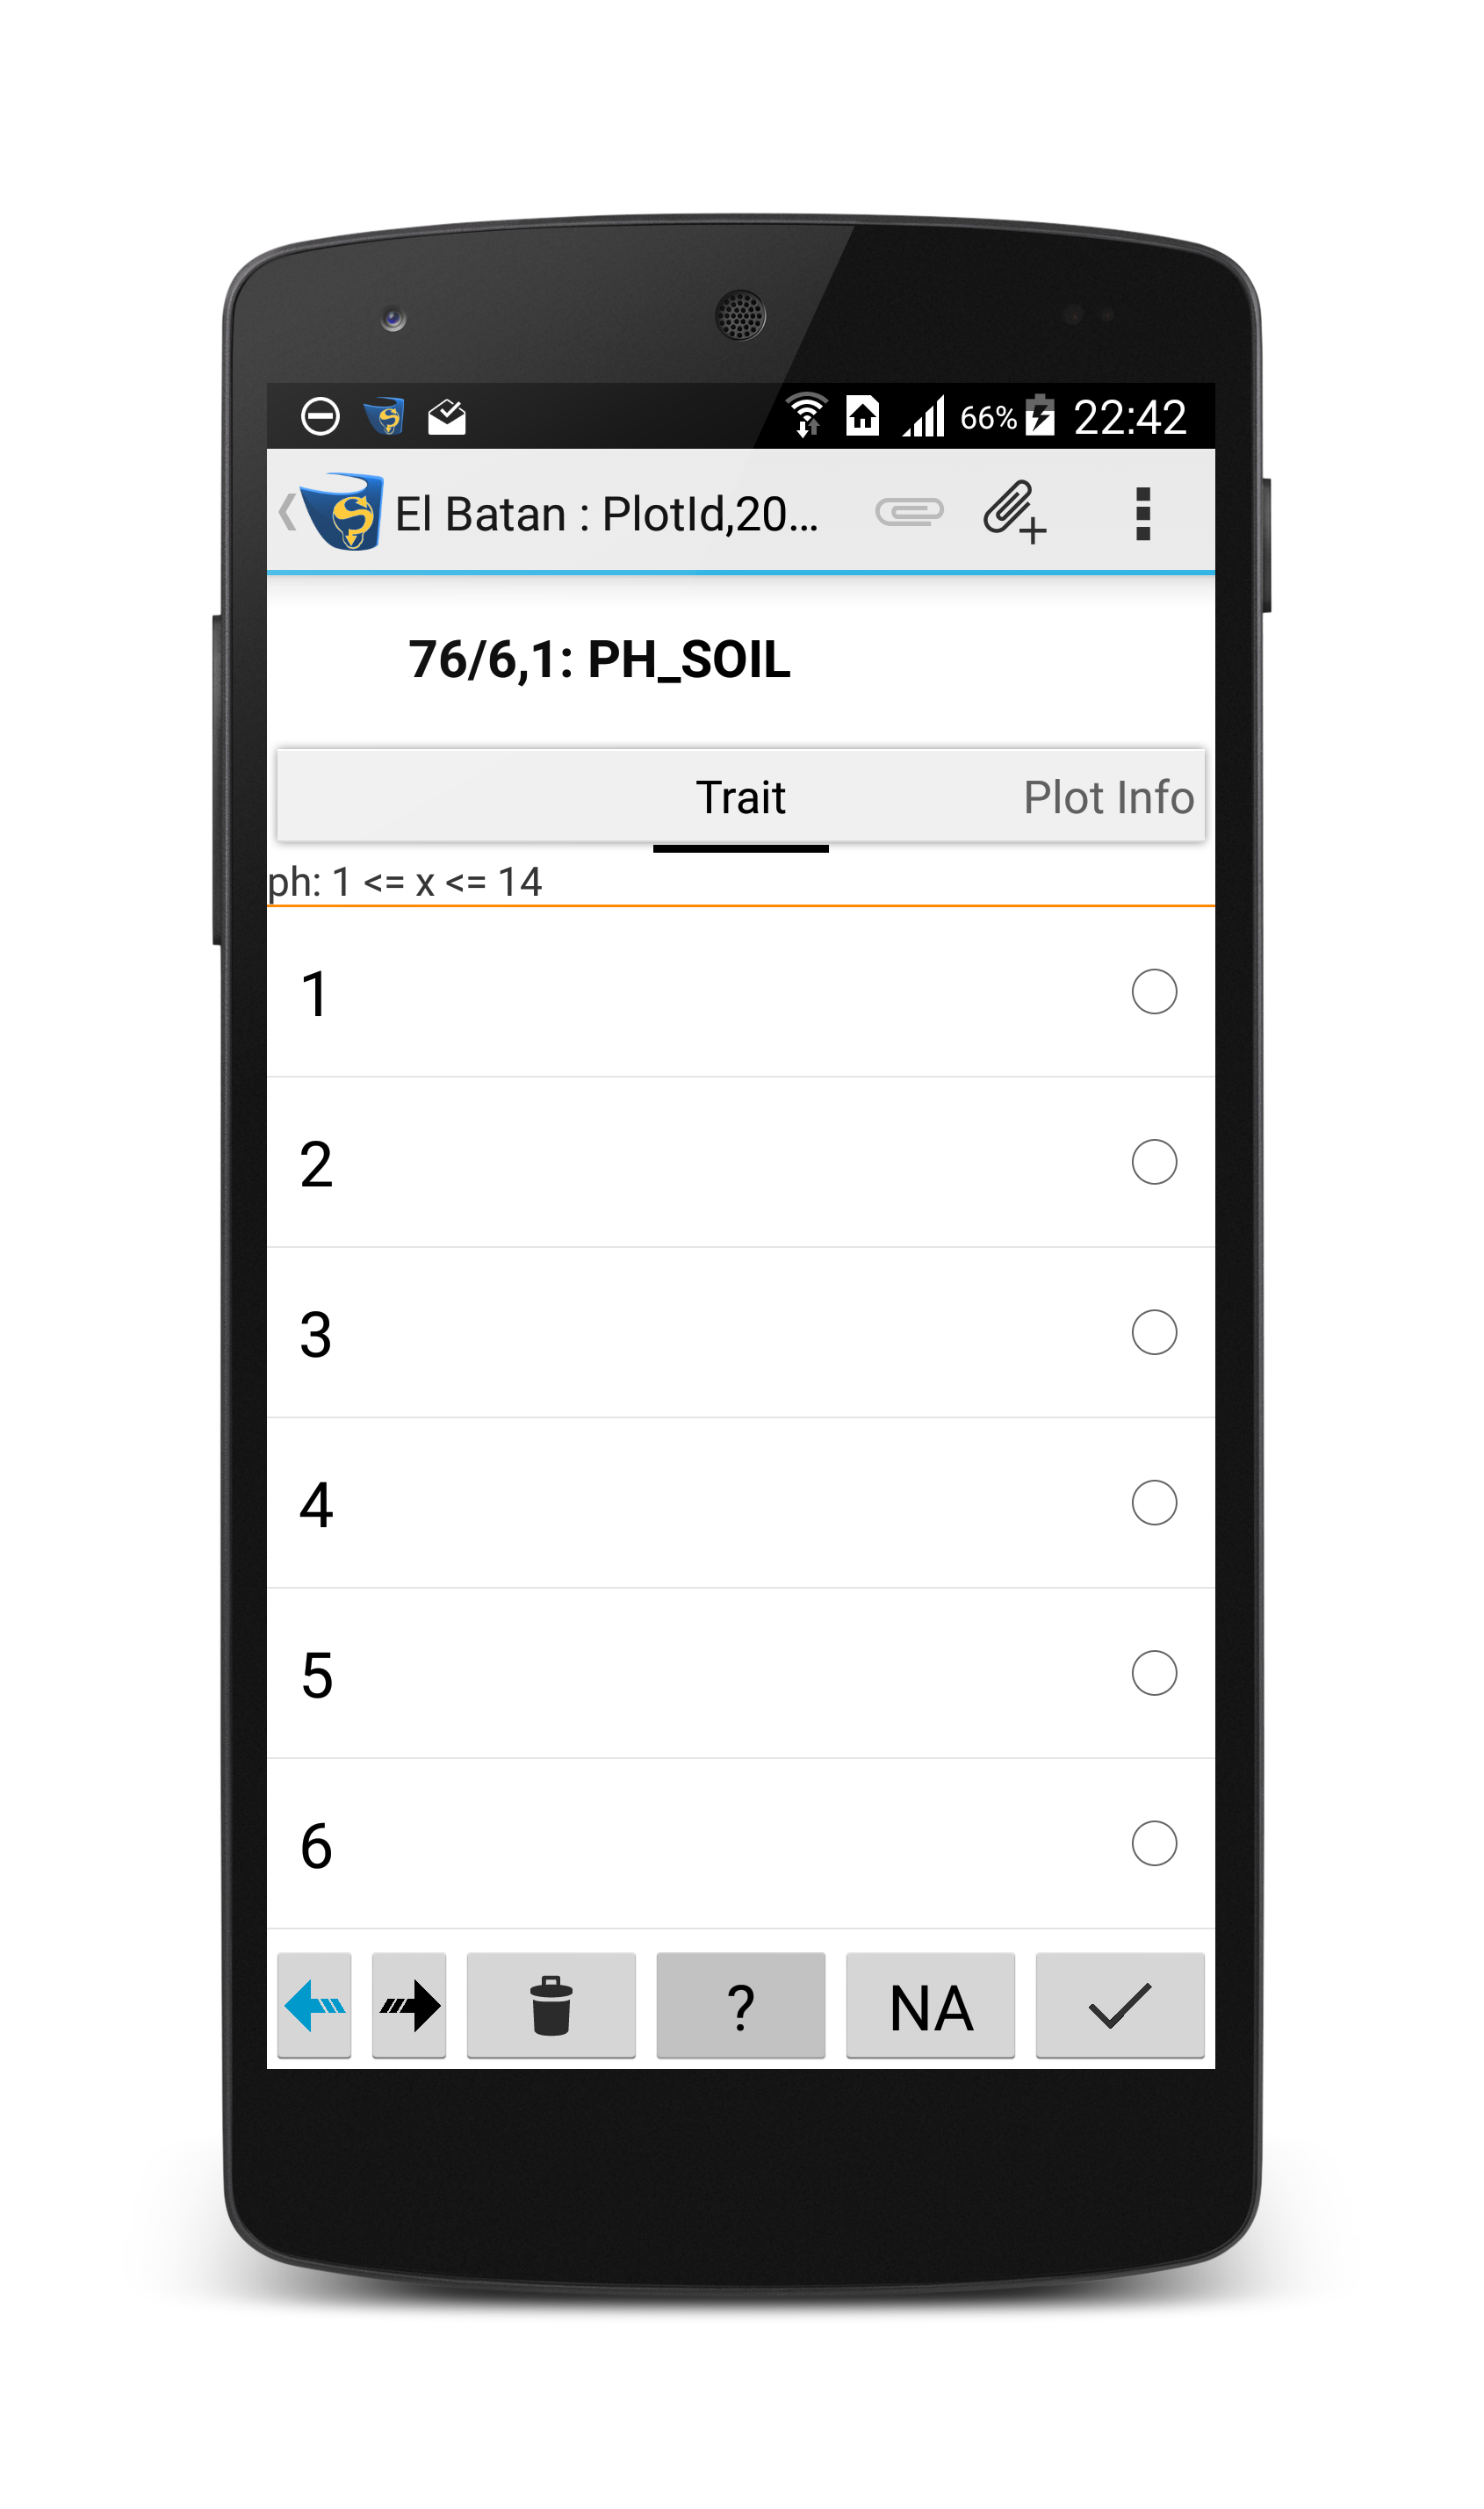
In the Scoring Panel, all Traits in the selected plot will either display a ‘-‘ to indicate that there is currently no recorded value (i.e. the trait instance at in the following image), or it will contain a value (i.e. the trait instance at in the following image).
The following steps will outline how to score traits:
| Step | Action | Image |
|---|---|---|
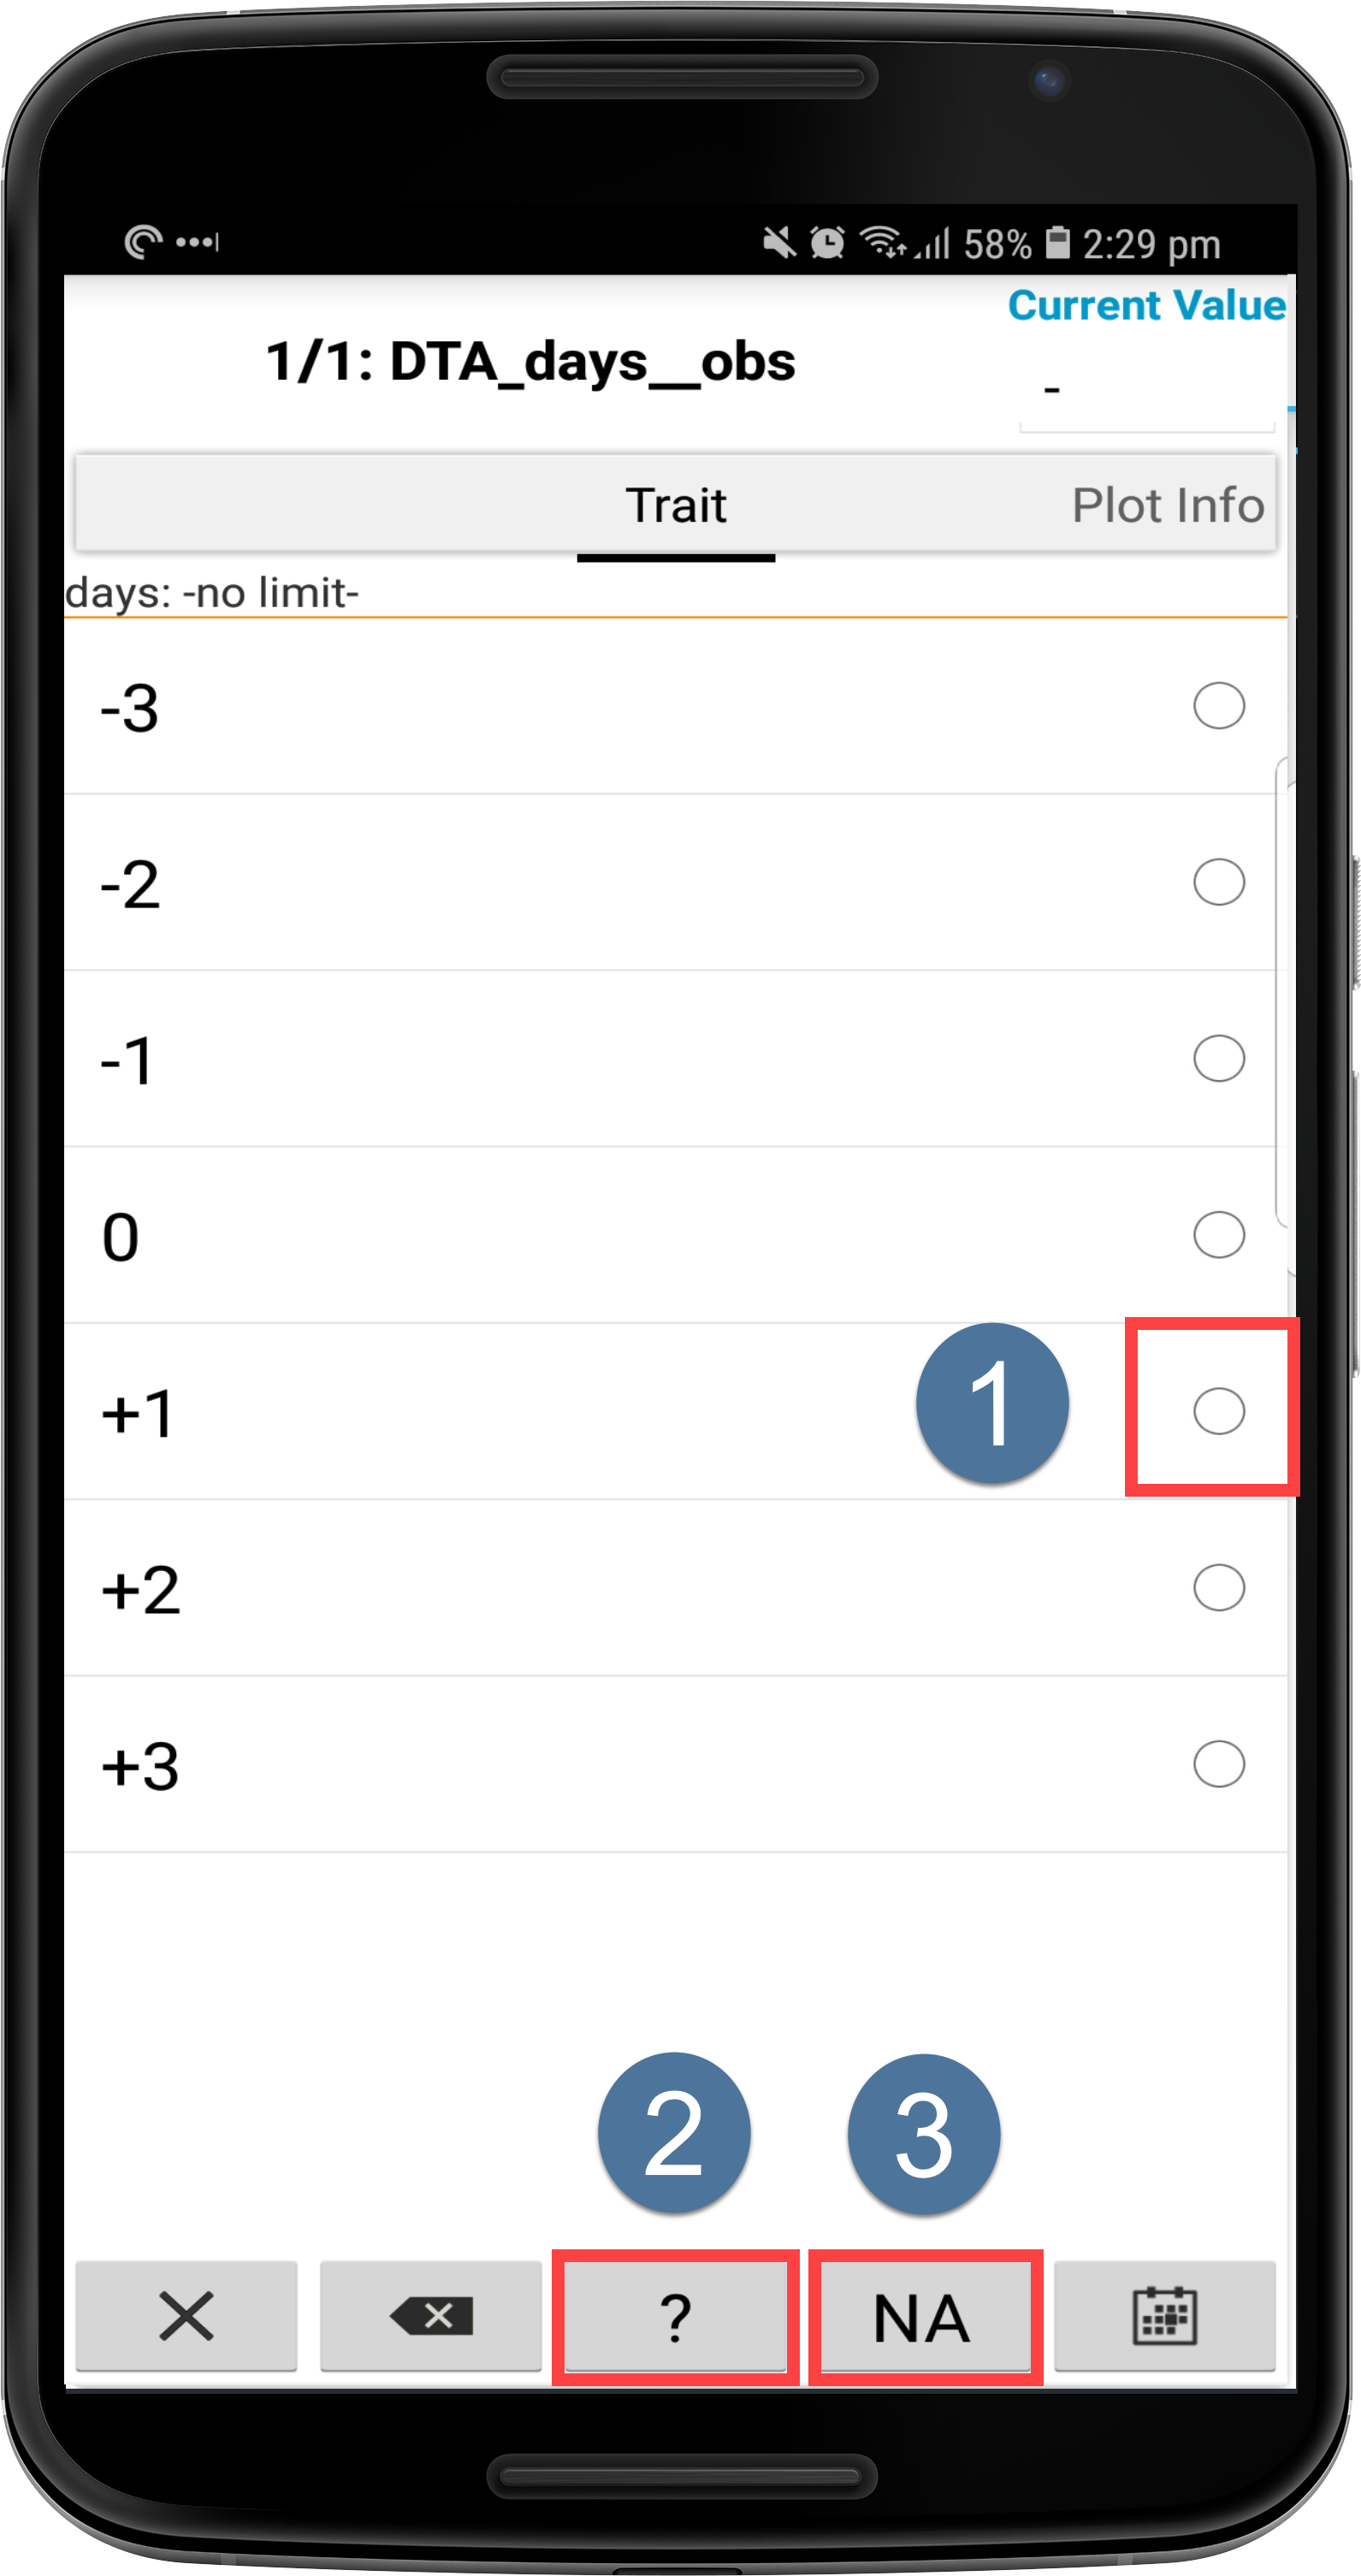
| 1. | Select a trait instance to begin scoring. This instance contains radio-buttons to choose values which in this case are days. To select a value such as +1, select the corresponding radio-button (such as at ). Different trait instances require different values E.g. a decimal value. The ? Button at sets the value as Missing meaning that the value is missing from the trait instance The NA Button sets the value to NA (not applicable) which means that the trait is not relevant to that plot. |
 |
| 2. | Swipe the screen right to view plot information. | 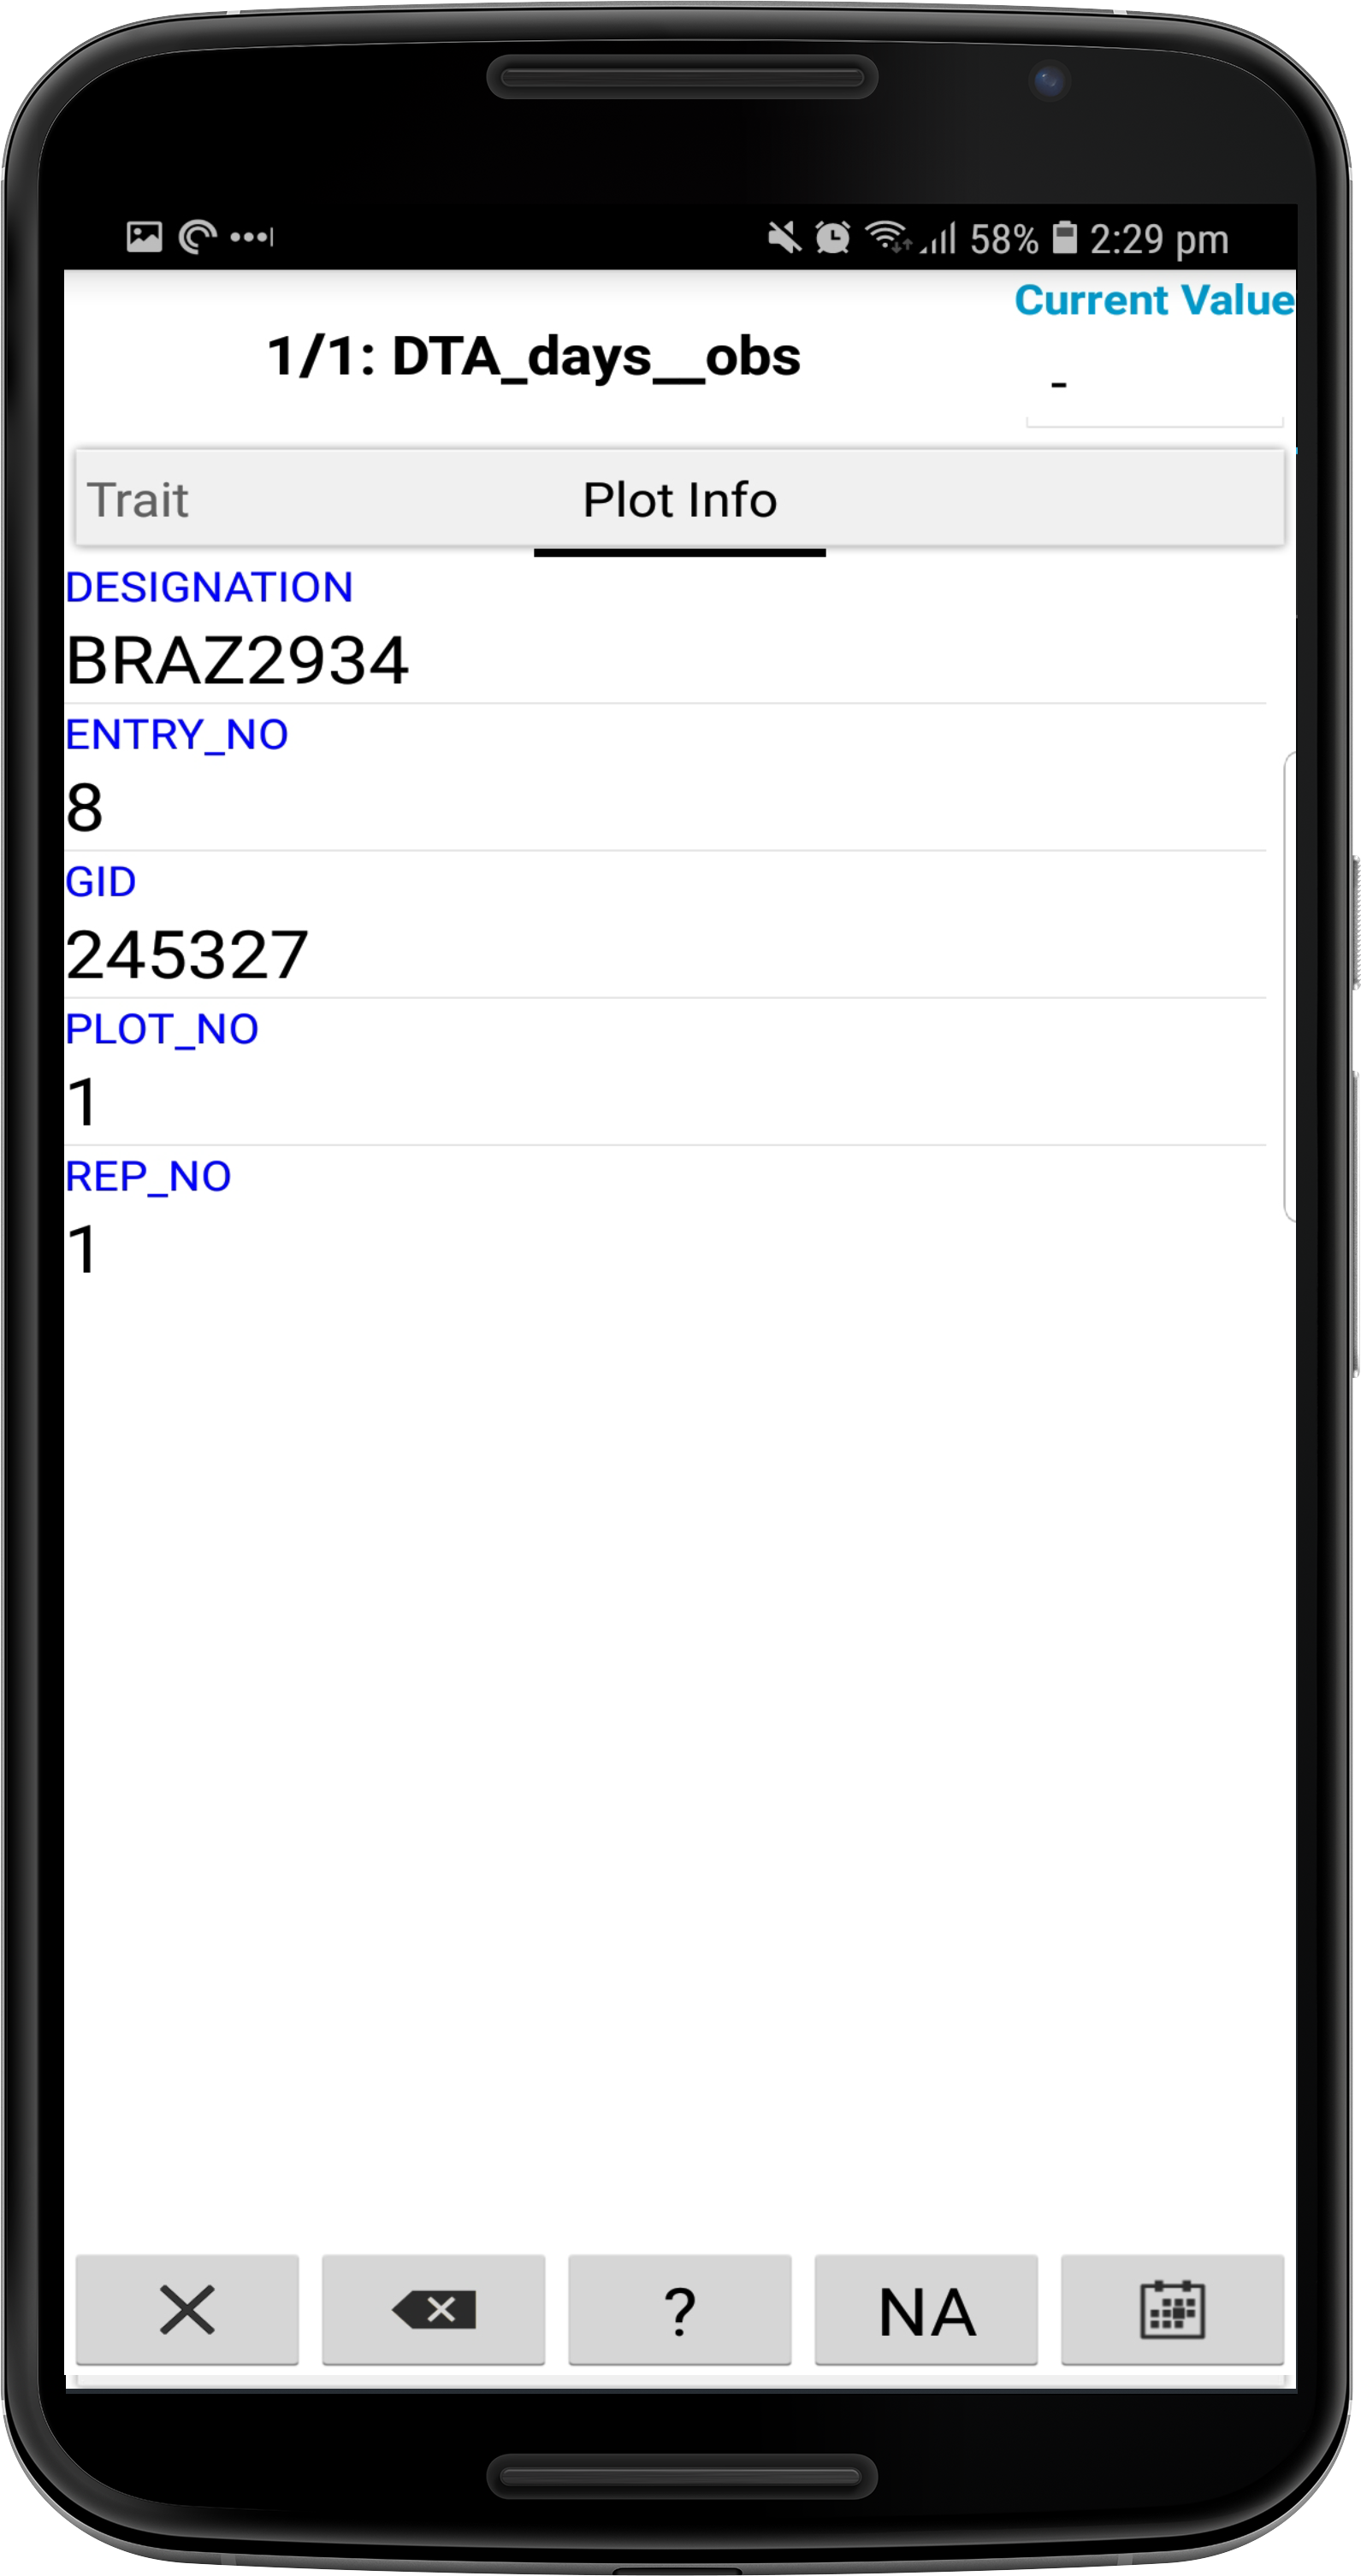 |
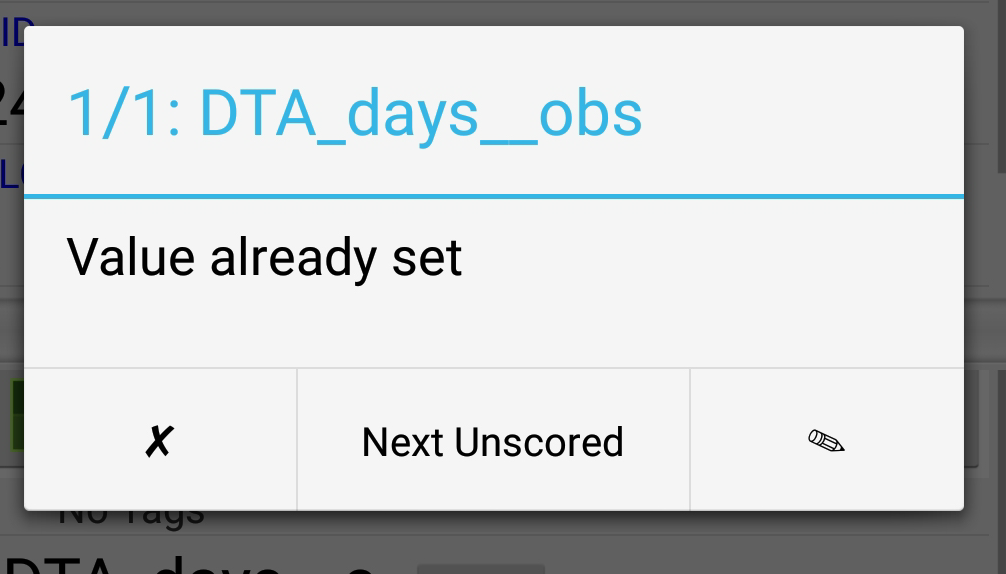
| 3. | If a trait instance that has already been scored is selected, the dialogue box appears on the right. It provides the option to edit the score of the selected trait with the  Edit Button, or to move to the next un-scored trait. Edit Button, or to move to the next un-scored trait. |
 |
Once a plot is scored, the user can proceed to another plot to score. Navigation between plots can be done in a variety of ways. The following image outlines the three different methods (not including Auto-Advance):
| Navigation Method | Action | Image |
|---|---|---|
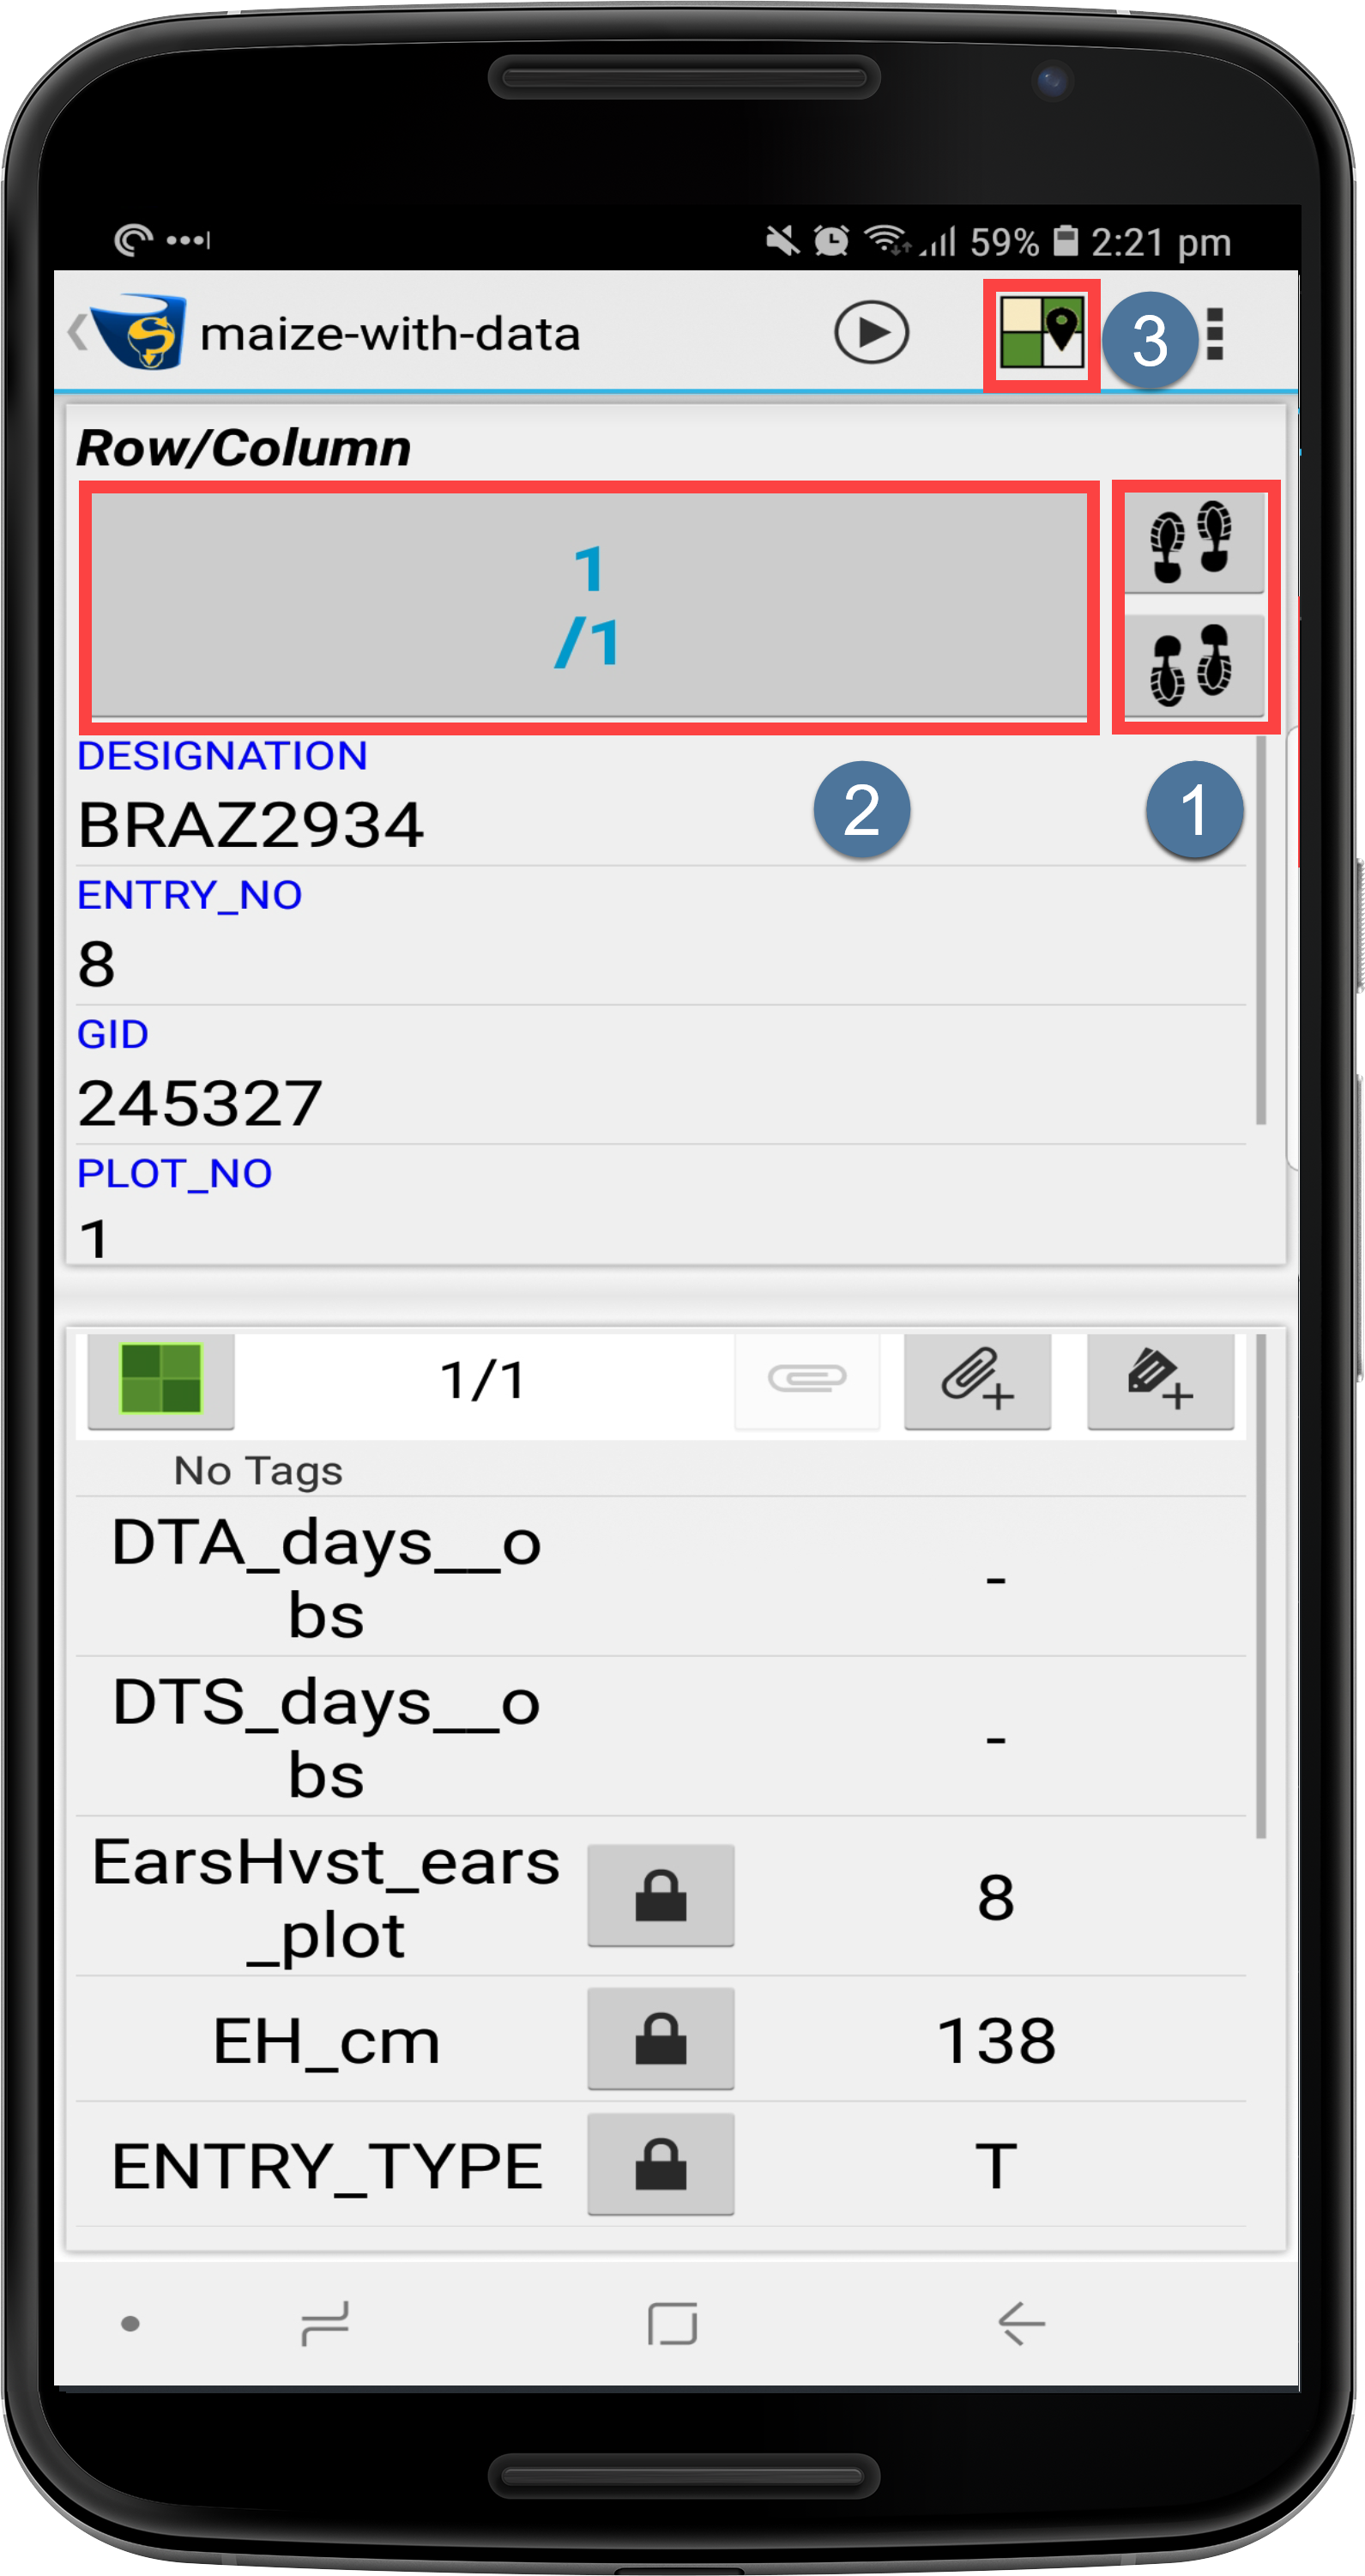
| 1. | To move to the next plot (‘next’ is determined by the collection order), select either the Move Forward Button and the Move Backward Button at . |
|
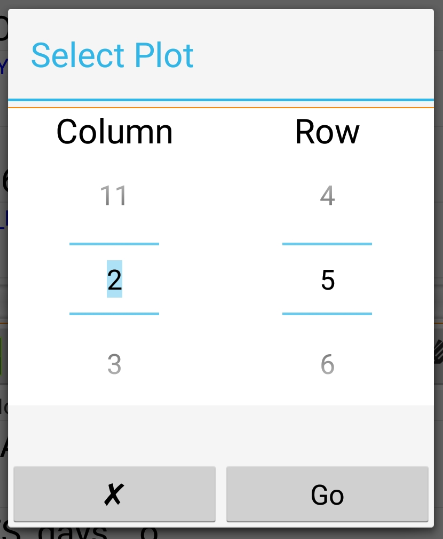
| 2. | Plot Selection can be used to pick a specific plot. Select the current plot (i.e. ) to display the selection screen to the right. Depending on the plot layout, the user will be able to pick x,y coordinates or a PlotID. |
 |
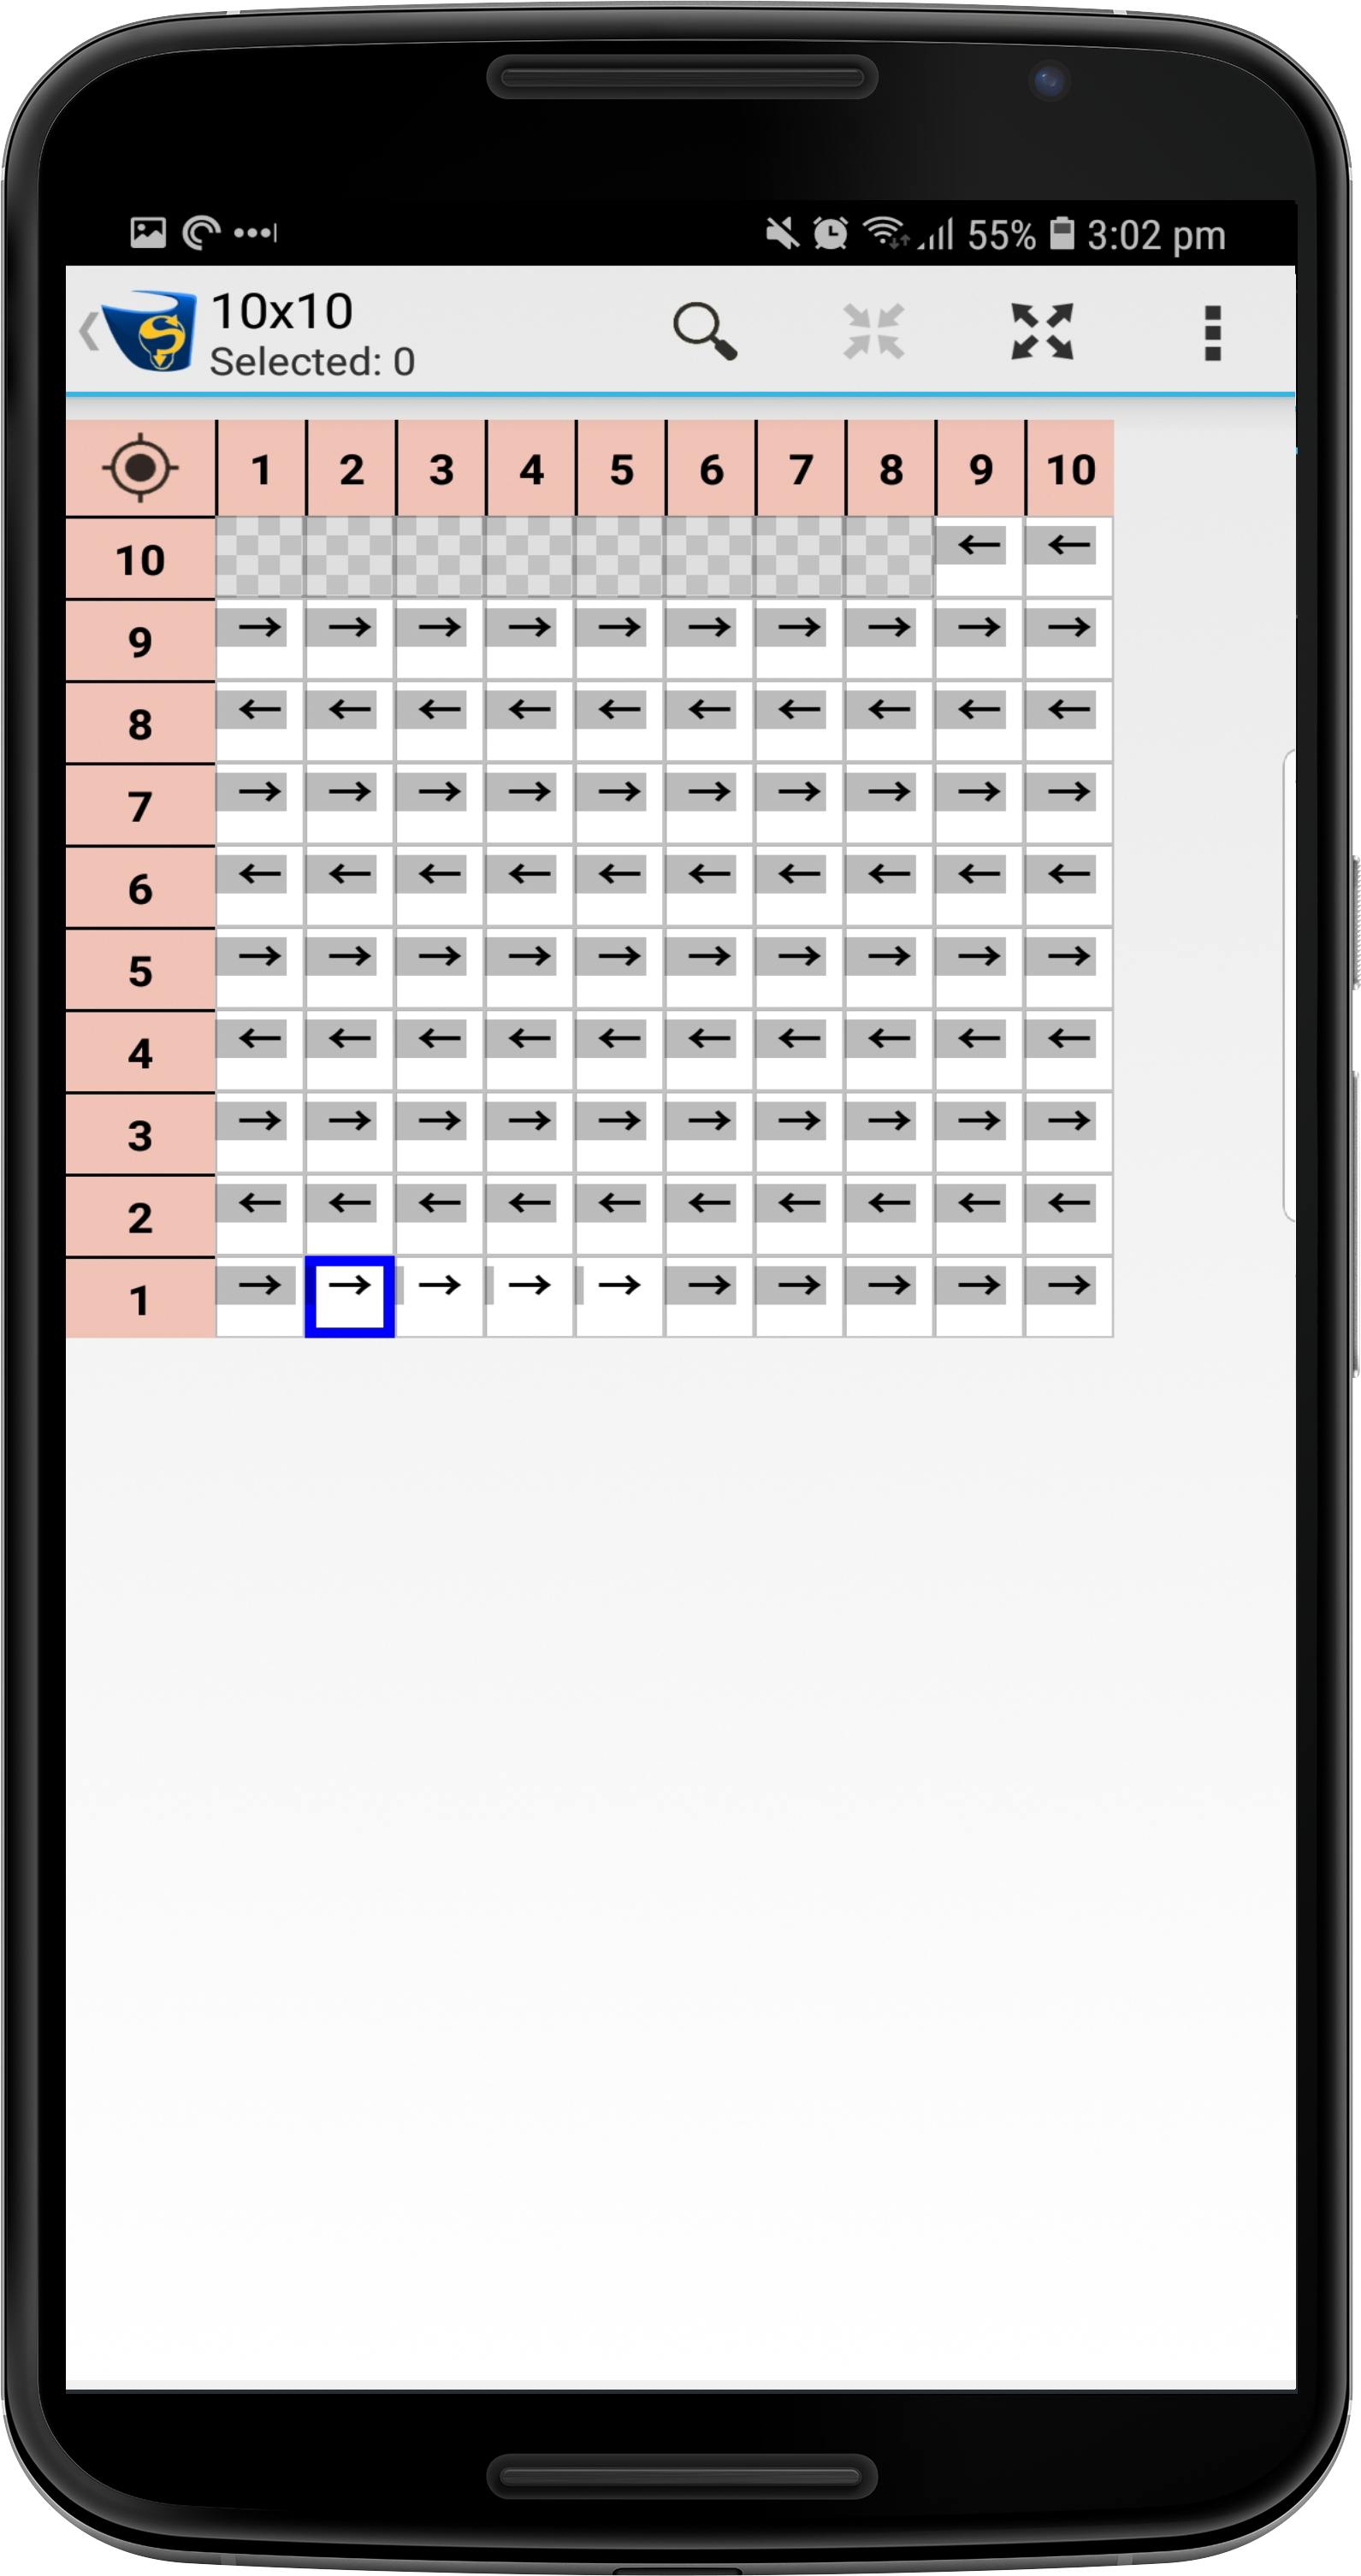
| 3. | Another option is to choose the Field-View option at which provides a top down view of the field. Choosing this option will display the screen on the right. The arrows indicate the collection order and the user can navigate to any plot by selecting the plot and choosing the Jump To option. |
 |
Note
The Auto-Advance feature will allow the user to move to the next trait instance and plot quickly but will be covered in the next step.
Tags
Tags are short, text descriptions that are used to represent information about a plot or sub-plot in a Trial. They provide a quick method of applying predefined classifications or annotations such as ‘BD’ which can mean ‘bird damage’.
The main benefits of tags are that they:
- Are simple to use - selectable from a list makes them quick and easy to assign;
- User or project definable;
- Provide consistent annotation, avoiding problems with spelling or language; and
- Deployable across multiple users, devices and locations.
This means that the:
- Users spend less time writing and repeating notes in the field; and
- Data curators have more consistent, uniform recordings from multiple locations by different field workers.
Tags have the following characteristics:
- User definable;
- Consist of a short name and optional long description;
- New tags can be created in the field;
- Can be imported from a CSV file; and
- Are exportable to CSV file.
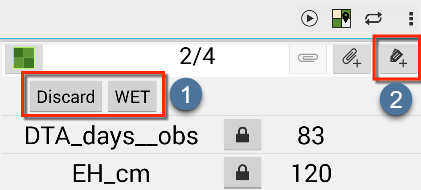
When tags have been assigned to a plot or sub-plot they will appear as shown in the following image, which shows part of the Scoring Screen with two tags assigned at which is above the trait column.
Tags are assigned or reassigned using the Tag Button at .
| Step | Action |
|---|---|
| 1. | Locate a plot to tag in the scoring Screen. |
| 2. | Select the Add Tag Button. |
| 3. | Select one or more tags to assign them to a cell. |
| 4. | Select Apply to save changes and return to the Scoring Screen. This displays the tag short name above the traits for the selected cell. |
Step 5 - Auto-Advance Scoring
The quickest way to score traits is to use the Auto-Advance feature. Auto-Advance also allows the user to concentrate on only those traits for which a measurement has not been provided.
When the user provides a value for a trait, KDSmart moves the focus to the next un-scored trait, skipping over those traits (and sometimes entire plots) which have already been scored. This is useful when starting scoring as it quicker and when scoring has been finished if the user needs to find any un-scored plots or traits. The following image and steps demonstrate how to use Auto-advance:
| Step | Action |
|---|---|
| 1. | Select the in the menu bar to turn on Auto-advance scoring. |
| 2. | Choose either the All Traits option to score all traits within the dialogue box, or the Un-scored Traits option. |
| 3. | Begin scoring by selecting the blank area next to an un-scored trait. This displays a new screen with the data entry form for the trait on one side and the Plot Information on the other side (this is demonstrated in the image above). |
| 4. |
|


As in the normal scoring screen, the presentation of the Auto-Advance scoring screen changes depending on whether the user is:
- Using a Tablet or Phone-sized device.
- Using Portrait or Landscape mode.
- In right-handed or left-handed input mode.
Step 6 - Transferring a Scored Trial to KDXplore
Once data is collected by scoring with KDSmart, the data will need to be transferred to KDXplore for curation. The following quick-guide demonstrates how to transfer scored data for KDXplore using Google Drive.
To prepare for transfer, the user needs to have a KDSmart device, a Google Account (for Google Drive), and access to the internet. You also need a device with KDXplore installed to open the file.
| Step | Action |
|---|---|
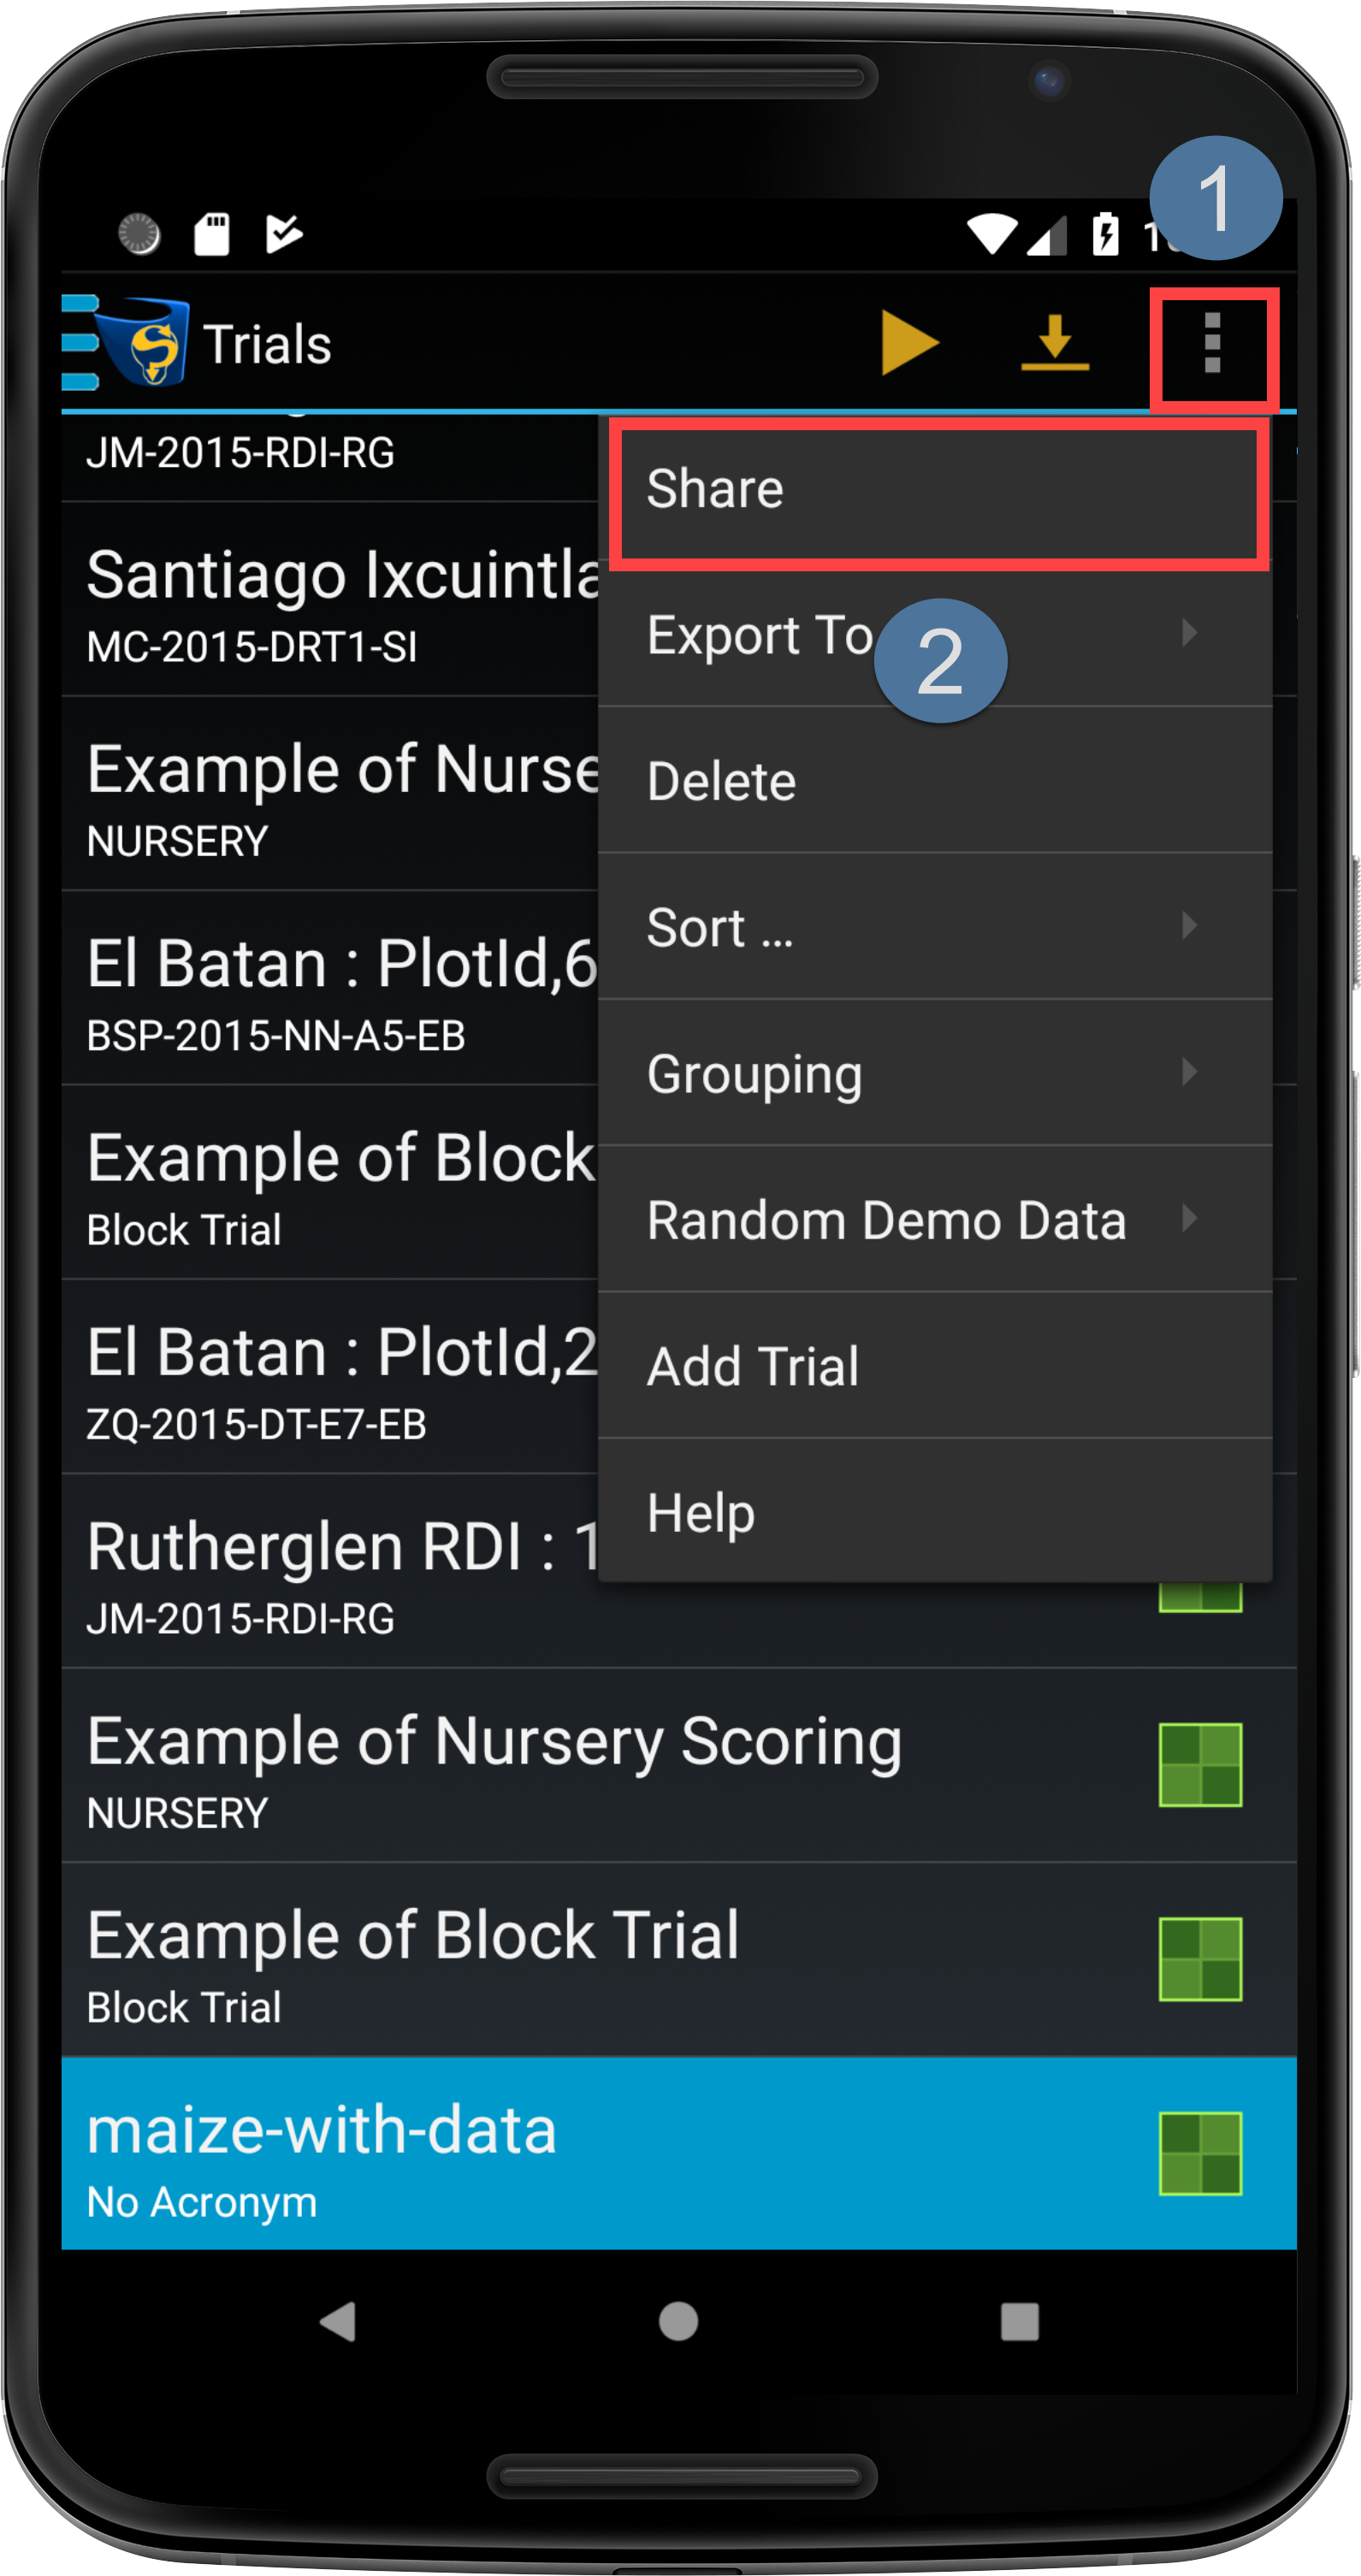
| 1. | On the Trials Screen in the above image, ensure that the scored trial that you want to transfer is selected. Then choose the Options Button at and then the Share option at . |
| 2. | The Choose Export Option Window will be displayed as seen in the image below. Select the Full Data for KDXplore option at 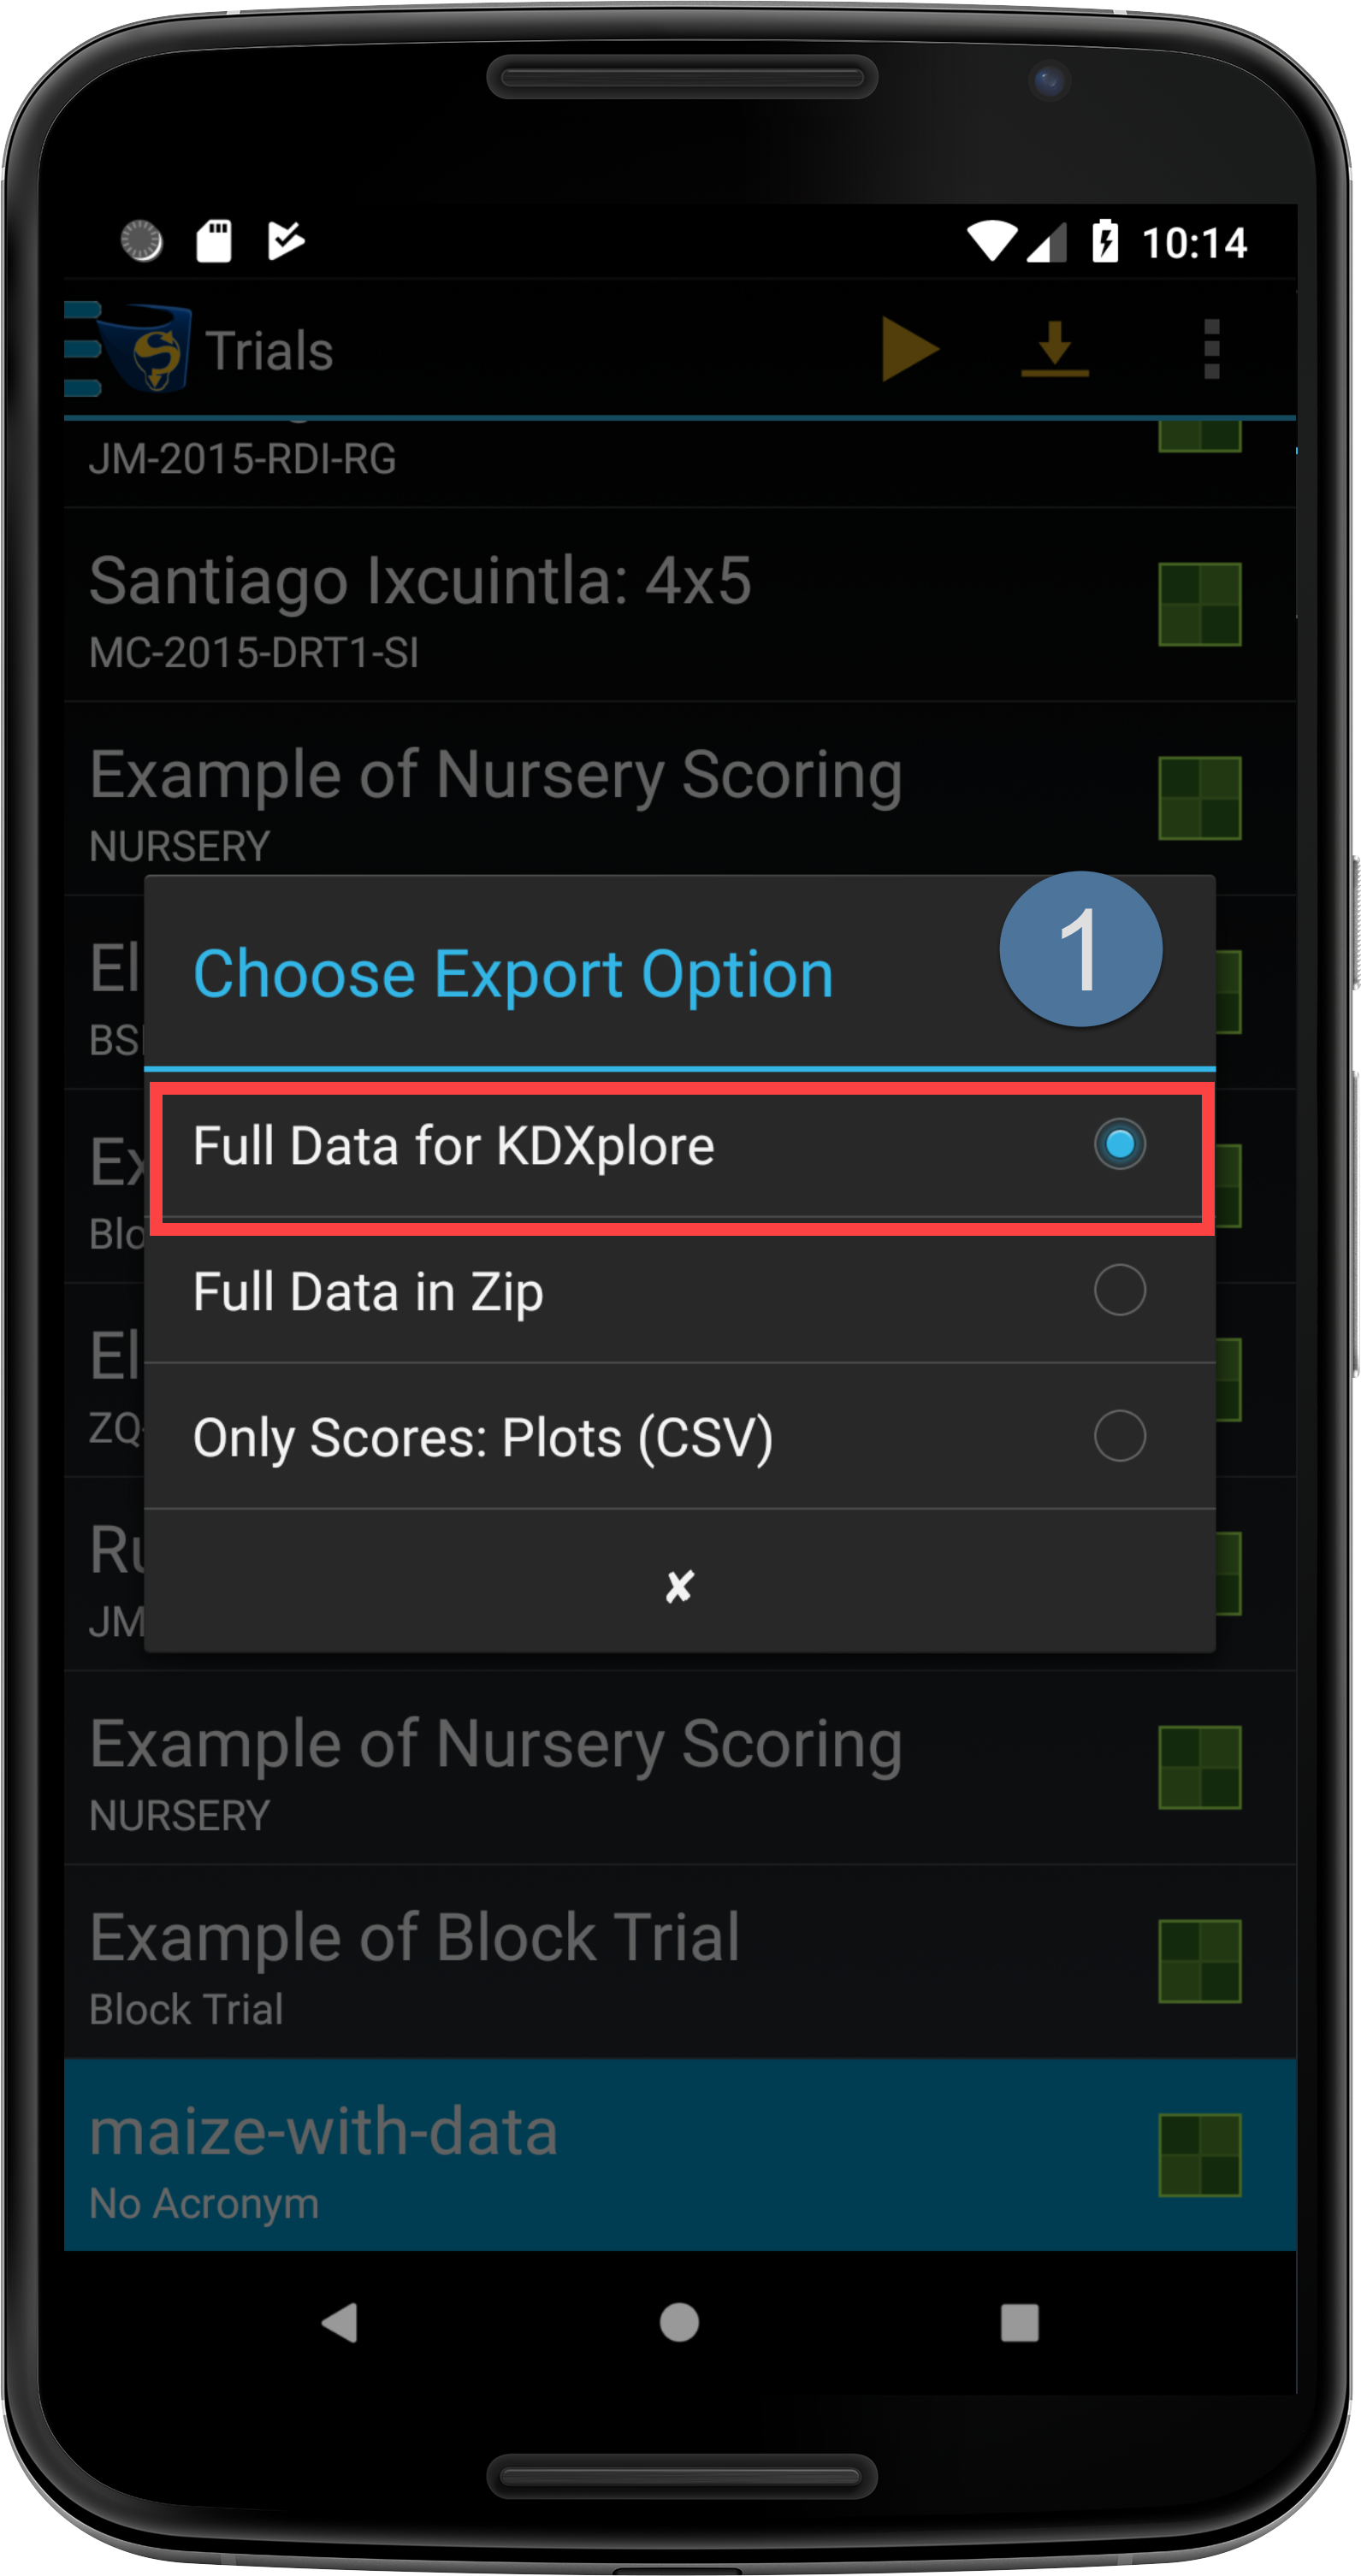
|
| 3. | You will be presented with options for sharing the KDX file. Select the Save to Drive option at 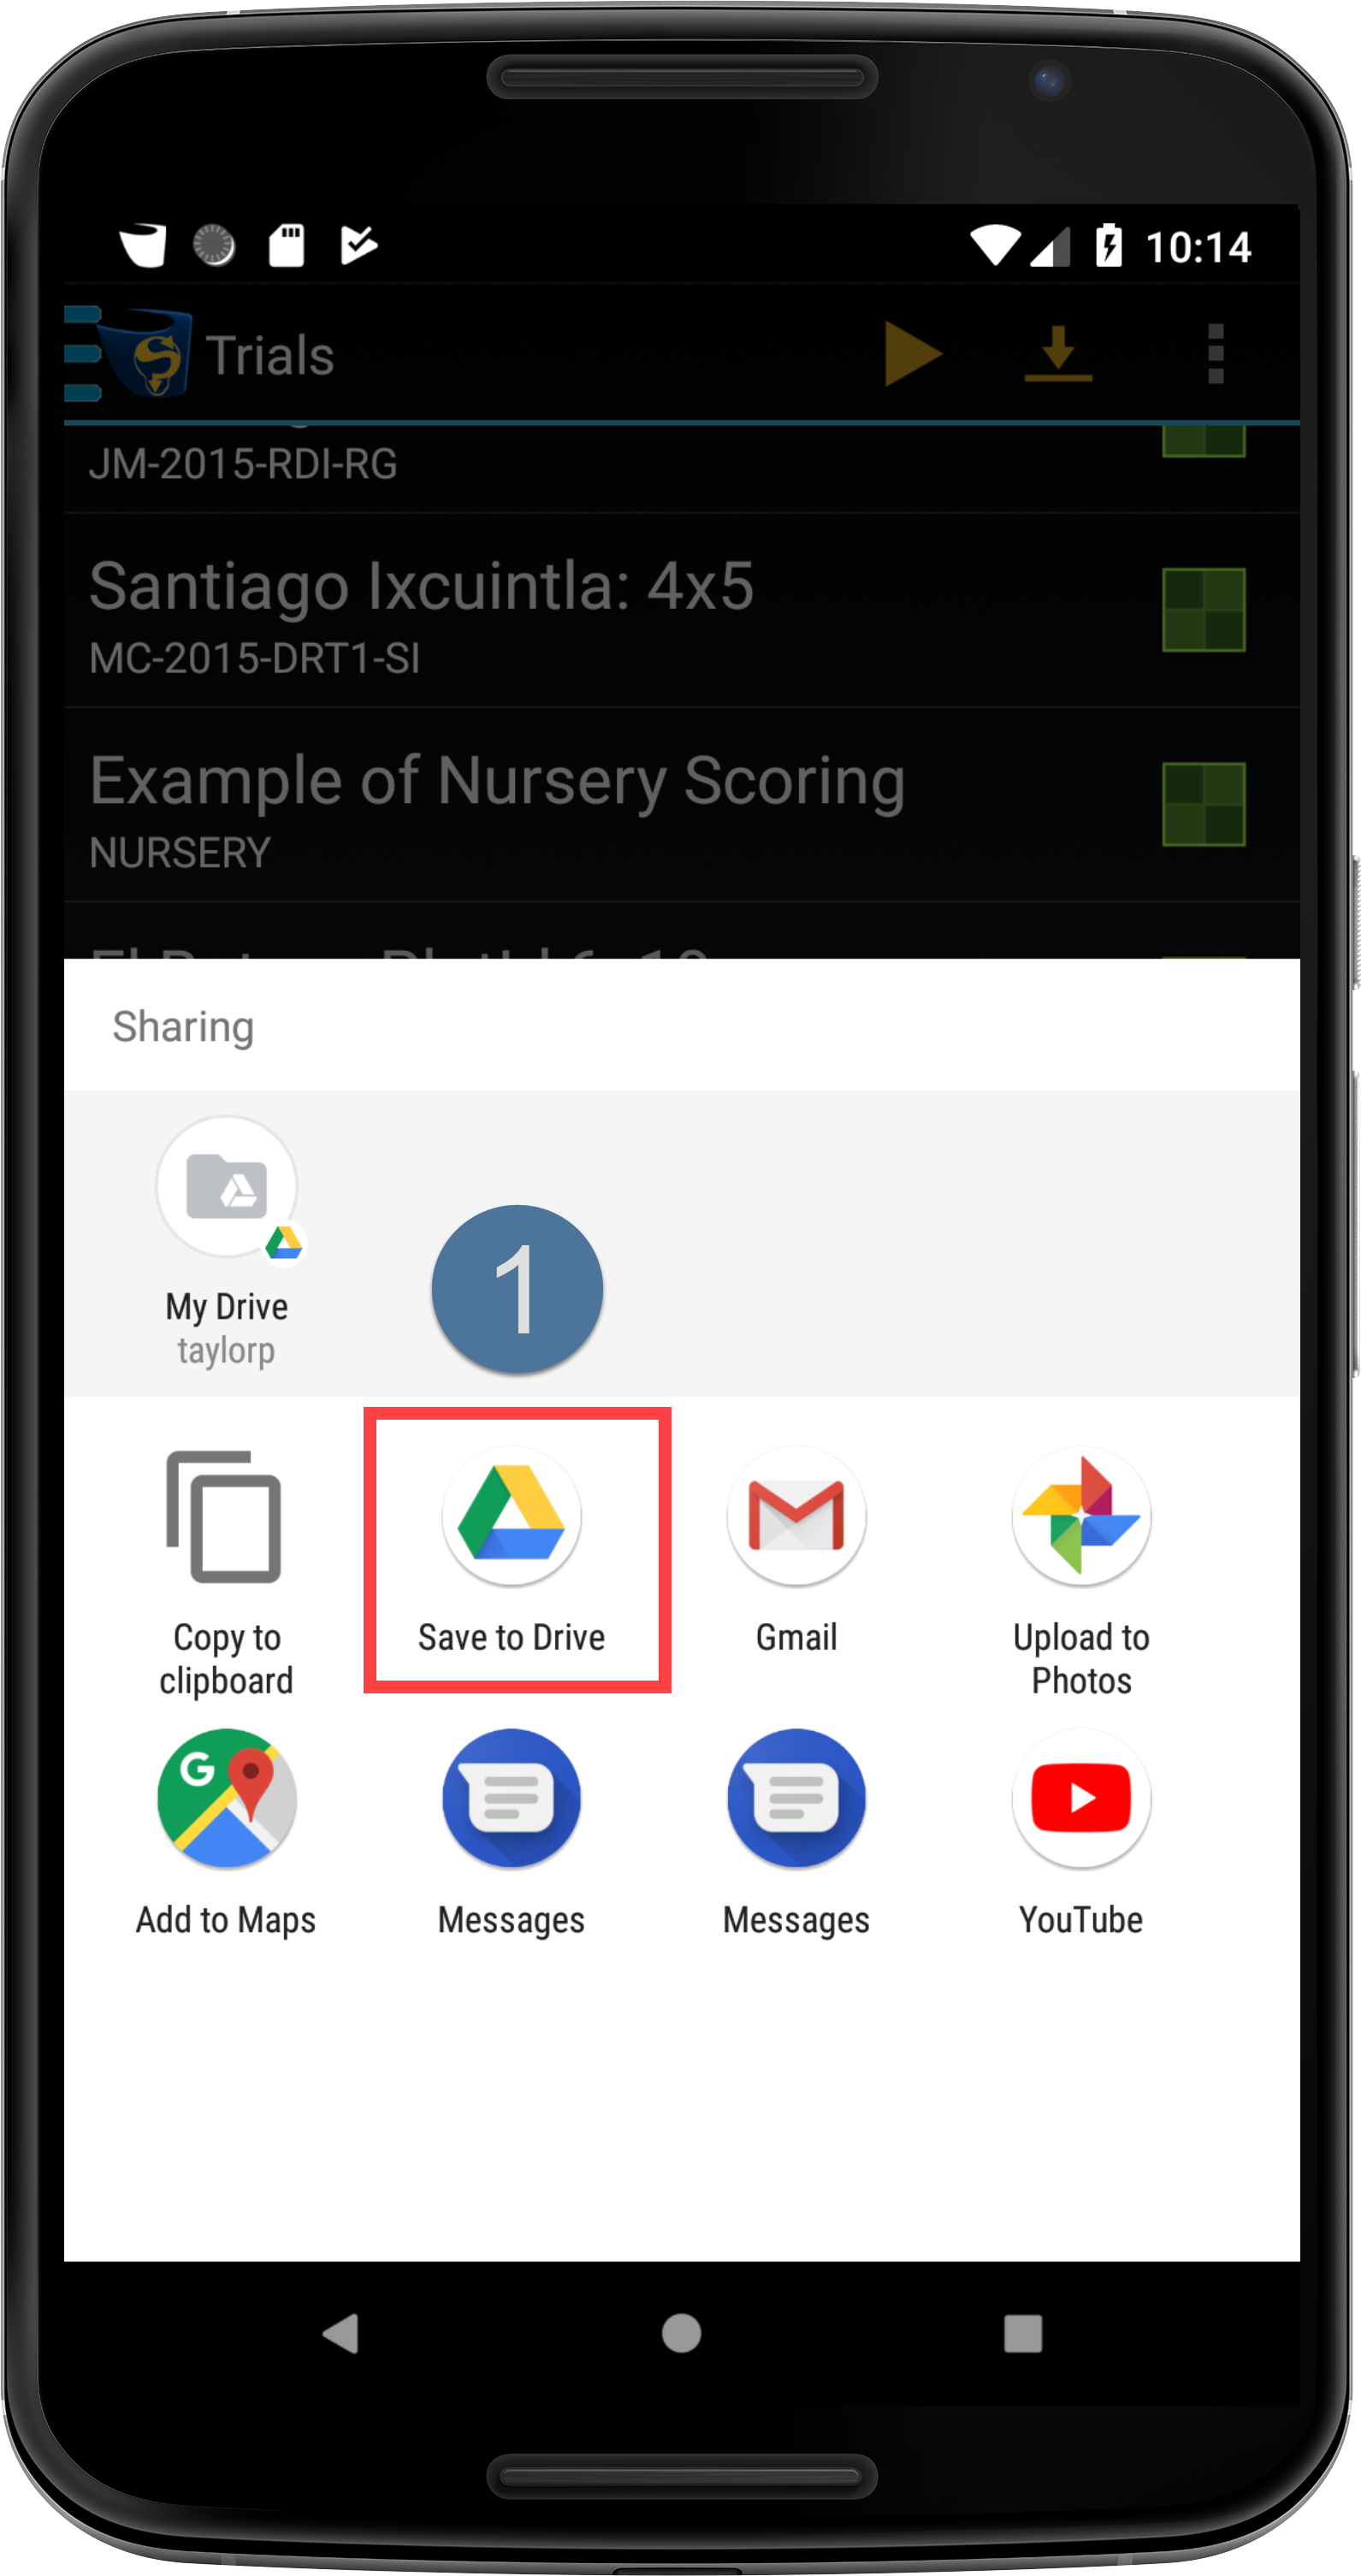
|
| 4. | Choosing the Save to Drive option displays options for saving the file as seen in the below image. Select the Save option at 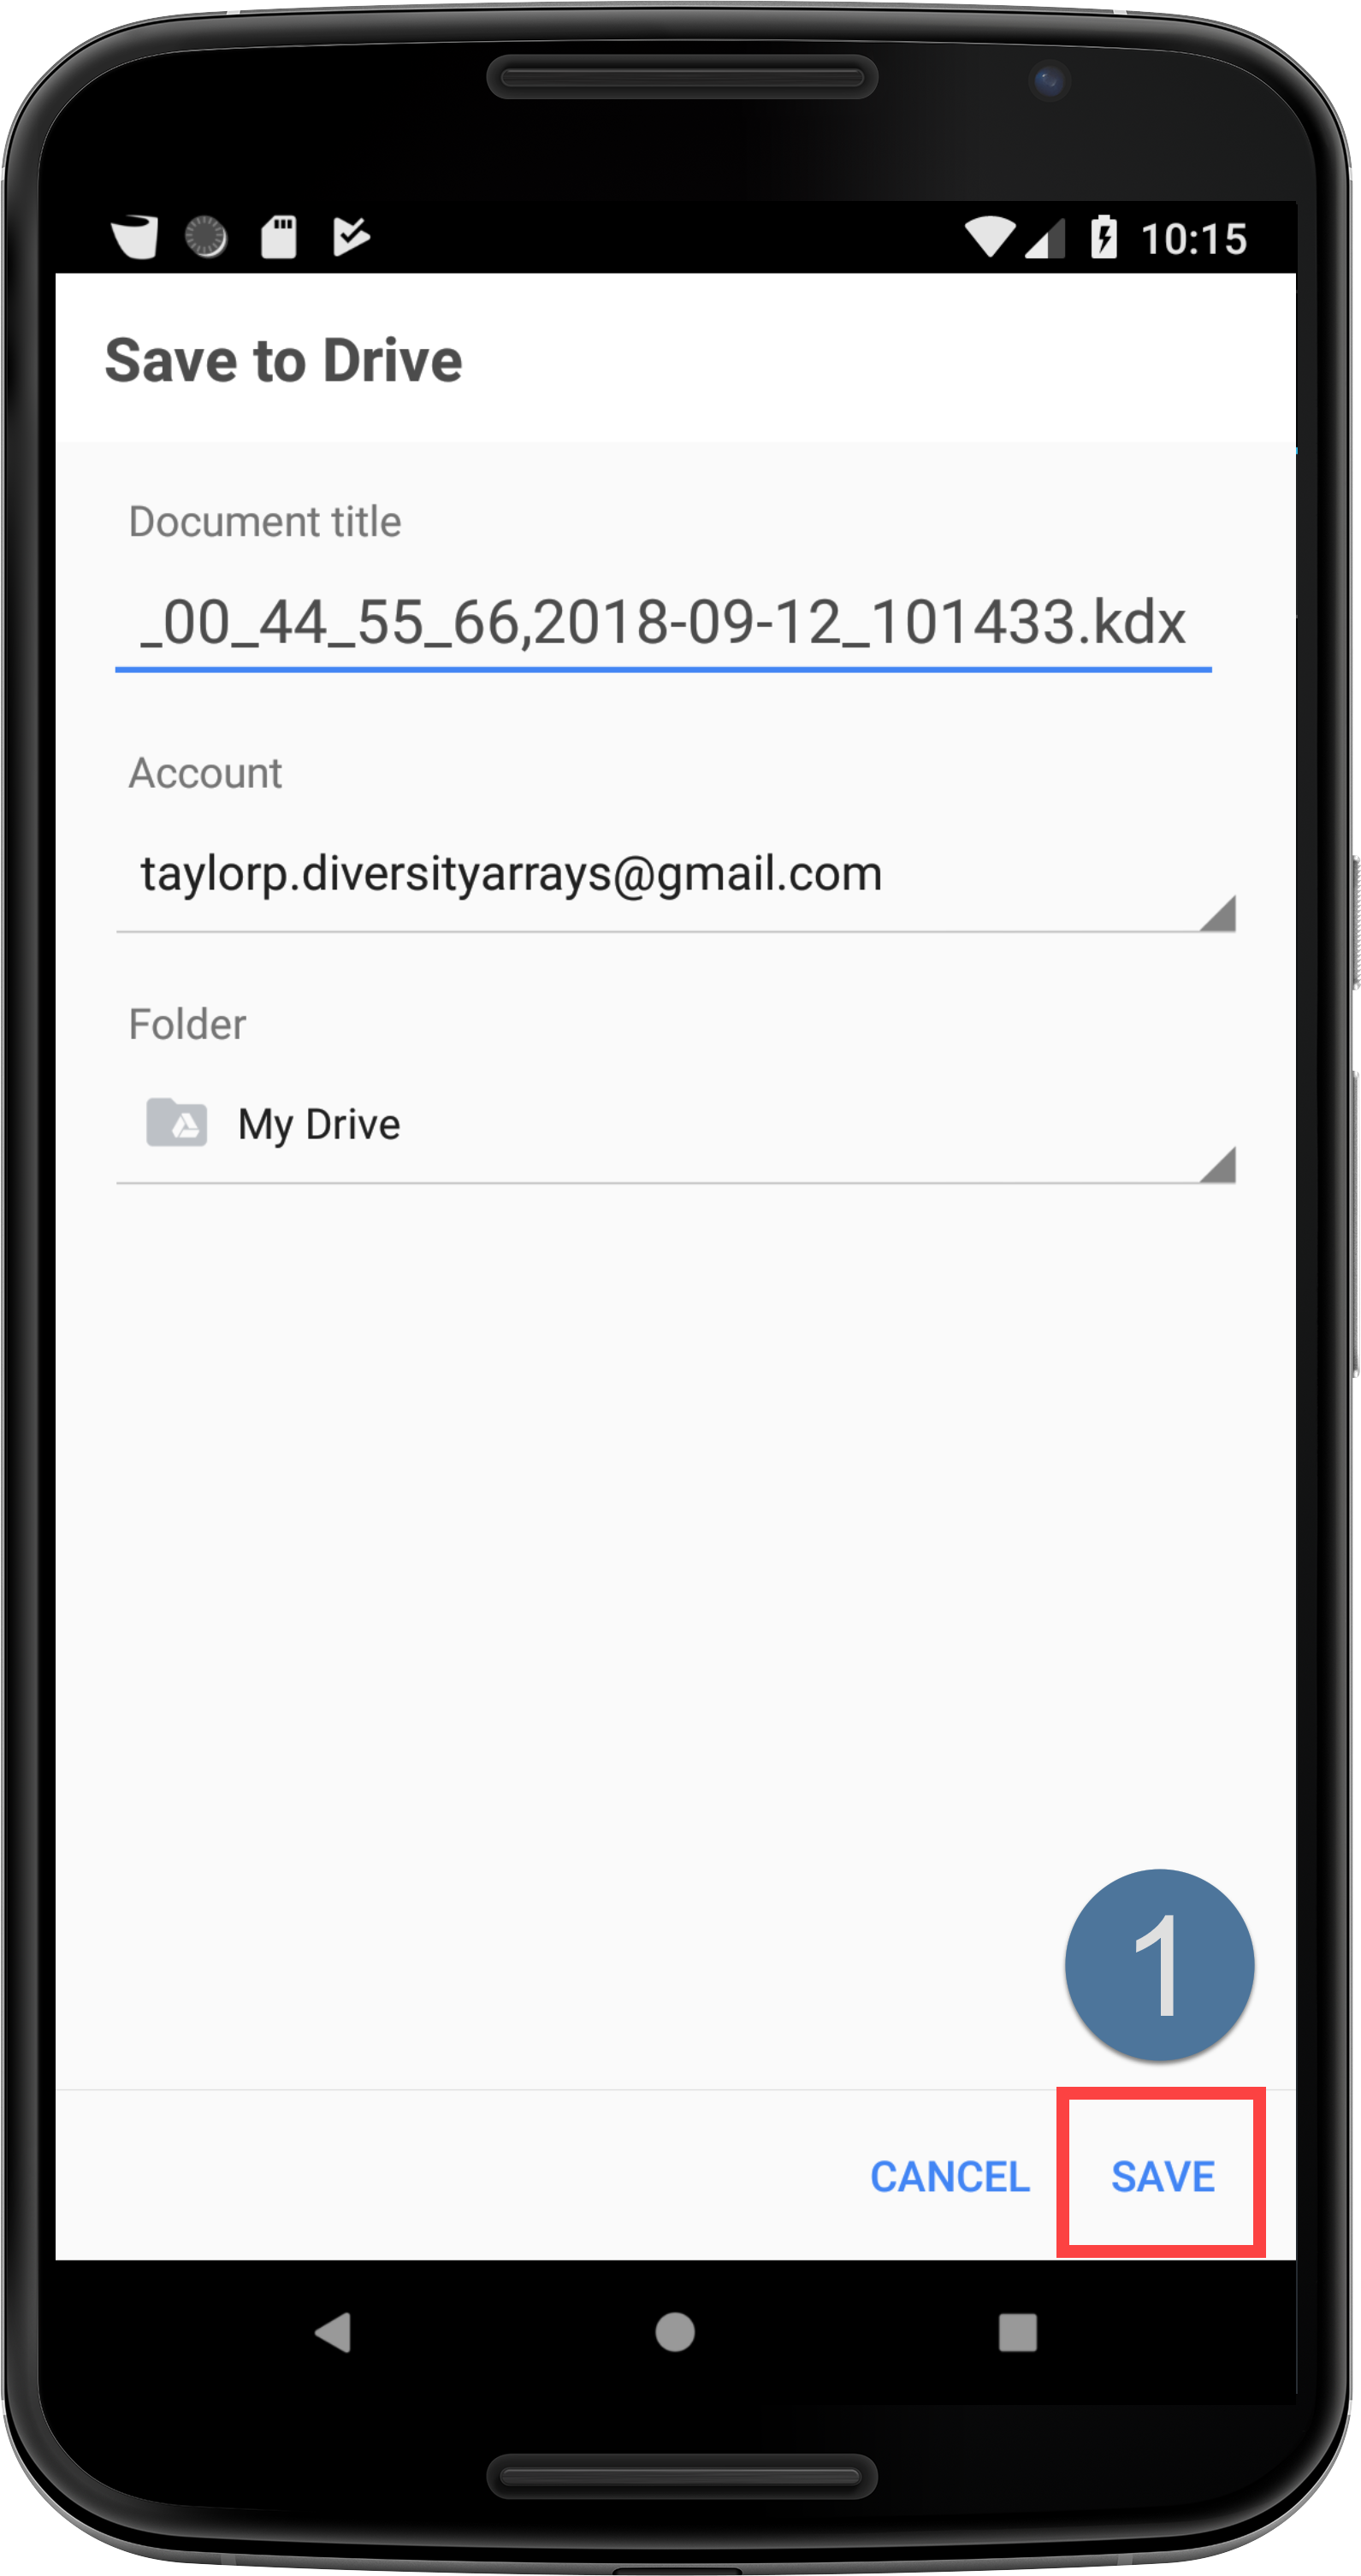
Transferring a Trial 4/5 |
| 5. | Once the file has been saved, confirmation notifications are displayed on the device as seen in the below image. This will indicate that the scored trials are now stored in Google Drive. 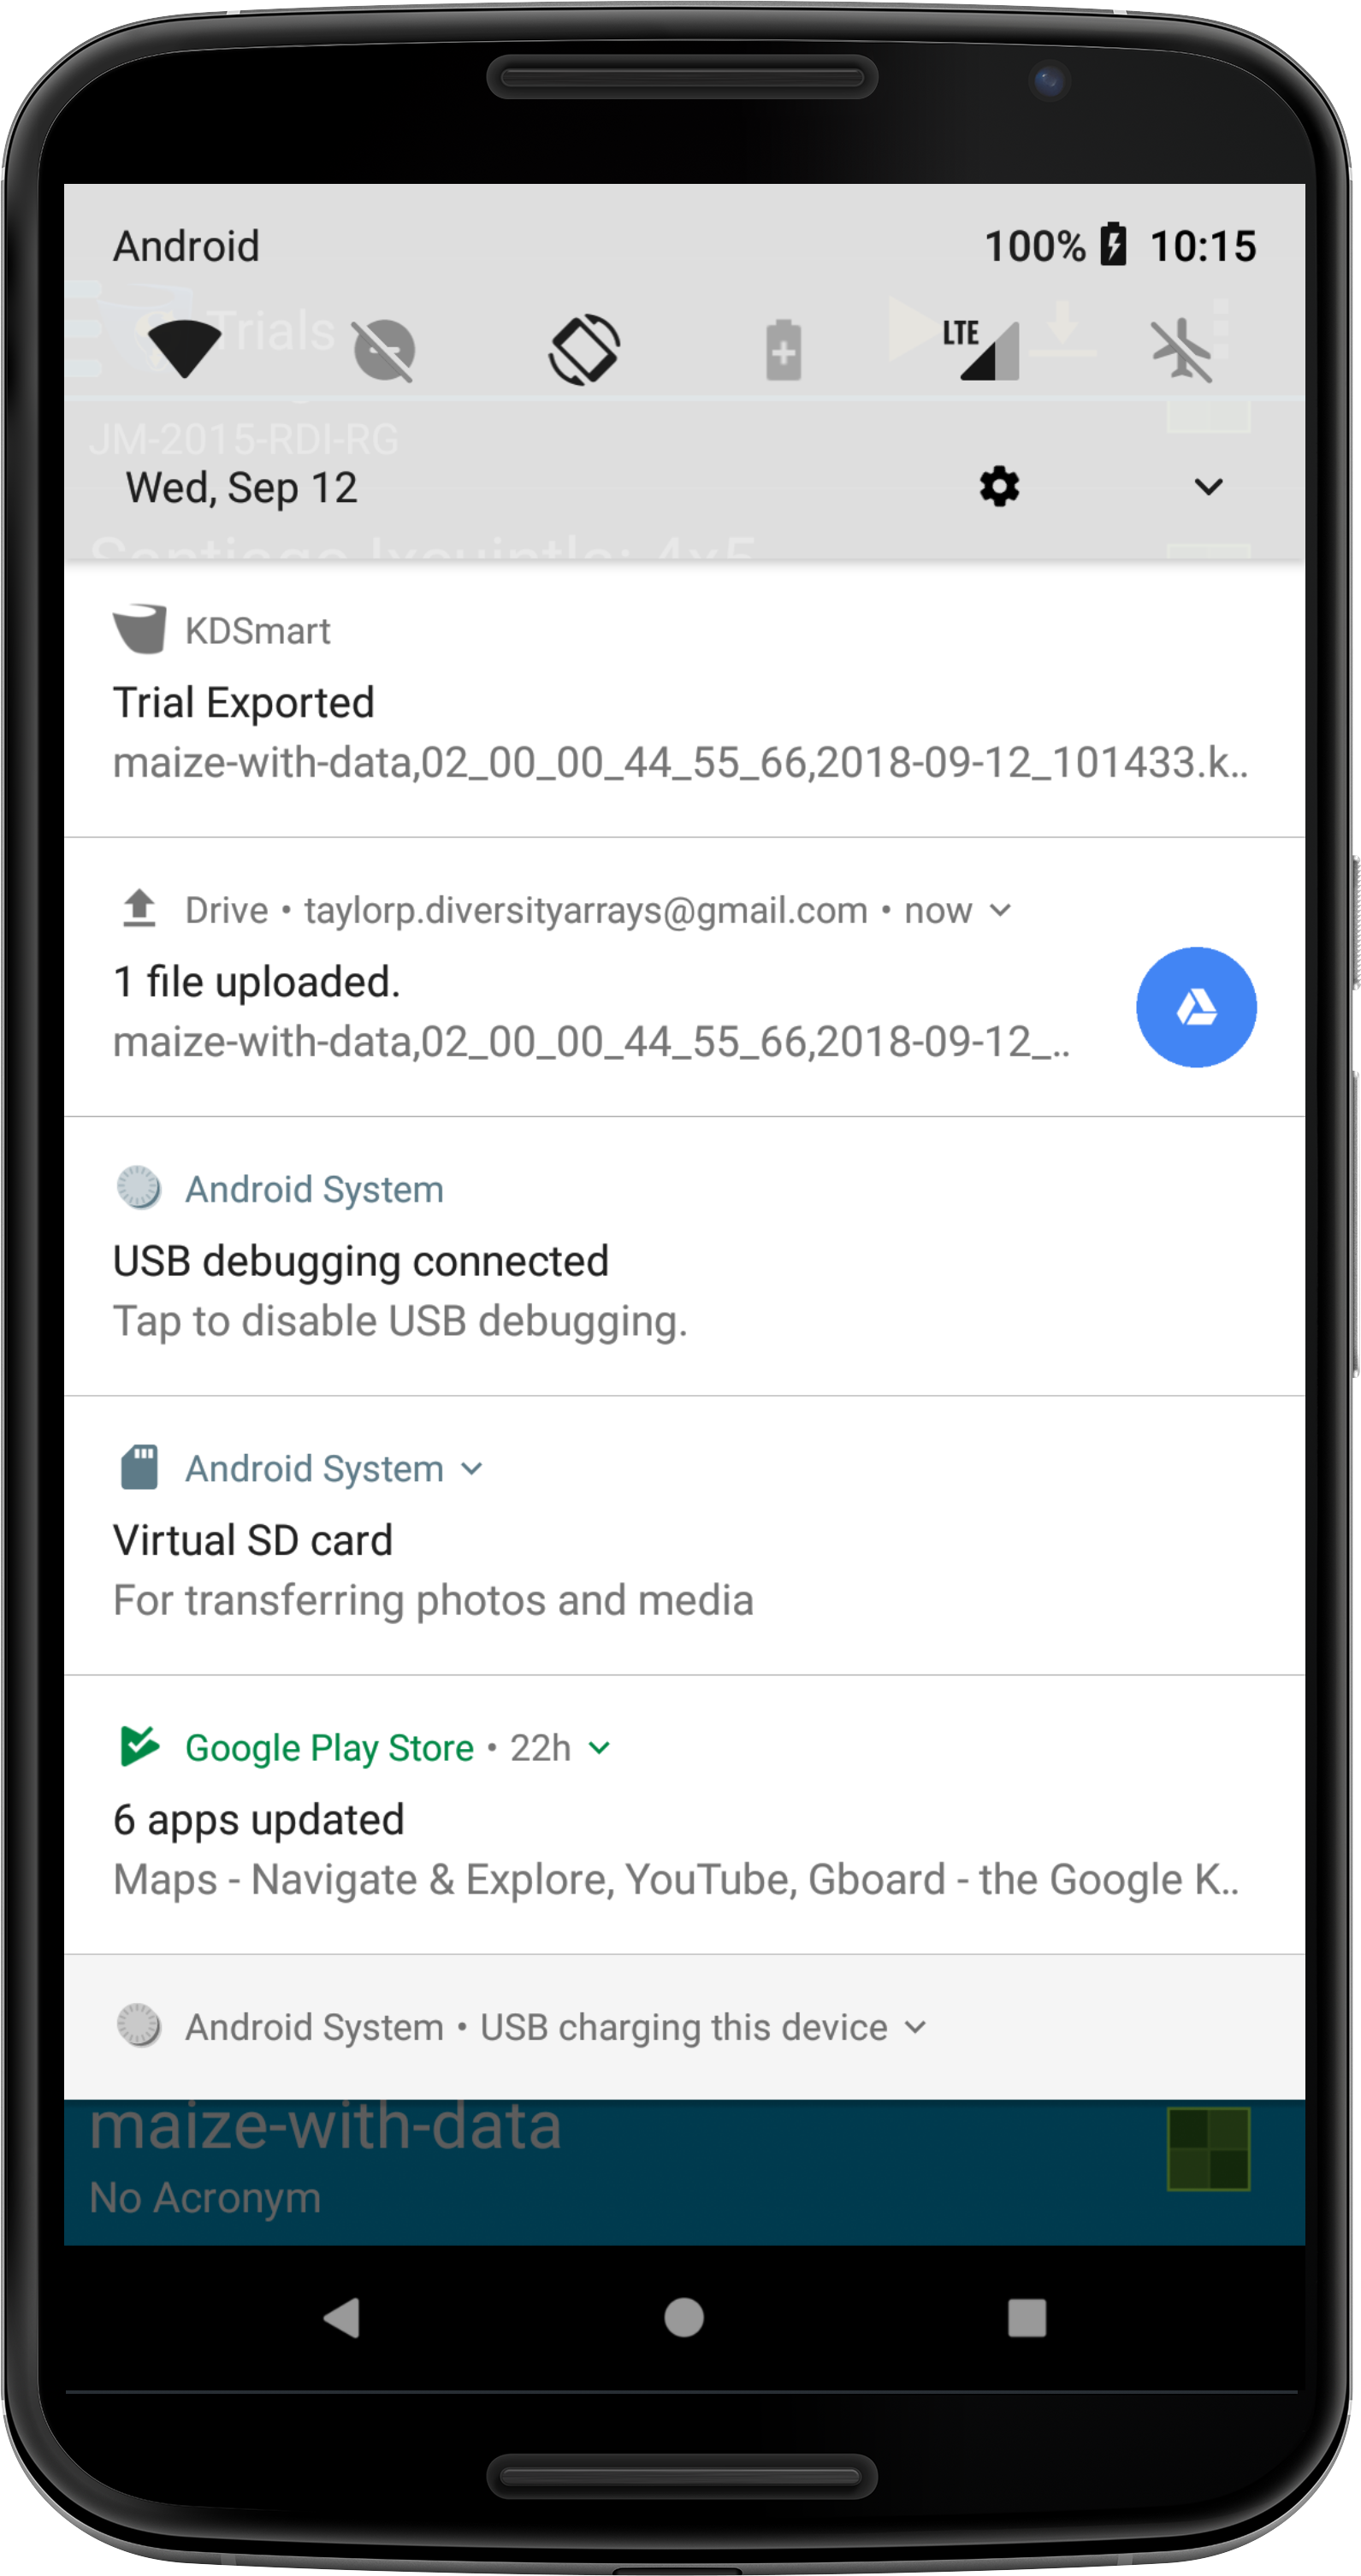
|
Once these steps have been completed, you need to load the scored trial into KDXplore. Please see the Loading Trials from Google Drive section for how to do this.
Note
KDXplore and KDSmart integration with Google Drive was included with KDSmart version 3.0.22. Before this, KDXchange was used to connect devices over Wi-Fi and transfer data. Google Drive is the recommended method of data transfer however if you need to use KDXchange, instructions can be found at the KDXchange page.


Summary
By now you should be able to:
- Navigate around the KDSmart application and open trials;
- Be familiar with the operation of traits and tags;
- Use different views for scoring data; and
- Transfer scored data to KDXplore using KDXchange.
To become more comfortable scoring trial data using KDSmart, or perhaps trying a different device, please try the different methods of scoring to practice and see what works best for each situation encountered.
For more information about using KDSmart, consult the full KDSmart help guide at KDSmart Help Guides.
When ready, please follow the link to continue to the next tutorial: Tutorial 4 - KDXplore Curation.