Scoring
Scoring is the collecting of data for a trial with KDSmart. It mostly involves applying values to predefined traits in that trial, but could also include adding tags, notes, and attachments to plots or sub-plots as well.
This page will provide information on how to score trials, as well as some scoring options and features.
For more information on scoring and how it works within the context of the KDDart Platform, see the KDSmart section of the Tutorials page at: http://www.kddart.org/help/kdtutorials/html/KDSTutorial.html
The Scoring Screen
The Scoring Screen that you will be presented with when you start scoring will depend on the Scoring View that you choose when configuring the collection parameters of your trial. For more information see the Collection Parameters section of the Trial Details Page at: http://www.kddart.org/help/kdsmart/html/preparation.html#collection-parameters
Sheet Scoring Mode
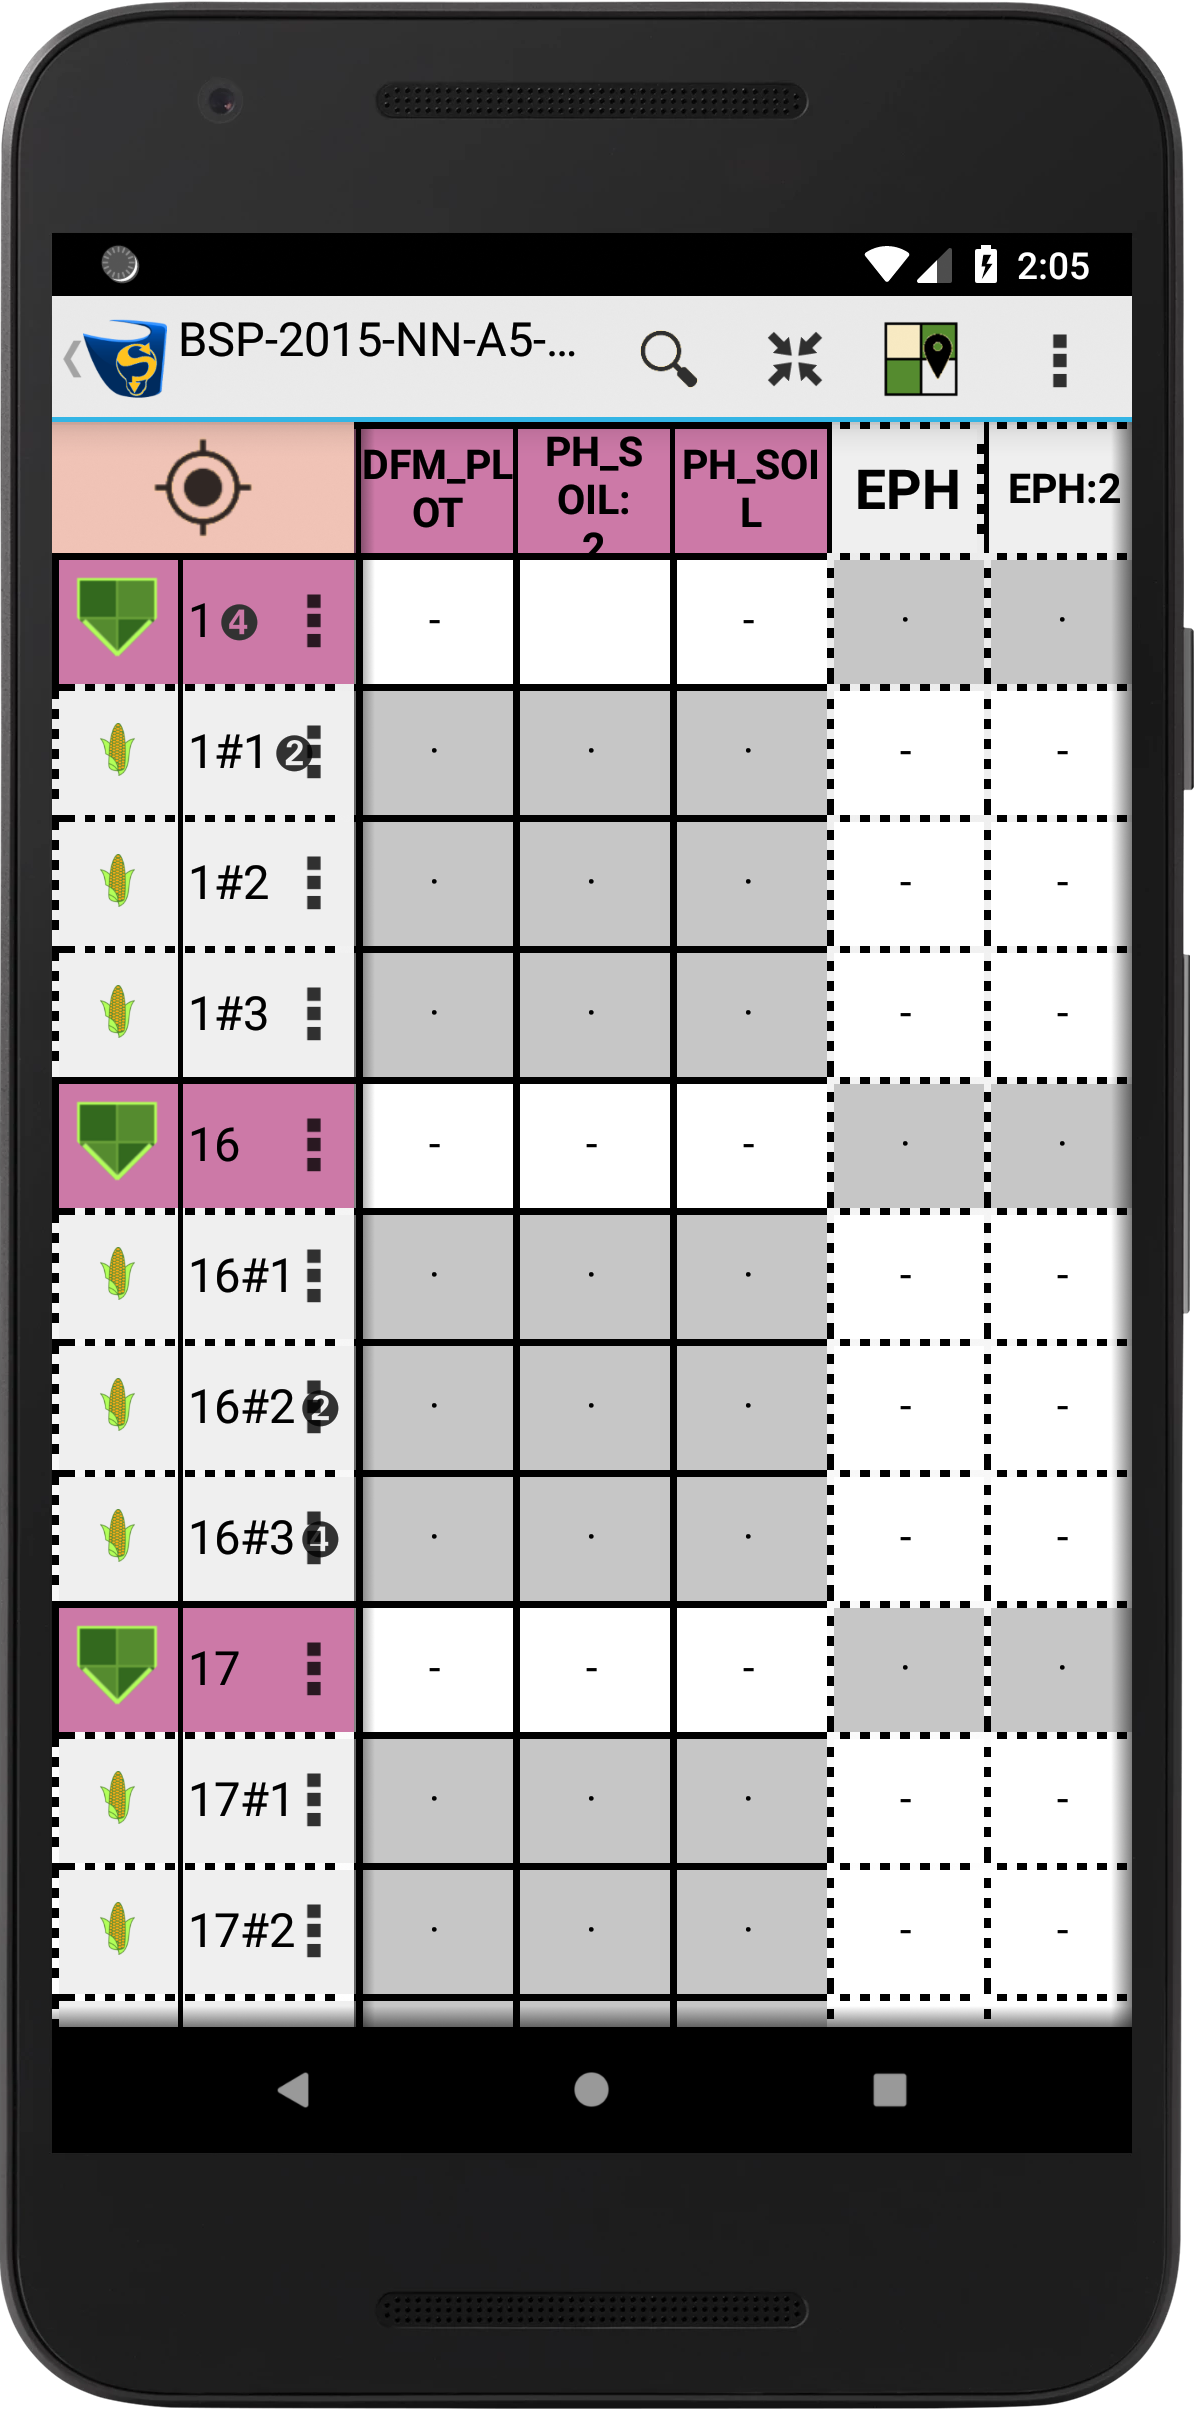
Sheet Scoring Mode is a simple-sheet style view, similar to CSV or Excel document. This mode presents all traits for plots and sub-plots in a spreadsheet and selecting a cell will allow for entering of data. It has limited plot navigation features and can be slower to score, but many users find the view familiar and easy to use.
Path Scoring Mode
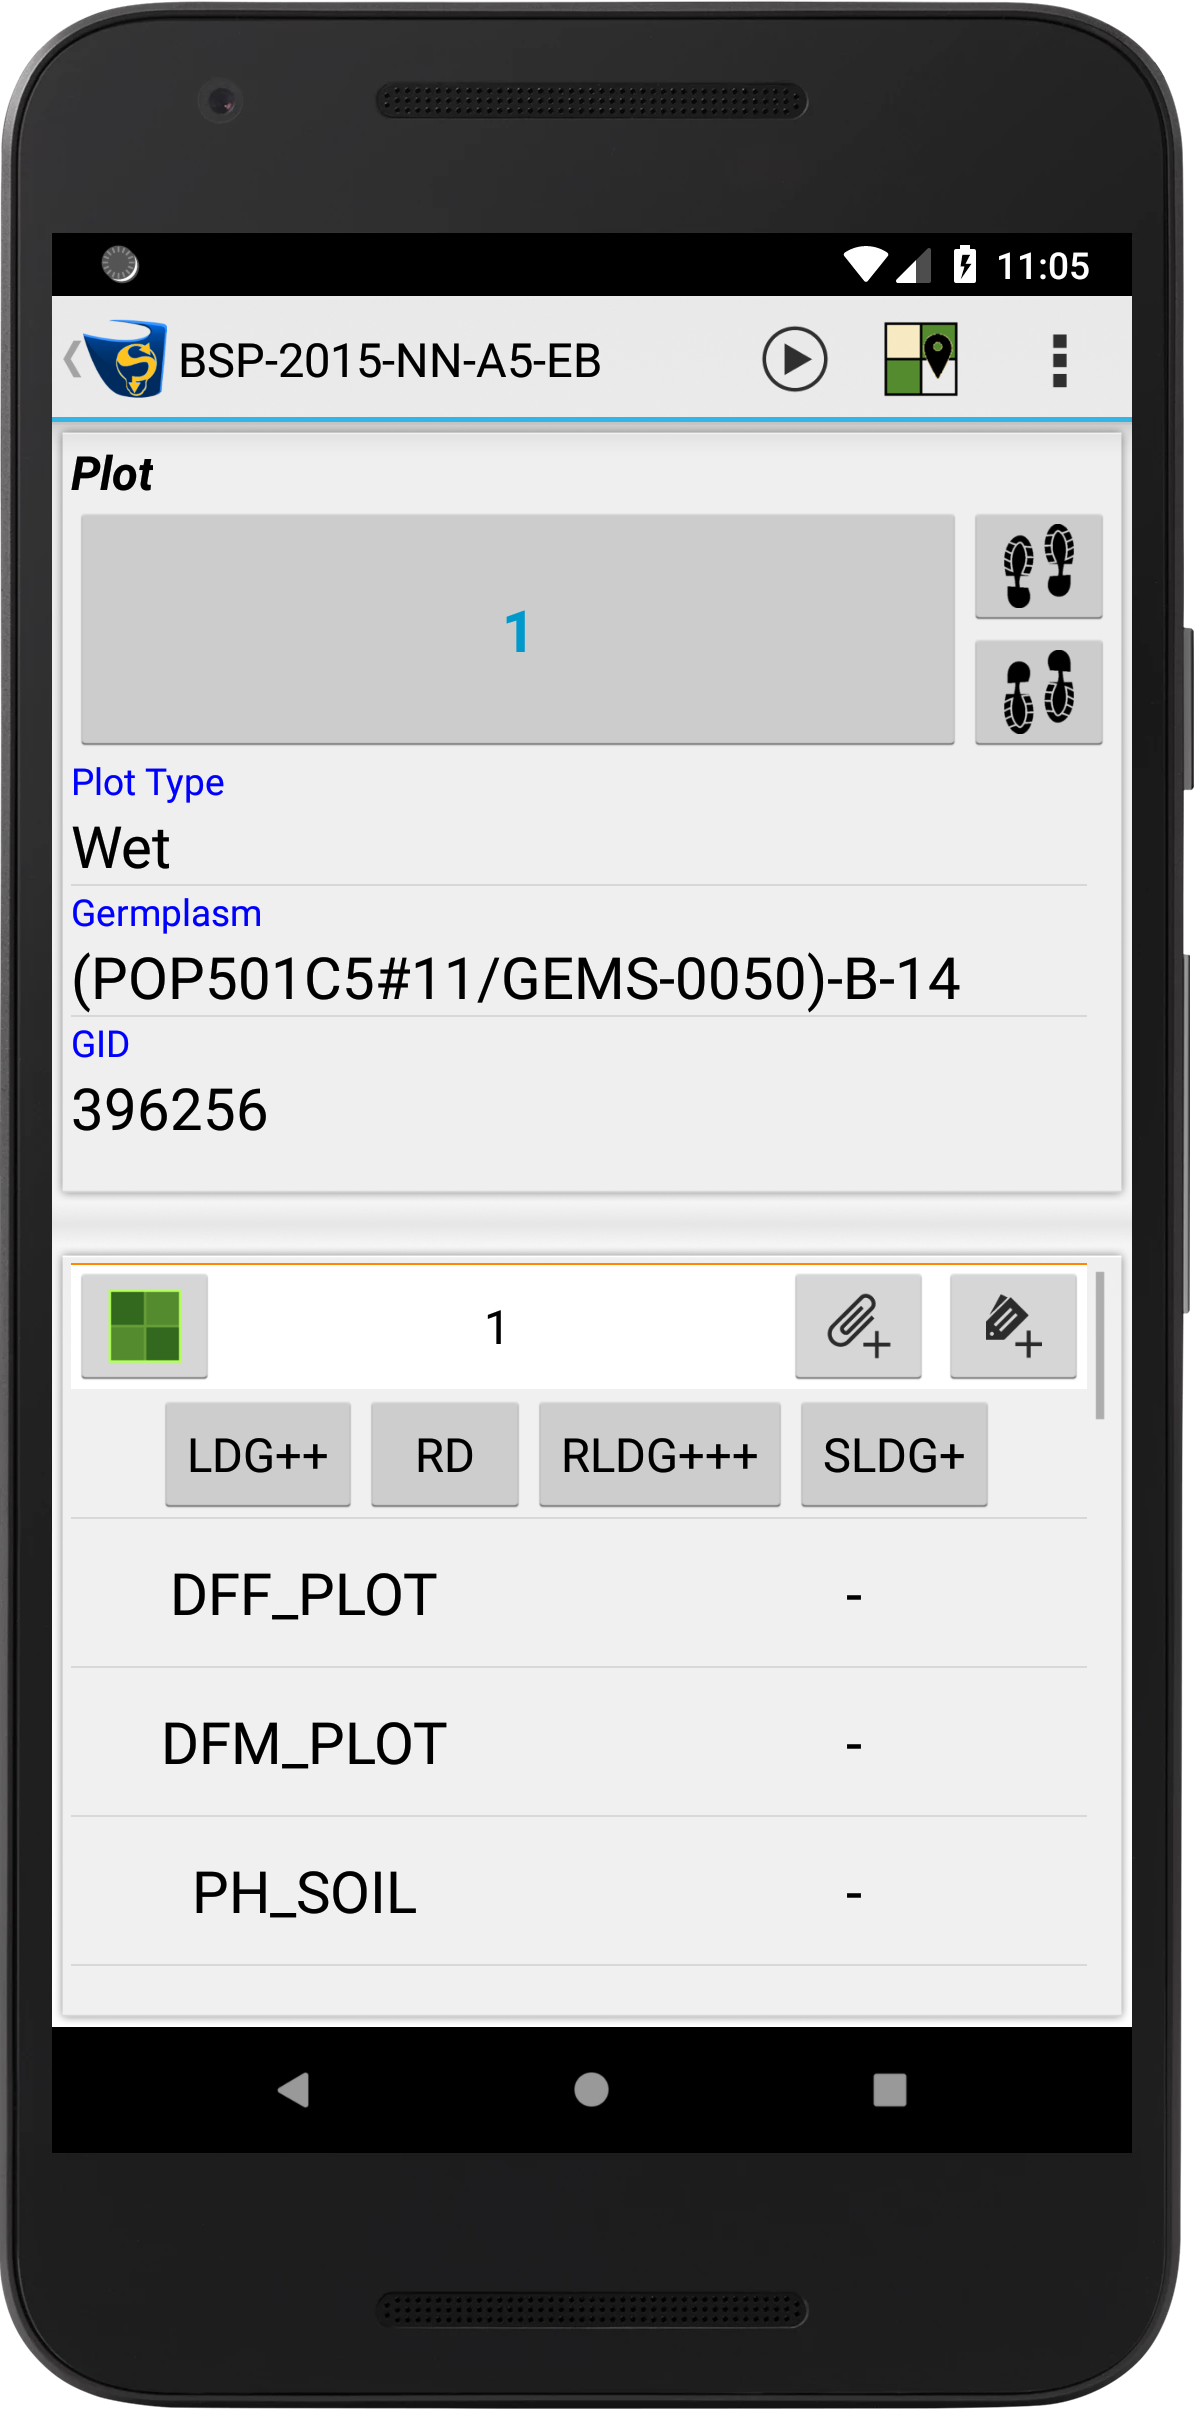
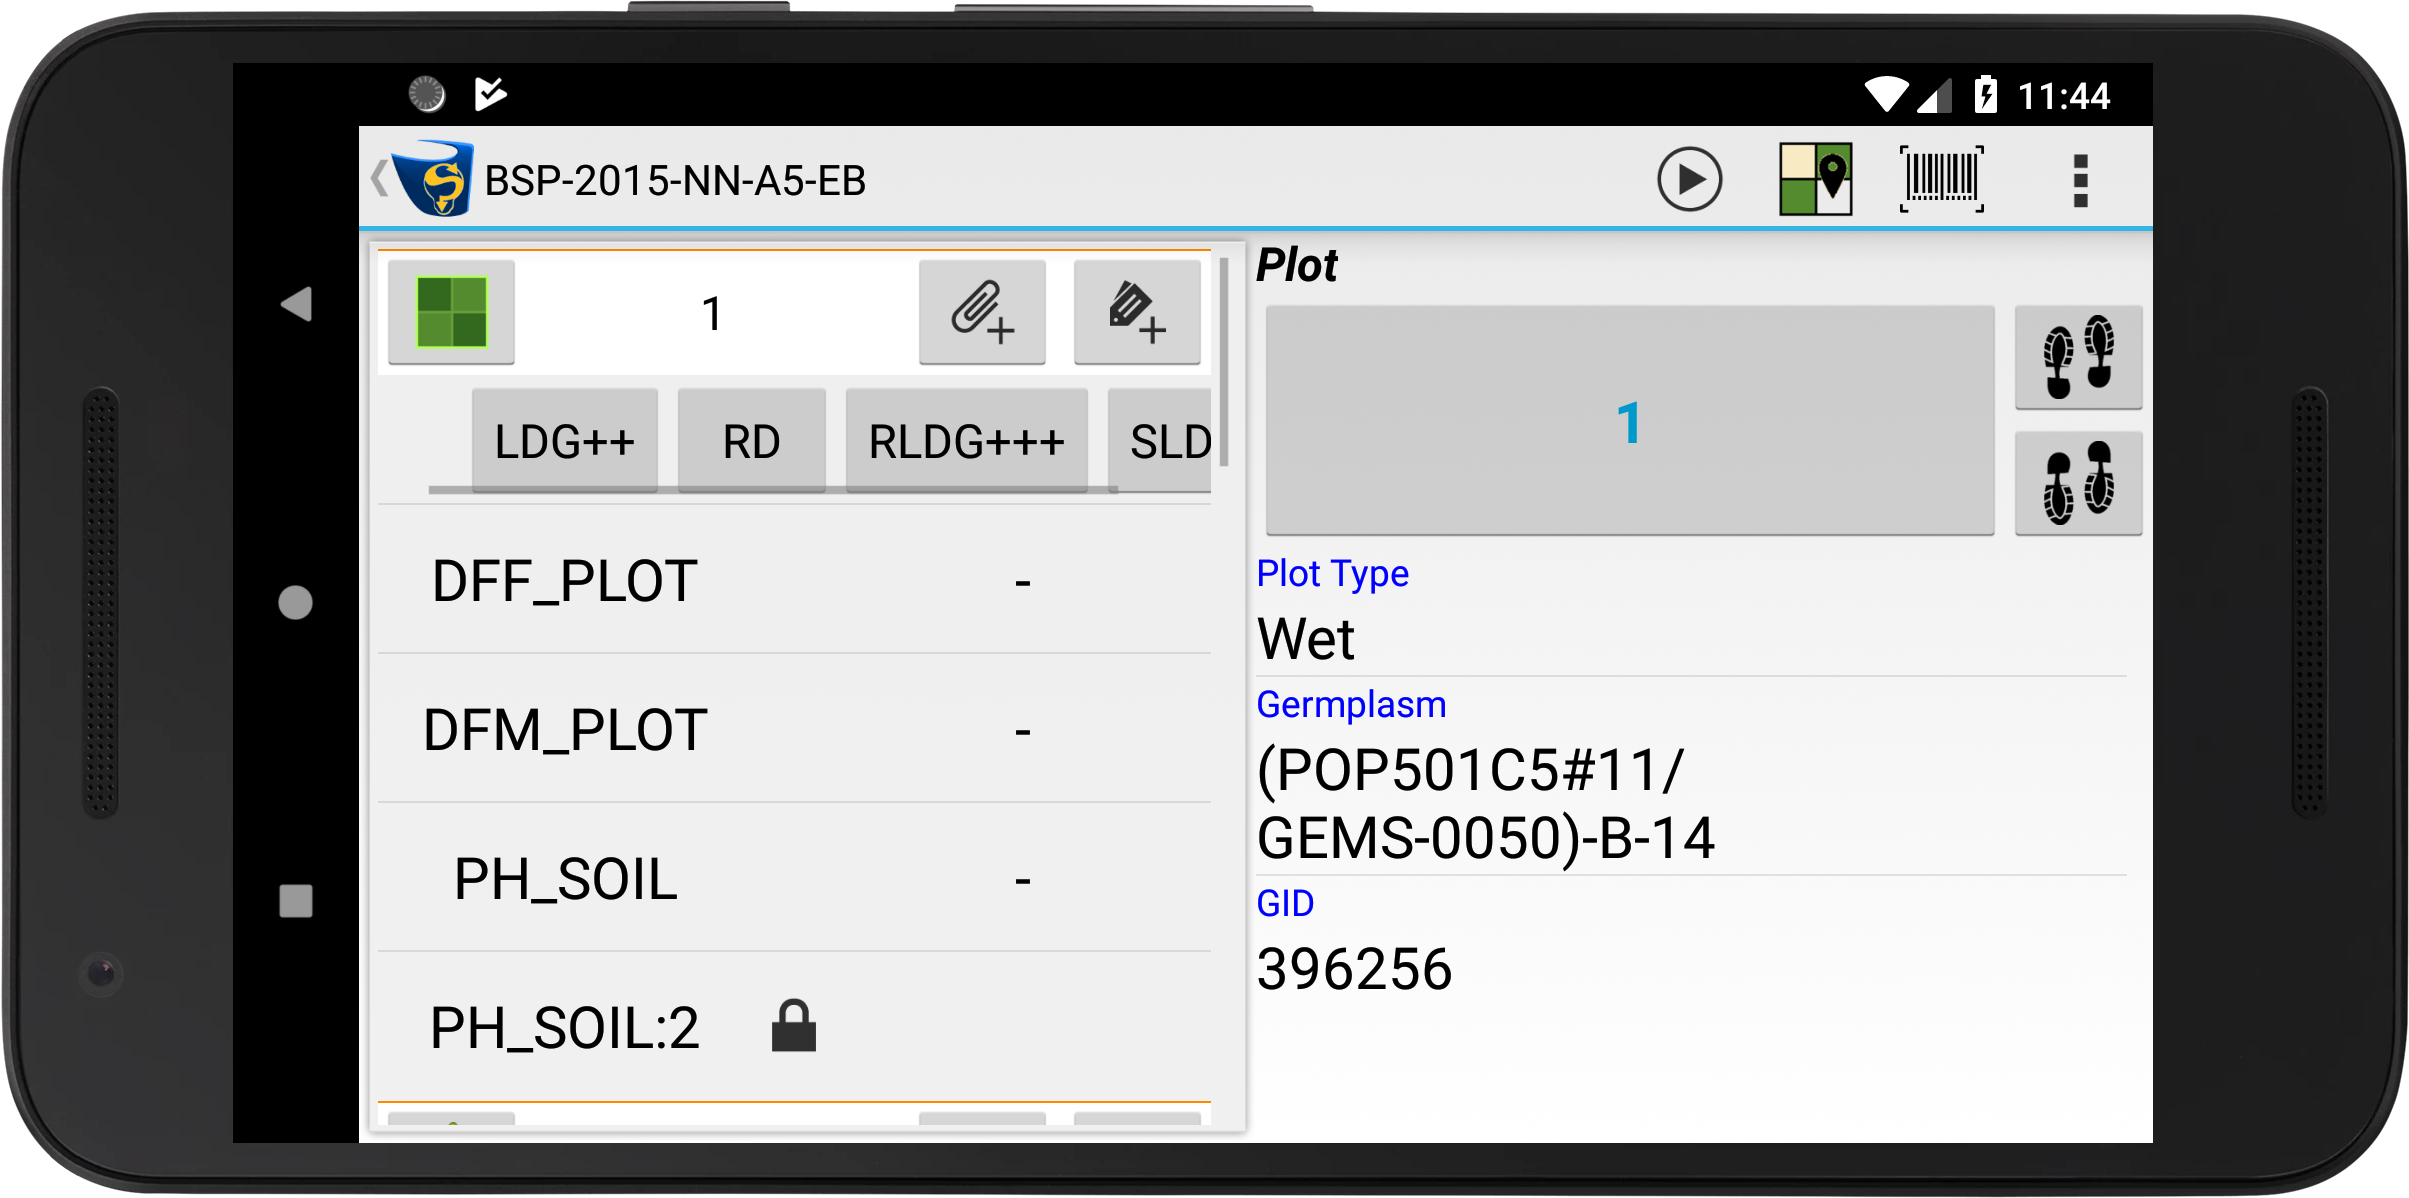
In Path Scoring Mode, you will only select one plot at a time, for which you will be able to see all plot info, including plot traits, sub-plots, sub-plot traits, tags, etc. This mode is designed for easy navigation between plots as you physically walk through a field, score the traits, then move to the next plot on the Scoring Screen. This also allows the user to choose the Auto-Advance Mode which is the quickest way to score but will be explained further below. Additionally, Path Scoring Mode includes Field View which displays a top-down view of your field.
Field Scoring Mode
Field Scoring Mode is a new scoring method that uses Field View as the default for the Scoring Screen, and the selection of a plot opens Sheet Scoring View. The new bulk scoring feature is also exclusively available in Field Scoring Mode. See the Bulk Scoring section below for more information on using this feature.
Screen Orientation
The Scoring Screen in KDSmart (in Path Scoring Mode) can be oriented to best suit the user who is scoring. You can choose between Portrait or Landscape Orientation, and Left-handed or Right-handed Mode. The default is Right-handed/Portrait Orientation but this can easily be changed.
To change screen orientation, select the  Menu Button and then the Change Screen Orientation Button. You will have a few seconds to physically tilt your device into the Landscape or Portrait Orientation and the orientation will be set.
|
|
Select the Menu Button in the top right-hand corner of the Scoring Screen to be presented with menu options. Select the Swap Sides Button to swap between Right-handed and Left-handed Mode.
|

|
Note
Sheet Scoring Mode and the upcoming Field Scoring Mode can operate in Portrait or Landscape Mode but there is no Left-handed or Right-handed Mode.
Scoring
Applying trait values is the primary function of scoring trials. Selecting a trait to score will be different depending on what scoring mode you are using, however applying traits will always be the same as each scoring mode utilises the same Trait Measurement Screen. Follow the instructions below to learn how to score a trait.
Step |
Action |
|---|---|
1. |
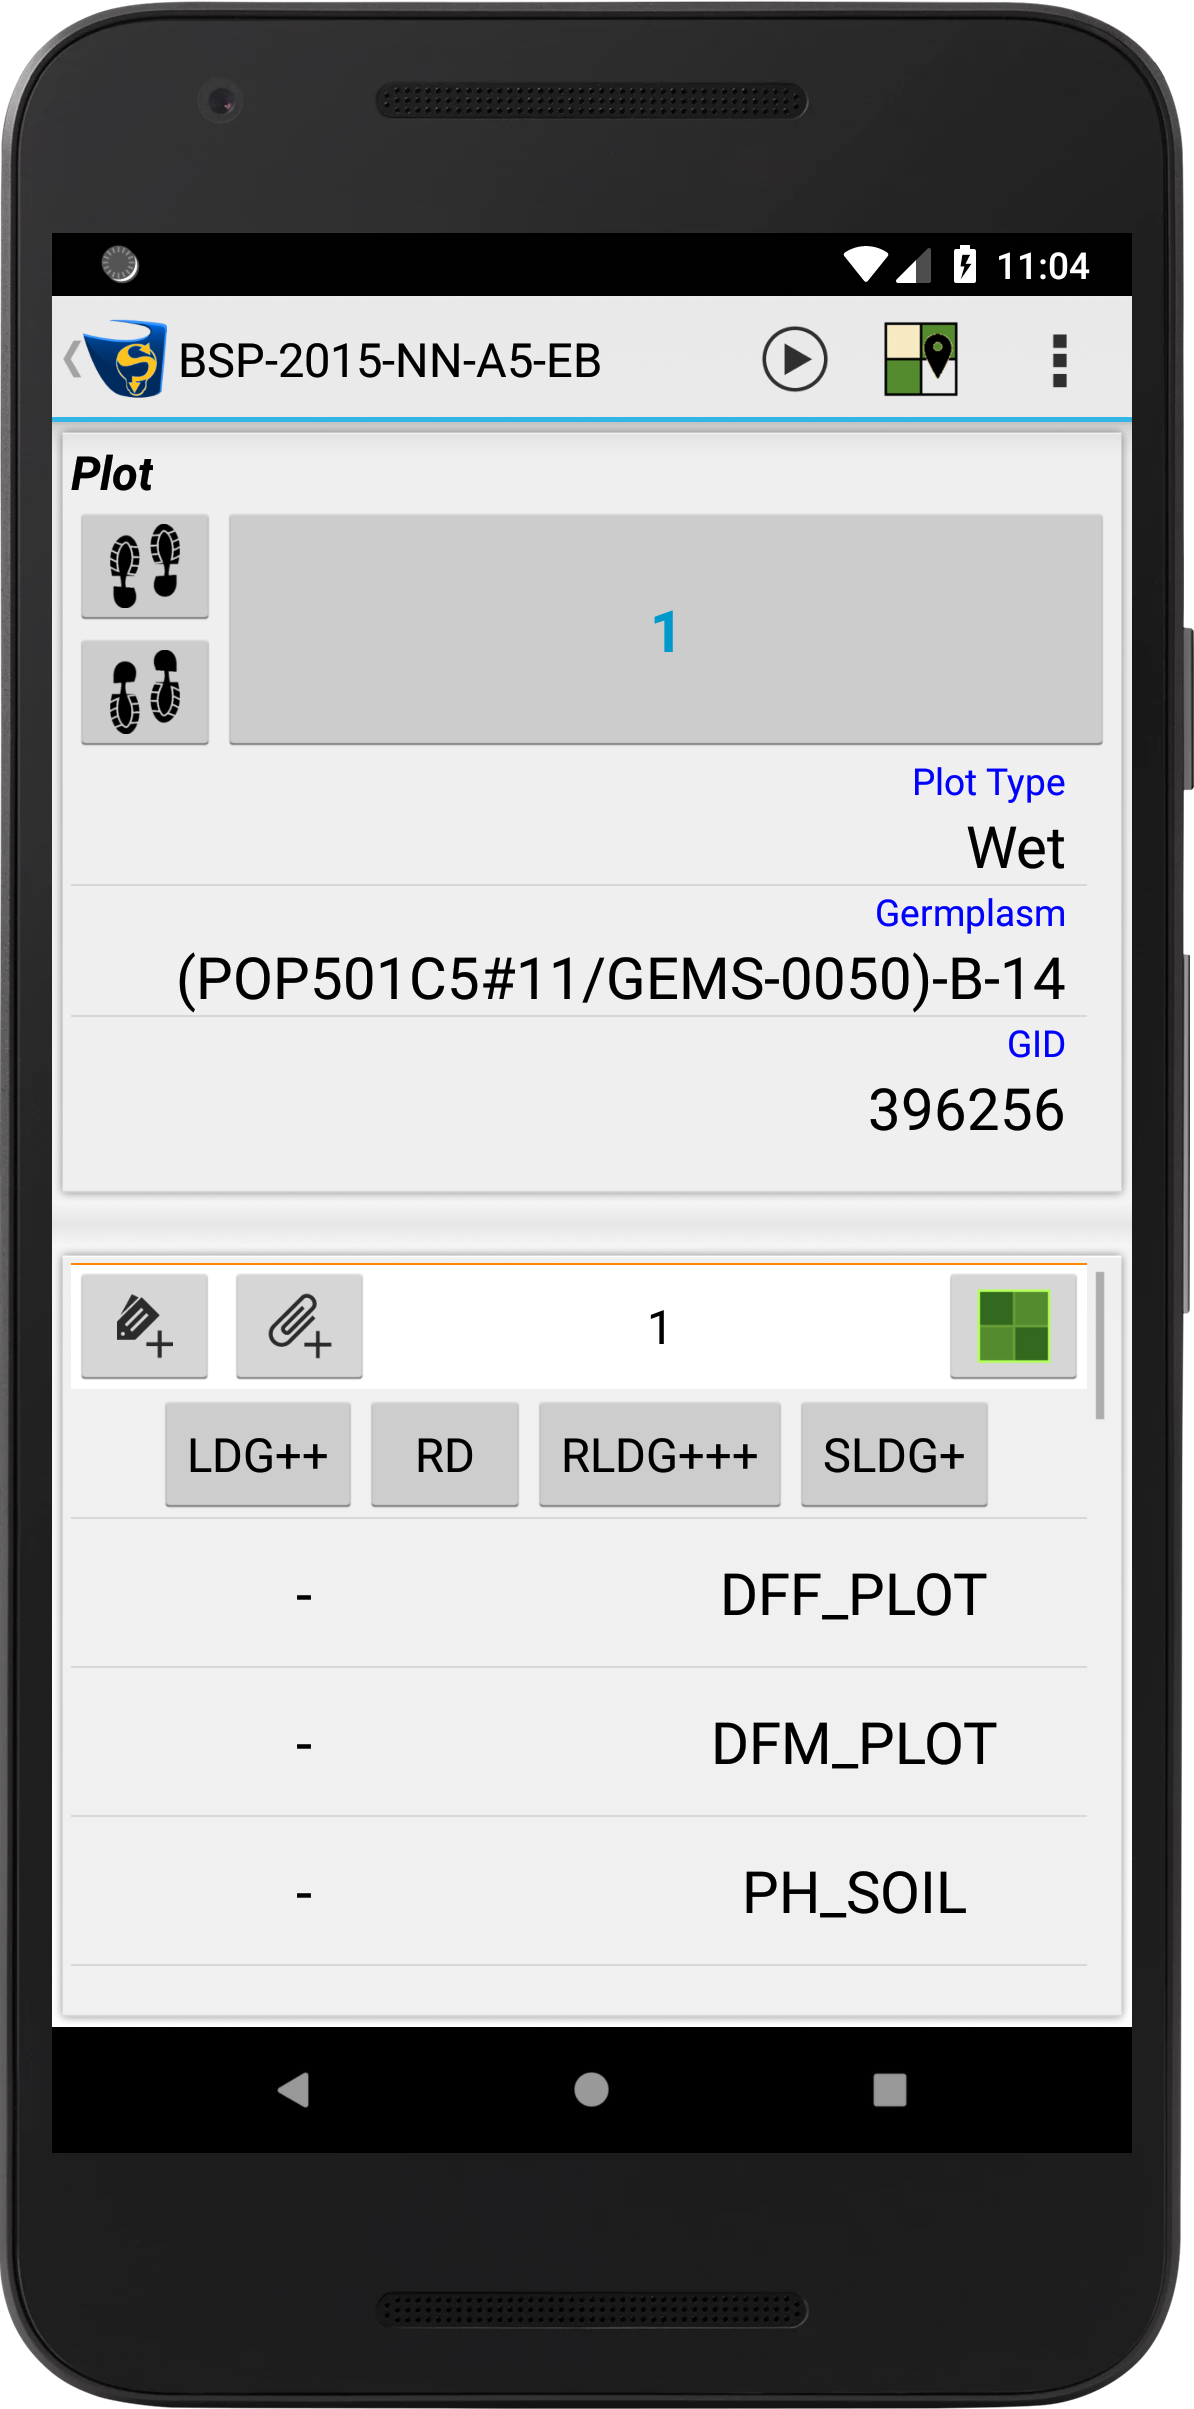
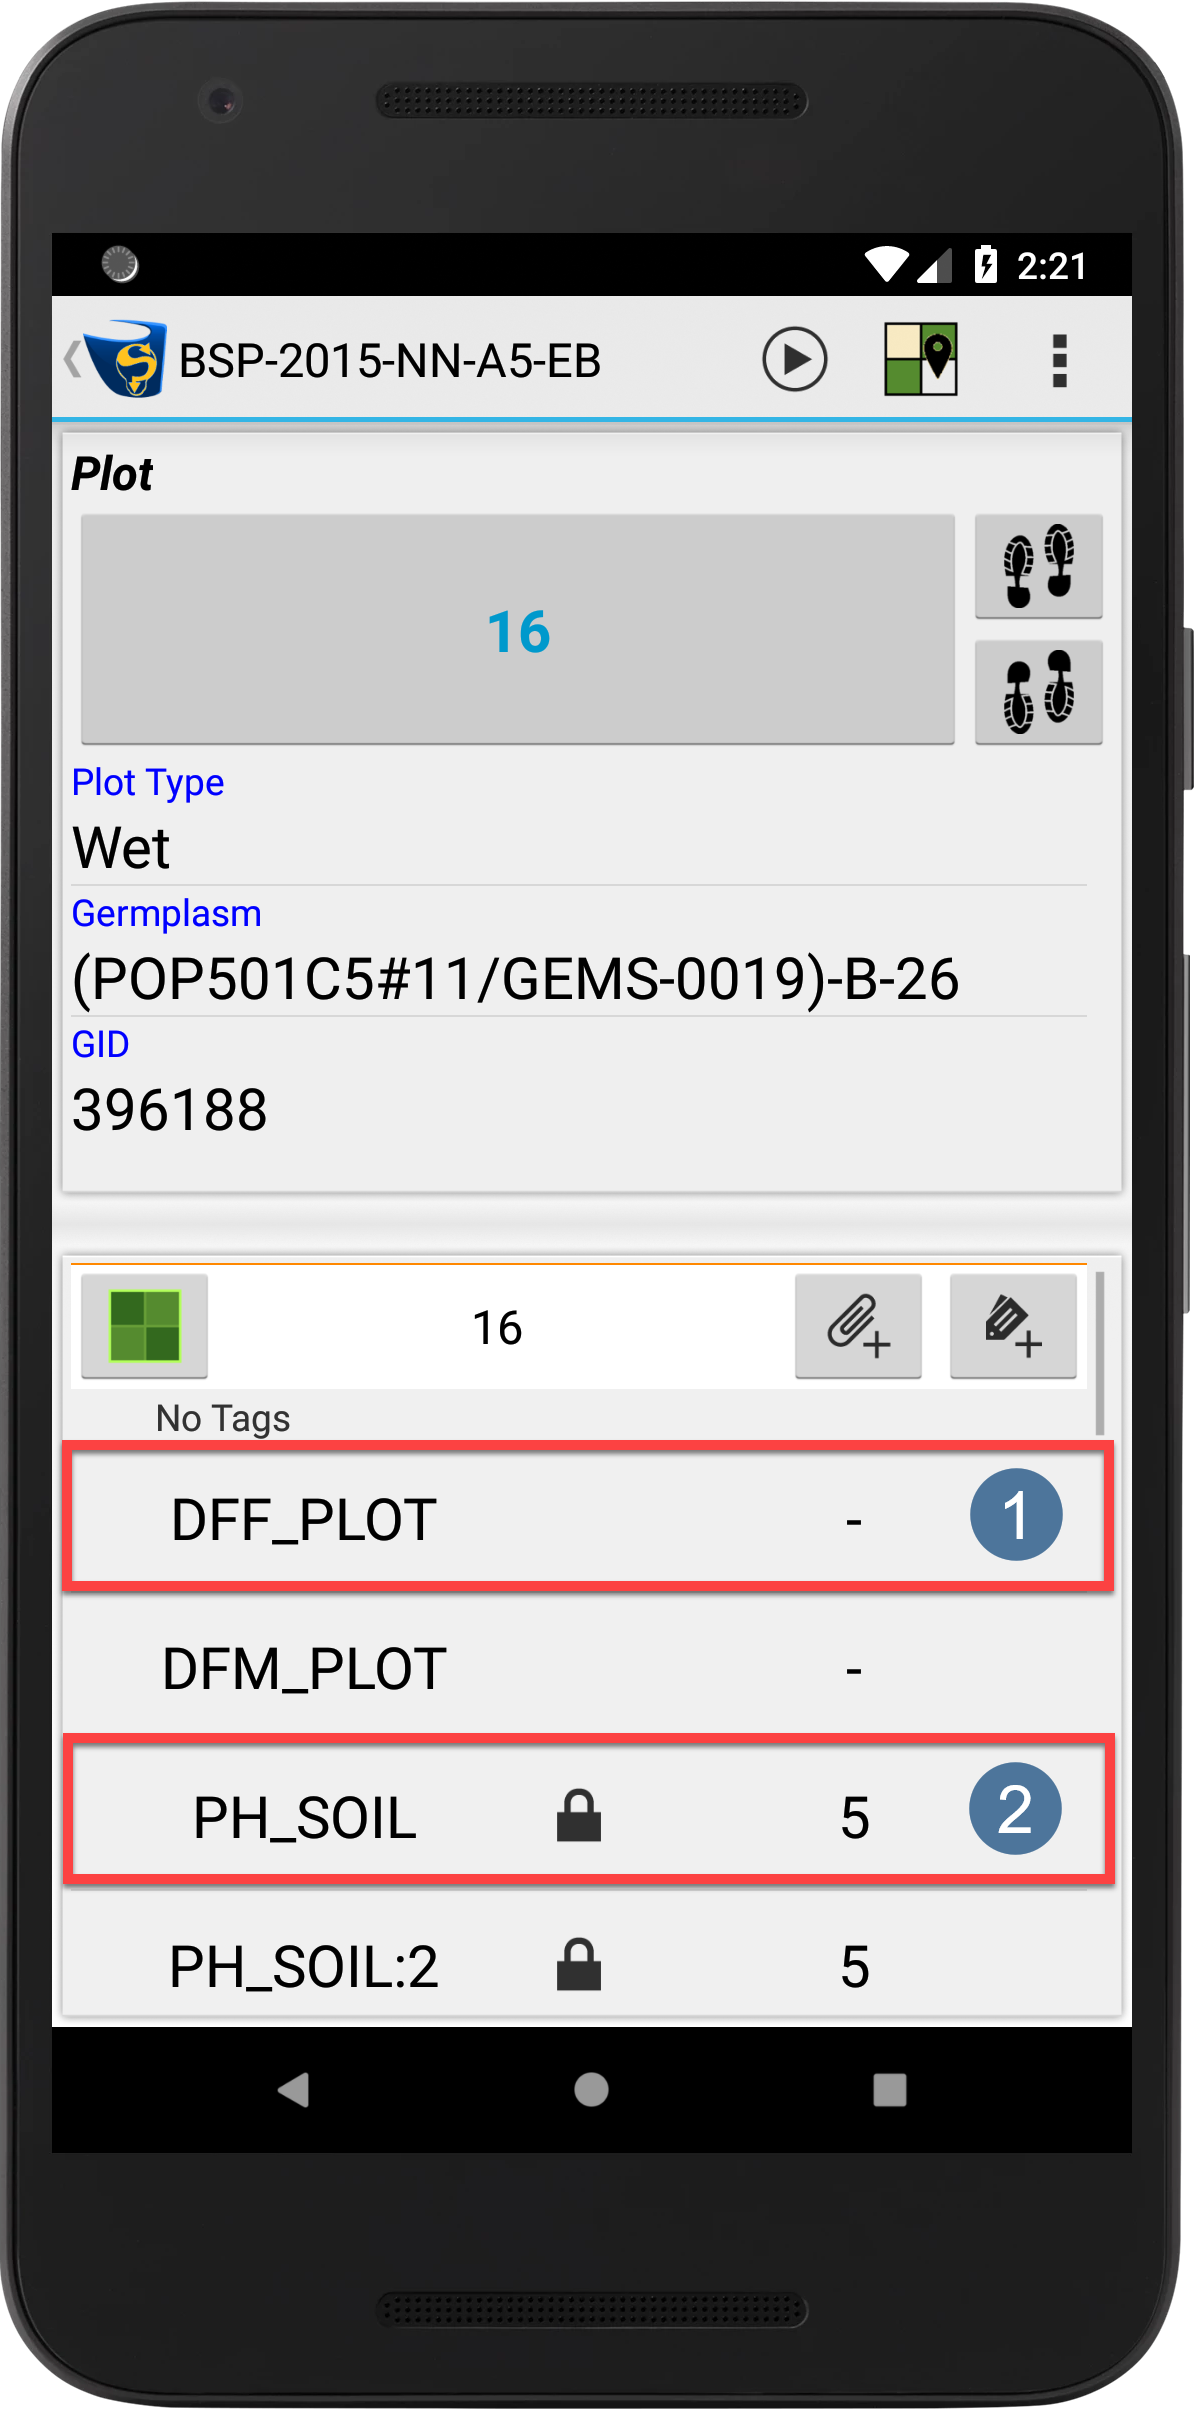
To open the Trait Measurement Screen, select any trait on the Scoring Screen. You can choose a trait with no value such as the trait outlined at
|
2. |
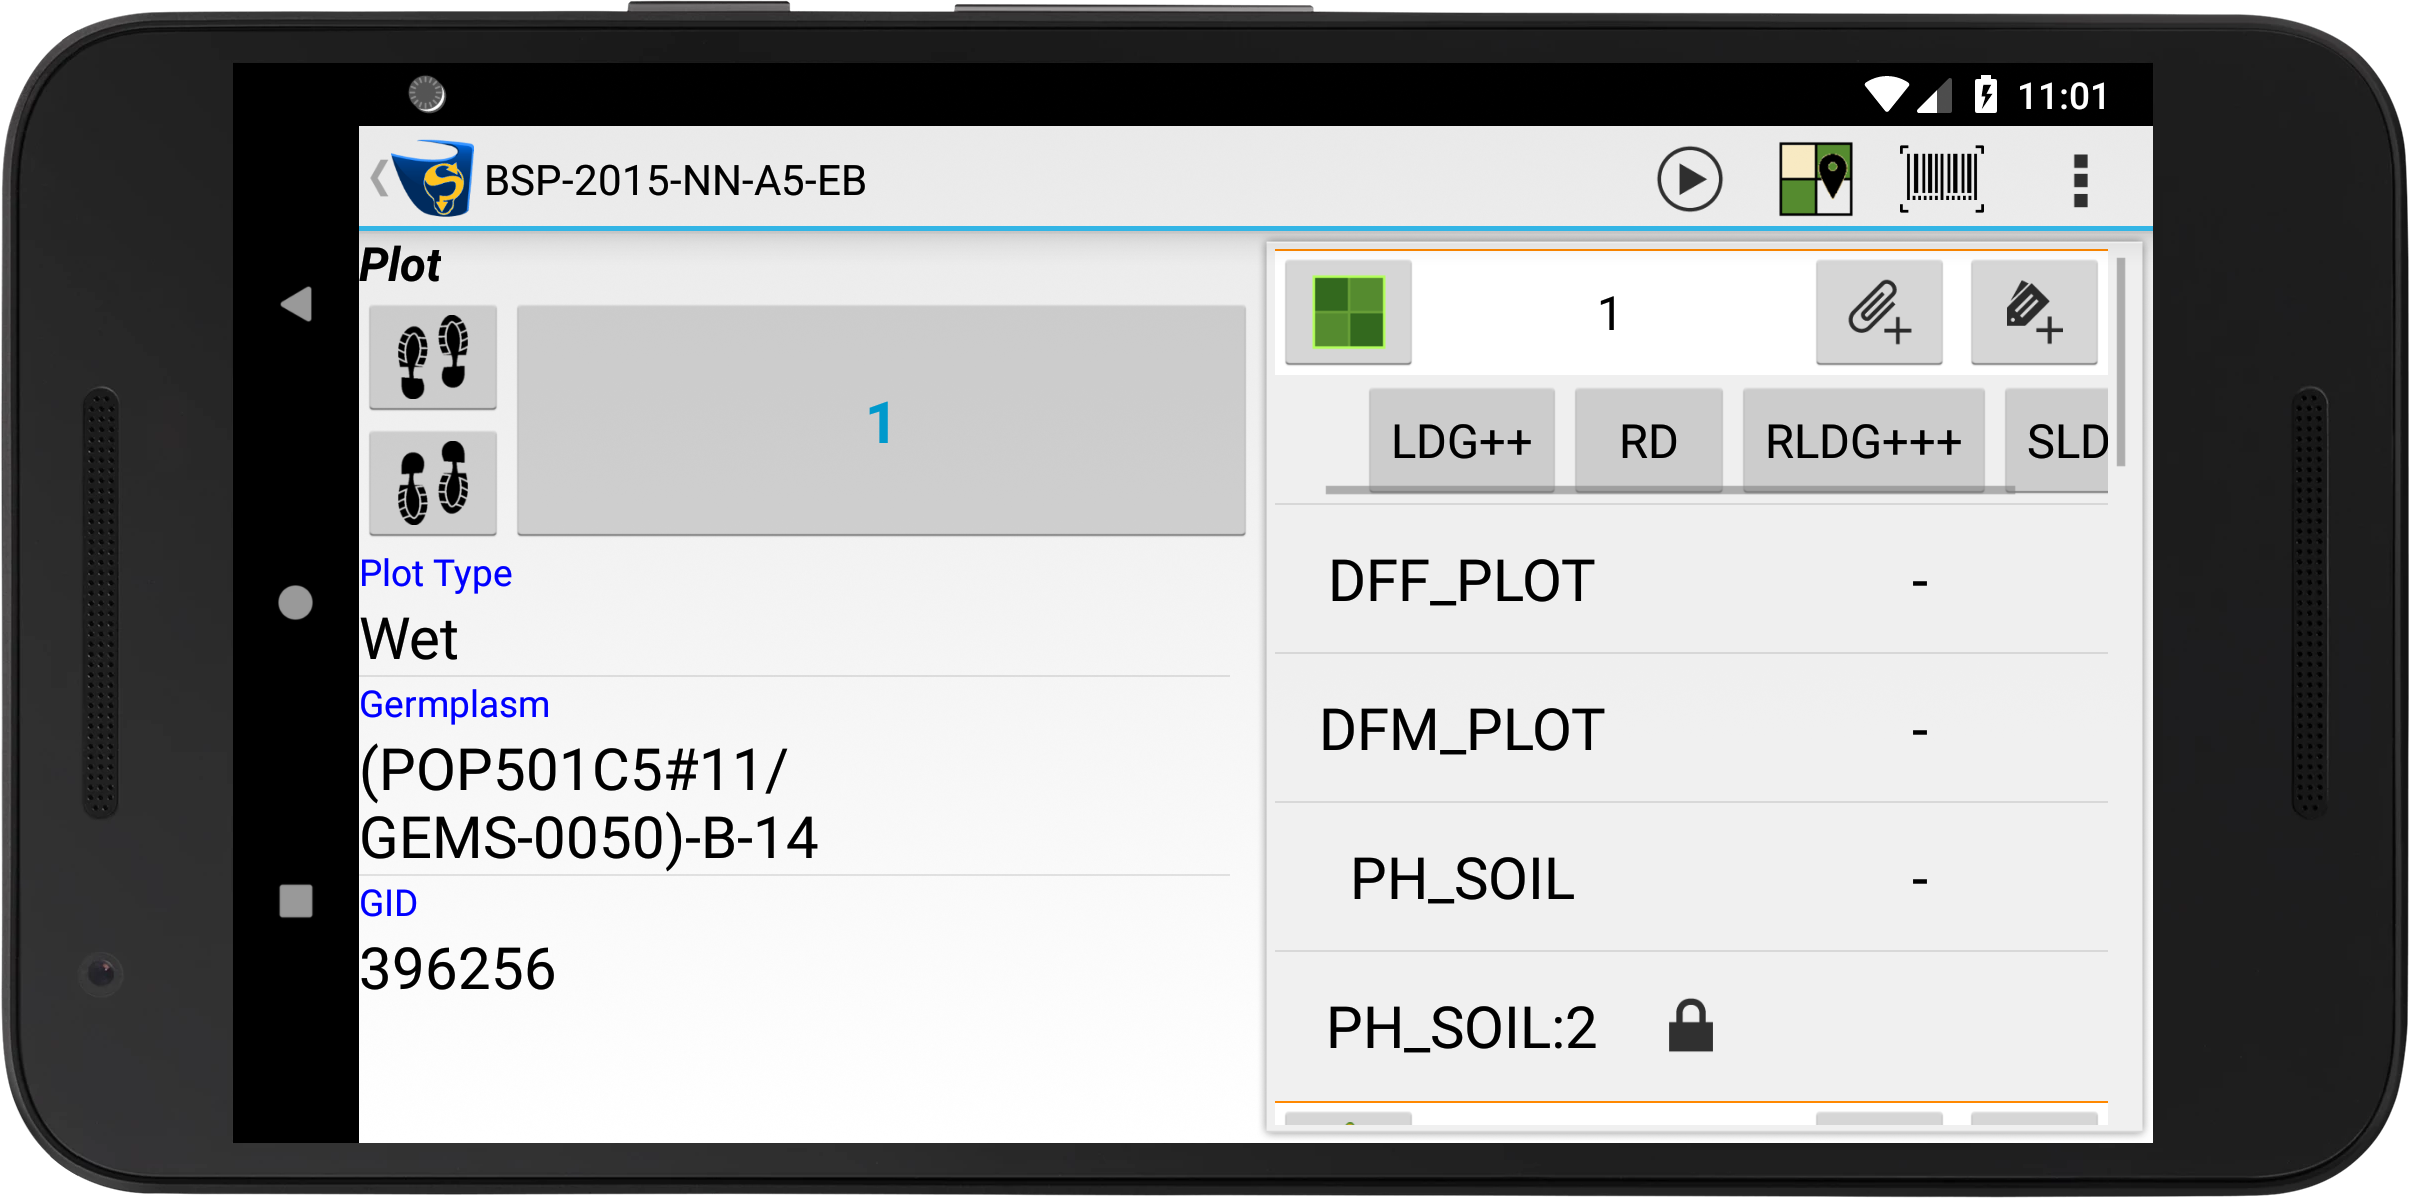
The screen below is the Trait Measurement Screen which allows you to choose a trait value. This will be different depending on the trait data type - this example is of an elapsed days trait. You can also swipe right to see more information about the current plot. Either select a value or choose one of the trait scoring options at the bottom of the screen e.g. Reverse Button to go to the previous trait. The table below provides information on the scoring options. 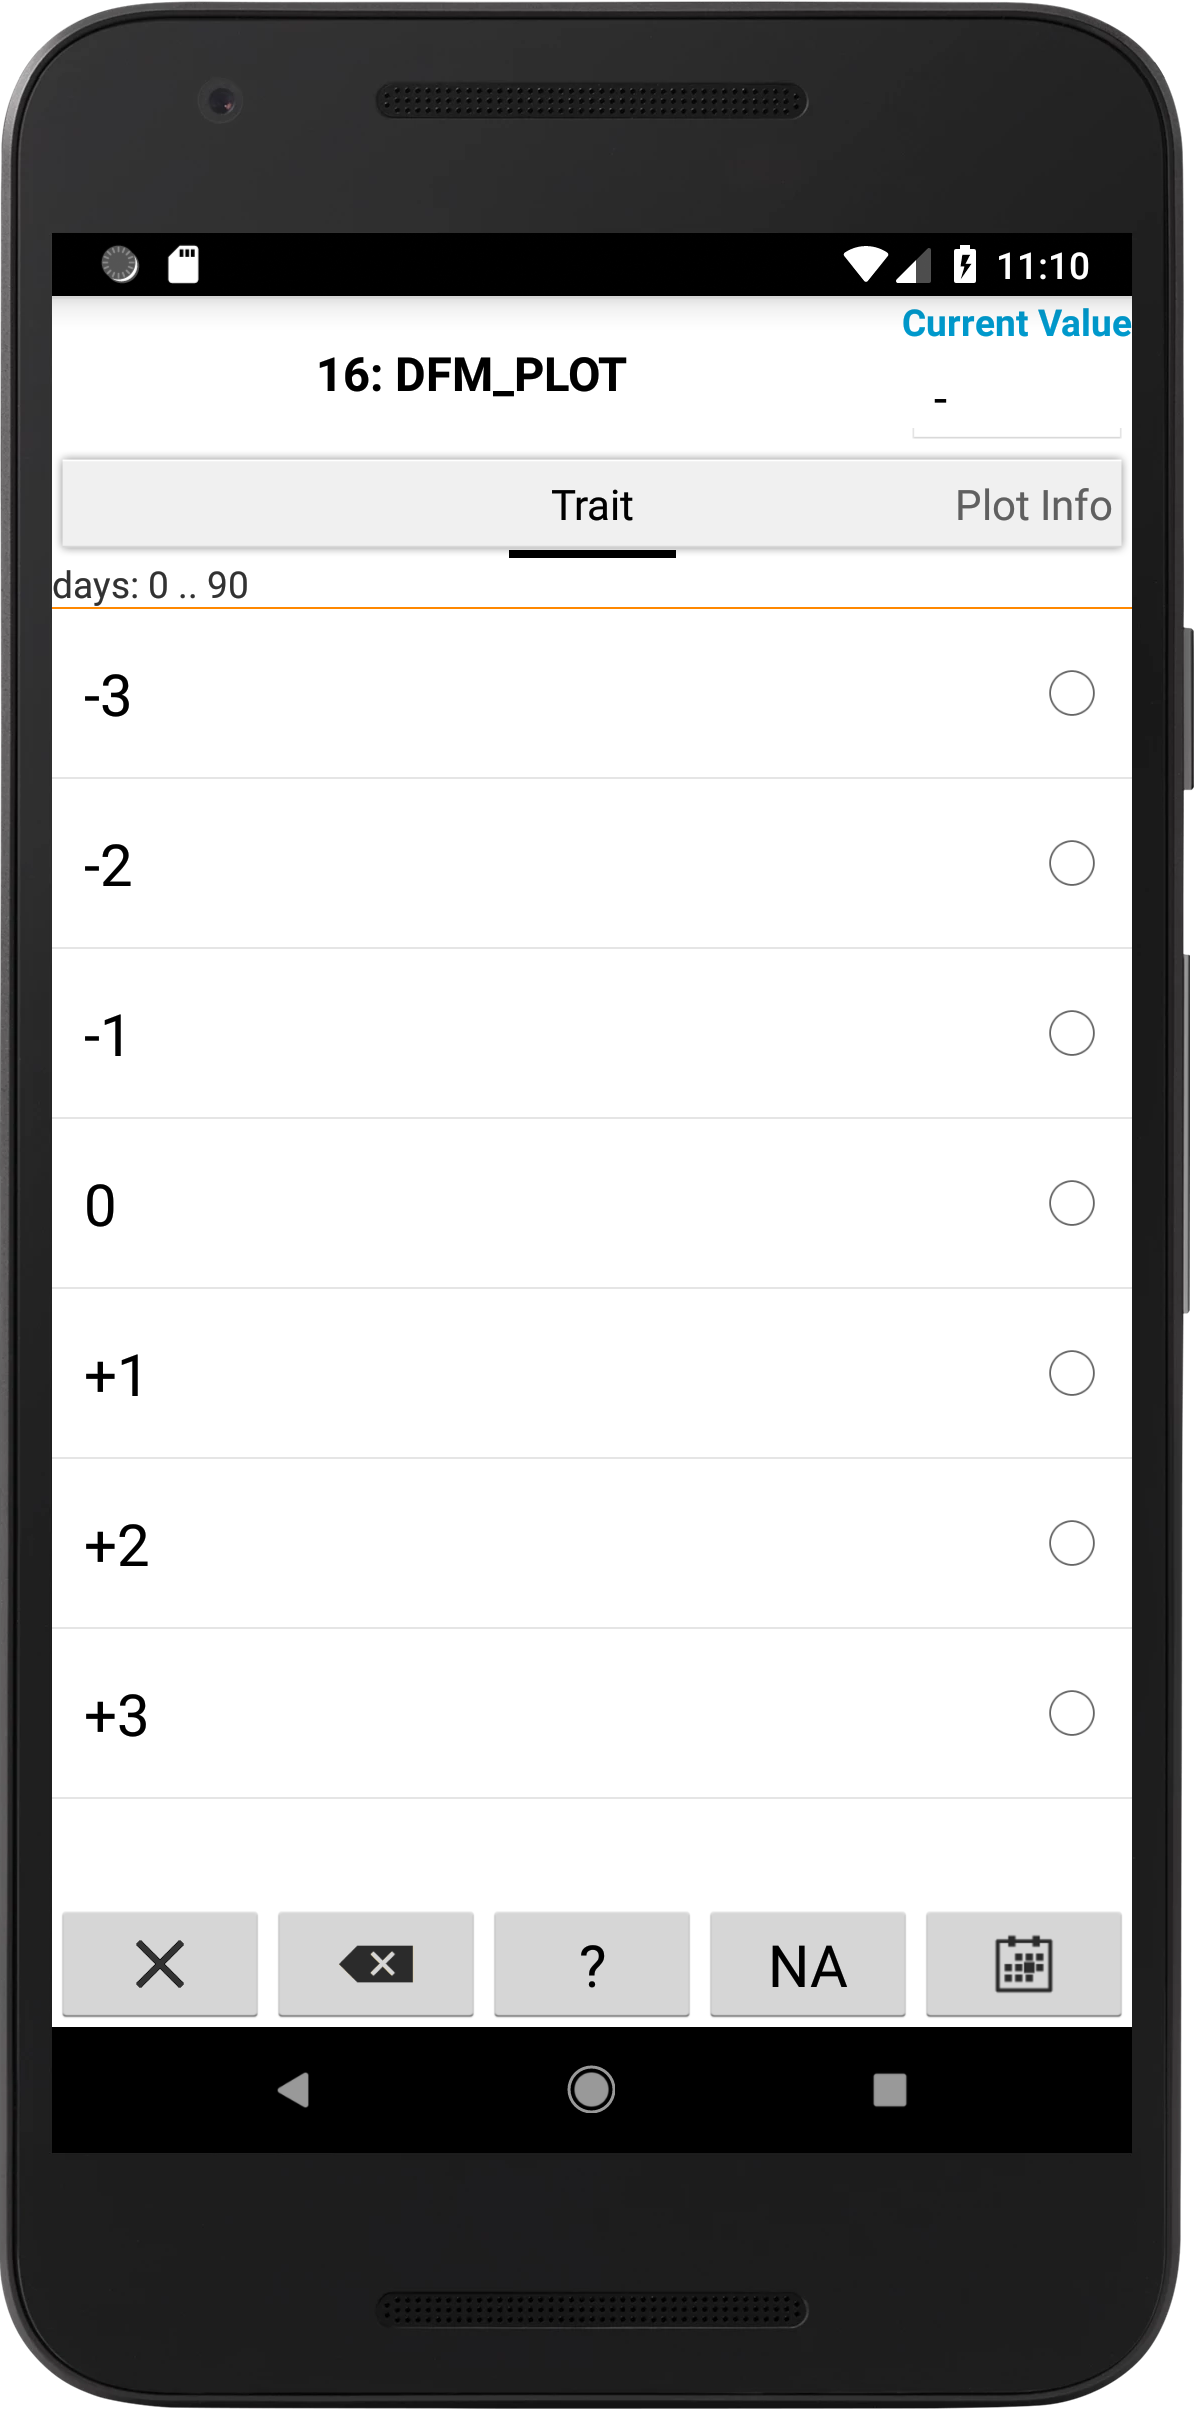
|
3. |
After applying a trait, you will be taken back to the Scoring Screen. Select another trait to choose a value for it and repeat the process until you have scored all traits. |

Button |
Action |
|---|---|
|
Cancels the scoring of the selected trait. Cancelling will return the user to the Scoring Screen |
|
Deletes a current value and returns the user to the Scoring Screen. |
|
Applies the value of Missing to a trait instance. This can be used if the actual value is missing. |
|
Applies the value of Not Applicable to a trait instance. This can be used when the trait does not need to be scored for the selected plot or sub-plot. |
|
Accepts and applies a value that has been entered such as confirming a decimal trait. |
|
Opens a Date Picker so that a date can be chosen. |
|
Navigates to the previous trait instance. |
|
Navigates to the next trait instance by skipping the current trait. |


The video below is a demonstration of scoring at trial in KDSmart. You will be able to see how trait values are applied to trait instances.
Please note that whilst this video demonstrates scoring in Path Scoring Mode, the application of trait values is done from the same Trait Measurement Screen in any scoring mode.
Additionally, the sections below provide further information on bulk scoring and navigation between plots.
Bulk Scoring
The new bulk scoring feature allows users to apply a single value to many plots or sub-plots. This can dramatically increase efficiency of scoring in some situations but is only available in Field Scoring Mode. See the instructions below for how to bulk score plots and sub-plots.
Step |
Action |
|---|---|
1. |
Open a trial in Field Scoring Mode and select the plots that you need to apply the same trait value for. A long-press will enter you into select mode then you can add any plot to your selection. |
2. |
Select the Plot Bulk Scoring Button to open the Bulk Scoring Screen. All plot traits will be listed and the number of trait that are already scored will be listen in the # Already Scored Column. |
3. |
Select a trait to open a Trait Measurement Screen. Select a value and you will be automatically returned to the Bulk Scoring Screen. |
4. |
If there are plots that are already scored, you will need to select the Overwrite Trait Values Checkbox to overwrite the previous values. |
5. |
The Undo Button for that trait will now be available in case you selected the wrong value. |
Note
Sub-plot bulk scoring is the exact same process as bulk scoring plots. However, the Sub-plot Bulk Scoring Button will only be available if there is only one plot selected.
Navigating Between Plots
It is crucial that users are able to navigate between plots quickly so that trials can be efficiently scored. This is why there are plenty of options for navigating between plots. The video referenced above (Scoring a Trial in KDSmart) also outlines the navigation methods in Path Scoring Mode. See the sub-sections below for more information on navigation between plots.
Button |
Action |
|---|---|
|
Advance/Retreat |
|
Plot Selection |
|
Field View |

Note
The information in this section is about navigation in Path Scoring Mode. Scoring in Sheet Scoring Mode is simpler, as you only need to select a cell to score it, but it can also be slower than using Path Scoring Mode.
Advance/Retreat
Advancing and retreating is moving to the next or previous plot that is determined by your collection order. For example, if you are starting on plot 1, you can advance to plot 2 and then retreat back to plot 1. The  Advance Button will move you to the next plot and the
  Retreat Button will move you to the previous plot.
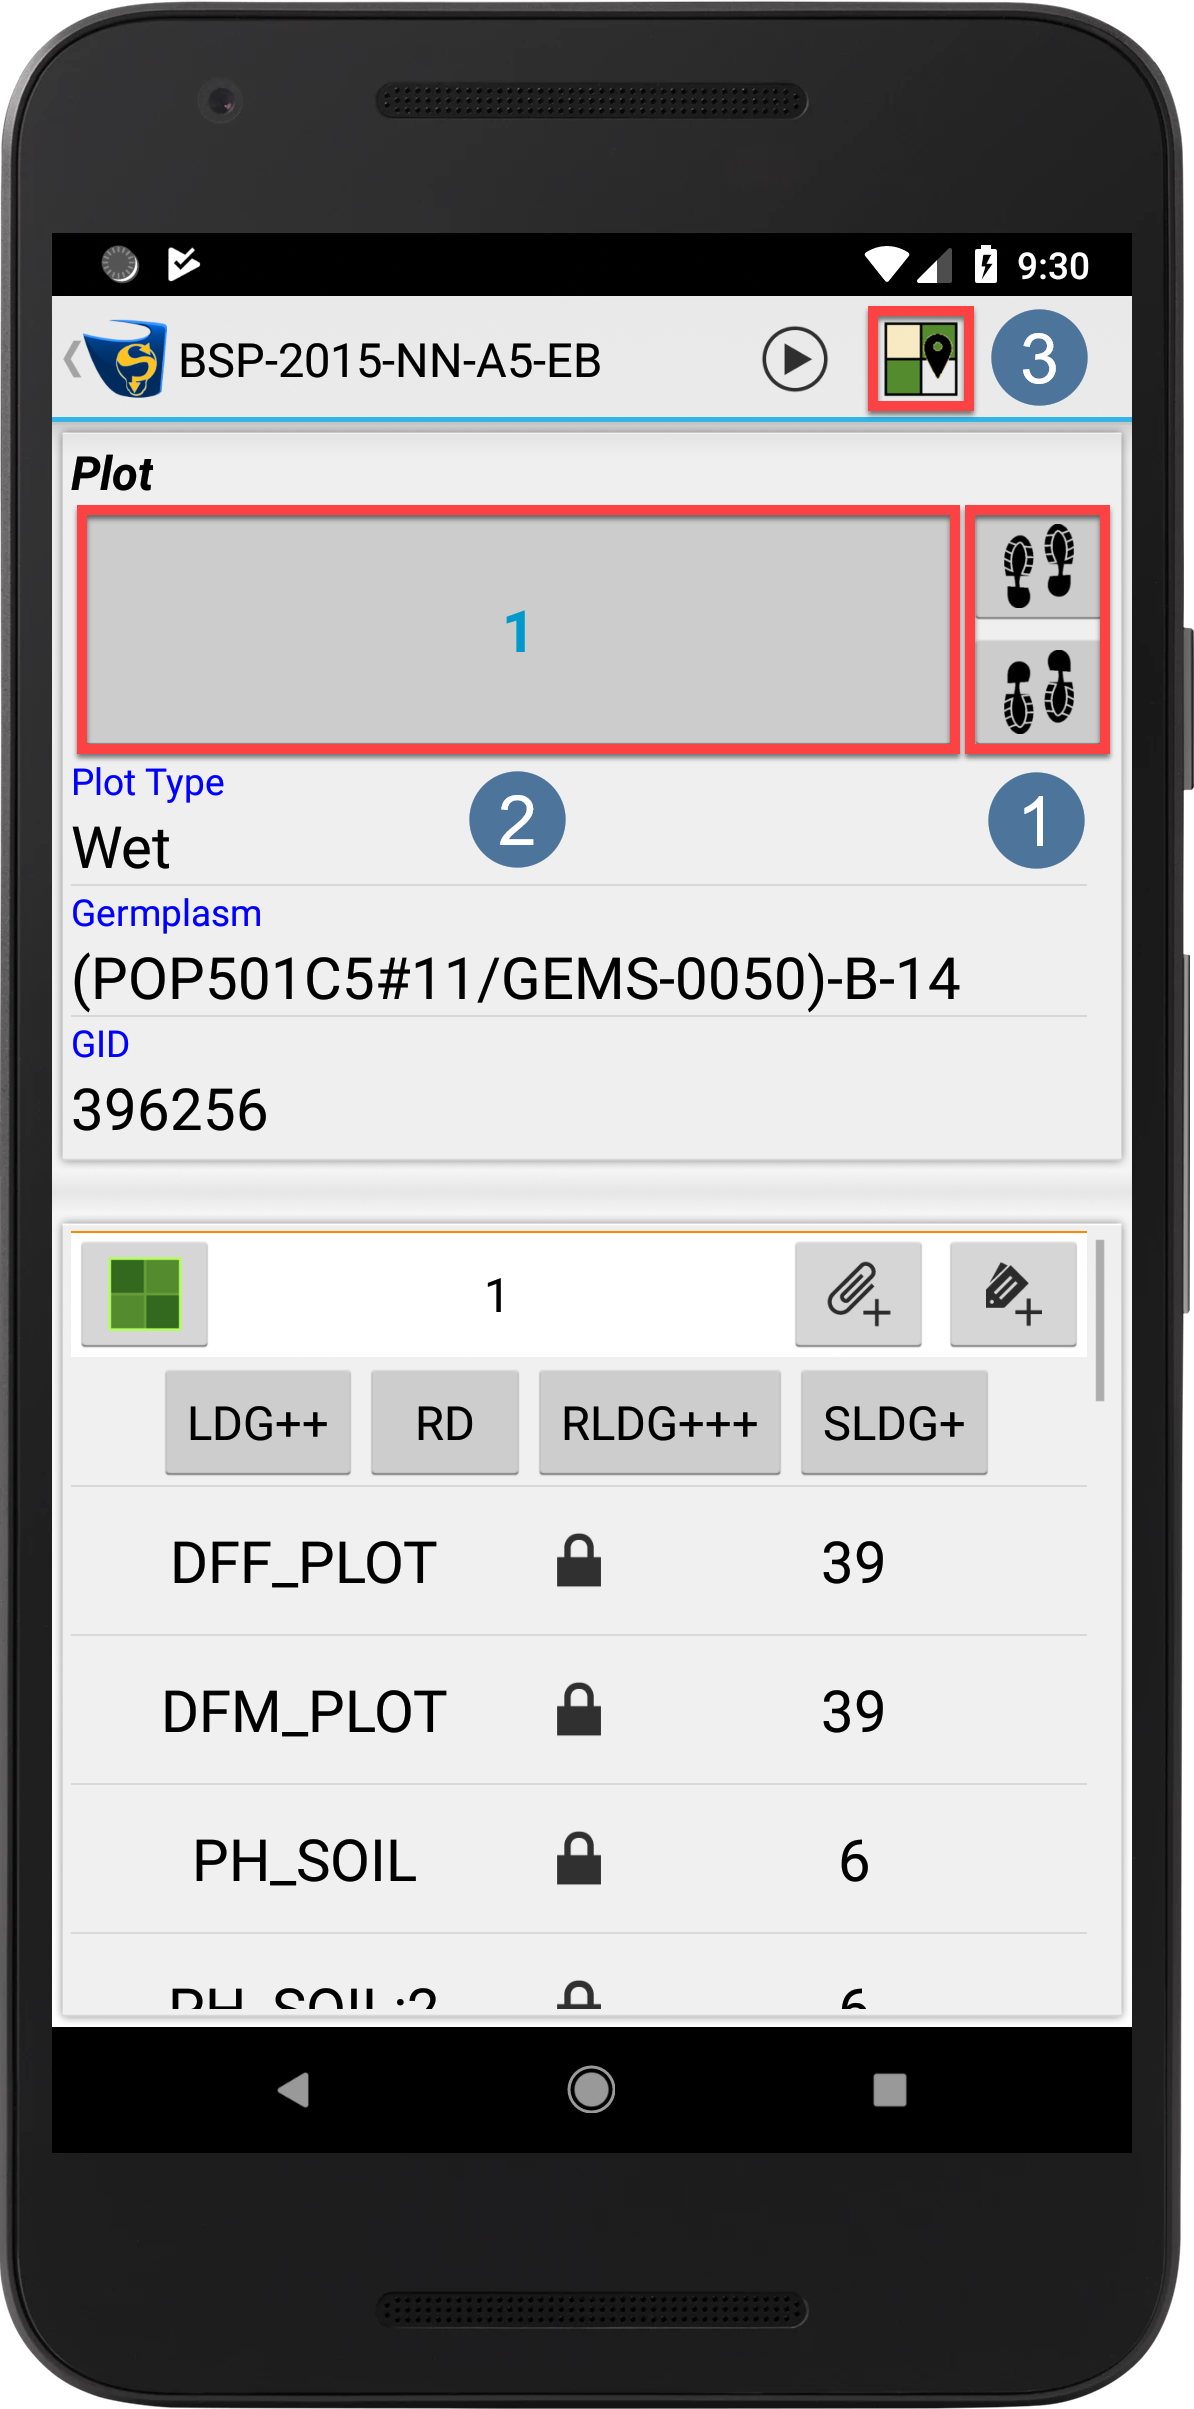
Plot Selection
Plot selection is directly entering the number or x/y coordinates of a plot to navigate to it. Selecting the Plot Button as outlined in  in the image above will display the Plot Selection Window as below:
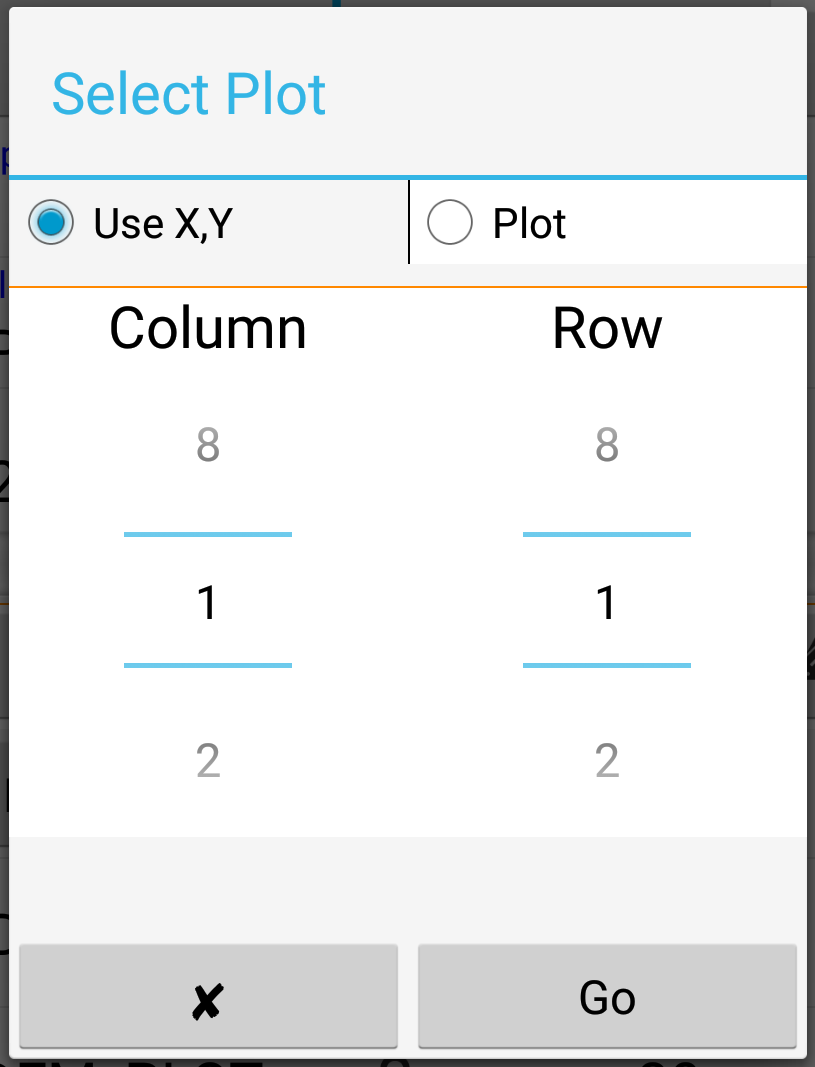
You can navigate to a plot by either choosing it’s x/y coordinates or the plot number and then selecting the Go Button to confirm.
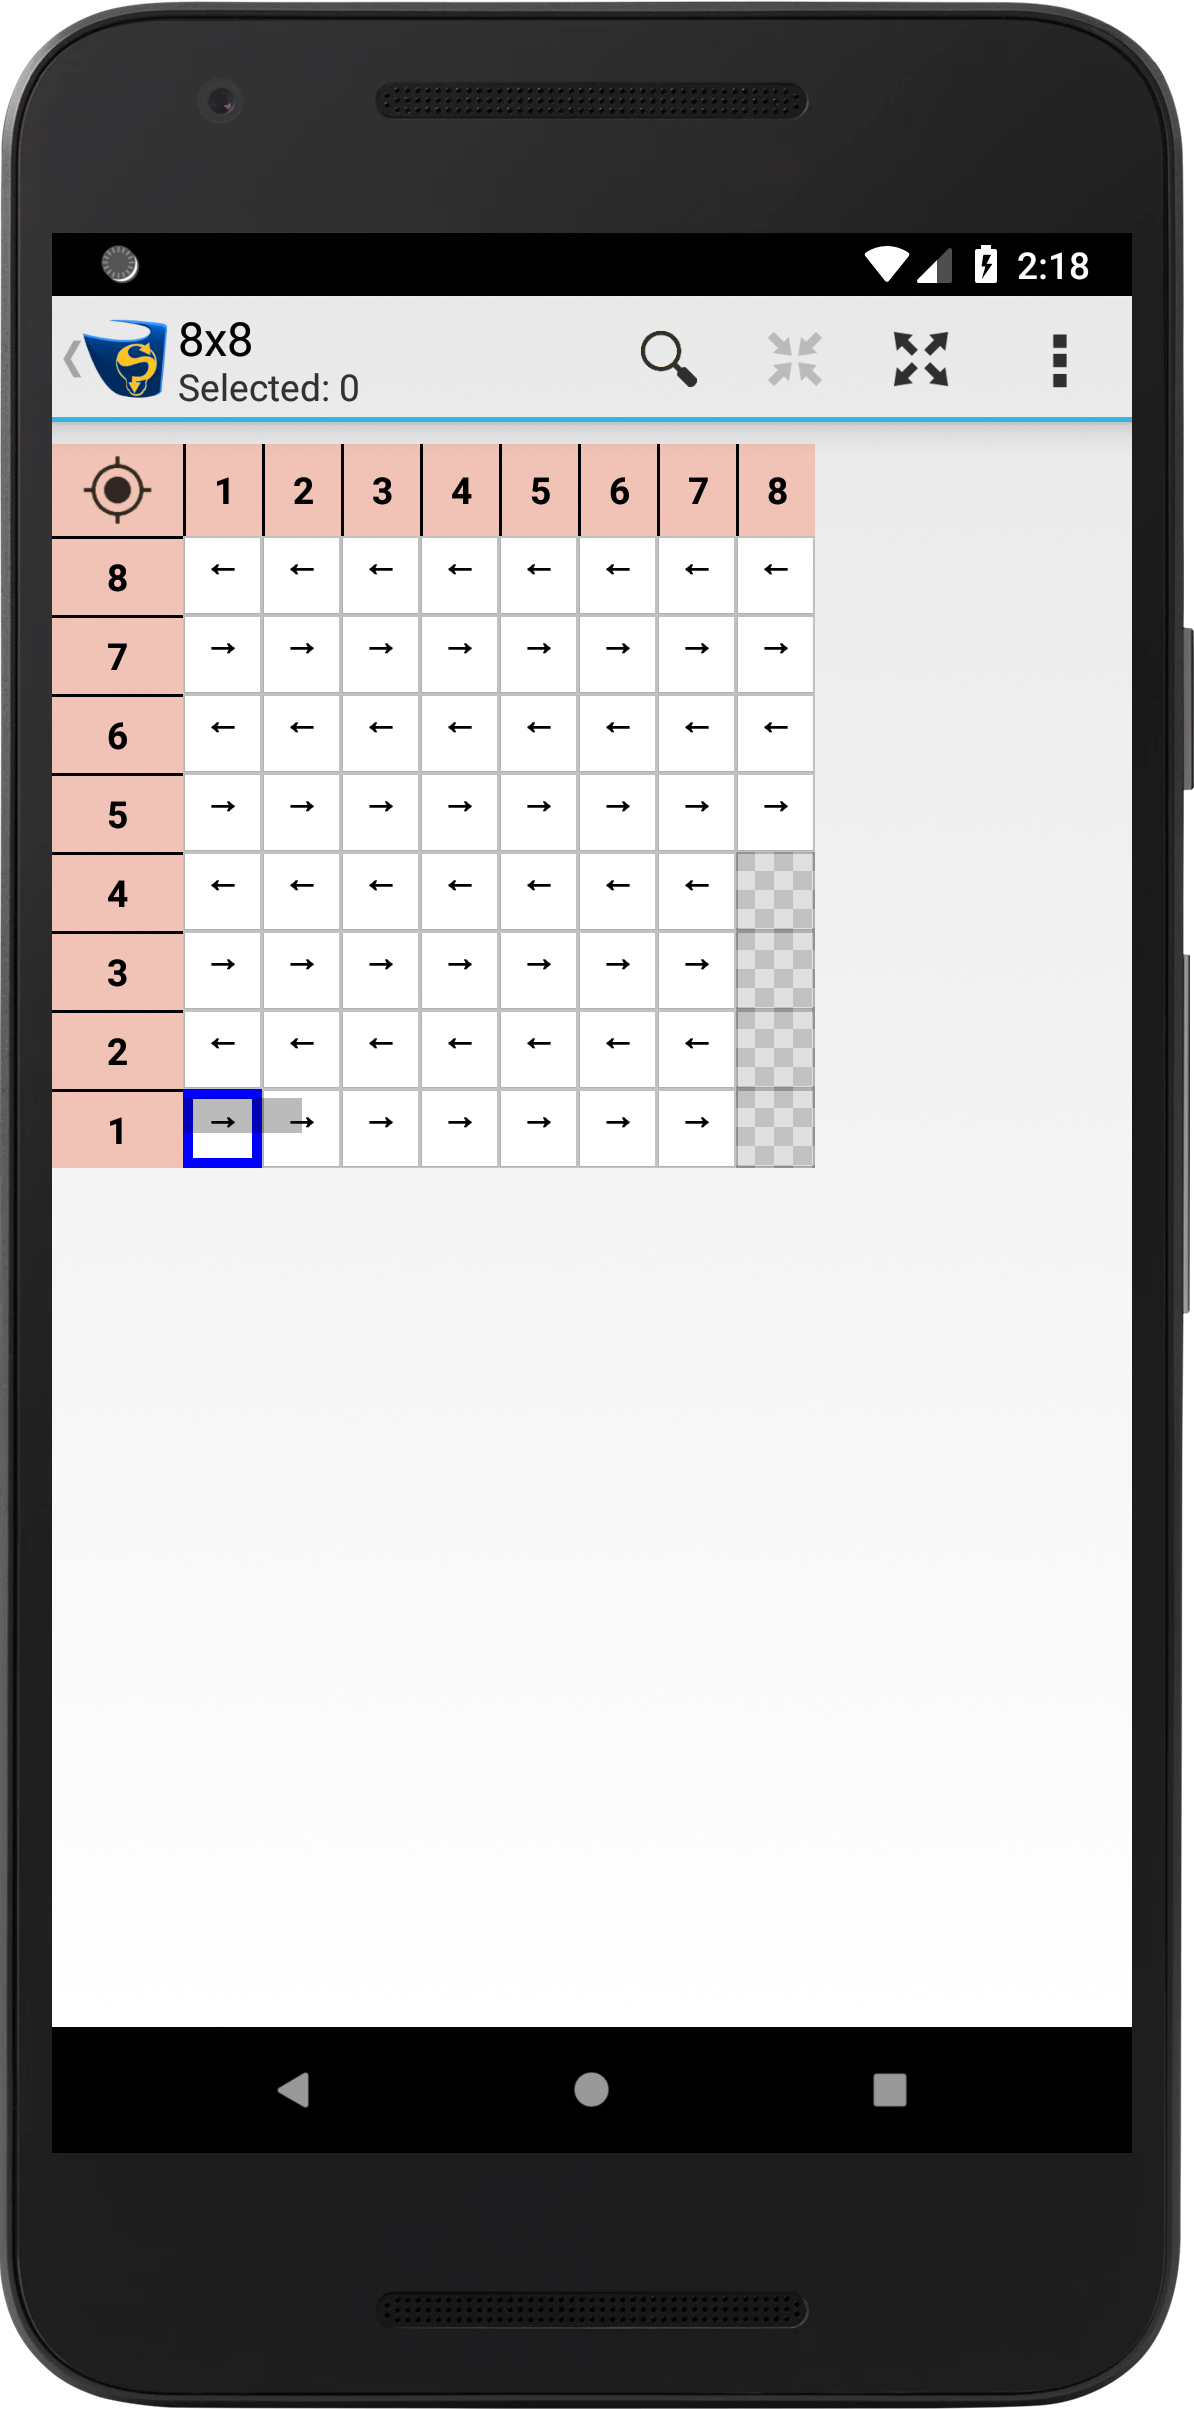
Field View
Field View is a top-down look at the field which offers an alternative way to navigate between plots, search plots, and produce heatmaps. It will provide different information depending on the level that it is being viewed at (how zoomed in/out you are). At a minimum, the collection order (the arrows in each plot) and the percentage of each plot scored (the grey bar in each plot) will be displayed. Select the  /
/ Zoom In/Out Button to reach higher or lower level views. Lower level views have more information about tags, traits, trait values, etc. The image below is an example of Field View at the highest level:
A long press on a plot will reveal a window with information on that plot. A short press will provide both plot information and options for selecting multiple plots and navigating to that plot (as seen in the image below). Select the Go To Button to navigate to the selected plot.

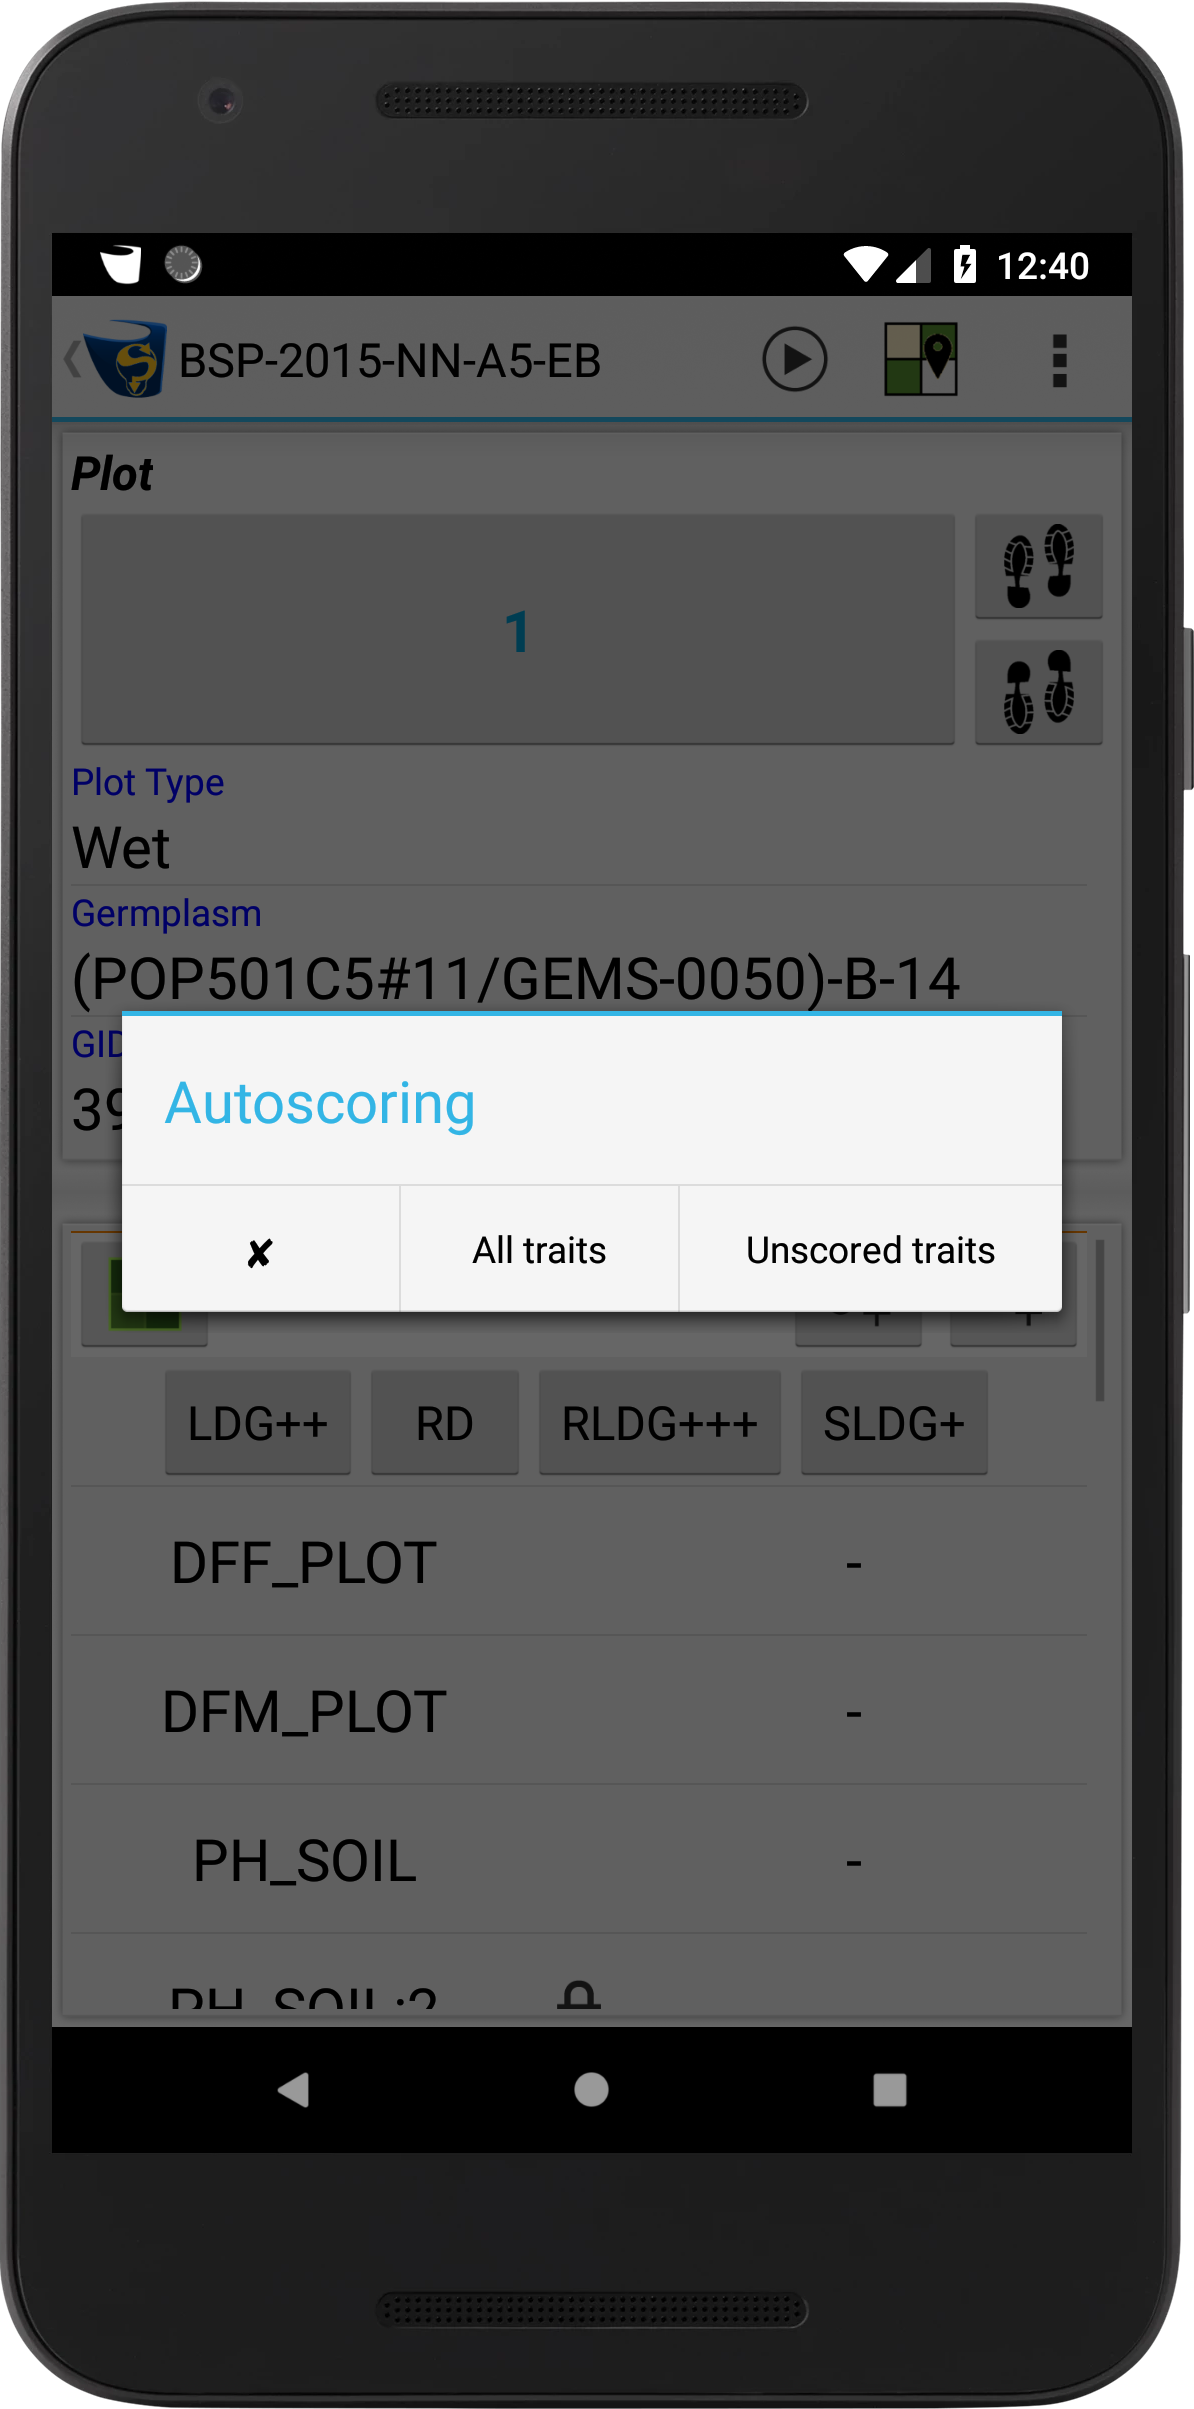
Auto-Advance
The quickest way to score traits is to use the Auto-Advance Mode. Auto-advance also allows the user to concentrate on only those traits for which a measurement has not been provided.
When the user provides a value for a trait, KDSmart moves the focus to the next un-scored trait, skipping over those traits (and sometimes entire plots) which have already been scored. This is useful when starting scoring as it quicker and when scoring has been finished if the user needs to find any un-scored plots or traits. The following video and instructions demonstrate how to use Auto-Advance:
Step |
Action |
|---|---|
1. |
Select the |
2. |
Choose either the All Traits option to score all traits within the dialogue box, or the Un-scored Traits option. |
3. |
Begin scoring by selecting the blank area next to an un-scored trait. This displays a new screen with the data entry form for the trait on one side and the Plot Information on the other side (this is demonstrated in the image above). |
4. |
|
5. |
Return to the Scoring Screen and select the |


Note
The Auto Advance feature is only available in Path Scoring Mode.
Assigning Tags
Tags are short text descriptions that are designed to be like reusable notes that can be applied to plots or sub-plots. Along with scoring traits, assigning tags is a part of the scoring process. One or more tags may be assigned to a plot (or sub-plot) or reassigned if required. More information about tags and their management can be found in the Tags page at http://www.kddart.org/help/kdsmart/html/tags.html
To assign a tag in Path Scoring Mode, follow these steps:
Step |
Action |
|---|---|
1. |
Locate a plot or sub-plot to tag in the Scoring Screen. 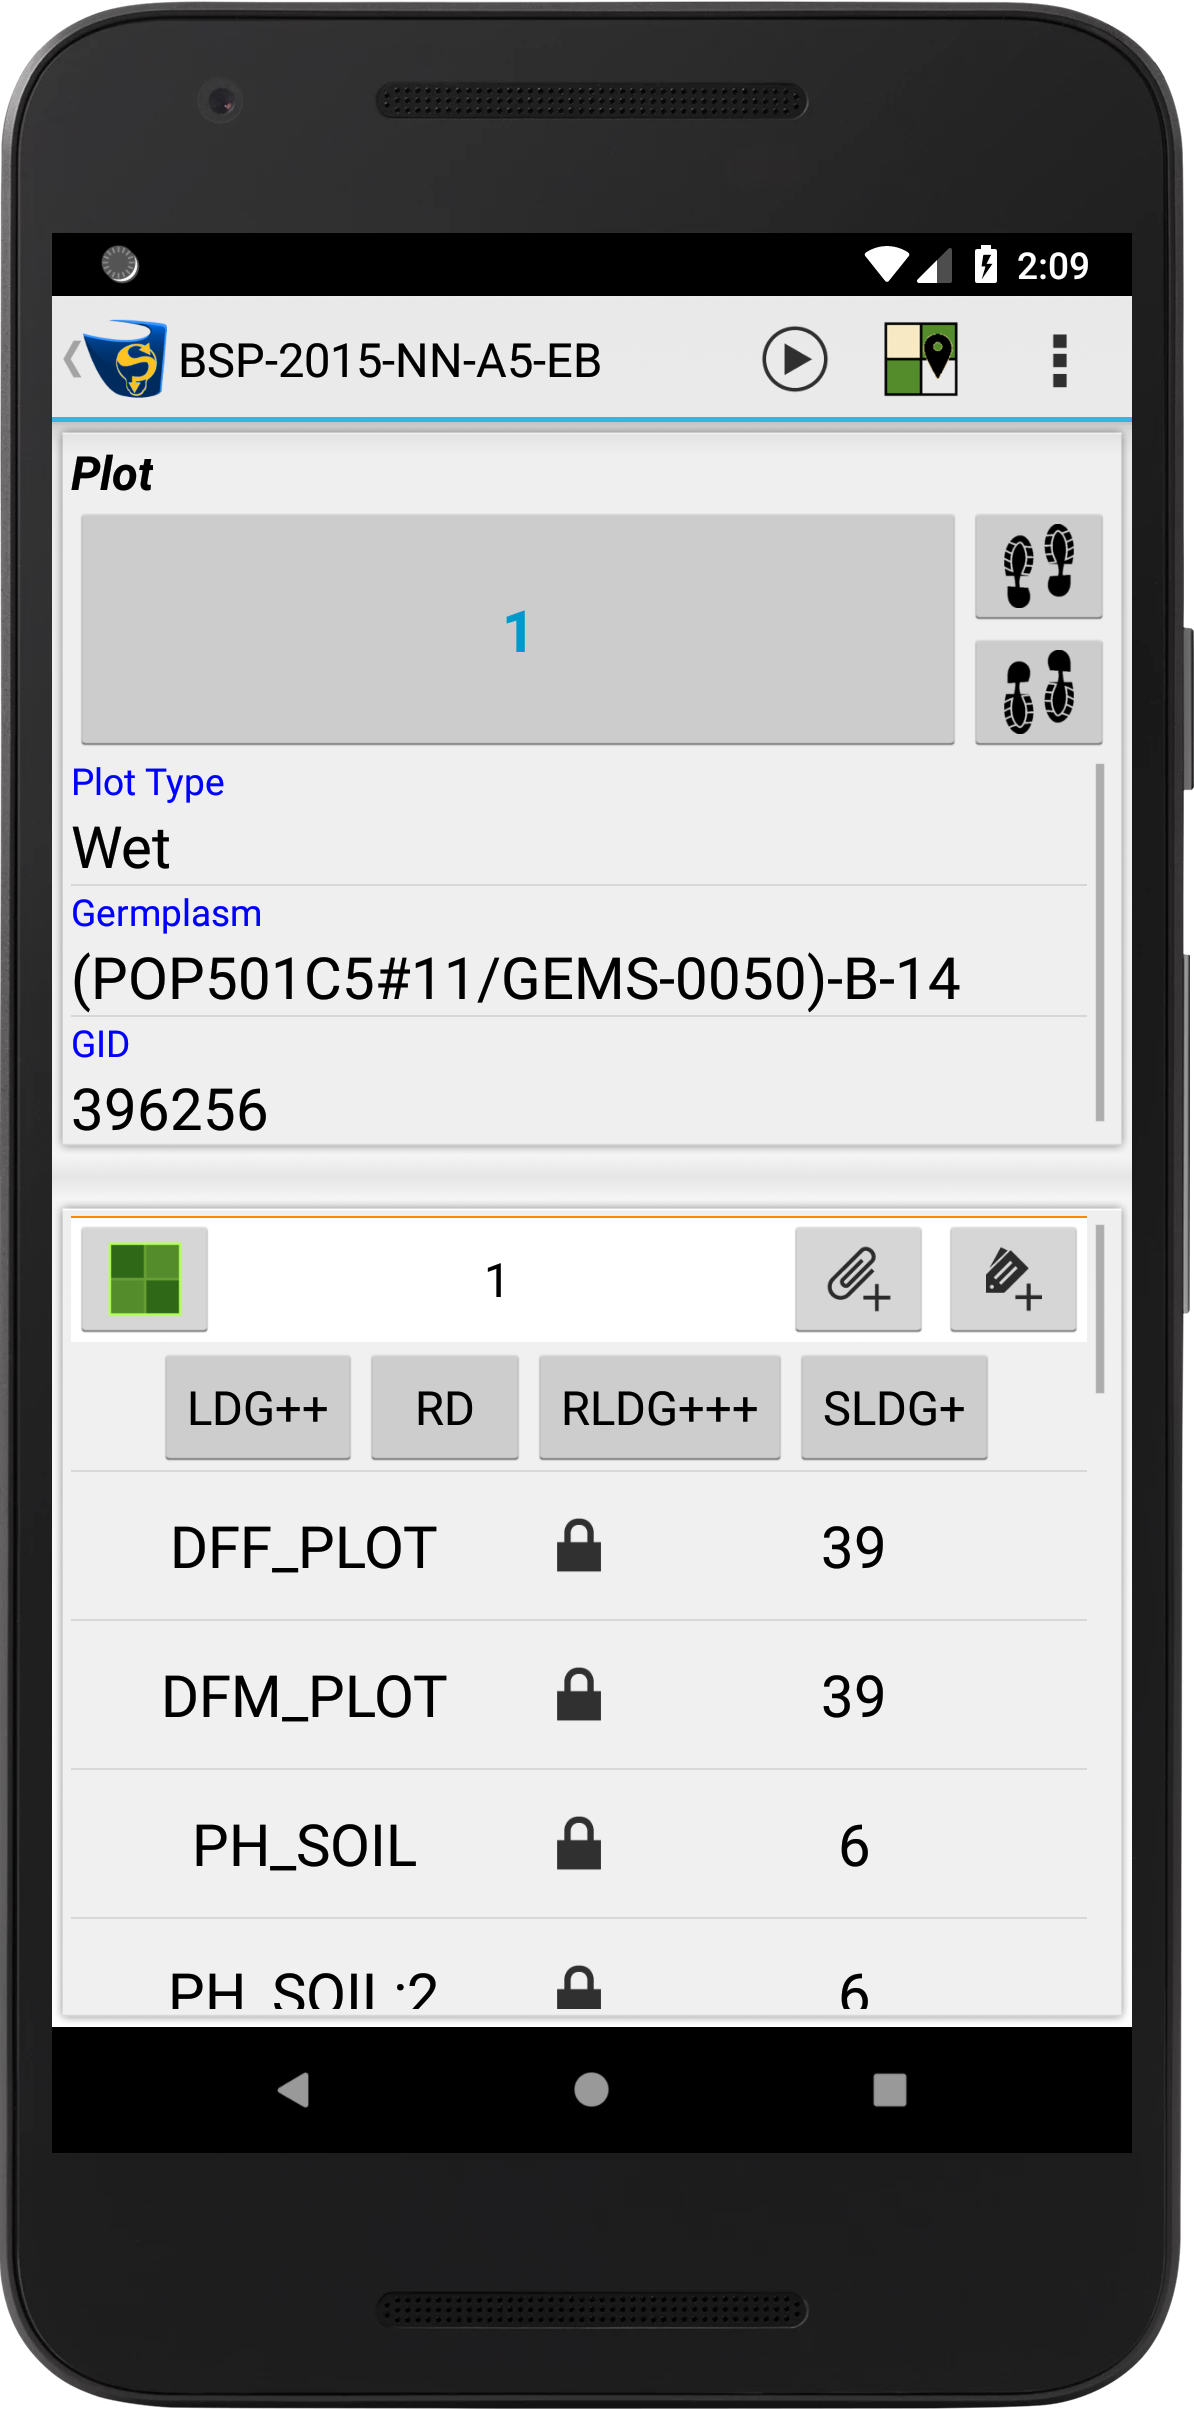
|
2. |
Select the |
3. |
Select one or more tags to assign them to a plot. 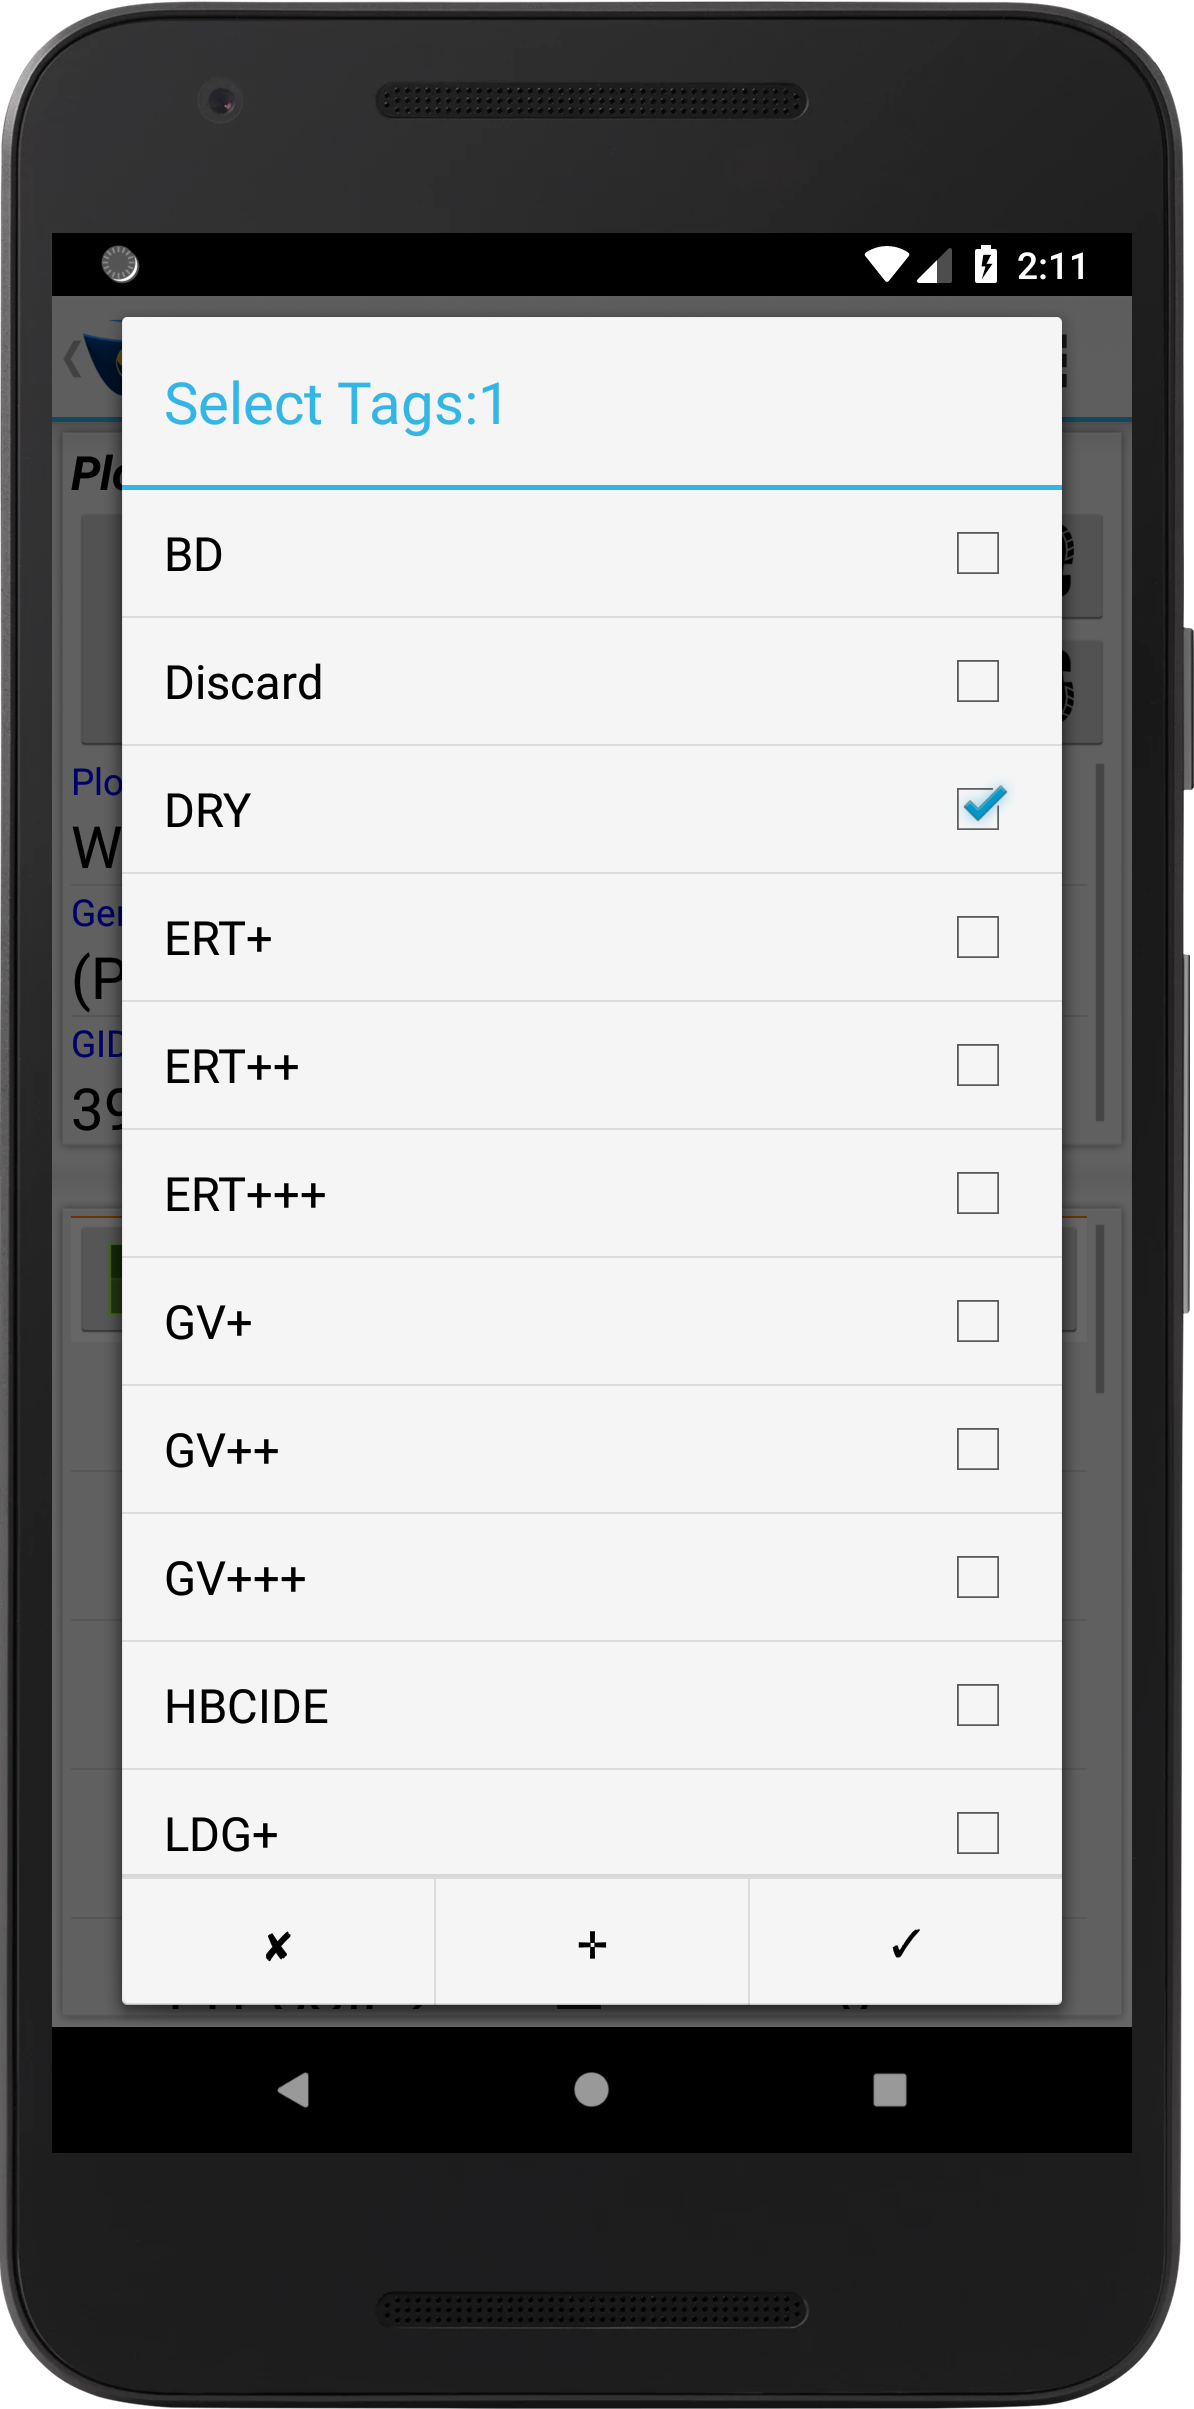
|
4. |
Select the Confirm Button (tick) to save changes and return to the Scoring Screen. This displays the tag short name above the traits for the selected plot. |
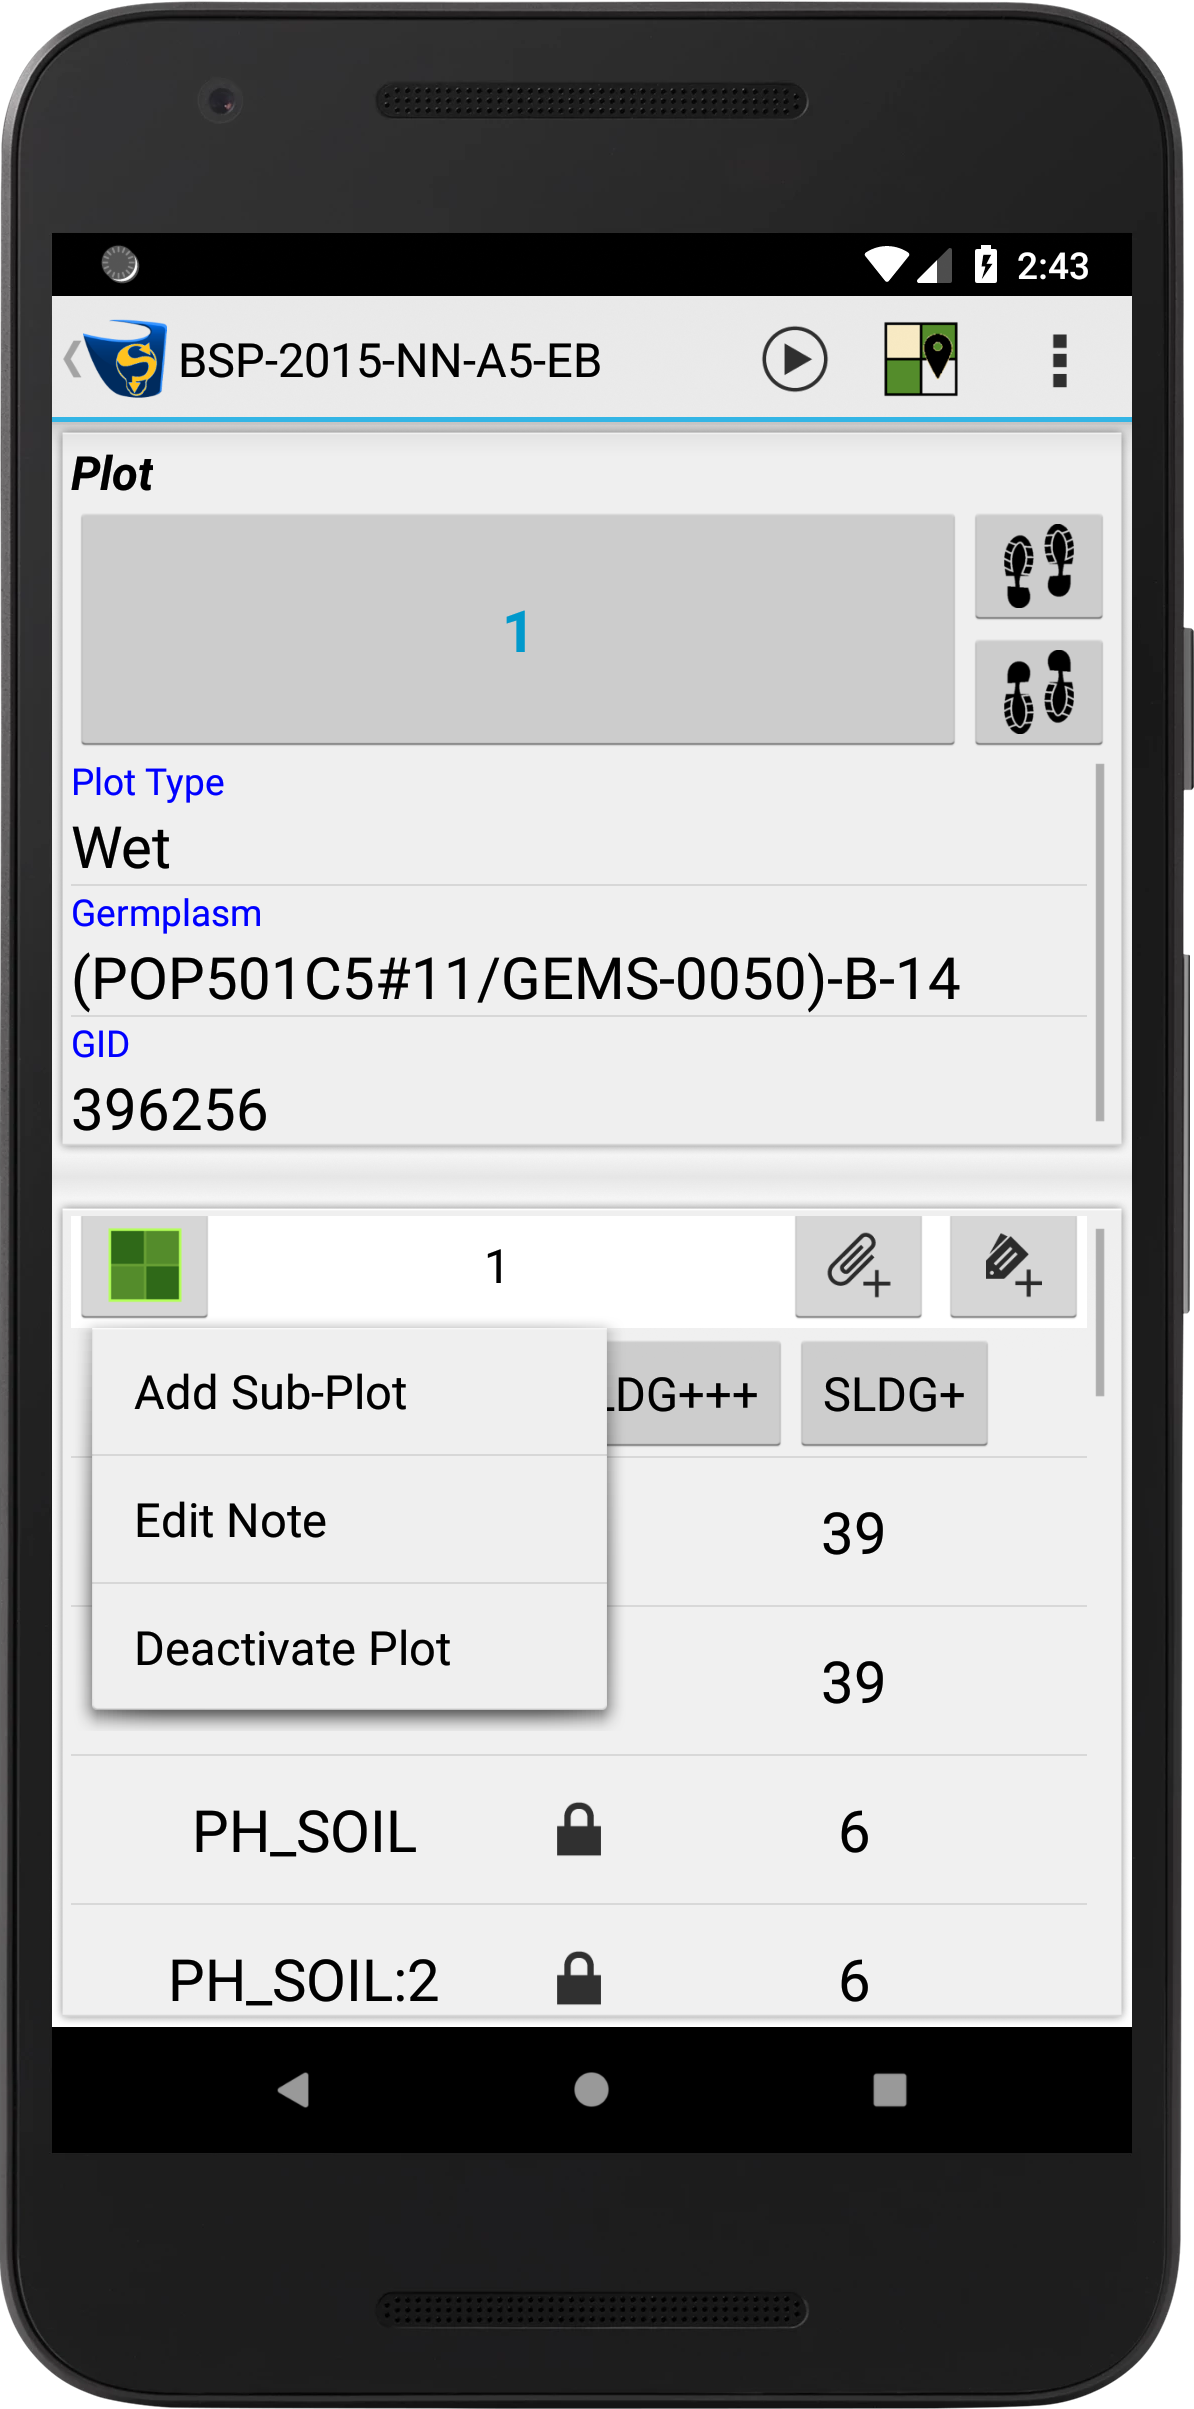
Adding Notes
Notes can be added on each plot or sub-plot in a trial. In any scoring mode, this can be done by selecting the  /
/ Plot/Sub-plot Button which will display some options such as an Edit Note Button. This can be seen in the image below (Path Scoring Mode).
Note
The Sub-plot Button in this example is of maize but it may be different depending on your settings e.g. a leaf or DNA icon. You can see that you can also deactivate plots and sub-plots in this menu and add sub-plots if needed.
Adding Attachments
Both images and audio files can be attached to each plot and sub-plot in KDSmart and can be used instead of notes or tags. The  Attachment Button can be found on each plot and sub-plot (next to the
  Tag Button) and will open the Attachment Screen as seen below:
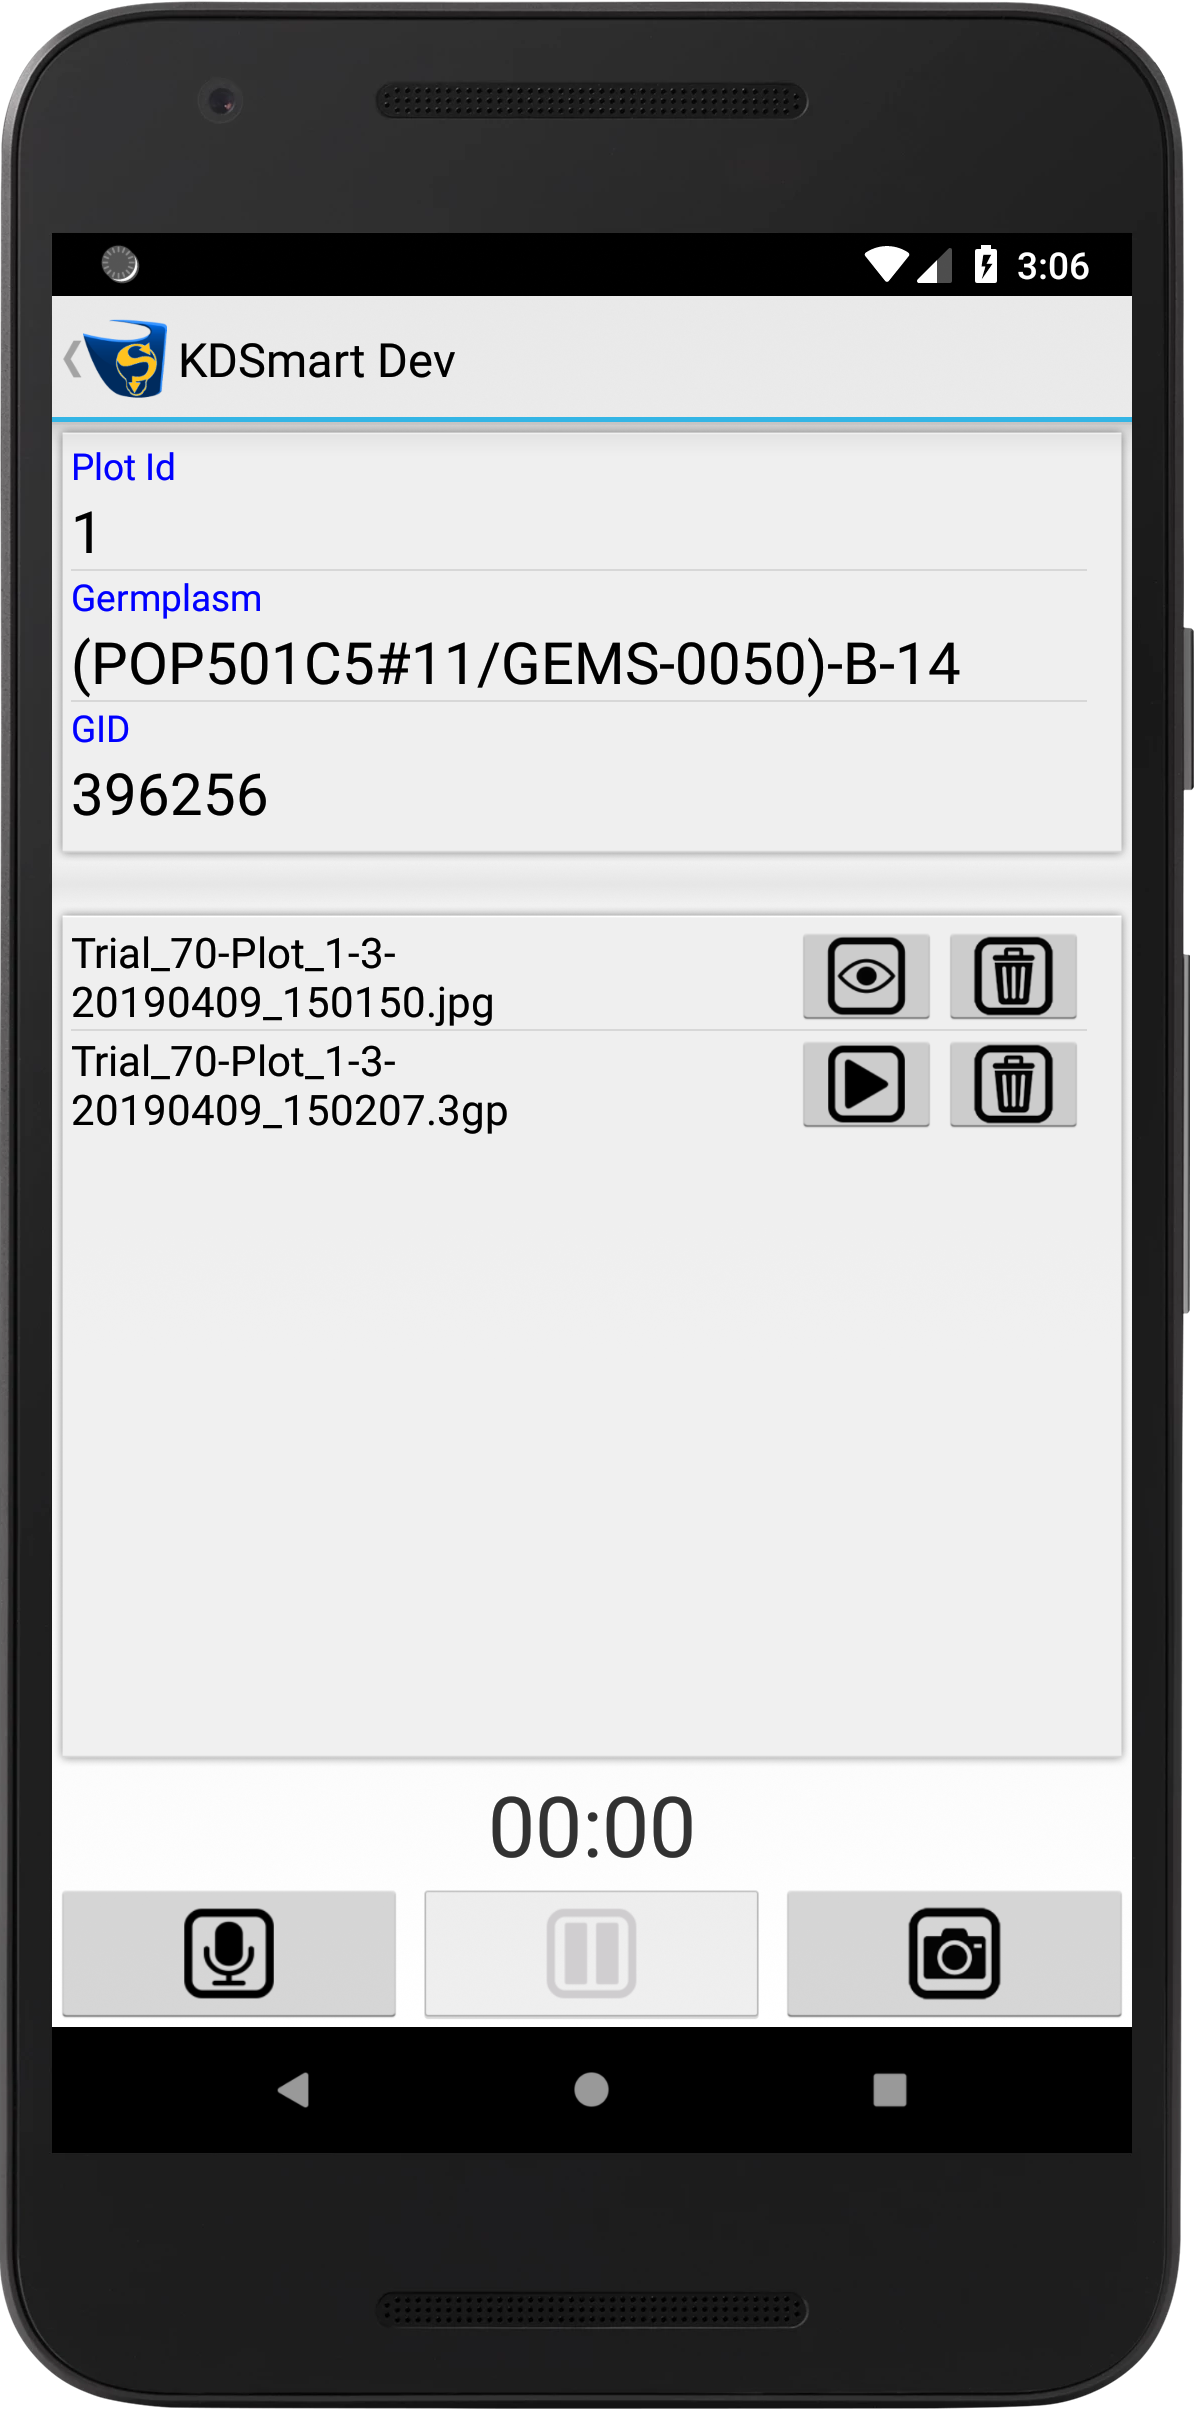
There are two attachments currently saved in the example above; one is an image and one is an audio file. This can be seen by the .jpg and .3gp file extensions. There are two tables below with instructions on attaching images and audio files.
Step |
Action |
|---|---|
1. |
Image files can be attached by taking a picture with the device camera. Select the |
2. |
Take a picture and select the Confirm Button. This will look different depending on what device you are using. |
3. |
The new attachment should appear in the list of attachments as seen in the image above. Select the |
4. |
Select the |


Step |
Action |
|---|---|
1. |
Audio files can be attached by making an audio recording with the device microphone. Select the |
2. |
The |
3. |
Select the |
4. |
The new attachment should appear in the list of attachments as seen in the image above. Select the |
5. |
Select the |


