Tutorial 2 - KDXplore
The Trial Manager Plug-in within KDXplore is a versatile and useful tool for providing users the ability to manage trials by editing traits and tags and enabling visualisation options for data. It also provides a platform for users to load and curate their collected data.
This tutorial provides instruction on how to begin using KDXplore’s Trial Manager. Upon completion you should be able to:
- Open and navigate Trials using Trial Manager;
- Load trials into KDXplore;
- Add traits and tags to a trial;
- Create trait instances in a trial;
- Make a scoring Set for efficient scoring;
- Edit basic trial Information;
- Connect KDXplore and KDSmart; and
- Transfer trials to KDSmart.
These activities form a part of managing and configuring trials. This is an important step toward being able to load trials onto KDSmart devices for data collection in the field.
Table of Contents
Note
Select any heading to expand/display  or contract
  the section.
Step 1 - Loading Trials
The first step to start working with Trial Manager is to load a trial using one of the several available methods. Loading trials using Google Drive, from CSV files and from a KDDart database will be covered.
If the connection to the KDDart database is successful, then a variety of trials are available for practice. See Training Sample Data for sample files and database login information.
Further example CSV files are available at the KDSmart/KDXplore Example Resources page. Please visit this page and download the ‘Column and Row Trial’(KDSXsample1_Normal_Trial_X_Y.csv) to use for the following tutorials if you do not already have a trial to use.
Loading Trials from a CSV File
KDXplore can import CSV and Excel XLS or XLSX files easily using drag+drop. For information on file import formats please see the CSV Import File Formats help page.
This annotated illustration accompanies the following instructions to import a trial from a CSV file:
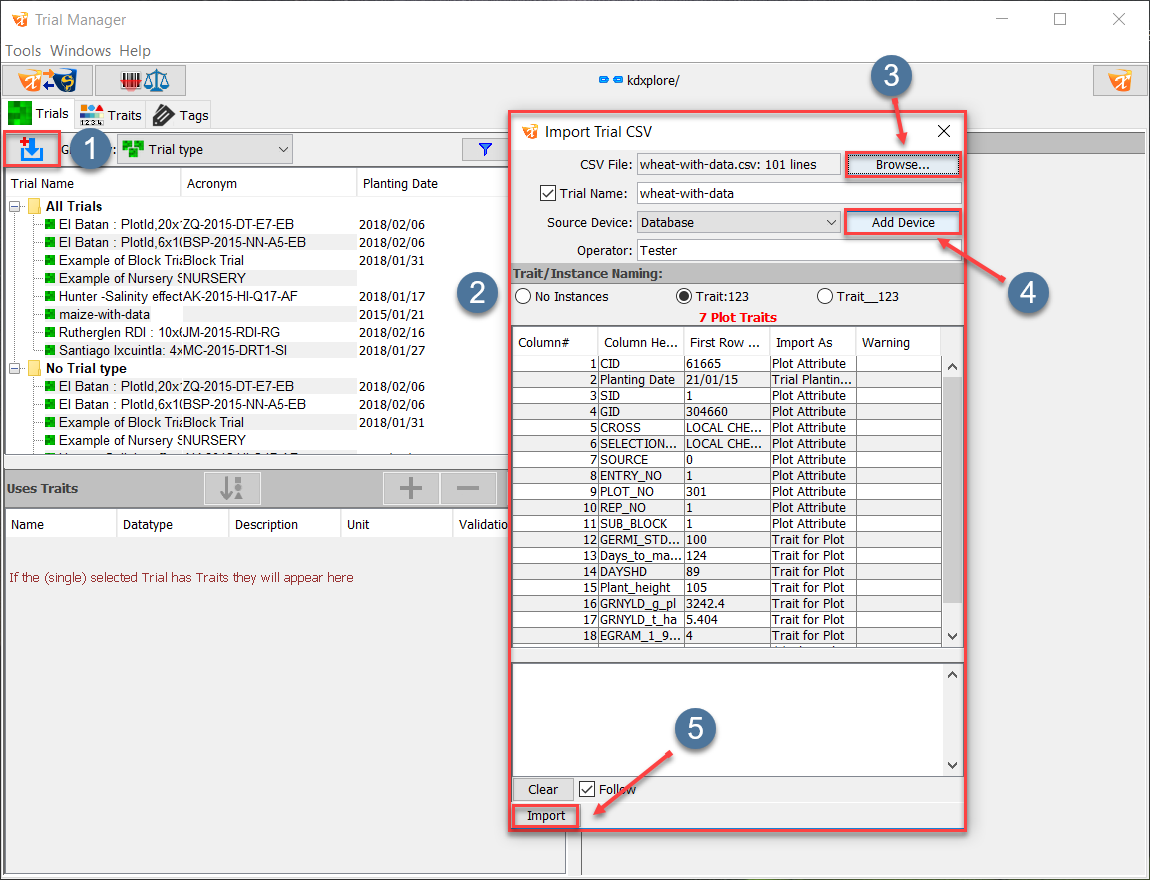
Trials can be imported from various sources and in different formats. One of the easiest ways is to import a CSV file which is outlined below in the steps and video below:
| Step | Action |
|---|---|
| 1. | Select the Add Trials Button at  and select the Load From CSV option. This will display the Import Trials Window at and select the Load From CSV option. This will display the Import Trials Window at  . . |
| 2. | Either drag+drop a CSV file into the window or select the Browse Button located at  . . |
| 3. | Select the Add Device Button at  to link any connected devices to import data (this is optional). to link any connected devices to import data (this is optional). |
| 4. | Change the Trial Name and Operator if necessary. The traits that are contained in this file will also be listed in the window. Selecting a trait by right-clicking it will allow the user to choose import options for that trait i.e. Don’t Import. |
| 5. | Select the Import Button at  to save the preferences and import the trial. to save the preferences and import the trial. |
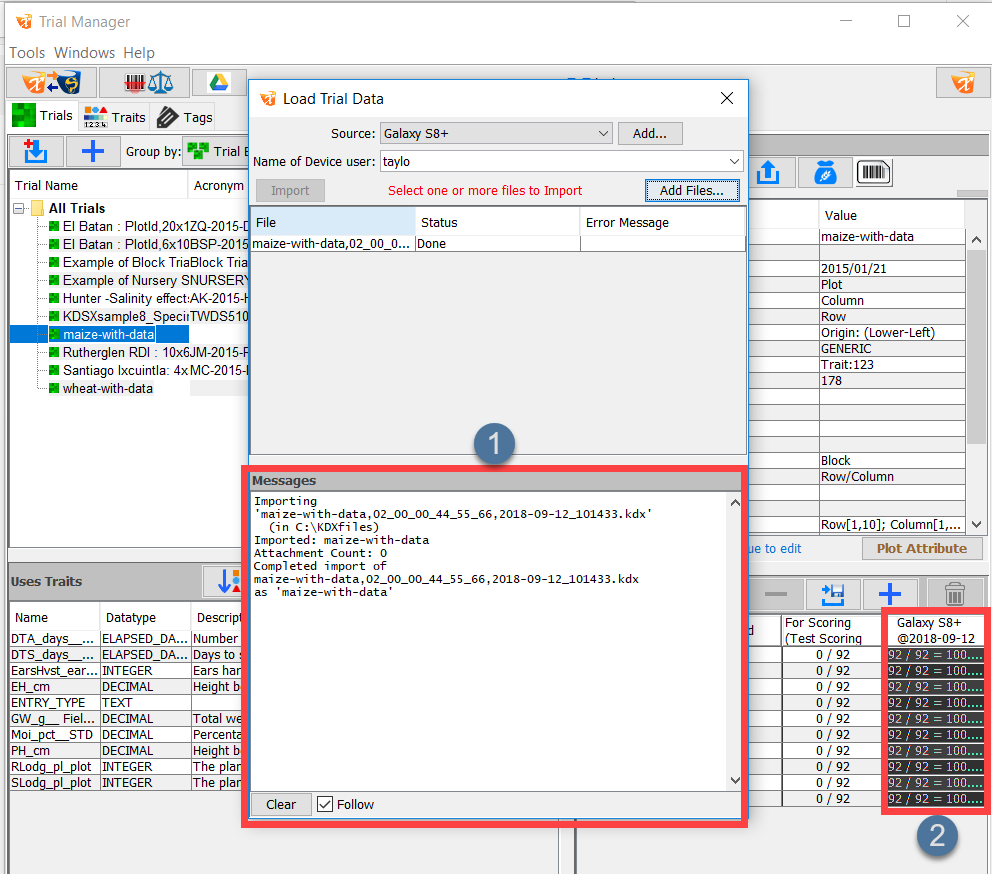
Once a trial has been imported it will appear in the list in the Trial Details Panel. Trials can also be imported from KDDart by selecting Load From Database and from connected KDSmart devices through the Load From Tablet Data option when selecting the Add Trials Button.
Note
Whilst this covered the import of a CSV file, the same process applies for a XLS or XLSX file except the user must choose the Load From XLS option after choosing to add trial.
Loading Trials from KDDart Database
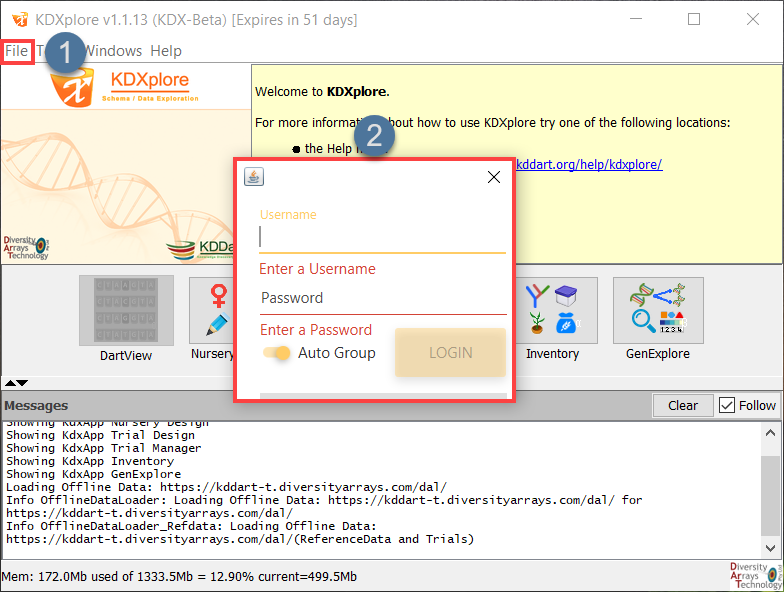
To import trials from the KDDart database, you must first log in to KDDart. See login instructions below, followed by database trial import instructions.
| Step | Action |
|---|---|
| 1. | Select File at the , then choose the connect option. |
| 2. | The KDDart Login Window will then appear as at . Enter your username and password and then select the Login button to log into the KDDart database. |
Logging into KDDart allows the user to easily import trials with the relevant traits and tags attached. The following instructions demonstrate how to import a trial from the database:
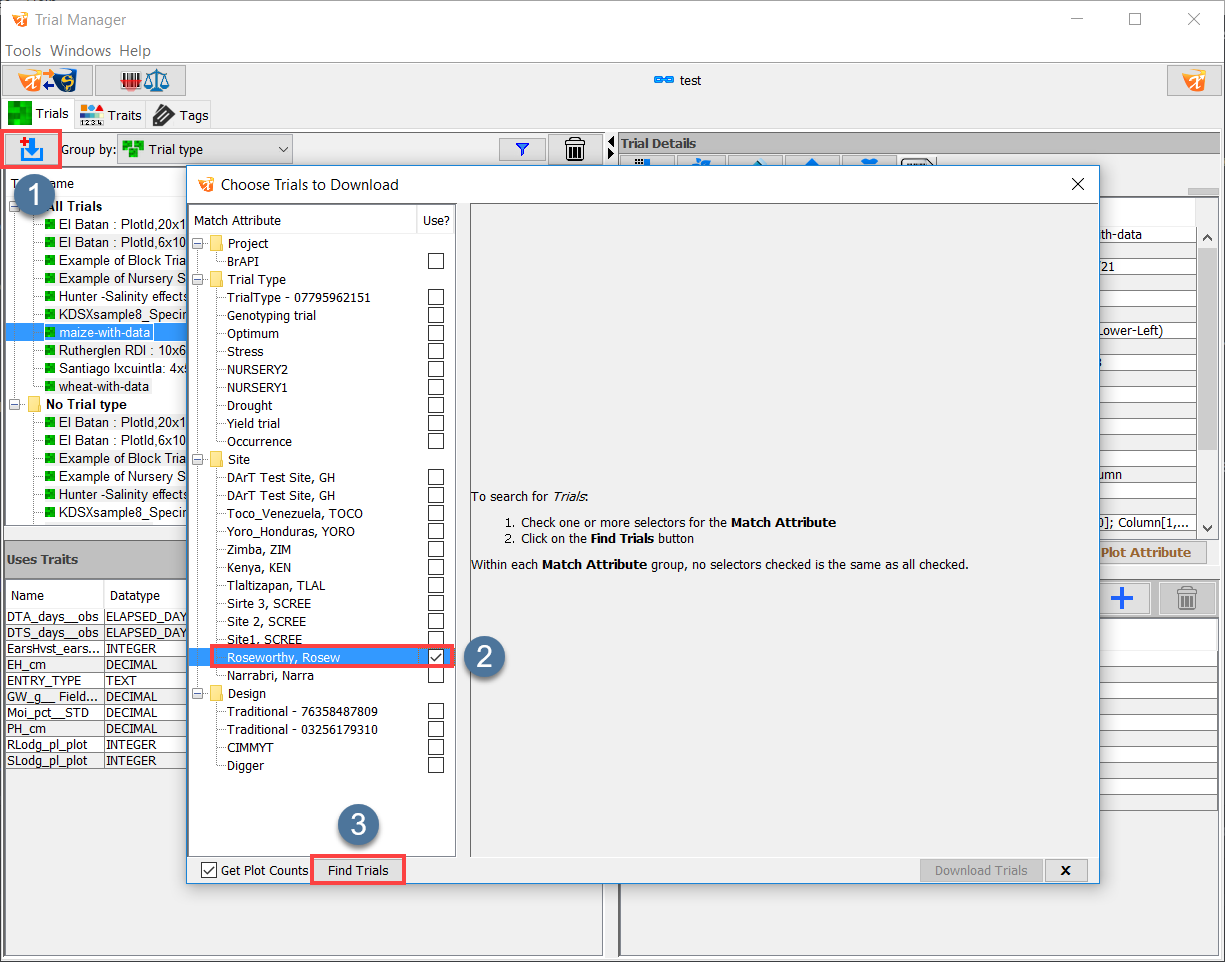
Importing a Trial from the Database¶ Step Action 1. Select the Import Trial Button at
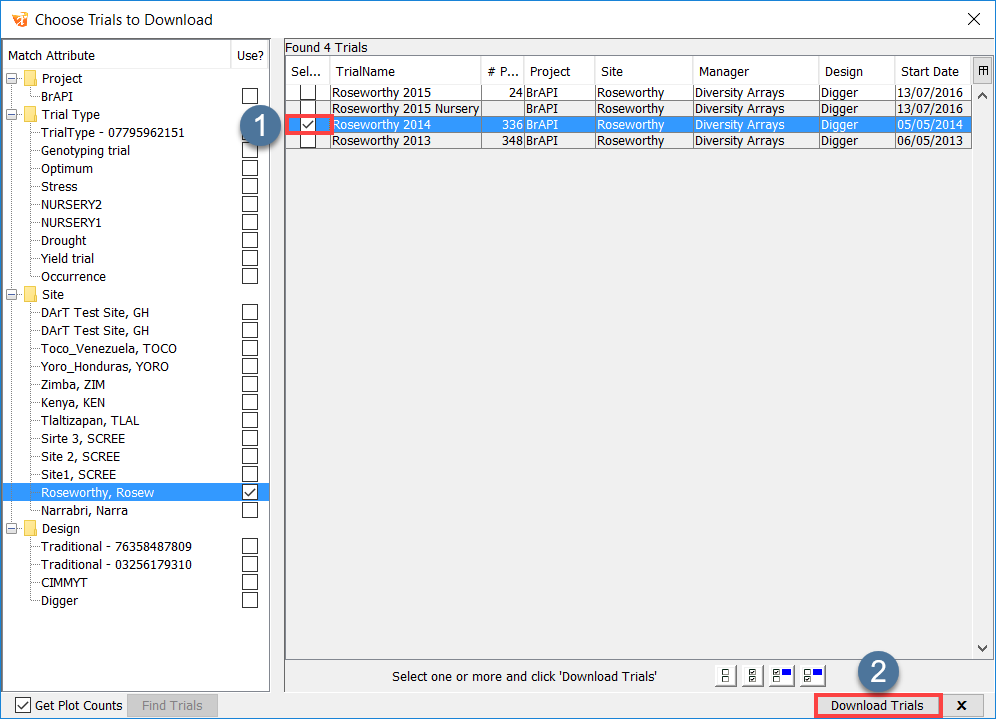
2. Choose an attribute to search for (such as the one at 3. Select the Find Trials Button to search for the trials. If no attributes were selected, then all trials in the database are presented. 4. The search results will be displayed (such as in the following image). Choose a trial (or multiple trials) such as the one in
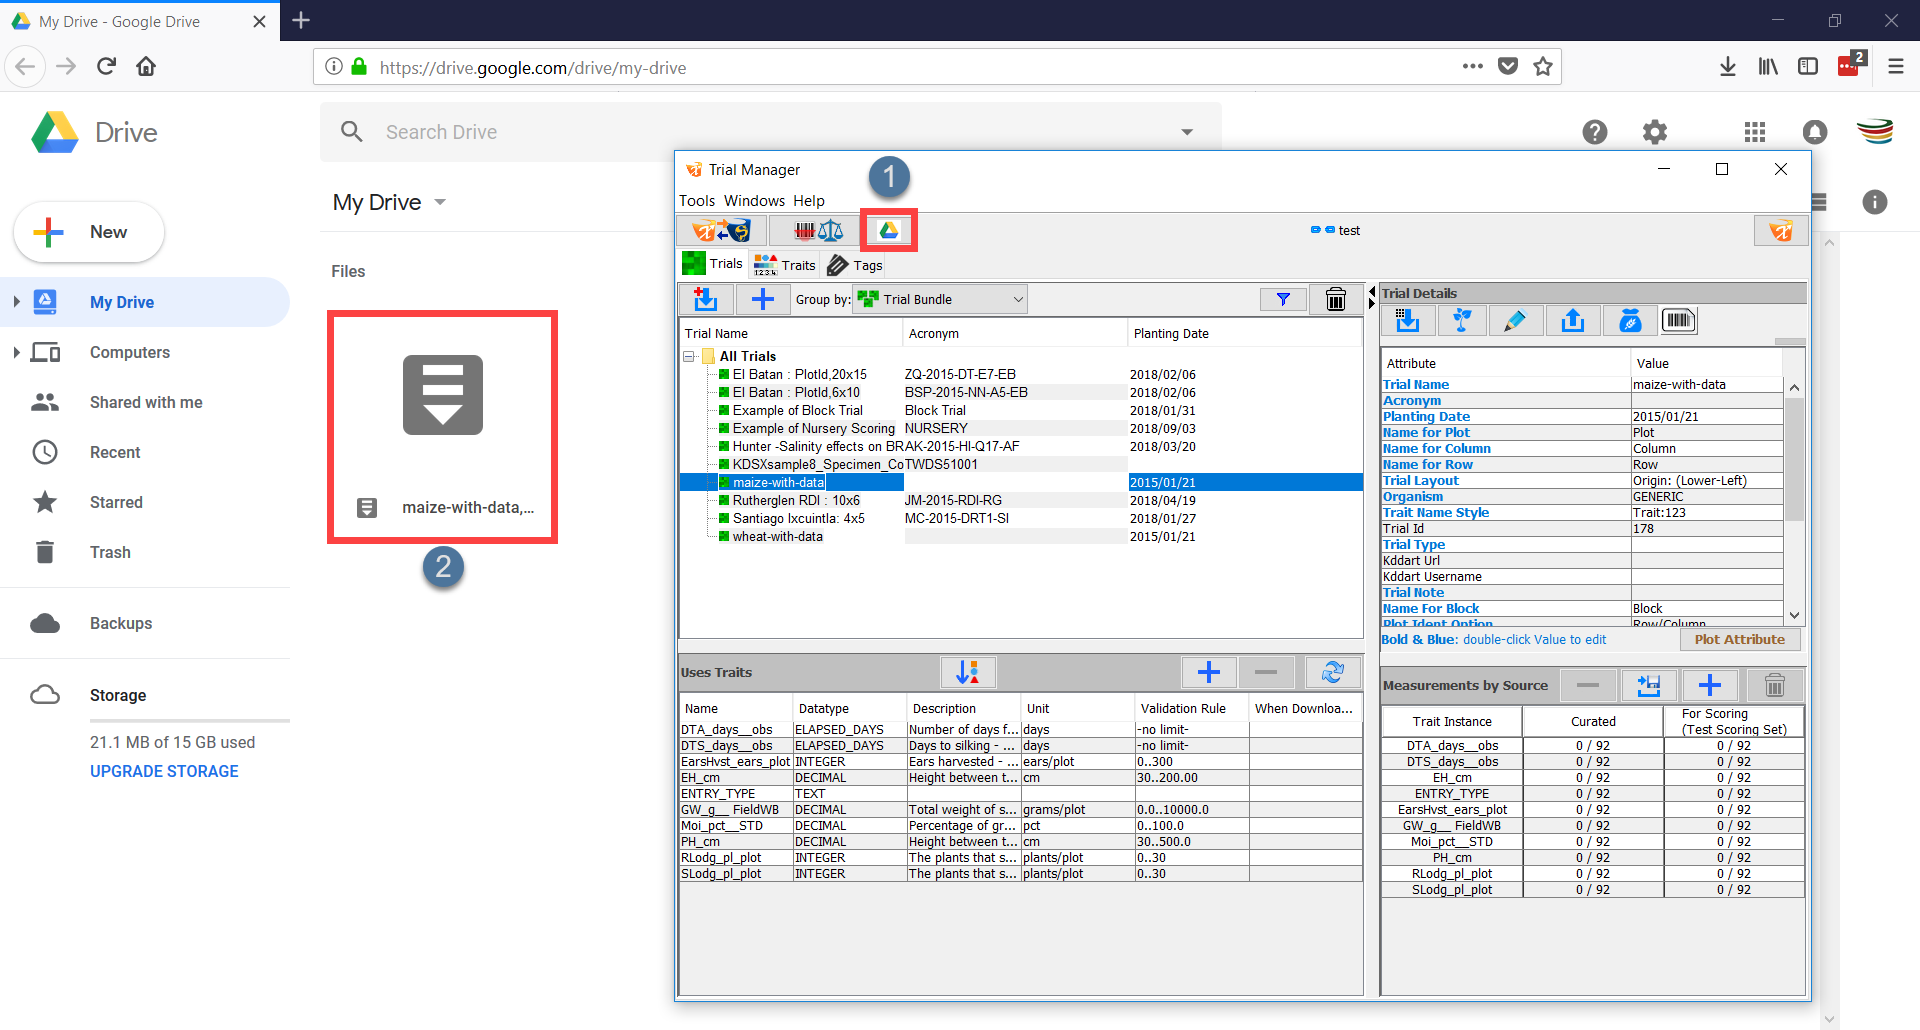
Loading Trials from Google Drive
The integration with KDSmart and Google drive means that it’s likely that any scored trials (trials with scored data) will be located on Google Drive. This means that the trial will need to be downloaded to the computer that KDXplore is installed on. This method is the same as the Loading Trials from a CSV File method except that you will need to download the file (which will likely be a KDX file) from Google Drive. The image and instructions below will outline how to download a trial from Google Drive and load it into KDXplore.
| Step | Action |
|---|---|
| 1. | Ensure that Google Drive is opened. If it’s not, then there is a Google Drive button in KDXplore which will open it in a browser. This button is located at in the above image. |
| 2. | Choose any file such as the one located at . Right-click this file and then choose the Download option. This downloads the file to the default location for your browser (e.g. The Downloads folder). |
| 3. | Click+drag the downloaded file (such as the one 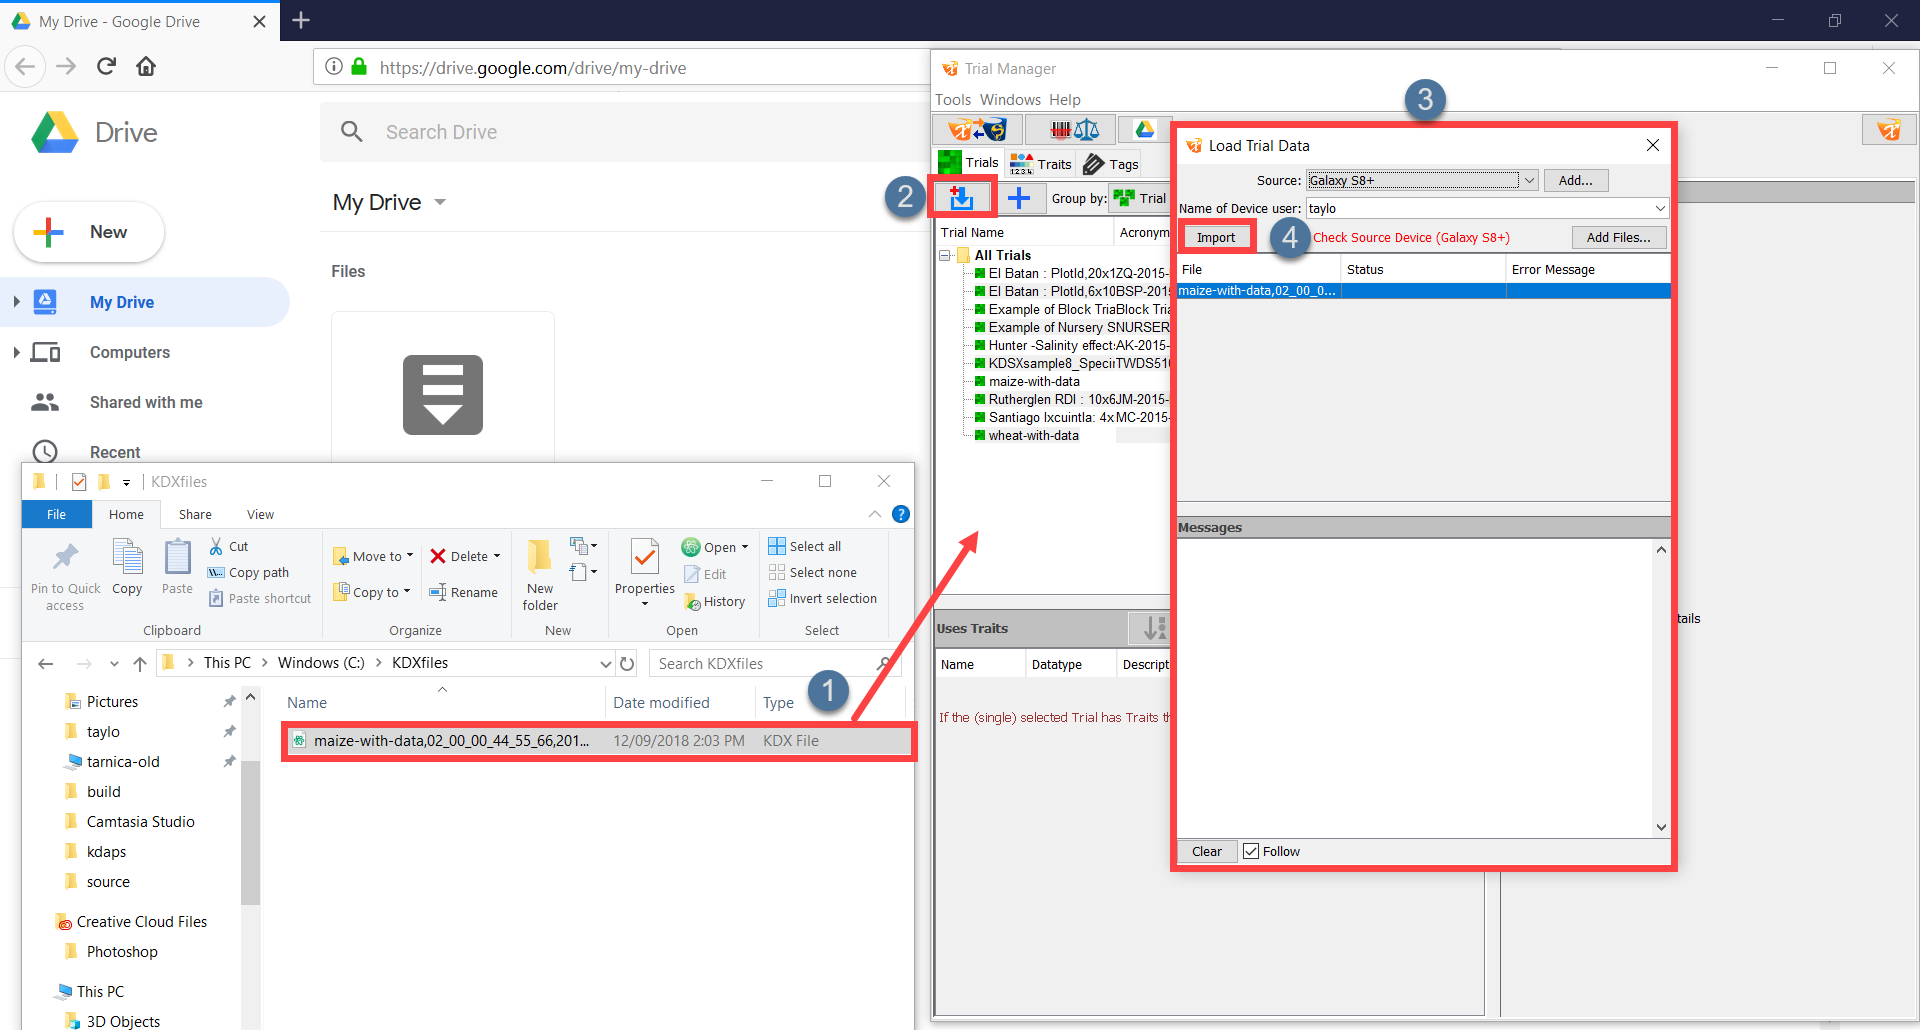
|
| 4. | As with the Loading Trials from a CSV File method, select/highlight the file you want to import, select a Source device, and enter the Name of the Device User. |
| 5. | Select the Import Button at
|
Step 2 - Adding Traits
It’s likely that any trial that is added will already have the required traits necessary for the experiment. However, traits can also be added to a trial within the Trial Manager Plug-in by creating a new trait, editing an existing trait, or importing a trait. This tutorial will contain a quick demonstration on adding a new trait.
Users can add new traits which can then be added to trials. These new traits provide users the flexibility to add traits after a trial has been created, e.g. adapting a previously used trial for a new experiment.
The following image and instructions demonstrate how to add new traits:
New traits can be added by:
| Step | Action |
|---|---|
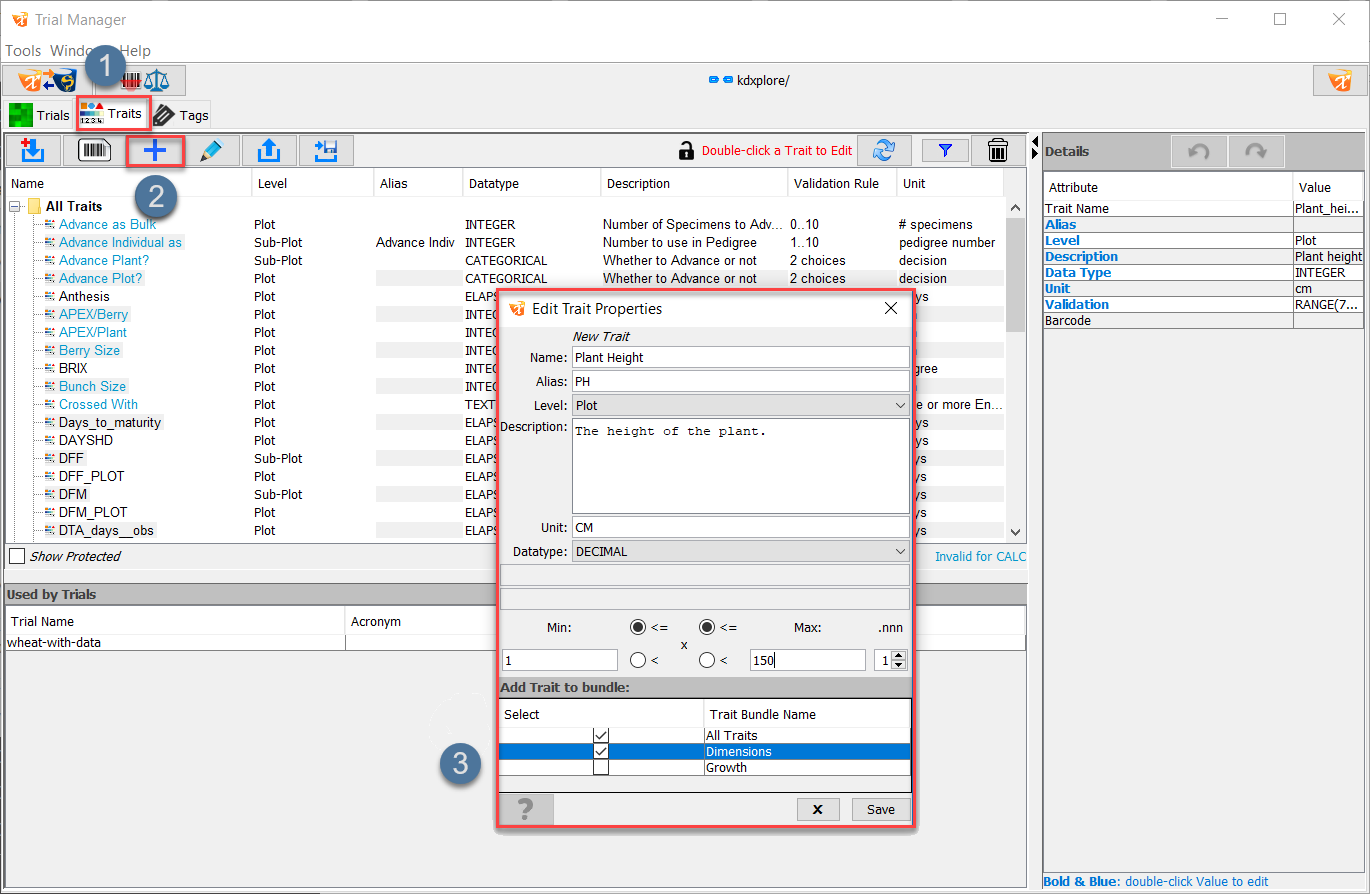
| 1. | Navigate to the Traits Panel by selecting the Traits Button at . |
| 2. | Select the Add Traits Button at to create a new trait. This will display the Edit Trait Properties Window at . |
| 3. | Within the Edit Trait Properties Window are the key trait fields. Enter the details of the trait. More information on traits can be found below. |
| 4. | Select the Save Button to save the new trait which will then be displayed in the Traits Window. |
To add a new trait, all the following details must be entered:
| Attribute | Description |
|---|---|
| Trait Name | The name for the new trait. Must be unique and short because it’s displayed in the Scoring Screen and there may be limited screen space on smaller devices. |
| Alias | An alternative name for the trait. This can be something shorter than the trait name and is optional. |
| Level | This will define the trait as one that is relevant on the plot or sub-plot level. |
| Description | This is an optional longer explanation of the trait to assist in data entry. |
| Unit | The unit of measurement in which the trait can be scored by e.g. centimetres so that a plant leaf can be measured |
| Data Type |
|
| Validation Rule | The Validation rule optionally restricts the values being entered. The nature of the rule is dependent upon the selection of a data type and can include a minimum and maximum value. |
| Add Traits to Bundle | Checkboxes that allow the user to add the new trait to existing trait bundles. |
Note
You can also try importing traits by downloading a traits file from the KDSmart/KDXplore Example Resources page and importing them with the same method that is used for importing trials. For more information on adding traits to a trial, please see the Adding Traits section of the full help guides.
Step 3 - Adding Tags
In KDXplore Trial Manager, tags are short, coded descriptions that are used to represent information about a plot in a trial. Tags available for use in scoring in trials can be seen, along with definitions in the Tags Tabs of KDXplore Trial Manager.
Similarly to traits, tags can be included in a trial but the user may also create custom tags for a trial. Follow the instructions below to create a new tag:
| Step | Action |
|---|---|
| 1. | Select the Add Tag/Tag Bundles Button at the top of the panel at and then choose the Add Tag option. |
| 2. | This opens the Add Tags Window (shown with ) which allows the user to create a new tag by entering a new tag label and a description. Tags must have a unique name in KDXplore, similarly to traits. This example demonstrates the creation of a tag known as HD which is described as Human Damage. |
| 3. | Choose a Tag Bundle with the checkbox at . If there are no user-created bundles, then there will only be the All Tags bundle to choose (Note: Creating tag bundles will be examined later). |
| 4. | Once the tag name and details have been entered, select the Save Button at . |
The new tag is added into the Tags Panel after being saved.
Step 4 - Attaching Traits to a Trial to make Trait Instances
When a trait is scored for a specific plot/sub-plot it will contain the value entered. Some traits however, may need to be scored several times, such as recording plant height at several time intervals, or the changing soil PH.
The least desirable workaround would be to have multiple traits with slightly different names (i.e. Plant_height_wk1, Plant_height_wk2, etc.). This creates more work for trait creation, management, analysis and data curation.
A much simpler and more effective solution is to create Trait Instances. This can be done in the Trial Manager which will allow the trait to be used, or scored, multiple times within the same trial.
Using the Plant_height example, if three instances are specified for the trait, then three measurements can be recorded for each plot/sub-plot and is available for comparison e.g. Plant_height#1, Plant_height#2, etc.
The following image and steps will outline how to create multiple instances of Plant_height:
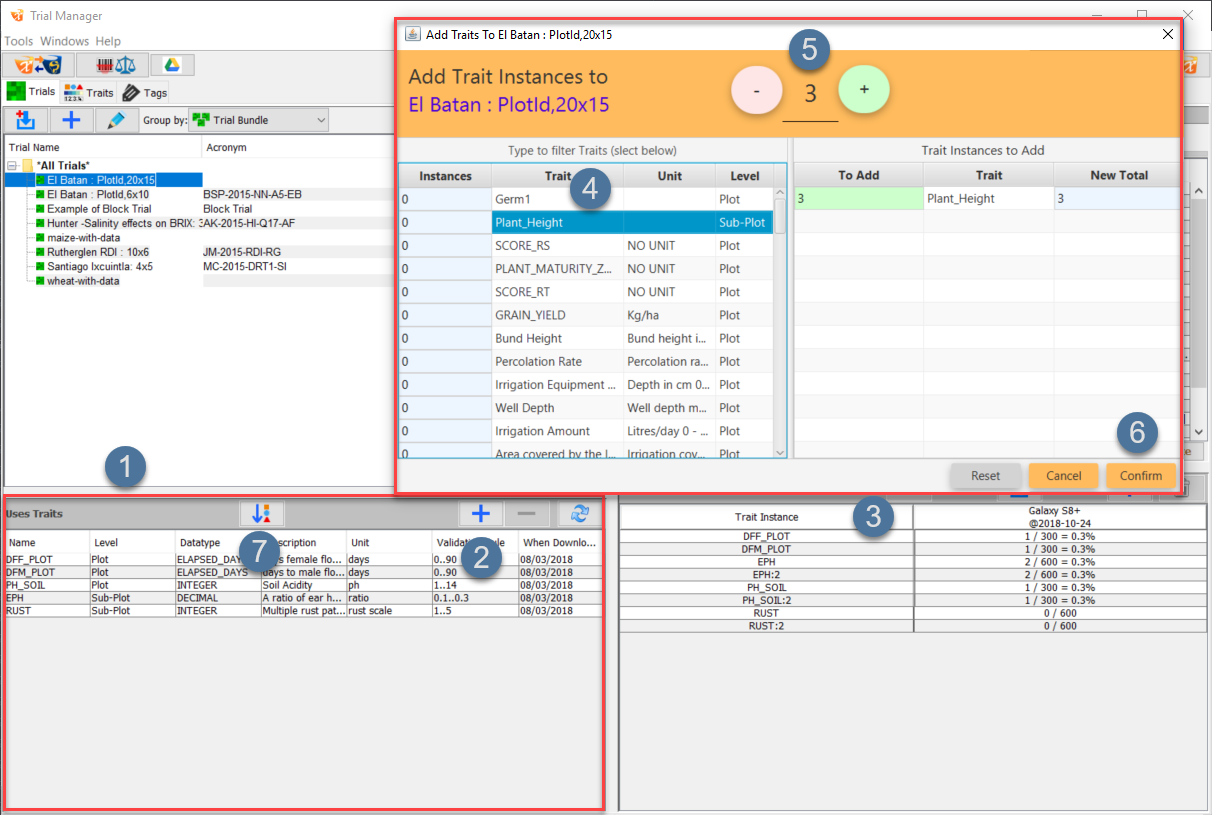
| Step | Action |
|---|---|
| 1. | Select a trial and Navigate to the Uses Traits Panel within Trial Manager at . It will list all the traits that a trial is using. Select the  Add Trait Instance Button at to open the Add Trait Instances Window at . Add Trait Instance Button at to open the Add Trait Instances Window at . |
| 2. | Select a trait such as Plant_height at . |
| 3. | Choose the number of trait instances desired (such as 3 in this example) at . |
| 4. | Select the Conform Button at  to add the trait instances to the trial. to add the trait instances to the trial. |
| 5. | Changing the scoring order by selecting the Trait Order Button  at at  can also be useful as it helps the user choose the most efficient scoring order to score data. Try changing the scoring order to something more convenient. can also be useful as it helps the user choose the most efficient scoring order to score data. Try changing the scoring order to something more convenient. |
Step 5 - Making a Scoring Set
One of the best strategies for scoring data efficiently and quickly is to create a scoring set. A scoring set allows the users to pick specific traits that can be scored at one time for a trial. An example of this would be if there is a trial which requires the measurement of plant height at 3 different intervals in the experiment.
The trial might contain a variety of traits but the user can create a separate scoring set so that the plant height can be measured separately.
The following image and example will demonstrate how to do this:
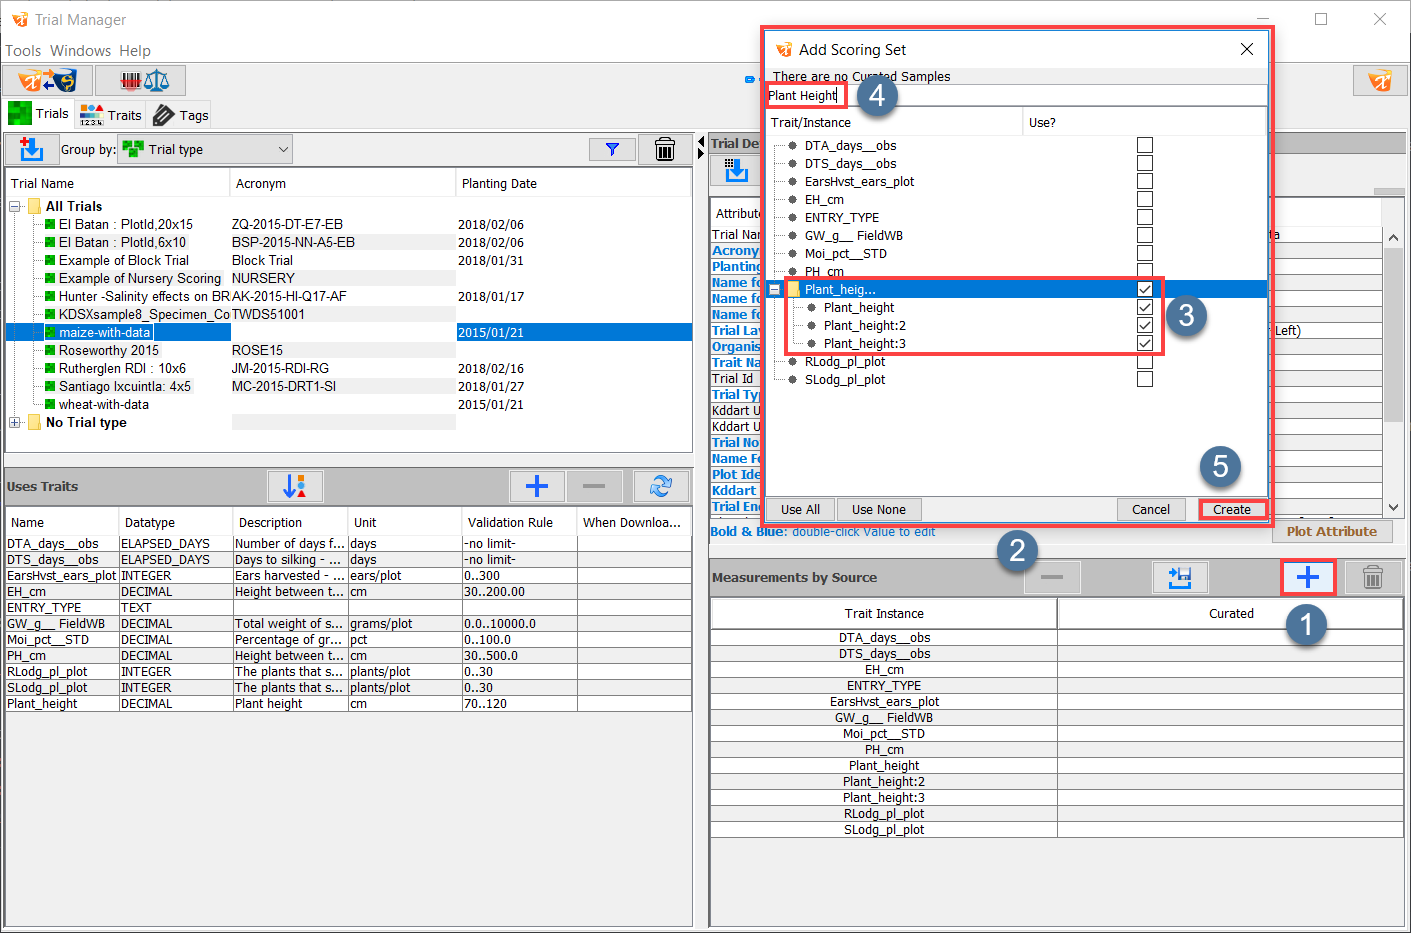
Making a New Scoring Set¶ Step Action 1. Start by selecting a trial to create a scoring set for. This example uses the ‘maize-with-data’ data from the previous step with multiple instances of the trait Plant_height. 2. Select the 3. Choose traits to add to the scoring set such as the Plant_height instances shown in the area at 4. Choose a name for the scoring set at 5. Select the Create Button at
Tip
Export the scoring set to KDSmart to use it.
Step 7 will demonstrate how to set up a connection between KDXplore and KDSmart.
Step 6 - Selecting a Planting Date
Basic trial information such as the planting date can easily be changed in Trial Manager. The following instructions detail how to change the planting data of a trial:
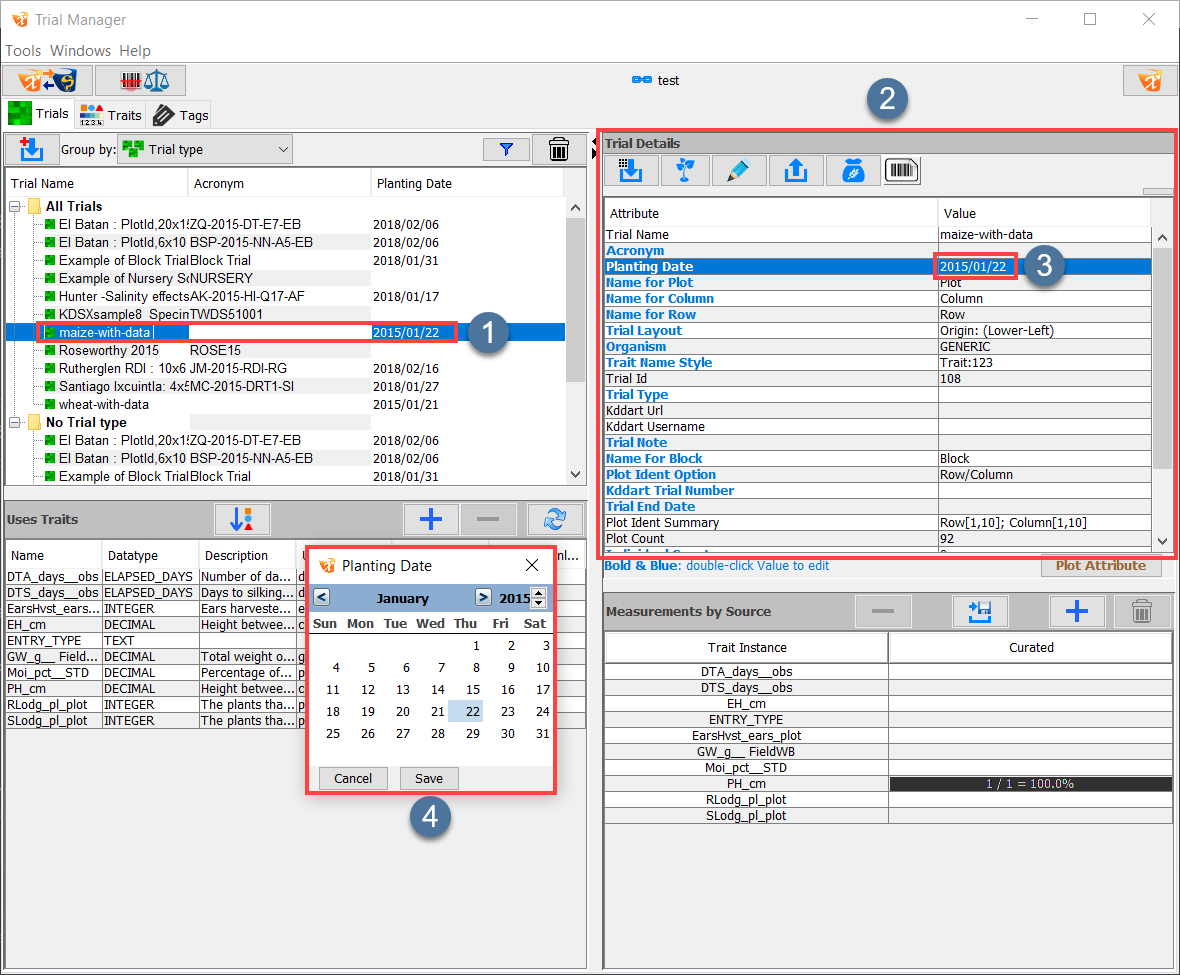
How to Change the Planting Date of a Trial¶ Step Action 1. On the main Trial Manager Window, select a trial such as the ‘maize-with-data’ example at 2. Basic information about the trial is listed in the Trial Details Panel at 3. Select and open the planting date at 4. Select a date, and then the Save option.
Tip
Many other trial details can also be changed with this method. Try it on other details such as name for plot and trial layout* to see what happens.
Step 7 - Transferring a Scoring Set to KDSmart
Once a scoring set for a trial has been created, it needs to be transferred to a KDSmart device for use in the field. The following steps demonstrate how to transfer scoring sets (or other data) from KDXplore to Google Drive so that they can be used in KDSmart.
To prepare for transfer, you will need to have a device with KDXplore installed, a Google account (for Google Drive) and access to the internet.
| Step | Action |
|---|---|
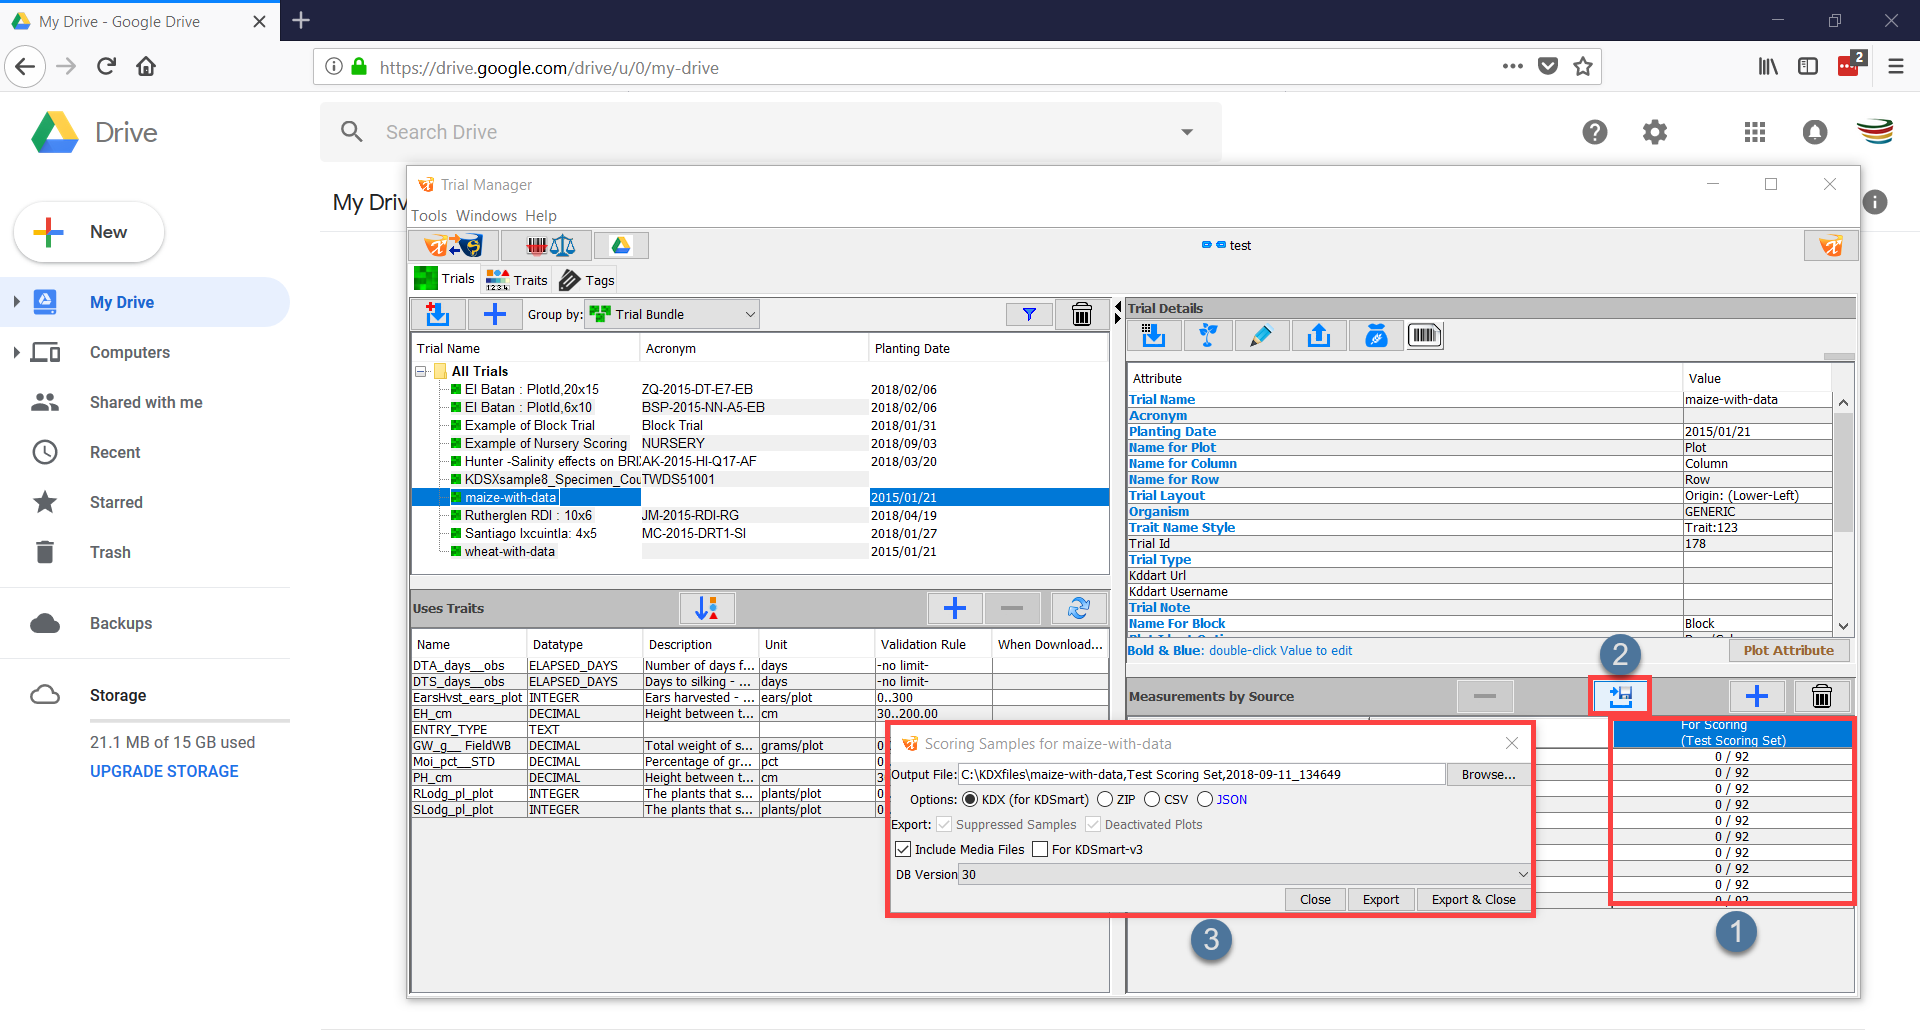
| 1. | Ensure that Google Drive is opened in an internet browser and have KDXplore open to prepare for the transfer. |
| 2. | Choose a scoring set such as the one at and then select the  button at . button at . |
| 3. | The Export Window will display (as at ) which provides export options. Selecting the Browse button allows you to choose a location on the computer to save the scoring Set to. Ensure that the radio button for KDX file is selected so that it’s ready to be used in KDSmart. |
| 4. | Select either the Export or the Export & Close options within the Export Window to export the KDX file to your chosen location. A dialogue will open and ask whether you want to open the containing directory - do this if you want to transfer the file to Google Drive immediately. |
| 5. | Click+Drag the file into the web browser with Google Drive opened and drop it to complete the upload. The file should now appear in Google Drive and there will be a message which confirms that the upload has been completed. 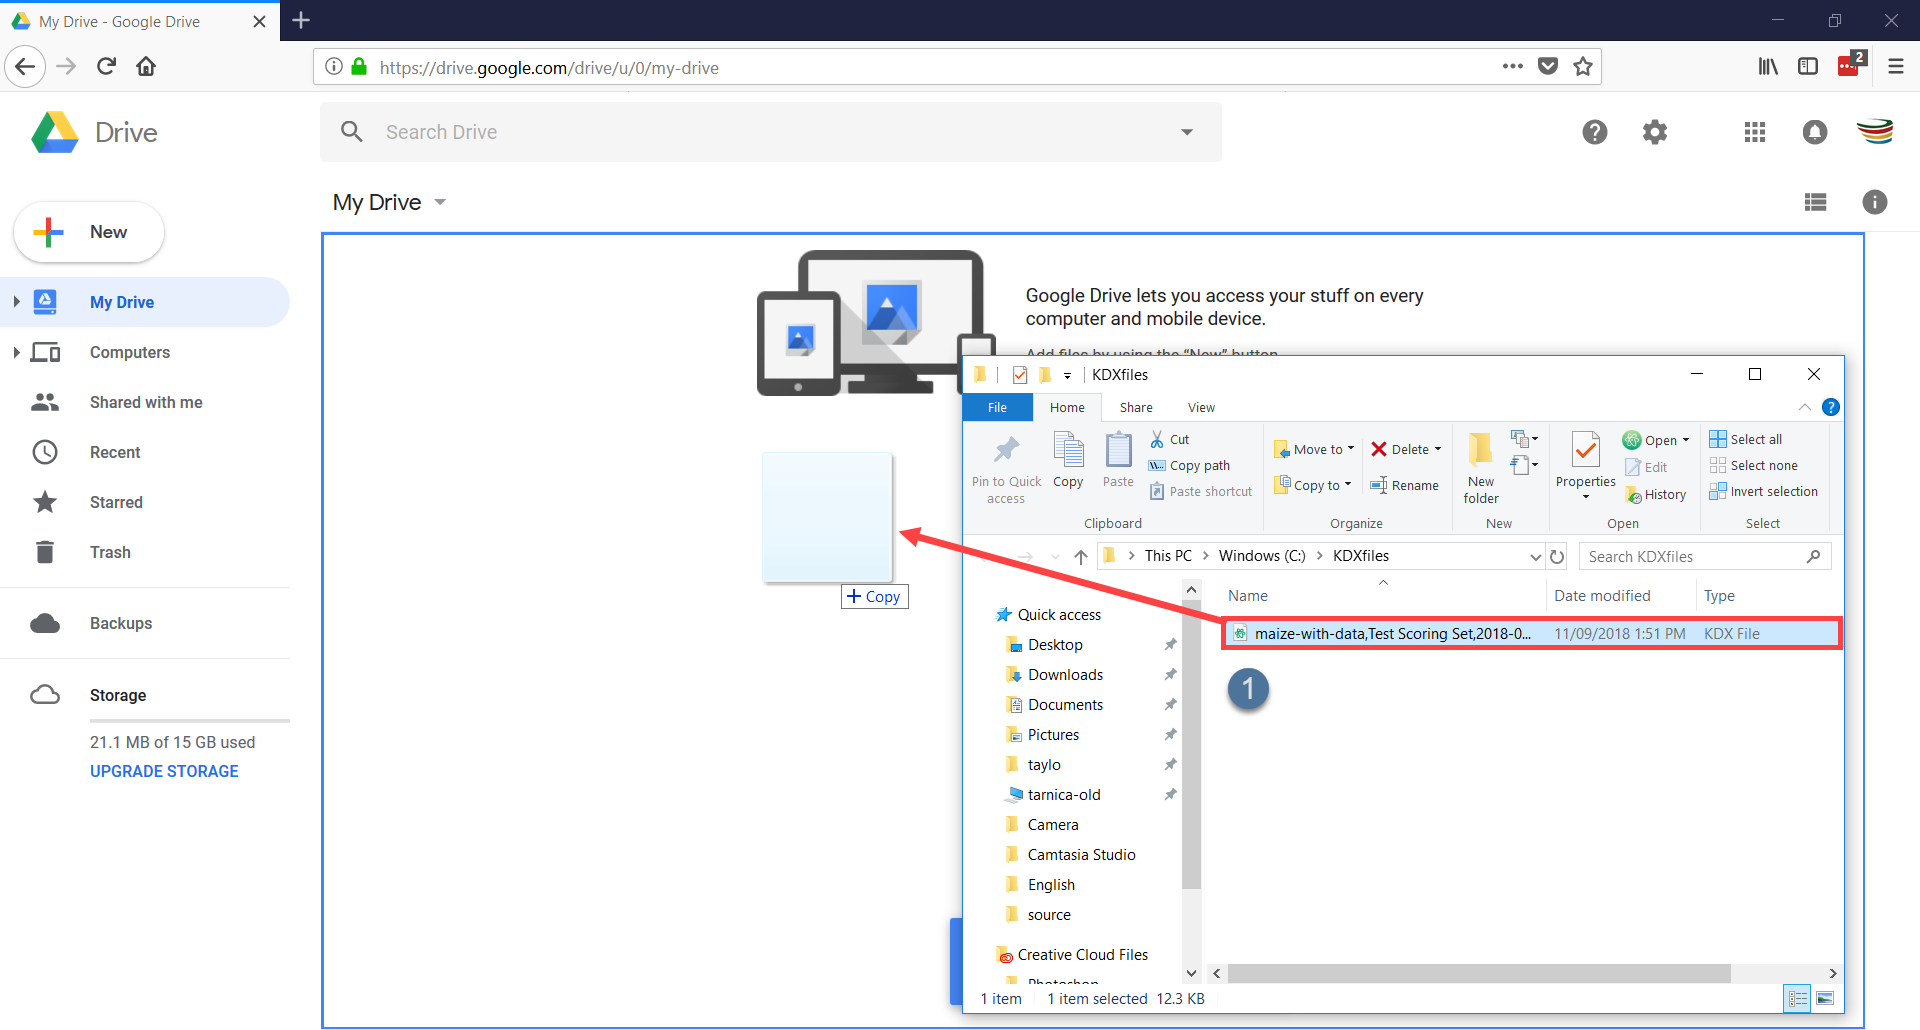
|
Trials that have been exported to Google Drive will now be available to be imported into KDSmart. Go to the next tutorial for more information on how to complete an import.
Note
An exported scoring Set will appear as a trial in KDSmart so no need to worry if you don’t see the scoring Set listed.
Note
KDXplore and KDSmart integration with Google Drive was included with KDSmart version 3.0.22. Before this, KDXchange was used to connect devices over Wi-Fi and transfer data. Google Drive is the recommended method of data transfer however if you need to use KDXchange, instructions can be found at the KDXchange page.


Summary
By completing the tutorial, you should now be familiar with the preparation tasks for setting up a trial for KDSmart using KDXplore and should also be able to:
- Open and navigate to trials in the Trial Manager;
- Load trials;
- Add traits and tags to a trial;
- Create trait instances in a trial;
- Make a scoring set;
- Edit basic trial Information;
- Connect to KDSmart; and
- Transfer scoring sets (trials) to KDSmart using KDXchange.
These exercises can be repeated using different example files that are located on the KDSmart/KDXplore Example Resources page.
Once comfortable with the activities of this tutorial, move to the next one by follow this link Tutorial 3 - KDSmart, using the next button or the main menu at left.