Bluetooth Scanning
Important
It is advisable before taking KDSmart and a Bluetooth scanner or scales to the field to test:
The scanner is configured correctly;
The tablet/phone with KDSmart can operate successfully with it; and
Your barcodes work as expected.
Barcode scanning in KDSmart can assist with quick, easy and accurate scoring. Barcode scanning can be used for plot or sub-plot location labels and for traits.
This page contains information for enabling Bluetooth scanner devices in Android, making it available for KDSmart. An introduction to scoring using barcodes with a Bluetooth barcode scanner is also provided.
KDSmart is designed to take advantage of a Bluetooth scanner when:
Bluetooth is available on the tablet or phone; and
The tablet/phone can successfully connect with the Bluetooth device; and
Trial(s) or traits have been prepared for barcode use before importing into KDSmart.
Barcode values must be present in the trial before it is imported into KDSmart from KDXplore or CSV file. KDXplore can generate barcodes for the trial and traits. For trials with KDXplore generated barcodes, the option Use KDXplore Barcodes found in KDSmart settings needs to be enabled.
Non KDXplore barcodes can be used with a trial. These need to be:
Included with a Trial CSV file for plot/sub-plots;
Must be unique - A not unique error for plot barcodes would result upon import;
Trait import CSV file with barcodes would need to be imported first; and
The option Use KDXplore Barcodes in KDSmart Settings needs to be disabled.
The following sections describe how to connect a Bluetooth device, provide information about the barcode types, examples of how to score and some tips.
Connecting the Tablet/Phone
Note
Bluetooth scanners generally have two modes: HID and SPP.
(More details on this page: https://serialio.com/scanner-data-transfer-methods )
Your scanner must be set to SPP mode before connecting it with KDSmart.
Instructions should be available in your Scanner’s Manual.
Before connecting to and using a Bluetooth device, the tablet/phone with KDSmart installed, must first be introduced to the device, referred to as pairing. Sometimes the device may have a pin number associated to enable pairing to occur.
The first connection and subsequent connections will require the devices to be paired. Pairing may need to repeated when disconnection occurs which can be:
After a period of time has elapsed;
After devices ‘go to sleep’ (they enter sleep mode to extend their battery life);
If the device is too far apart from the tablet/phone;
Signal is interrupted due to obstacles (e.g. walls, etc.); or
A combination of all of the above.
The following instructions show how to enable Bluetooth on the tablet/phone and pair with a scanner.
Step |
Action |
|---|---|
On the Android tablet/phone go to Android Settings 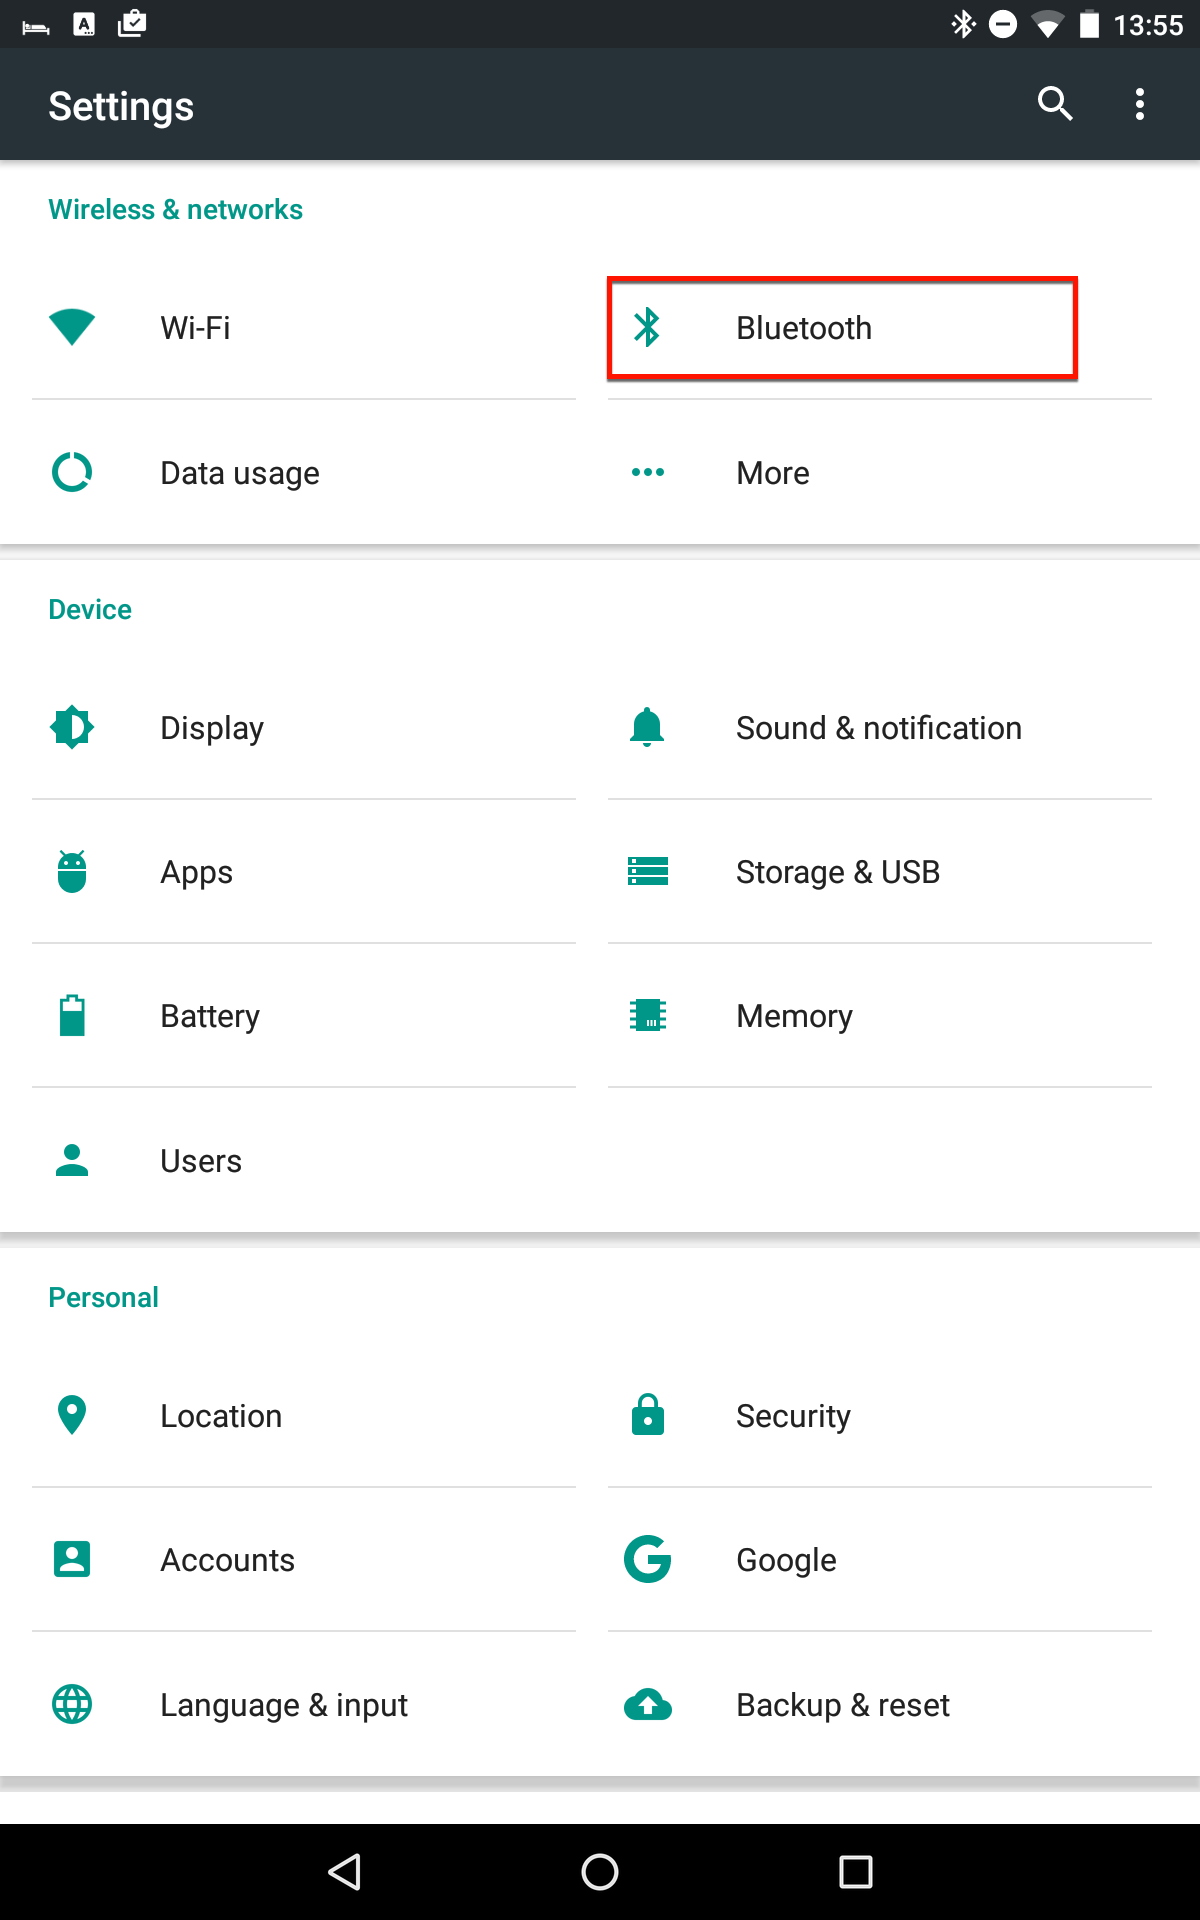
Note: The version in this image was Android MarshMallow v 6.0.1, which may have a different appearance to the settings in your Android version. |
|
|
|
Select the required device in the list of Available Devices and enter the pin number of the device if requested to complete the pairing. 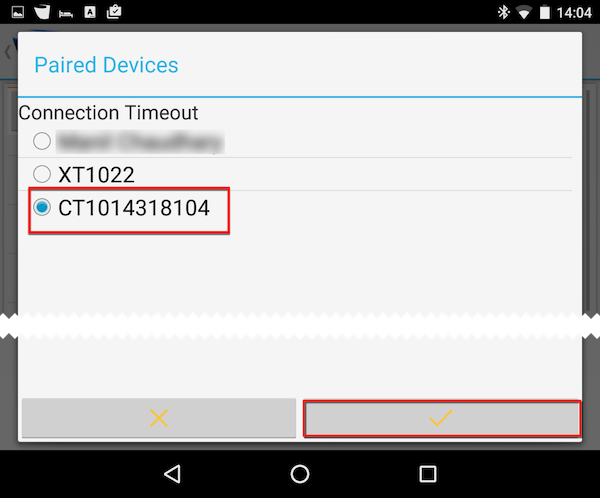
|
|
With the device paired and connected, it is ready for use by any Android applications, such as KDSmart. |

KDSmart - Scanner On
Once the Android tablet/phone has been connected KDSmart can be connected to the scanner as outlined in the following steps.
Step |
Action |
|---|---|
Return to Path View for the trial in KDSmart to be scored and from the top right menu (highlighted in the example) select Scanner On. This will display the paired devices. 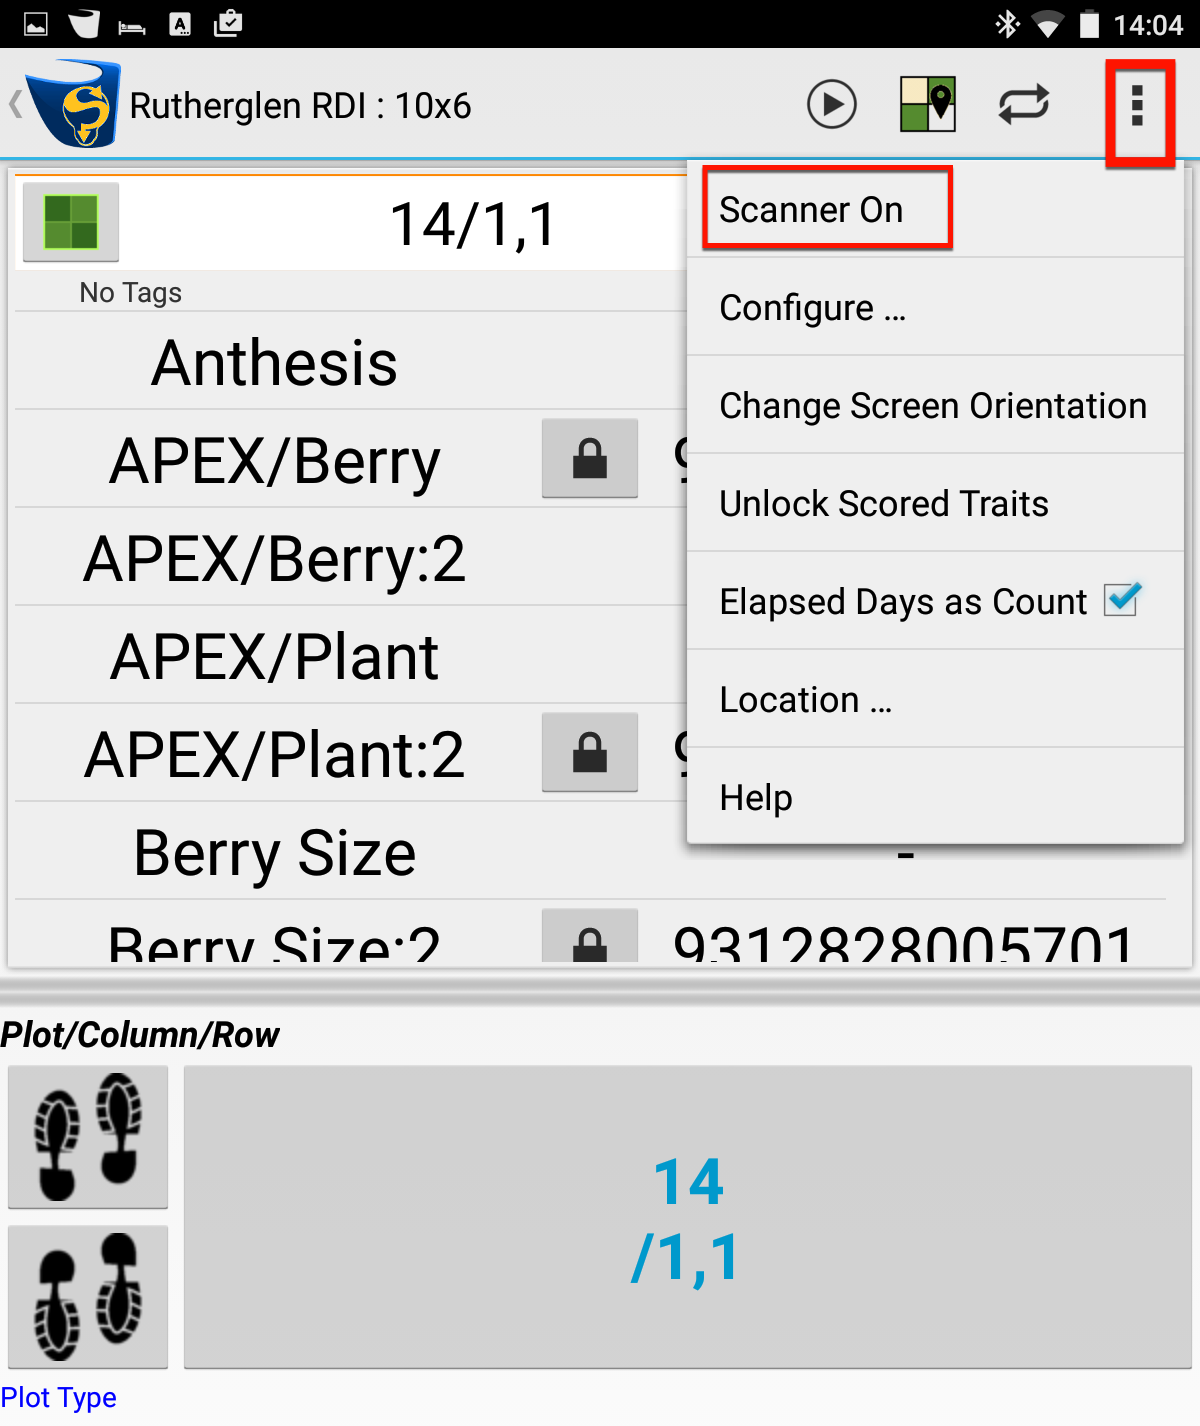
|
|
From the list of available Bluetooth paired devices select the scanner device to connect
|
|
Select the confirmation |
|
Scoring now may commence using the barcode scanner. |

Tip
To verify the scanner is working correctly use some prepared trait barcodes, if they are available. Try the following:
Within Path View for your trial select Scanner On from the menu
Go to Manage Traits and select the required trait;
Select the Test Validation Button;
Try entering values using the scanner. They should appear as if manually entered.
Using Barcodes in KDSmart
Note
Current Plot refers to the specific location (i.e. plot, sub-plot, etc.) selected and displayed in KDSmart Path View ready for scoring.
KDSmart can use barcode input to assist with streamlining scoring.
Barcodes can be used for the following:
- Location barcodes - used to position and display the current plot for the trial associated with the scanned barcode location for the:
Plot; or
Sub Plot;
- Trait barcodes - used for the current plot to set either the:
Trait with value; or
A value for the selected trait.
This different functionality/behaviour is outlined in the following table (Note: The barcodes displayed and human readable text are for illustration only):
Prefix |
Barcode Type |
Example |
Result When Scanned… |
|---|---|---|---|
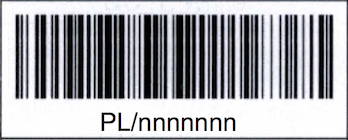
PL/ |
Plot |
|
KDsmart will position the scoring window to the plot at the barcode location. |
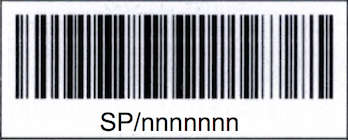
SP/ |
Sub Plot |
|
KDsmart will position the scoring window to the sub plot at the barcode location. |
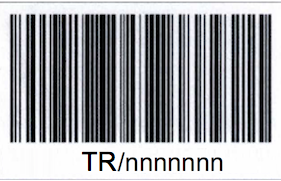
TR/ |
Trait Name |
|
|
TR/ |
Trait Name: Value |
|
These are possible for traits with a categorical data type or those with a specific and possibly short range. (See below Example - Trait and Value Barcodes). |
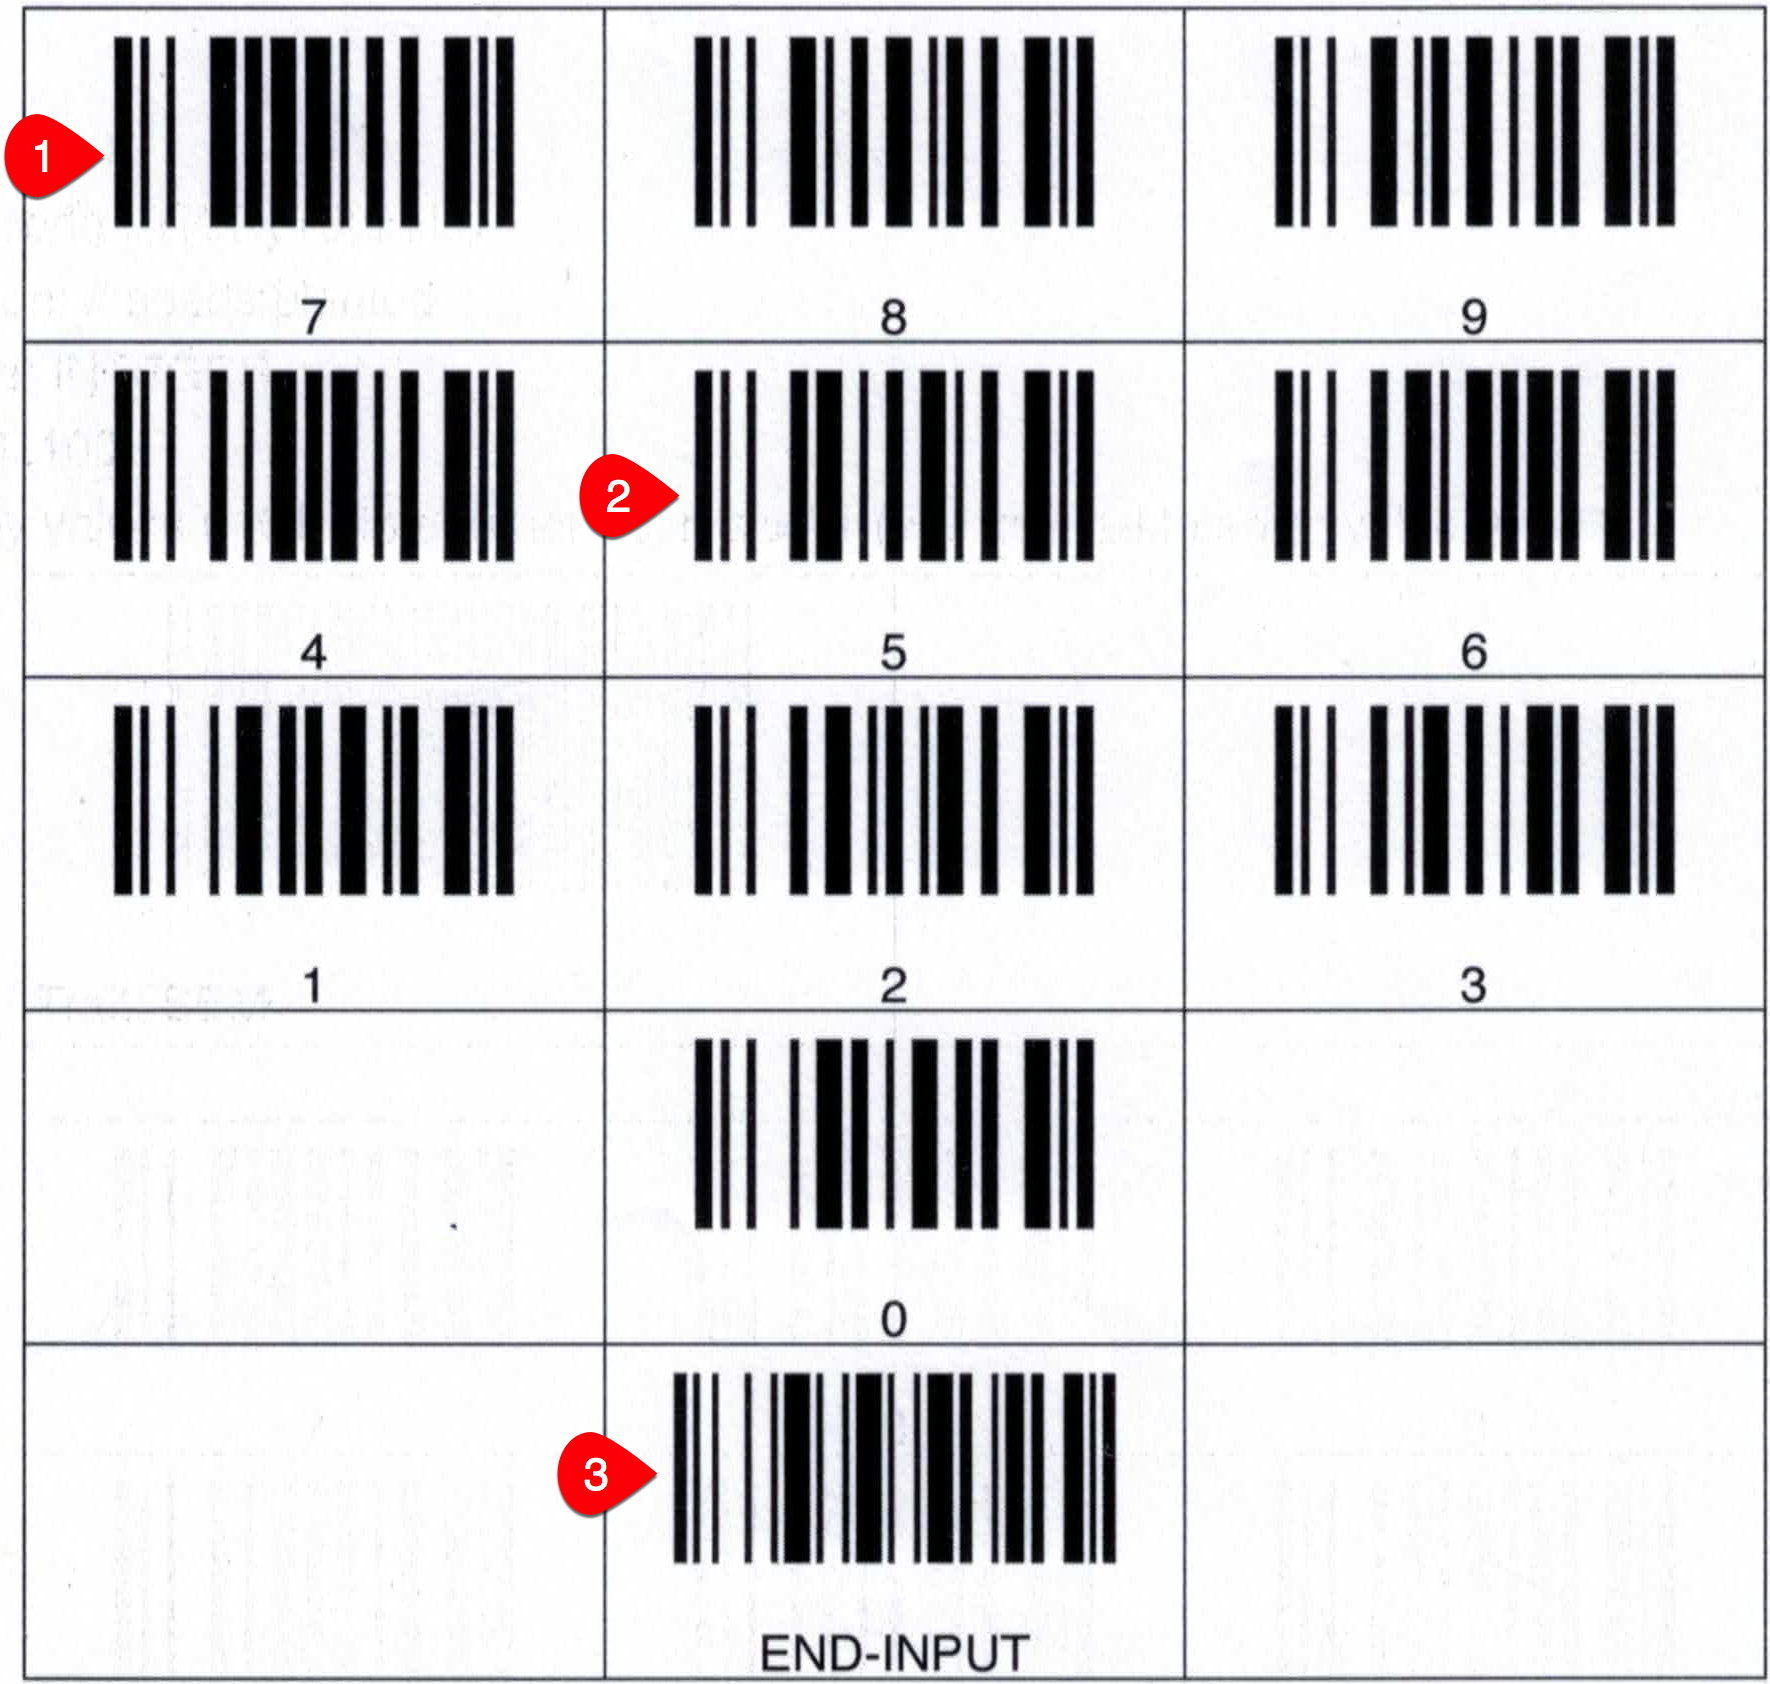
Value |
|
For the current plot and selected trait waiting for a value to be entered, KDSmart will enter the value of the barcode(s).
In this example the value ‘7’ would be entered as if entering the digit ‘7’ from the keyboard. |

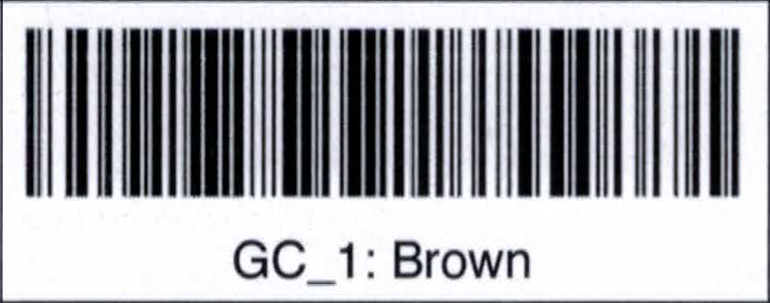
Example - Categorical Trait Barcodes
The following example shows a categorical trait barcode for the trait instance GC_1.

|
When KDXplore creates the barcodes for the categorical trait a barcode will be created for each possible value. This example shows there are 12 valid values for the Grain Colour trait. |
|---|
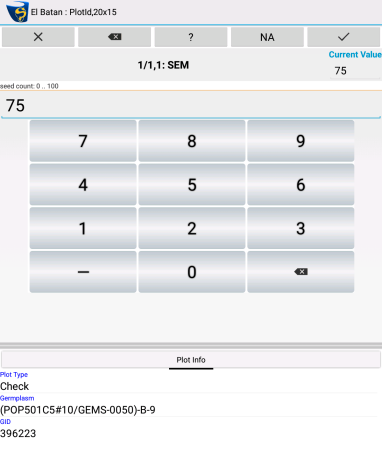
Example - Trait and Value Barcodes
The following example shows a trait barcode for the trait SEM.
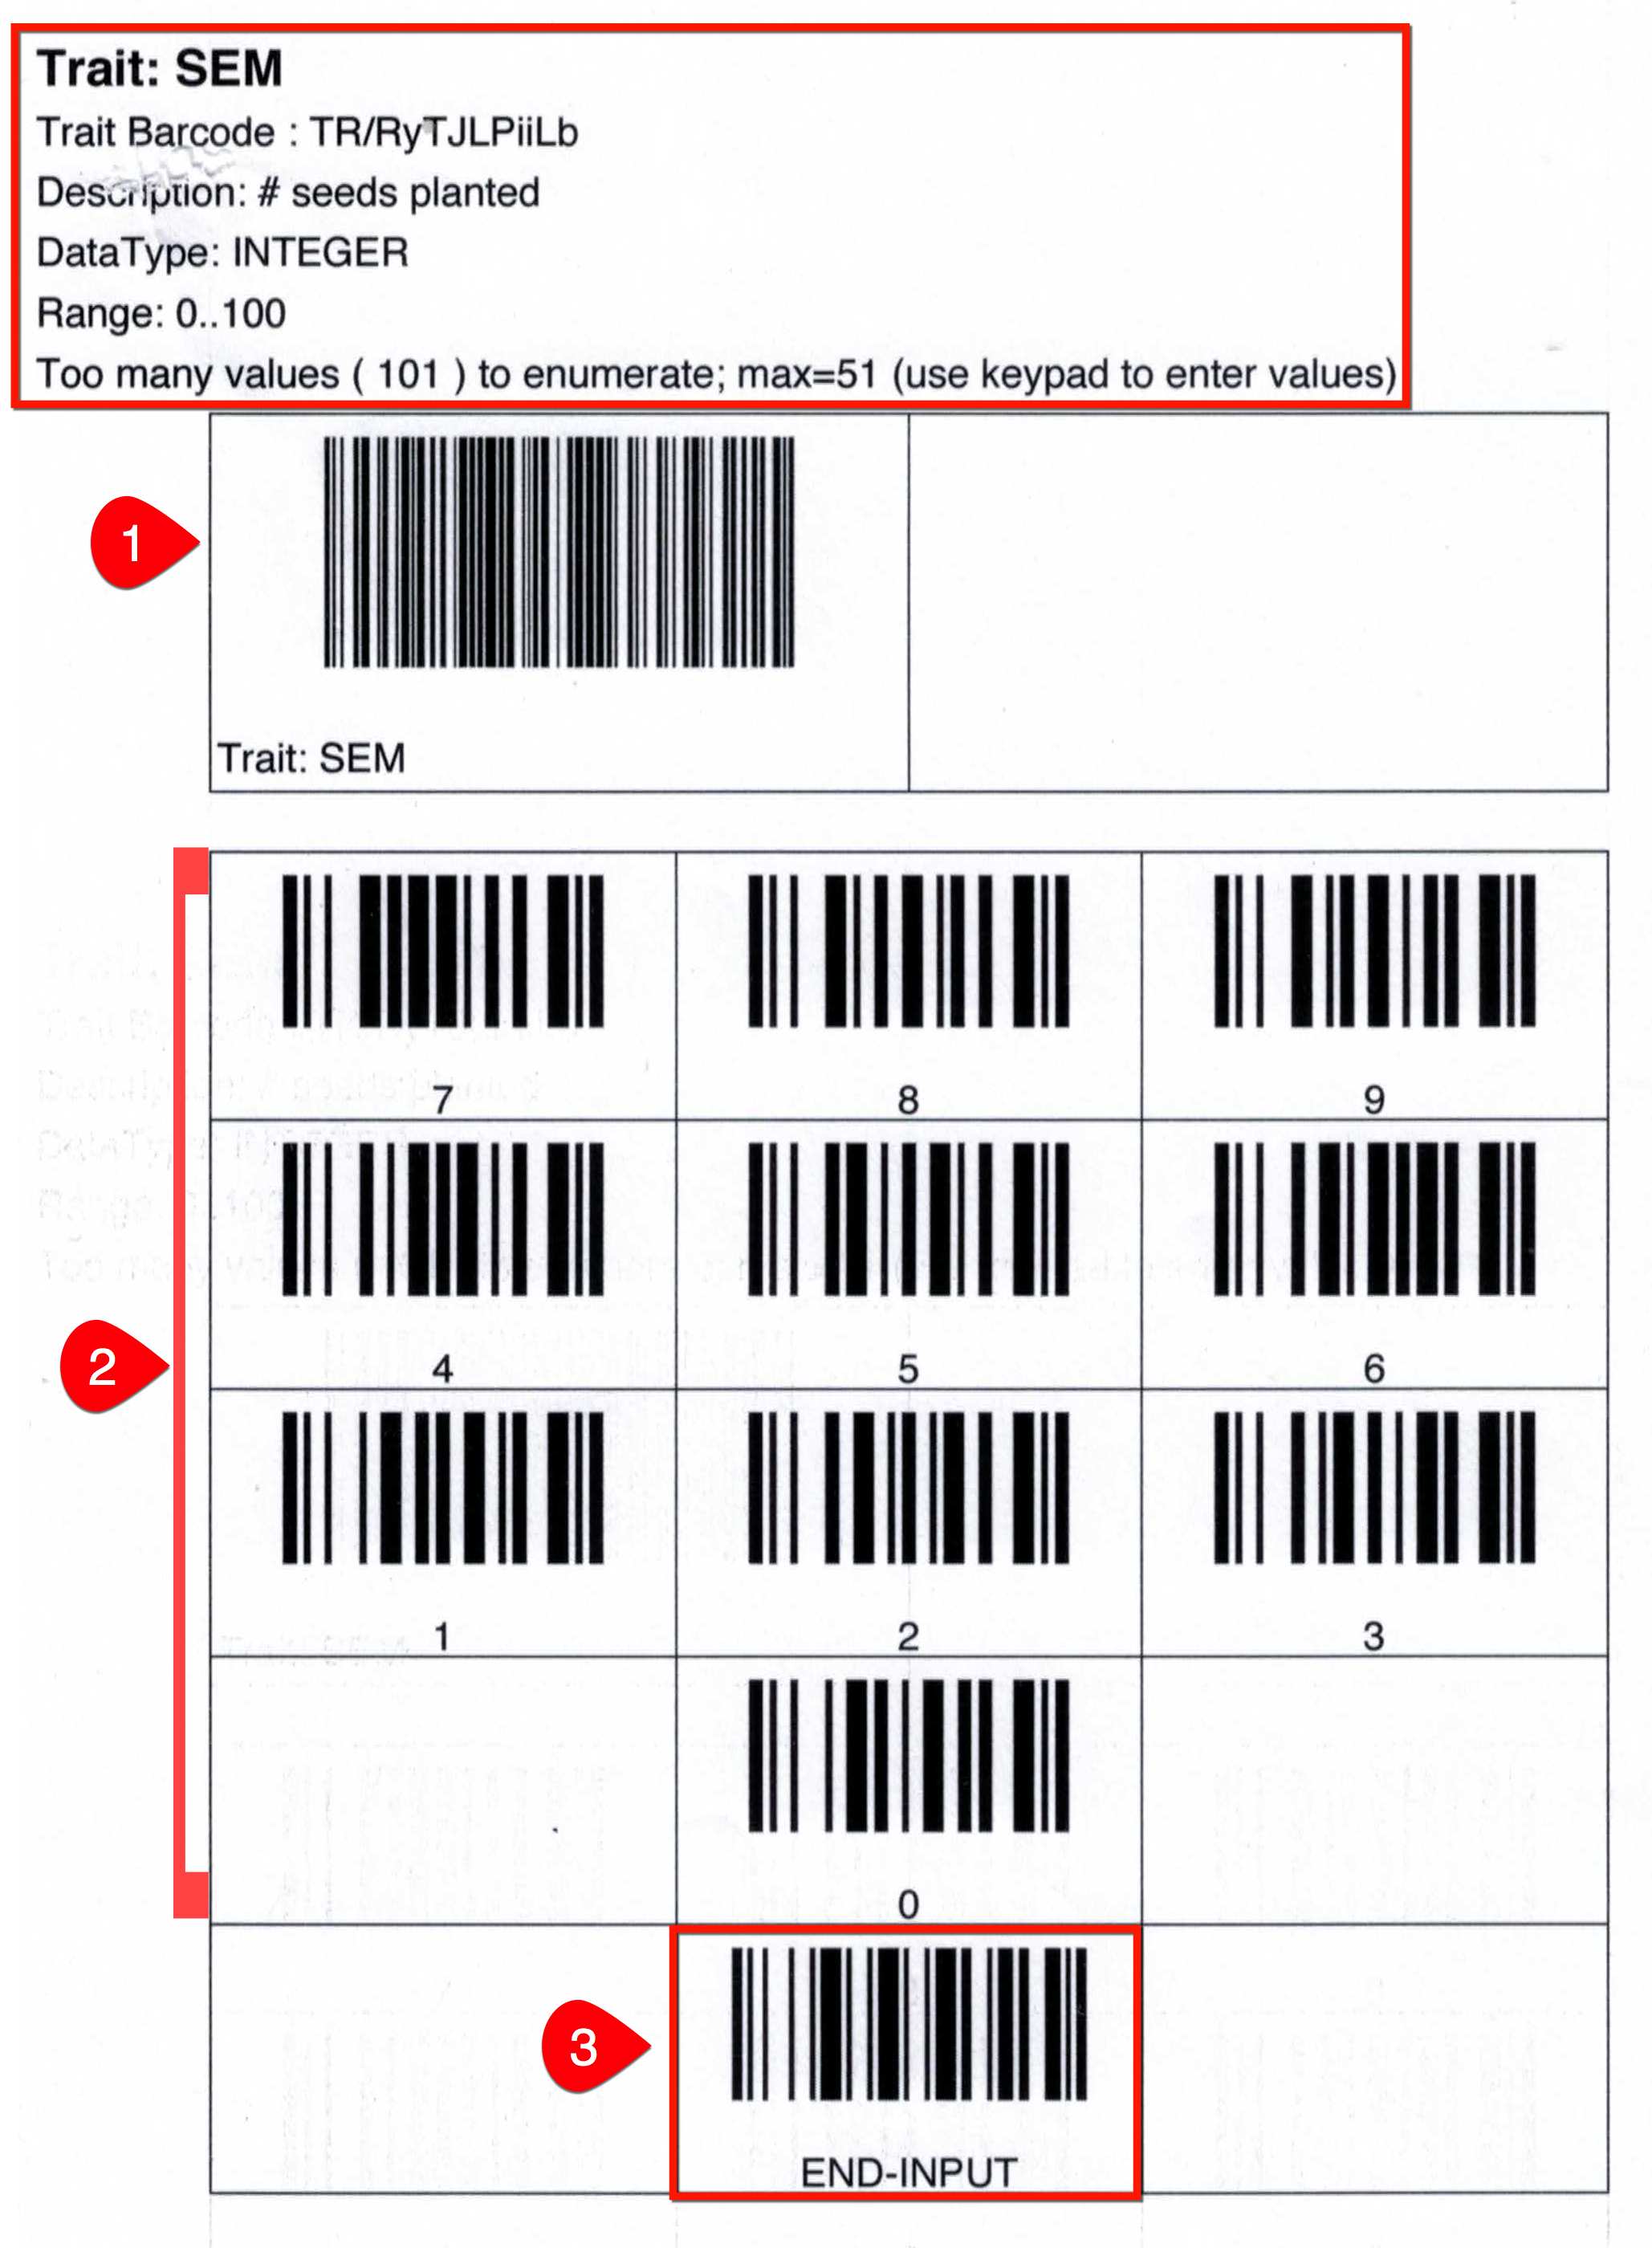
|
In this example:
|
|---|
Using a Scanner – Examples
In KDSmart trials containing barcodes can utilise scoring using a barcode scanner. To facilitate barcode scoring in KDSmart preparation is required, such as generating barcodes in KDXplore.
For a description of barcode types that can be used in KDSmart, refer to the table Barcode Types in KDSmart/KDXplore in the previous topic Using Barcodes in KDSmart.
The following scenarios illustrate barcode assisted scoring.
Navigating To A Specific Plot Or Sub-Plot
Scanning a plot barcode (prefixed PL/), or sub-plot barcode (prefixed SP/), will directly reference or display the location in KDSmart (i.e. the current plot).
For example if a barcode was located at the plot, it could be scanned and KDSmart will position the current plot at this location for the record to be viewed, trait(s) scored, tagged, etc.
The following table outlines the steps required:
Step |
Action |
Description |
|---|---|---|
|
A scanner, connected and ready, with the trial open in KDSmart in Path View. |
|
|
Then |
|
|
Scan either the plot or sub-plot barcode for the required plot/sub-plot |
|
|
Which results in: |
|
|
The current plot in KDSmart is positioned at the matching plot or sub-plot record ready for scoring or viewing. |


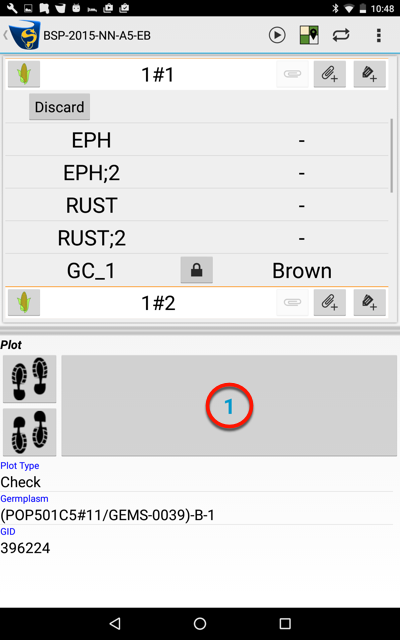
Scanning a Trait Barcode with Value – Categorical Data Type
For the currently displayed plot location, scanning a trait barcode with value (prefixed TR/) will set the value of the trait to the value represented by the barcode.
The example shown next will set the Trait GC_1 to Brown at the current location (i.e. plot 1):
Step |
Action |
Description |
|---|---|---|
|
A scanner, connected and ready, with the trial open in KDSmart, in Path View, positioned with the current plot at the required plot/sub-plot. |
|
|
Then |
|
|
Scan the trait Name:Value Barcode for the required trait and value. |
|
|
Which results in: |
|
|
|
Value now set for the GC_1 Trait instance to Brown.. |
Scanning a Trait Name Barcode – Numeric Data Type
The difference here is a value is not associated with the trait barcode. When the trait scoring window is presented (as if you manually touched the trait for the current plot), it can either be entered either via the numeric key pad or by scanning value barcodes. (see example above Example - Trait and Value Barcodes )
Depending upon the data type, your barcodes and what value needs to be entered, several barcodes may need to be scanned to perform the data entry.
Step |
Action |
Description |
|---|---|---|
|
A scanner, connected and ready, with the trial open in KDSmart, in Path View, positioned at the required plot or sub-plot. |
|
|
Scan the trait barcode for the required trait. |
|
|
The trait numeric entry window will display. |
|
|
|
Suggestions
A few suggestions follow for practical usage and also how trait datatypes and their validation could improve data collection, both manually or with barcodes.
Trait Value Barcodes
Using barcodes for traits requires the operator to carry those codes in some manner, possibly in laminated form to the field. In many situations using a barcode will be much quicker to record a trait, however in some instances it maybe slower or less convenient. The suggestions are to inspire some thought as to how best define and manage traits to ensure efficient and accurate data collection.
Traits can be represented with a barcode (TR/ trait barcodes) to streamline data recording. For these one of the most applicable datatypes is canonical. Barcodes for these traits can also be associated with a value, so scanning with a trait value barcode is a single operation.
The simple canonical example described earlier, repeated below, is for a trait grain colour GC with values of: white, purple, red, etc. (12 bar codes). At the current plot in KDSmart, just scanning one of these barcodes records the specific value for the trait.
An integer example could be for a trait Soil_PH with 14 values would have 14 bar codes: PH1, PH2, PH3, ……, PH14. Scanning one of these barcodes would set that trait to the value scanned for the current plot.
For some situations traits may have too many barcodes to make them worthwhile e.g. an integer trait with a valid range of 50 which would involve carrying a sheet of 50 trait barcodes. Locating and scanning the correct one could be more cumbersome and impractical, so either scanning value barcodes or manual entry could be more convenient.
Alternatively for this scenario, the most frequent trait values could be carried and entered using trait value barcodes and the less frequent values recorded manually.
Trait Preparation
When preparing traits consider alternative datatypes. Data collection could be made easier, with or without barcodes as selection of a value from a list can be easier than always needing to enter values.