Inventory Menu
The KDManage Inventory menu provides tools that you can use to manage inventory items and locations, including performing stocktakes or adding/removing items. The tools available in the Inventory are listed below:
The items are listed in order of dependency.
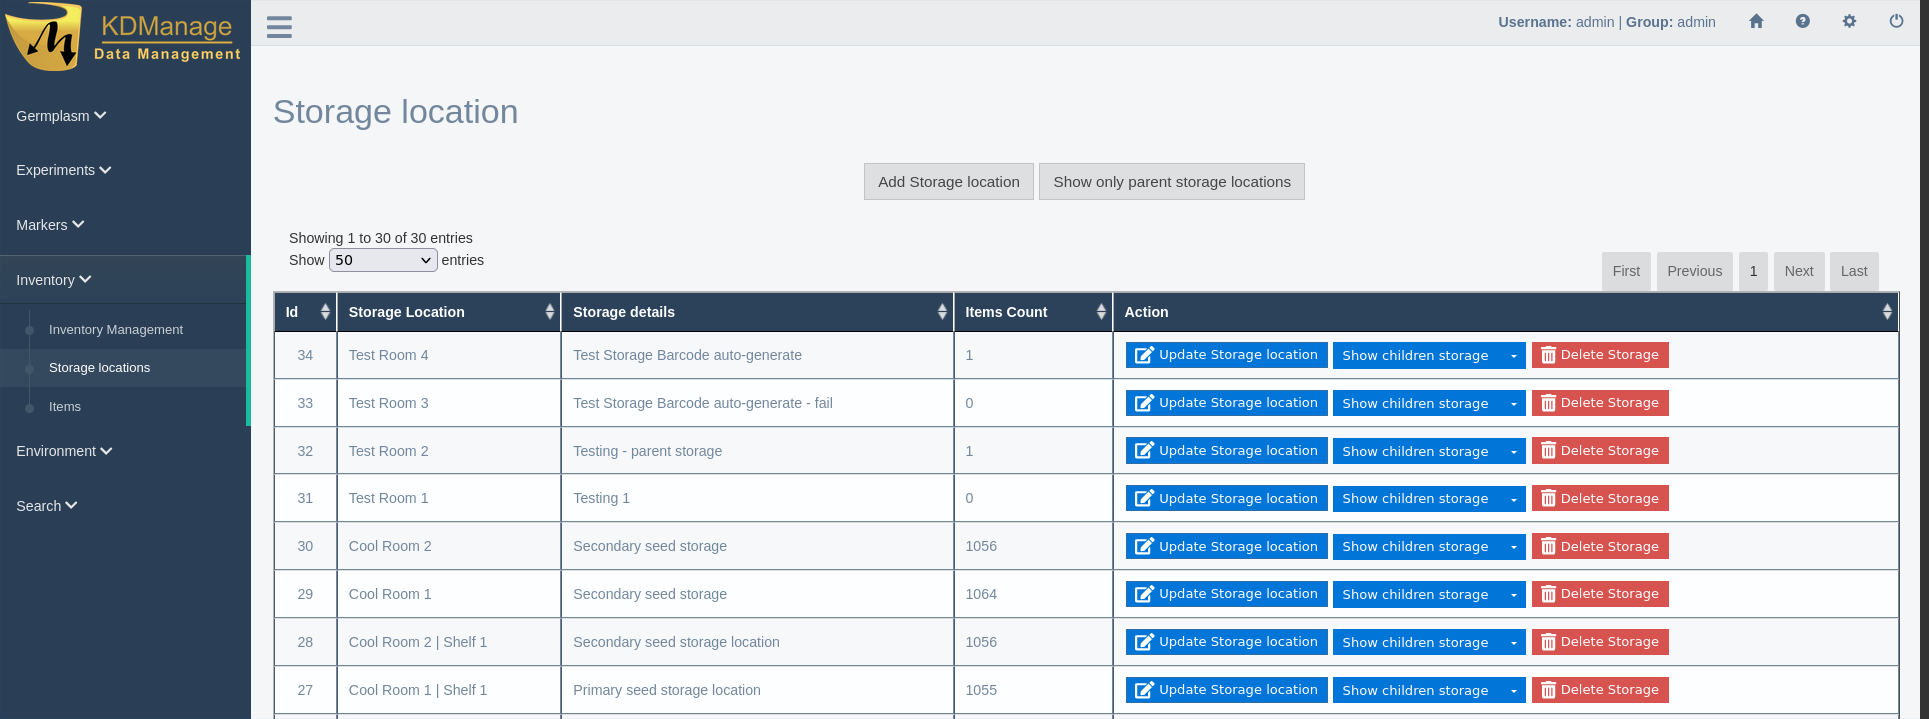
Storage Locations
Storage locations are the Inventory elements used for organising item storage for trials and nurseries. Storage locations are typically for grain storage; however, this is not a limitation. See the image and table below for an example and information on the fields for each storage location:
Field |
Mandatory |
Description |
|---|---|---|
Storage Barcode |
A barcode to identify the storage location. |
|
Storage Location |
Mandatory |
A name to identify the storage location. |
Storage Parent ID |
The ID of the parent of the storage location (e.g. North Pole Building 1 can be the parent of North Pole Building 1 | Room A). |
|
Storage Details |
A detailed storage description. This is flexible as it can be a text description. |
|
Storage Note |
Extra notes, comments, or extra details about the storage locations. |
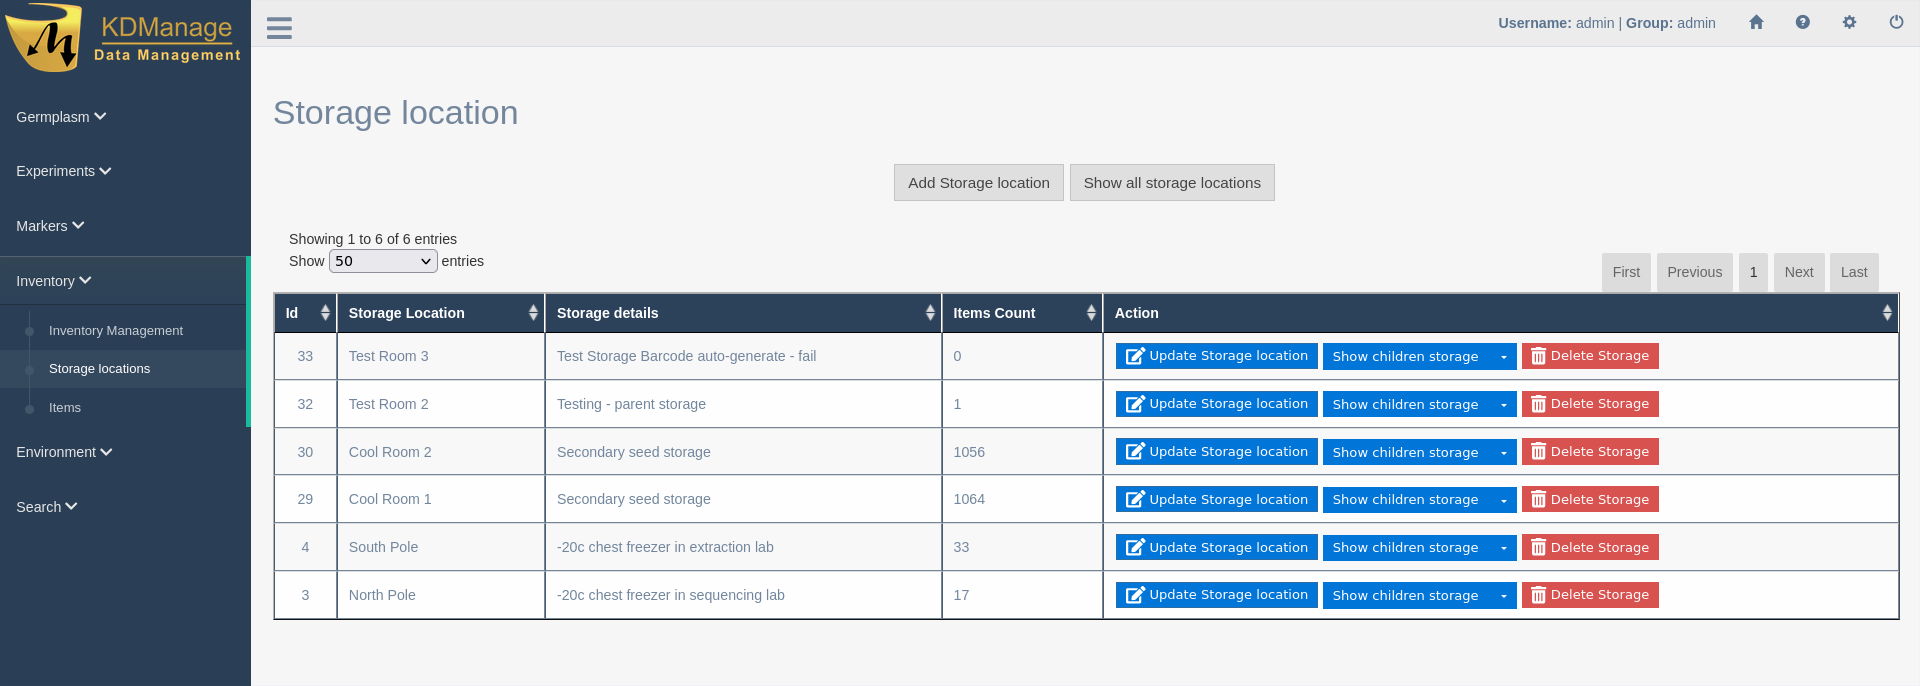
Filtering Storage Locations
Each storage location may have a single parent, which creates a hierarchical structure that can be explored by viewing the children of a single parent location. The following image shows some storage locations filtered to display parent locations. Select the Show All Storage Locations button/Show Only Parent Storage Locations button to switch this filtered view off/on.
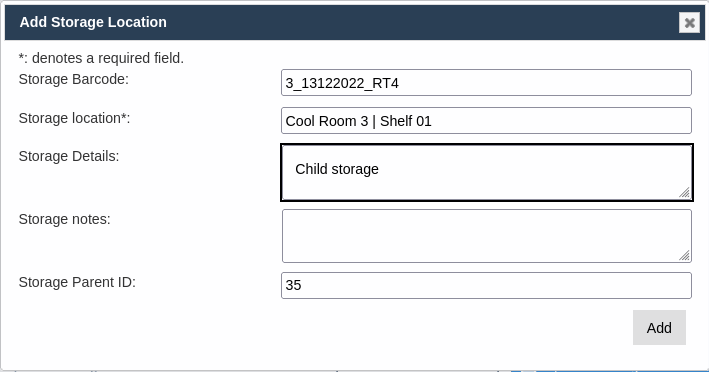
Adding a Storage Location
You can add both parent and child storage locations to the Inventory. Follow the steps below to add a new storage location:
Step |
Action |
|---|---|
1. |
Expand Inventory in the main left-hand menu, then select Storage Locations which will display a window as in the above illustration. |
2. |
Select the Add Storage Location button. This will display the Add Storage Location window (as seen in the above image). |
3. |
Complete the mandatory Storage location field, as well as any other fields you want to include.
|
4. |
Select the Add button to create the storage location. |
Tip
Selecting  Update Storage location for a storage item will open the Update Storage Location window, which is identical to the Add Storage Location window, except the purpose is to update an existing storage location rather than create a new one.
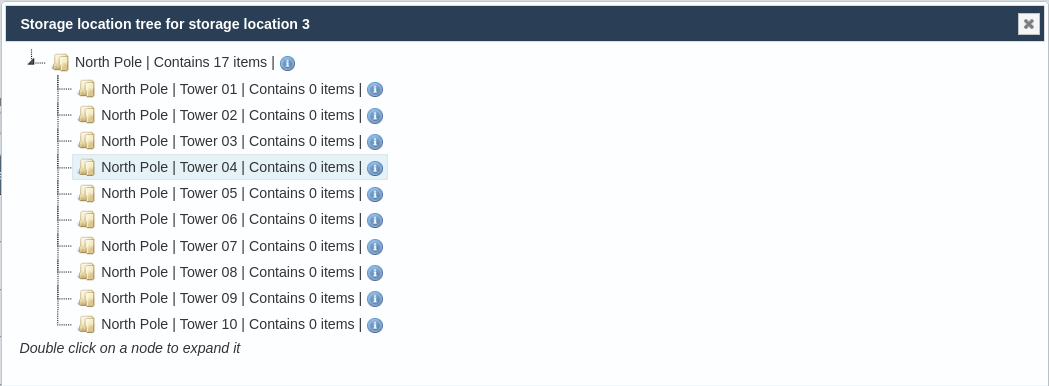
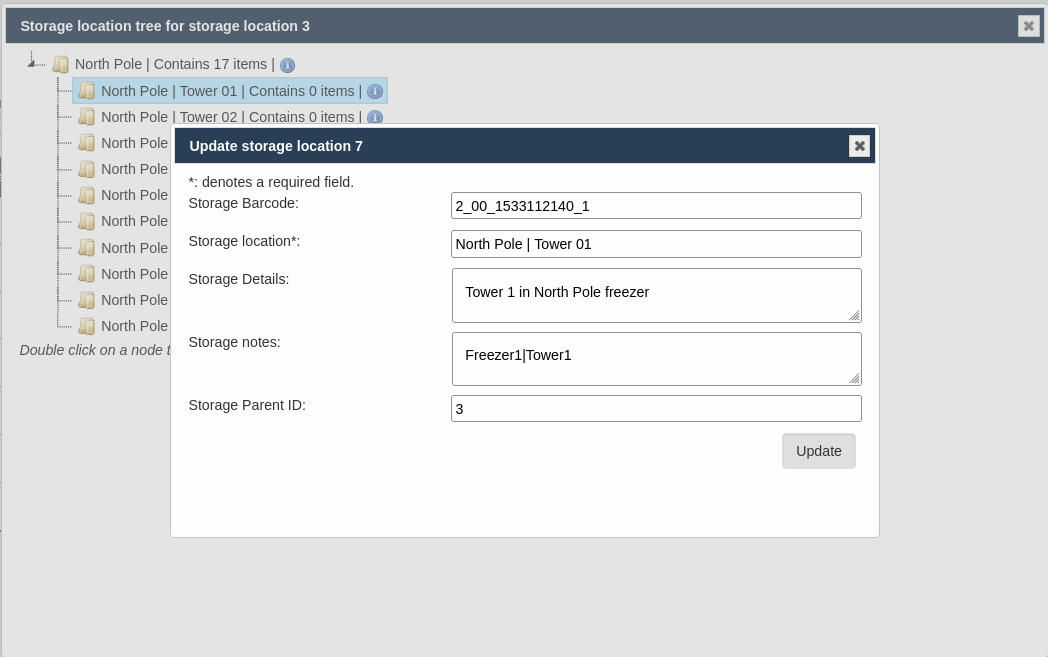
Viewing Storage Trees
A storage tree shows the relationship between a parent storage location and its children. Select the  Show Children Storage button in the Action column of a storage location to view its storage tree in a Storage Tree window (as seen in the image below). The following example illustrates an expanded view showing all the children storage locations of the selected parent storage location.
From the example above, selecting the,  Info button next to the location will display an Update Storage Location window which facilitates easier viewing and updating of storage locations.
Items
Items are the elements of the Inventory that represent the various stock and samples that you can use in future experiments or for post-experiment operations and analysis.
Each item is generally associated with a specimen, which may or may not be used in a trial. This reflects how different samples can be extracted or harvested from the specimens used in experiments.
This table describes the fields for an item:
Field |
Mandatory |
Description |
|---|---|---|
Trial Unit Specimen ID |
The ID of the trial unit specimen that the item was harvested from. |
|
Specimen ID |
Mandatory |
The specimen that the item is from. |
Item Source ID |
ID of the contact (who is the external source). |
|
Container Type |
The container type for item. |
|
Scale |
The device used to take measurements. |
|
Storage Location |
Id of the storage location where the item is stored. |
|
Item Type |
Mandatory |
The item type (e.g. seed). |
Item State |
A description of the state of the item (e.g. damaged, thrown away, active, etc.) |
|
Item Barcode |
The barcode on the item container. |
|
Amount |
The number of the items in container. |
|
Unit |
The unit of the item if it is known (refer to the Units topic). |
|
Date Added |
Mandatory, but no user’s action required |
The date and time that the item was added to the database. This field only displays in Item-related functions of Inventory Management page. |
Last Measured Date |
The date and time that the item was last measured. |
|
Last Measured User |
The user who last updated the item. |
|
Item Operation |
If the item is derived from other items by taking sample or grouping (mixing) it can be defined here. |
|
Item Note |
Comments for the item. |
|
Item Log type |
The item log type that will be added to the log of new items and original item. |
|
Item Log Message |
Message that user wants to add to Item Log. This field only displays in Item-related functions of Inventory Management page. |
|
Last Updated |
Mandatory, but no user’s action required |
The date and time that the item was last updated. KDManage fill this field out automatically as user update item. This field only displays in Update Item Window of Items page. |
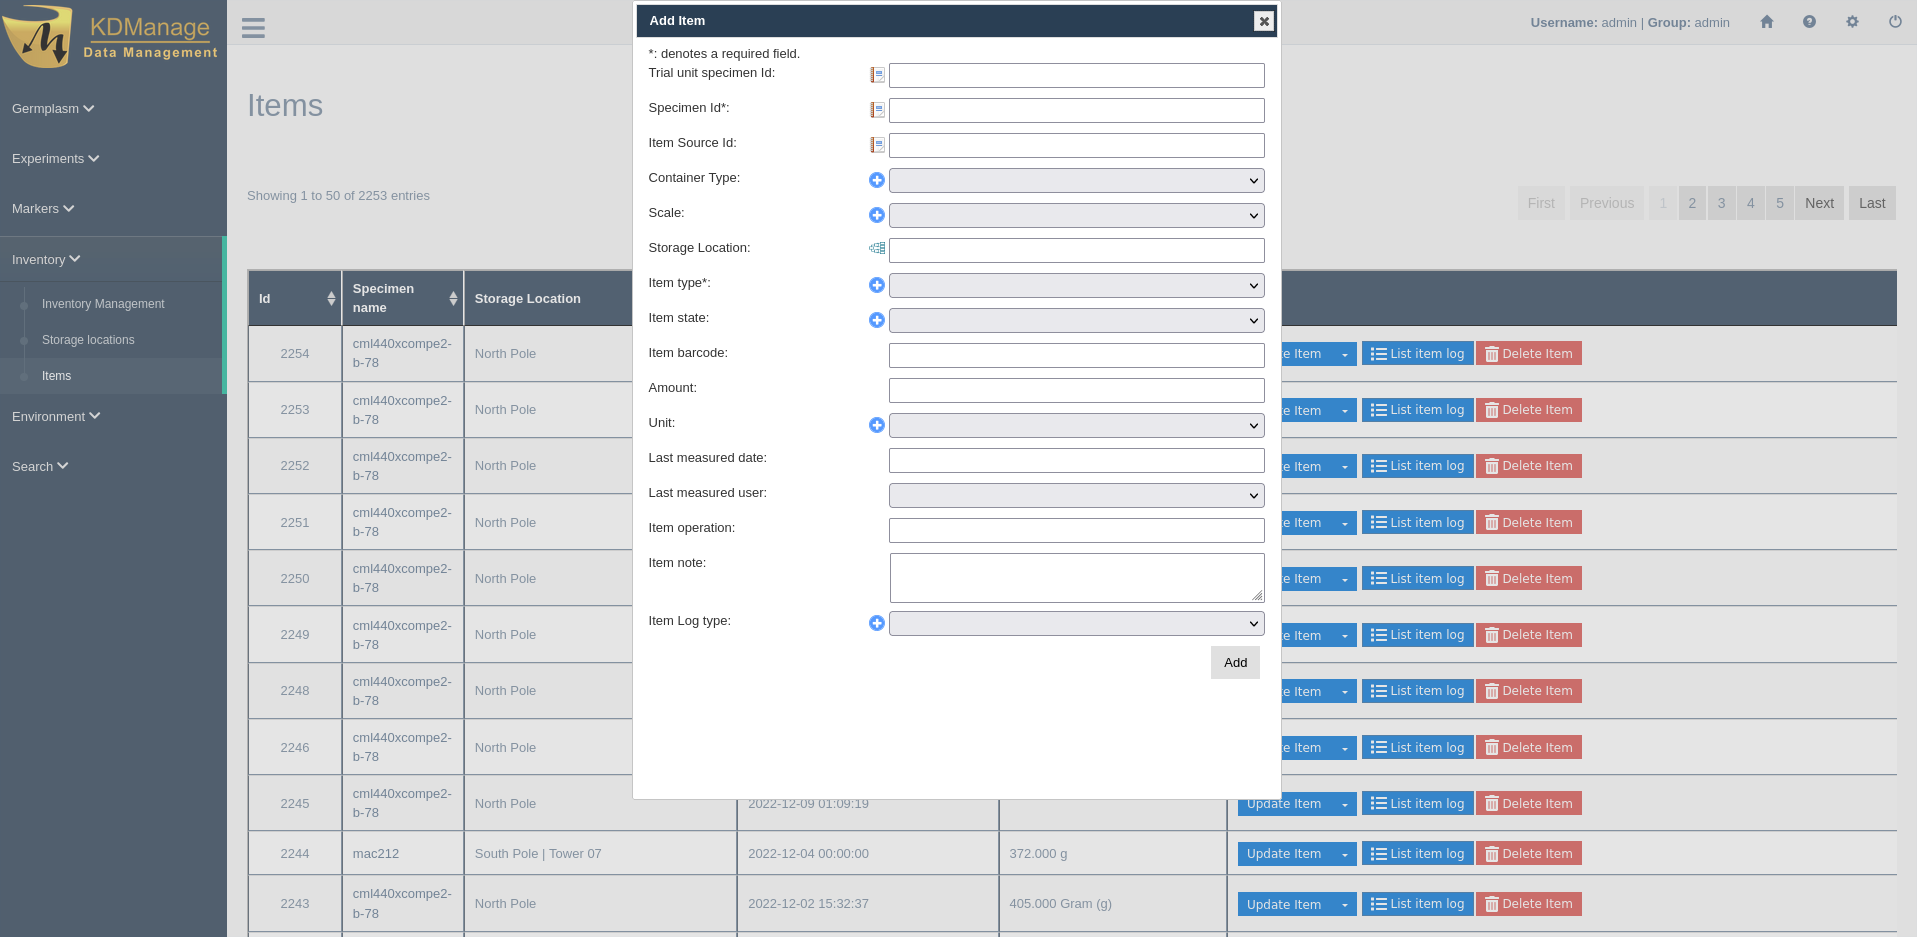
Adding a New Item
New items can be created and added to the Inventory by performing the following steps:
Step |
Action |
|---|---|
1. |
From the Items page in the Inventory, select the Add Item button. This will display the Add Item window. |
2. |
Fill out all necessary fields in the Add Item window. The below list provides some more information on how to add data for the different fields:
|
3. |
Select the Add button to create the item. |


It is often impractical to add items individually. A more practical method is to import items from a CSV which is described in the Importing an Existing Item section.
Tip
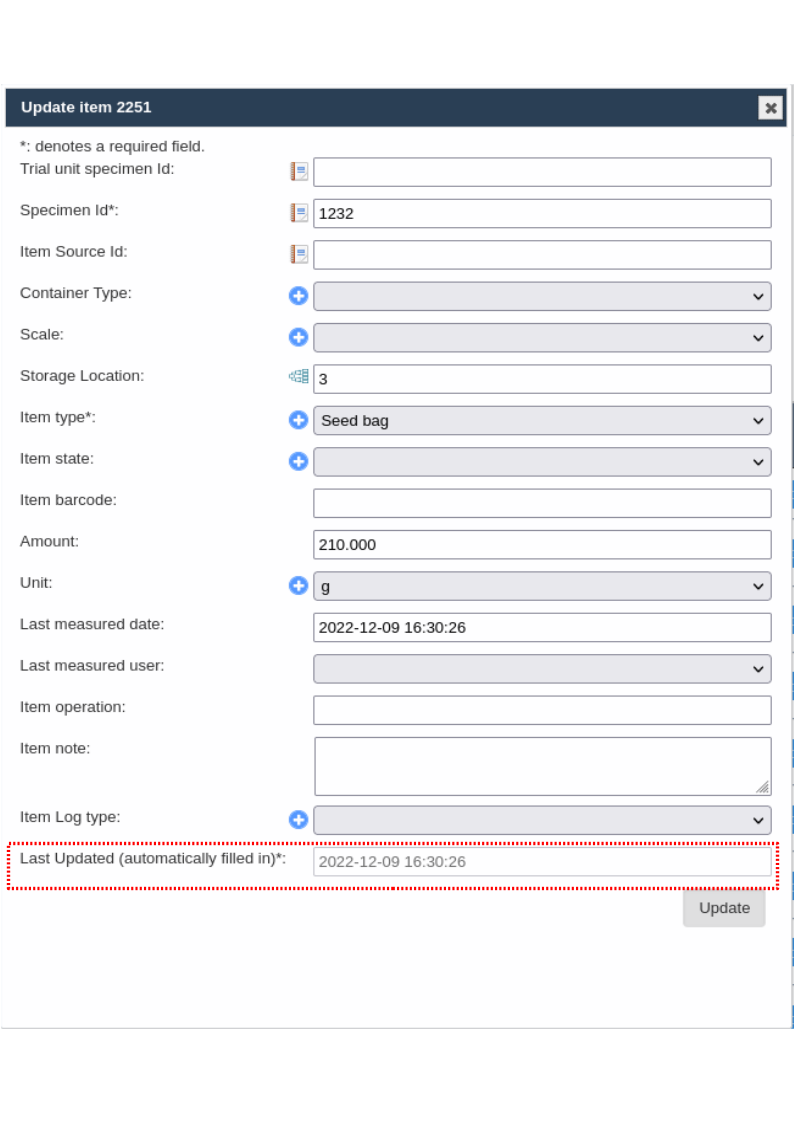
Selecting the  Update Item for a storage item will open the Update Item window, which is the same to the Add Item window, except an extra field of Last Updated and the purpose is to update an existing item rather than create a new one. The picture below shows how the Add Item Window looks.
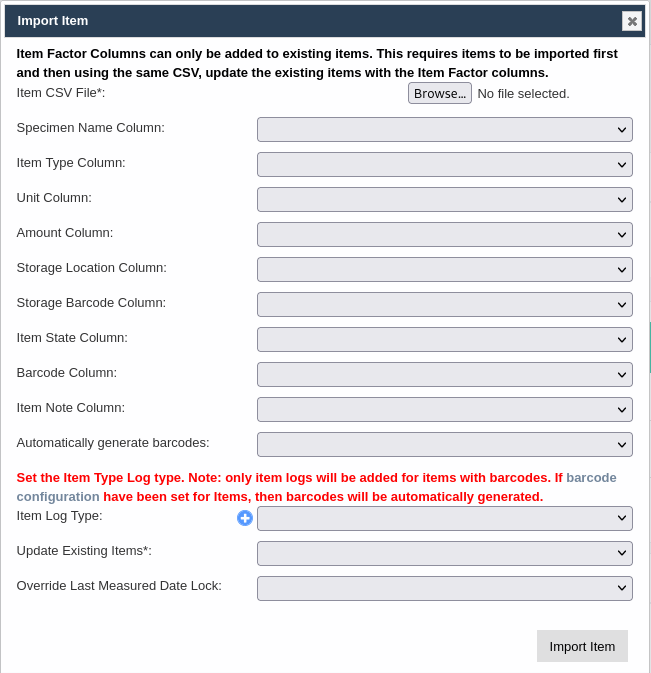
Importing an Existing Item
Importing items allows a large number of items from a CSV file to be added in bulk. These items are usually sourced from a harvest method.
Item CSV Preparation
An Item CSV file must be prepared correctly to ensure a seamless import. This means ensuring the correct:
The following types can be used:
Item type (mandatory);
Item state type (optional); and
Item container type (optional).
If a barcode configuration (refer to the Barcode Configurations topic), has been created for items and the barcode column is not given, then barcodes can be automatically generated for new items.
Use the IDs in columns of the CSV. When importing a CSV, the first row will not be added as KDManage will assume these are the headings of each column.
You may name these columns to the correct fields, to which the Import tool will automatically assign the columns to the correct fields.
The full column names that can be used are:
TrialUnitSpecimenId,
SpecimenId,
ItemSourceId,
ContainerType,
ScaleId,
StorageId,
ItemTypeId,
ItemStateId,
ItemBarcode,
Amount,
Unit,
DateAdded,
MeasuredByUser, and
ItemNote.
A single erroneous row will stop the process.
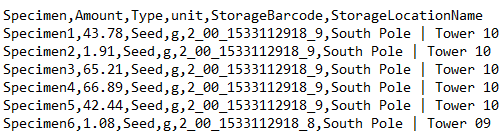
The following example shows a small item input CSV file.

Note
IDs of entities are used in the columns of the CSV.
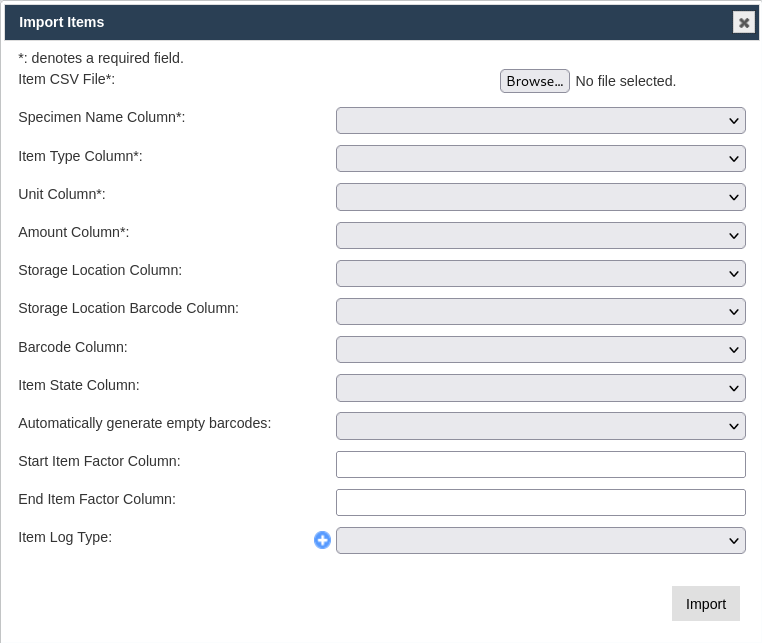
Steps for Importing an Existing Item CSV
If an item CSV has been prepared and you are ready to import the items, then see the images and steps below for information on how to do that:
Step |
Action |
|---|---|
1. |
From the Items tool in the Inventory menu, select the Import Items button to display the Import Items window (as seen in the image above). |
2. |
Select the Choose File button to open a window to select a file from your local machine. The columns will be automatically mapped to fields if the uploaded CSV has the headings specified in the Item CSV Preparation section. If not, you must specify the column name for each field. Leave a field empty if it is not required to be uploaded, but all mandatory fields must be included (fields with * is mandatory). |
3. |
If required, add a new item log type with the |
4. |
Select the Import button to finalise the import of the items file. The items will now be listed in the Items tool. |
Inventory Management
Inventory Management is a tool that provides management options for the Inventory. These options include bulk stocktake, split, merge, and other operations.
The image below shows Inventory Management with the Inventory Management panel (currently on the Storage tab) where items can be searched for by their storage location. The Barcode tab provides a search tool for searching items by their barcodes. The CSV Search tab provides a search tool for items which were created by provided csv file.
Below the Inventory Management panel is the Items panel which contains the items listed according to selections in the Storage tab or Barcode tab.

You can add storage locations and items by selecting the Add Storage and Add Item buttons. You can also import items by selecting the Import Items button. These three actions are all outlined in the above sections (Adding a Storage Location, Adding a New Item, and Importing an Existing Item) as they are identical to the actions available in the Storage Location tool and the Items tool.
Other actions available in Inventory Management are listed in the sections below.
Importing Items in Inventory Management
Importing items in the Inventory Management tool differs from previously described methods as it allows for more user-friendly data entry. In addition, instead of users requiring to use KDDart database IDs, these methods allow for named references.
Item CSV Preparation for Inventory Management
An Item CSV file must be prepared correctly to ensure a seamless import. This means ensuring the correct:
Units; and
If users wish to link items to specific specimens in a Trial, Trial Unit Barcodes should be used (see Adding Trial Unit Layouts).
Specimen names can be used in imports but must already exist in the database (see Specimen).
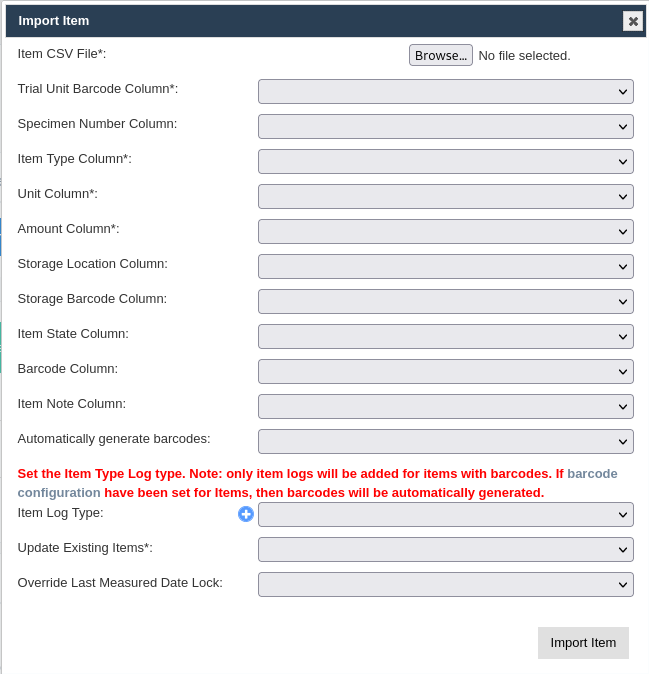
The following types can be used:
Item type (mandatory);
Item state type (optional);
If a barcode configuration (refer to the Barcode Configurations topic), has been created for items and the barcode column is not given. In that case, barcodes can be automatically generated for new items.
The following example shows a small item input CSV file.
Warning
An invalid row will stop the import process.
Filtering Items
Any selections from the Inventory Management panel can be filtered in the Items panel.
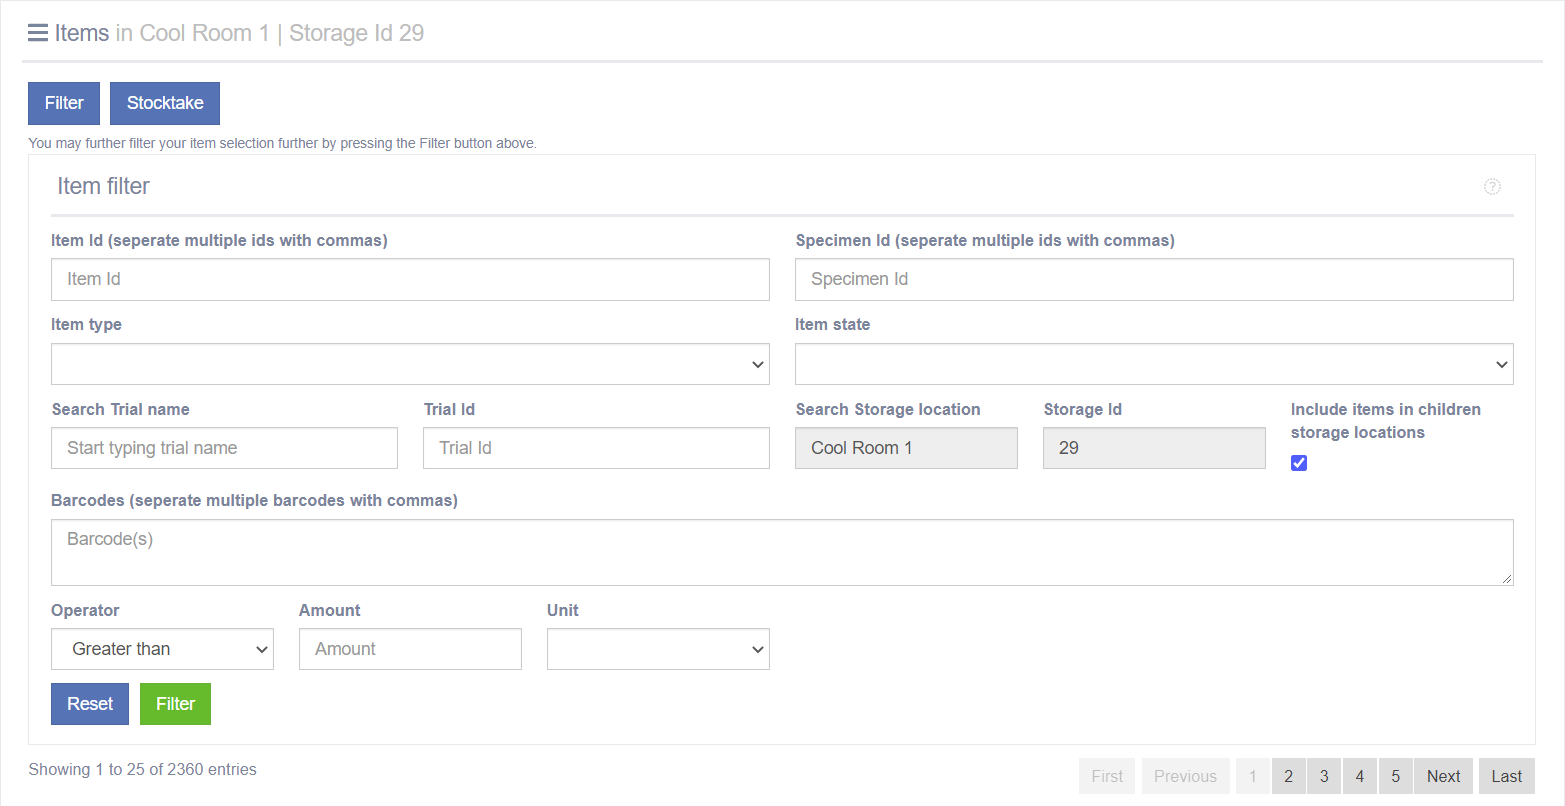
Step |
Action |
|---|---|
1. |
Select the Filter button |
2. |
Enter one or more filter parameters such as an item type, item ID, or trial name. |
3. |
Select the green Filter button |
4. |
More filter parameters can be applied by repeating steps 2-3 and results can be cleared by selecting the Reset button. |


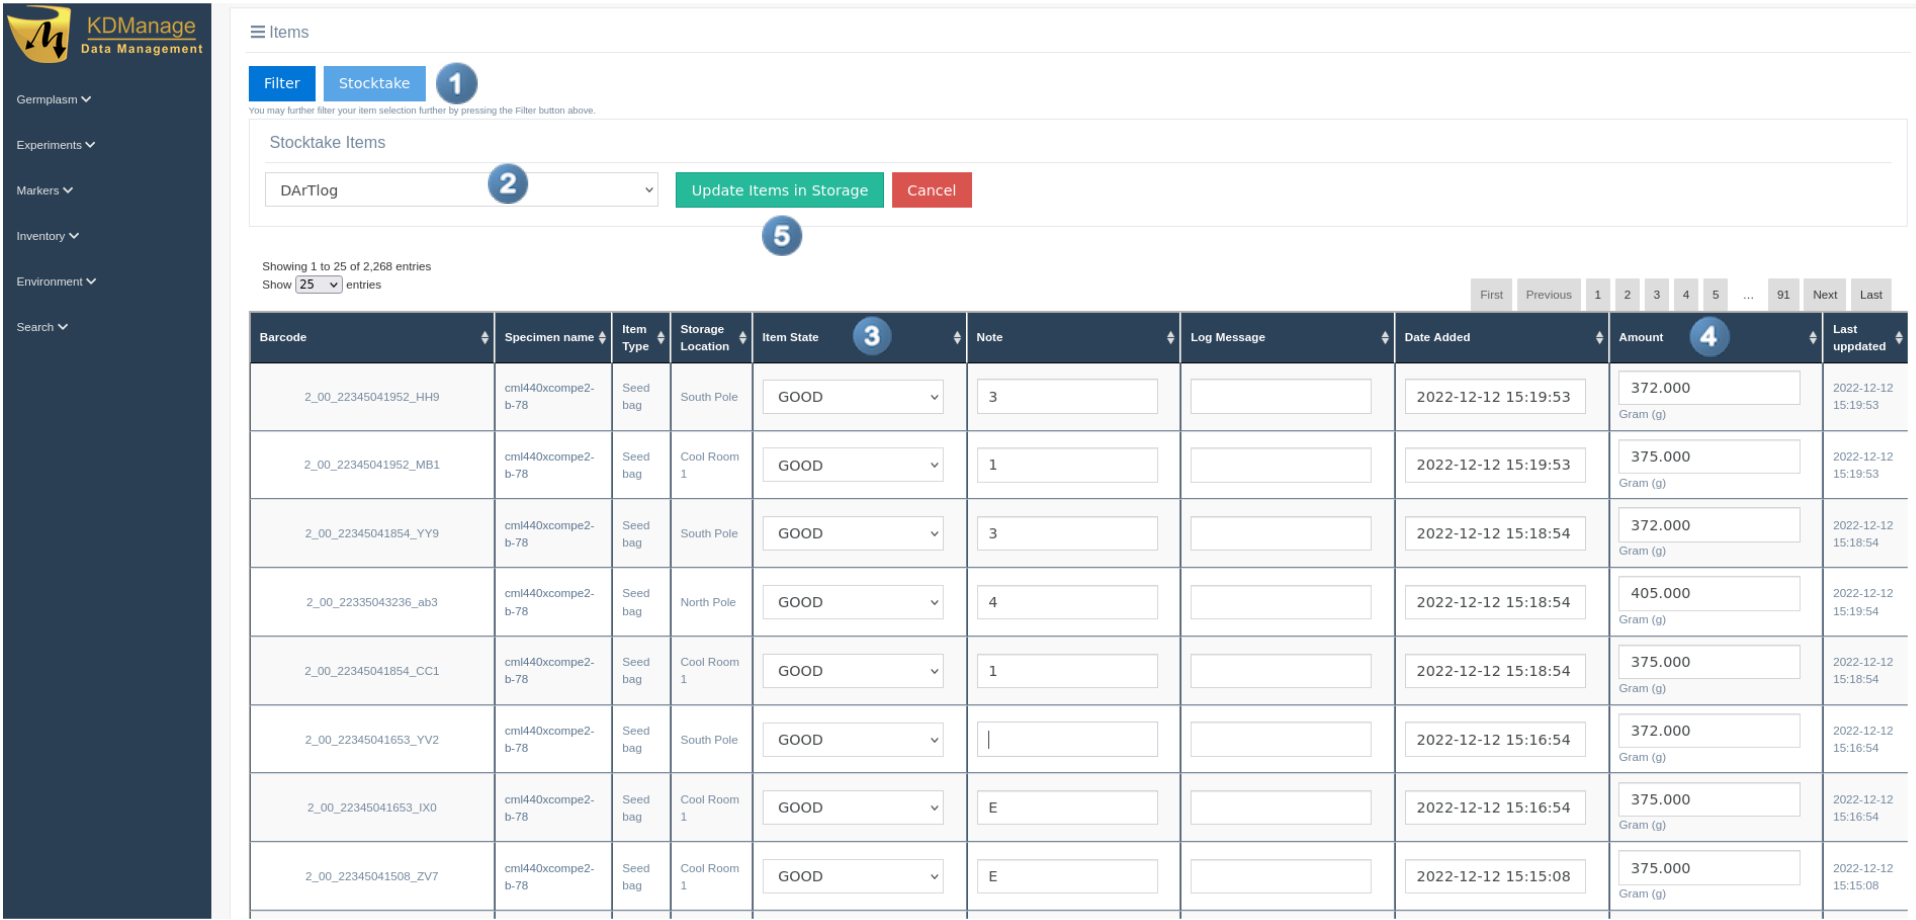
Conducting a Stocktake
After choosing a set of items, users may click on the  Stocktate button to begin a bulk stocktake. This allows users to update amounts and item states in bulk.
After making updates, users may choose the Item Log Type to track changes in each Item’s log.
Step |
Action |
|---|---|
1. |
When items have been listed, select the Stocktake button ( |
2. |
Choose an item log from the Item Log Dropdown menu at |
3. |
For each item, select an item state from the Item State column at |
4. |
If required, edit the amount for each item from the Amount column at |
5. |
When all items have been updated, select the Update Items in Storage button (at |


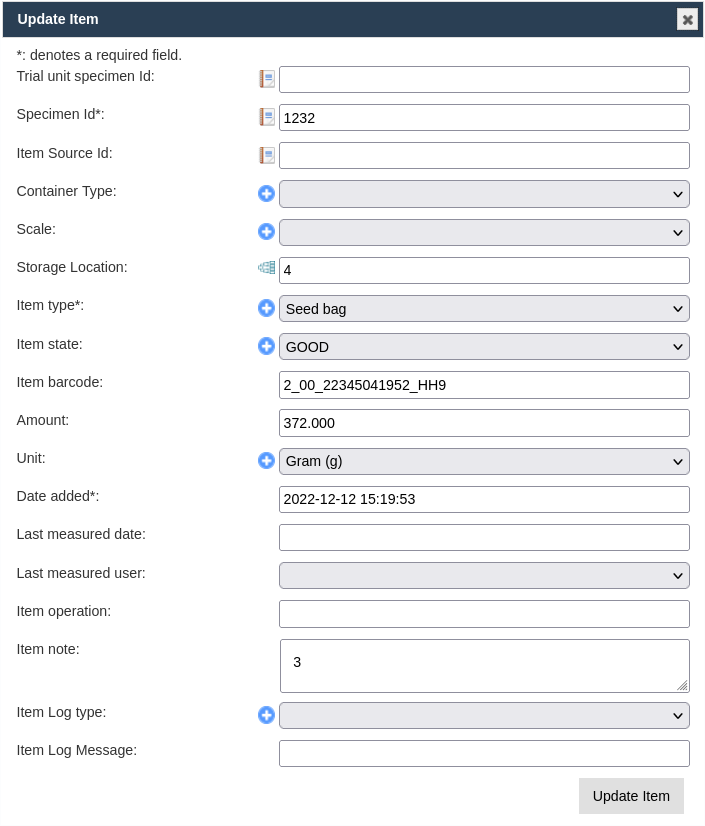
Updating an Item
Individual items can be updated by selecting the Update Button within the Action Column.
This will display the Update Item Window as seen in the image below where any details can be updated.
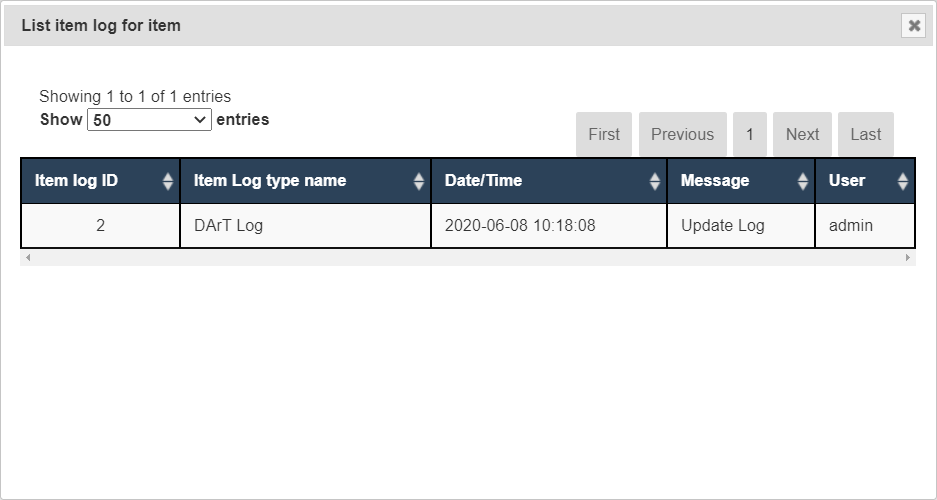
Show Logs
If any item has an associated log, it can be accessed by selecting the Show Logs button, which is located in the Action column of the Items panel.
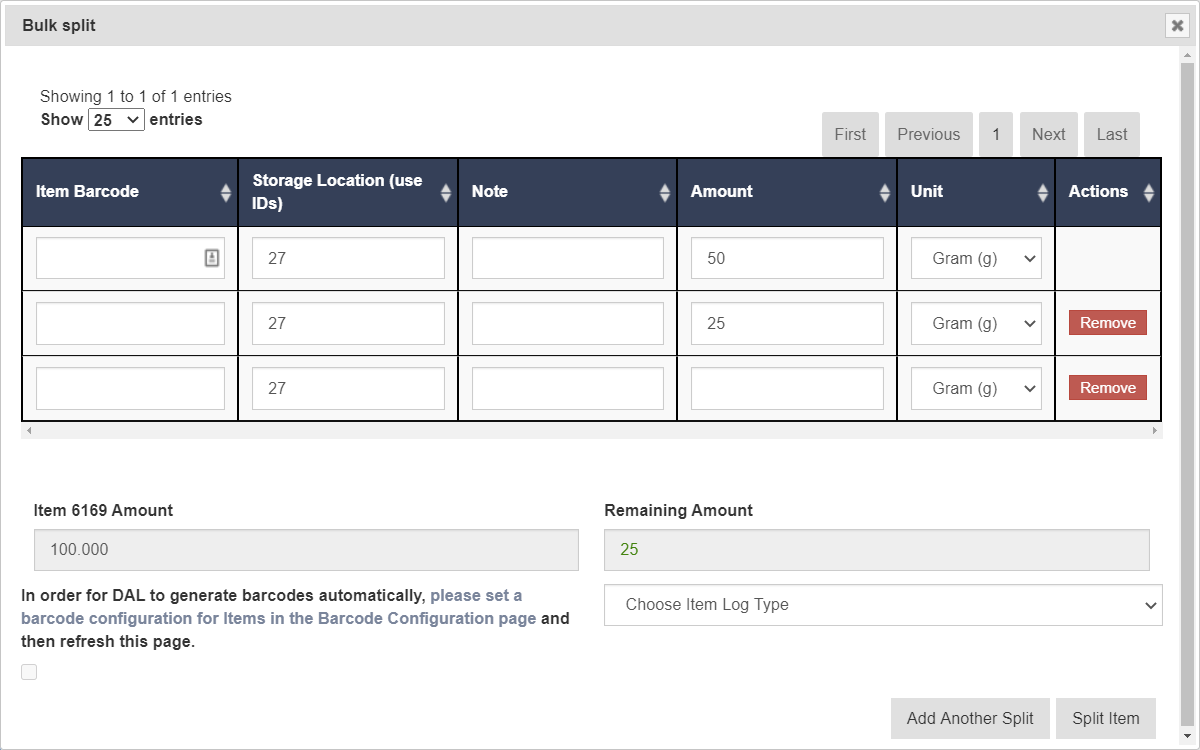
Splitting an Item
Single items can be split to create multiple new items. An example of this might be if a seed bag is split into two bags.
Step |
Action |
|---|---|
1. |
When items have been listed, choose an item to be split and select the |
2. |
Enter a barcode for the new item (if required). Select Automatically generate Barcodes checkbox if required. There is a link for the Barcode Configuration page which enables users to generate barcodes automatically. Continue with the other parameters for the new item which are a storage location ID, note (if required), and weight. Adjust the unit from the dropdown menu if required. |
3. |
More than one new items can be created at the same time. If you want to split into more than one item, select the Add Another Split button to create a new row for a new item. Continue by creating as many items as required. |
4. |
As you split the existing into more items, watch the Remaining Amount field, which shows the amount of the existing item remaining. |
5. |
Choose an item log option from the Choose Item Log Dropdown menu if required. |
6. |
Select the Split Item button to confirm the item split and the creation of new items. |

The two tables below contain information about the fields contained in the Split Item window.
The first table (the fields in  in the image) are for newly created items from an item split,
and the second table outlines the fields for updating the existing item that is being split.
in the image) are for newly created items from an item split,
and the second table outlines the fields for updating the existing item that is being split.

Field |
Mandatory |
Description |
|---|---|---|
Item Barcode |
A barcode to identify the item. |
|
Storage Location (use IDs) |
The ID of the storage location that new item will be stored in. |
|
Note |
Note attached to the item. |
|
Amount |
Mandatory |
New amount. The total split amount cannot exceed the original item amount. |
Unit |
Unit of the new item (such as grams). By default, this will be the original item unit. |
Field |
Mandatory |
Description |
|---|---|---|
Item Amount |
The amount of the original item that is remaining after splitting. |
|
Remaining Amount |
The remaining amount of the original item calculated from the rows above. The remaining amount cannot be below 0. |
|
Barcode Generate Checkbox |
New items will have their barcode generated if a barcode configuration has been specified. If a row has a barcode filled in manually, the manual barcode will overwrite the automatically generated barcode. |
|
Item Log |
The item log type that will be added to the log of new items and original item. |
Note
Item splitting is a two-step process. Firstly, the new items will be created. Secondly, the original item will be updated if the new items are successfully added. This means if there is a connection interruption to DAL, the original item amount update may fail, and the user will need to update the original item manually.
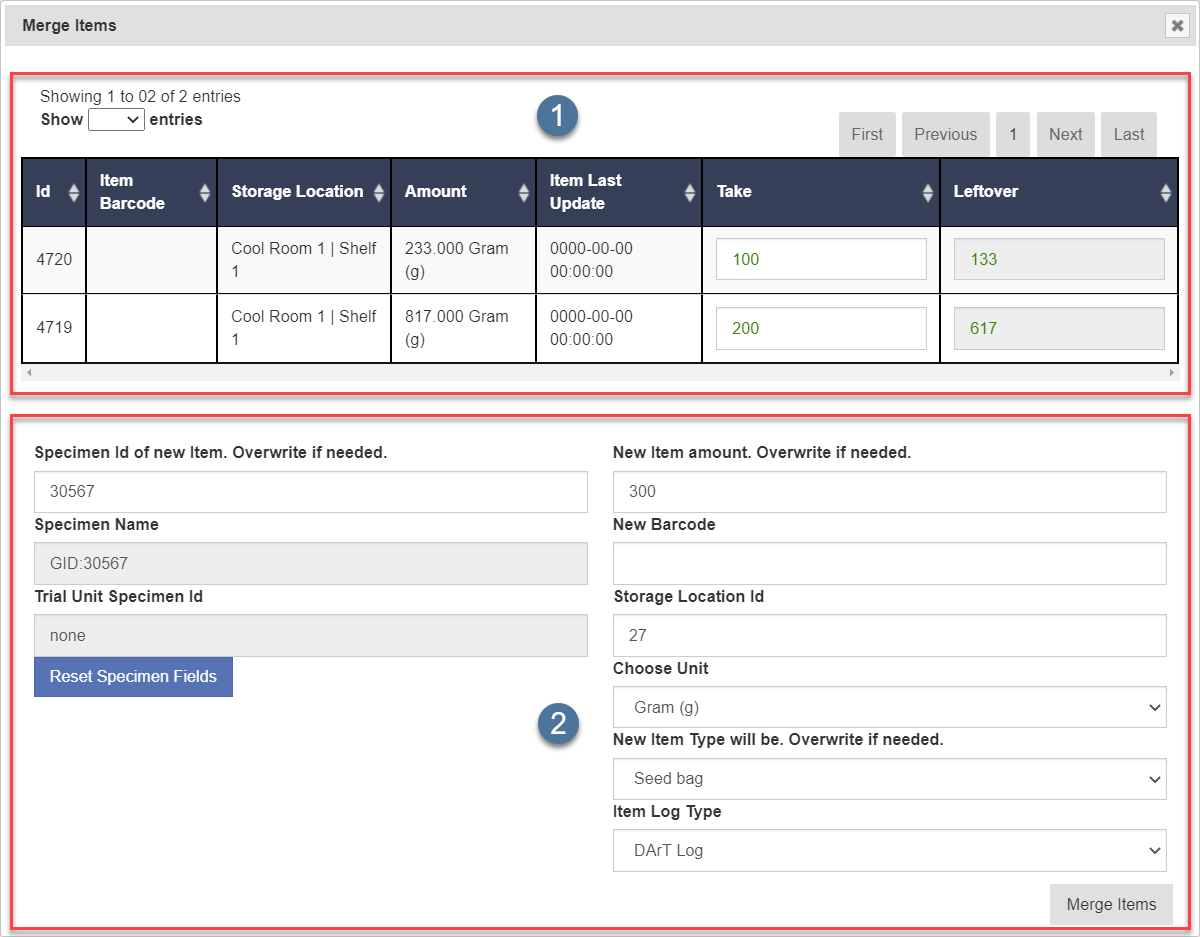
Merging Items
Items of the same specimen and item type can be merged to create a new item with a specified amount. See the images and tables below for instructions and more information:

Step |
Action |
|---|---|
1. |
When items have been listed, choose an item to be split and select the |
2. |
Enter the item ID of any additional items in the Merge Items panel and separate each ID with a comma. Altenatively, user can select |
3. |
After all items have been chosen, select the Merge Items button |


Step |
Action |
|---|---|
1. |
All items selected to be merged will be listed in the Merge Item rows (as seen in the image above). From the Take column, enter an amount from each item that will be taken to merge into a new item. In the example above, 100 grams of seeds have been taken from 4720, and 200 grams have been taken from 4719. |
2. |
The fields below the Merge Item rows present options for the creation of the new item that will result from the item merge. A new specimen ID will be automatically created, but it can be overwritten to create a new one if need be. Continue to fill in other details as required. |
3. |
Select the Merge Items button to complete the item merge. The newly merged item will now be available in Inventory. |
The two tables below contain information about the fields contained in the Merge Items window. The first table (the fields in in the image) are for items to be merged and the second table outlines the fields for creating a new item from the merge.
Field |
Mandatory |
Description |
|---|---|---|
Take |
The numerical amount that is to be taken from an item and put into a newly merged item. |
|
Storage Location |
A name to identify the storage location. |
|
Leftover |
The numerical amount that is leftover after a merge. |
Field |
Mandatory |
Description |
|---|---|---|
Specimen ID |
Mandatory |
Specimen Id of the new item. Normally taken from the merged items. This can be changed but is not recommended. |
New Item Amount |
The given amount for the new item. This is calculated by the taken amounts above but can be overwritten manually. |
|
New Barcode |
The new barcode of the new item. This is not automatically generated. |
|
Storage Location ID |
Storage location ID of the new item. Normally in the same storage of the first item in the merge list but can be overwritten manually. |
|
Unit |
Unit of the new item. |
|
Item Type |
Mandatory |
The item type of the new item. This will normally be the same item type as the merged items but can be overwritten manually. |
Item Log Type |
The item log type that will be added to the log of existing items and new item. |