Experiment Menu
The Experiment Menu contains various pages with tools that can be used to create and manage the entities in KDDart that represent experiments and methods.
The following items of the Experiment Menu illustrate the order of dependency:
This order of dependency means that a site must first be created before a design type can be added to it.
Site
Sites are high-level groupings of trials which may equate to places where breeding/variety evaluation occurs such as a breeding station. Geographic coordinates can be assigned to enable illustration on a map. A site may consist of a whole farm, breeding station or any other general environmentally homogeneous area, where planting occurs.
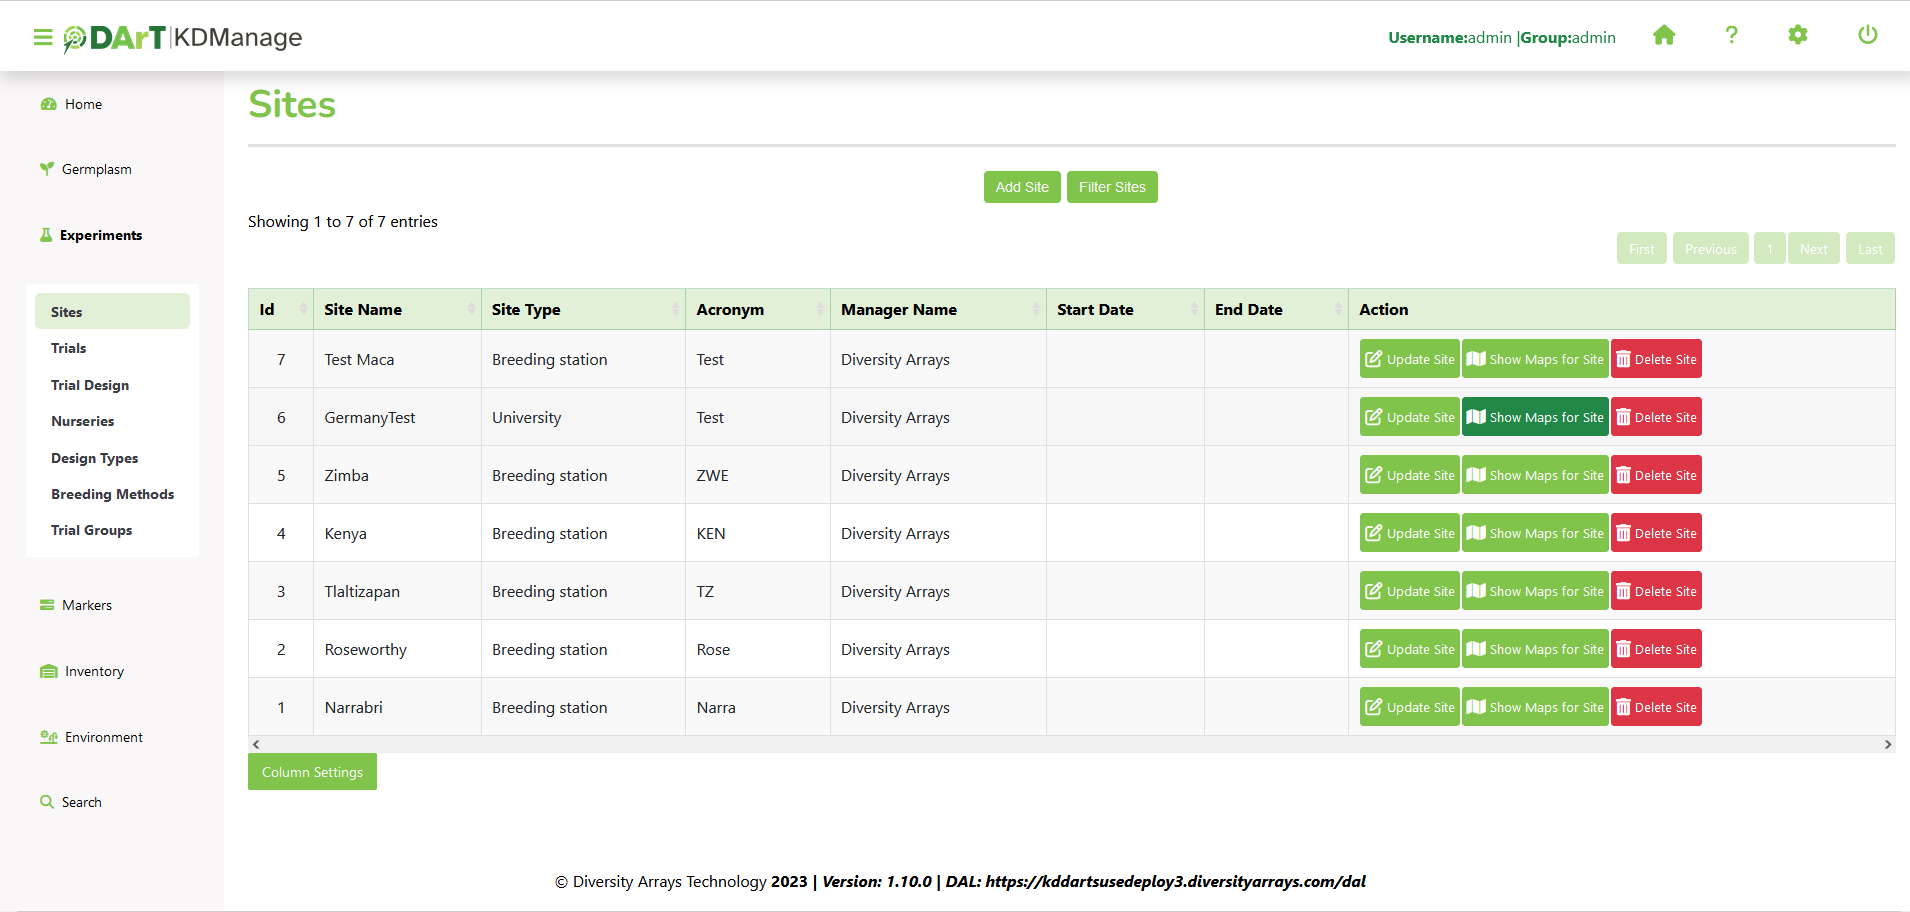
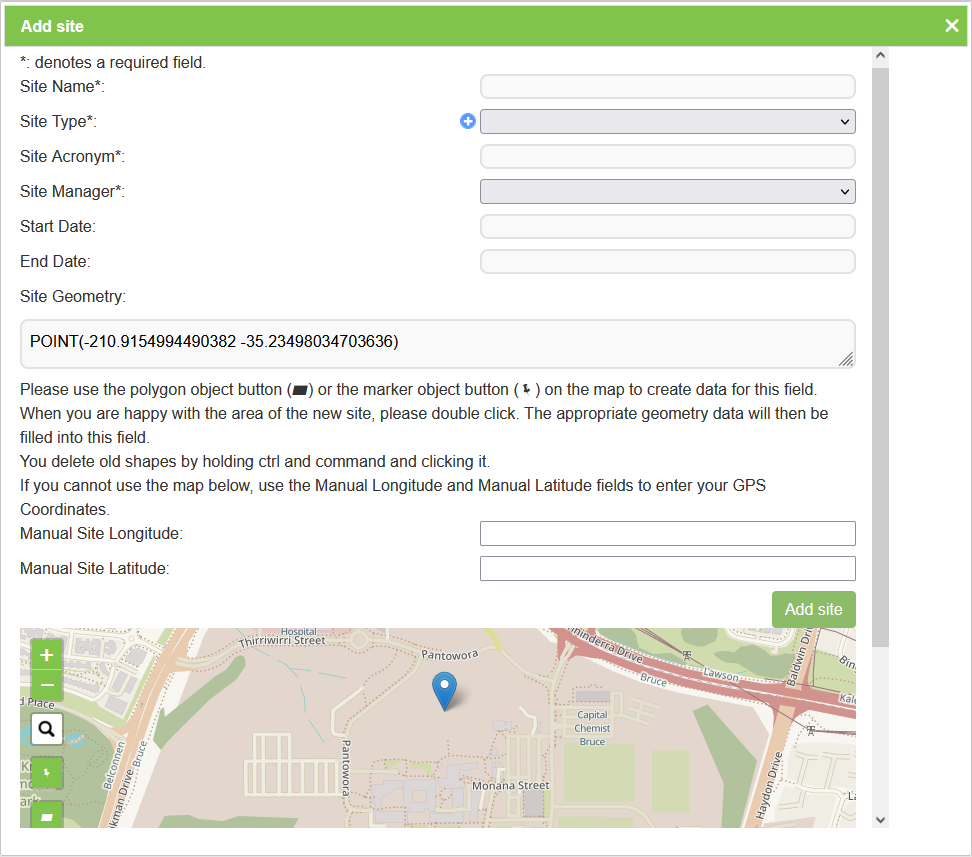
Sites can be added by selecting the Add Site Button which will display the Add Site Window which provides options for creating a new site. An image of the Add Site Window and a table describing it’s fields can be found below:
Field |
Mandatory? |
Description |
|---|---|---|
Site Name |
Mandatory |
A name to identify the site. |
Site Type |
Mandatory |
Selection from defined or classified site types. Site types must have already been created. |
Site Acronym |
Mandatory |
Abbreviated site name (e.g. may conform to the trial naming convention). |
Site Manager |
Mandatory |
An existing contact - a person currently managing the site (not necessarily a user of this system). |
Start Date |
Mandatory |
Date the site commenced operation (format YYYY-MM-DD). |
End Date |
Mandatory |
Date the site stopped operation (format YYYY-MM-DD). |
Site Geometry |
Mandatory |
This field contains the geographic coordinates of the site. It is populated by the selection of the site on the displayed map. |
Design Type
A design type defines how a trial or experiment is to be conducted.
The fields capture the layout/method that will be used to plant the genotypes, the number of replicates, etc. The data entered here is used as input for external software, such as DiGGer, which may be used to create the design.

KDCompute can generate a trial layout using DiGGer which will consume the data entered here.
Note
Whilst an external application can be used to construct the trial design it is not mandatory.
New design types can be added by selecting the Add Design Type Button which will open the Add Design Type Window. The window and a table which explains the relevant fields can be found below:
Field |
Mandatory? |
Description |
|---|---|---|
Name of Design |
Mandatory |
A name to identify the design type. |
Name of Software |
Mandatory |
The software used for preparing the design. For example, DiGGer could be used to create a randomised block design. |
Template File |
Mandatory |
Defines how the parameters need to be inserted in the input file for the design software. |
Genotype Format |
Mandatory |
Format in which the genotype name and genotype ID will be exported into the trial design input file. The DesignGenotypeFormat must be GenotypeName | GenotypeId (eg VENTURA|41 ) to satisfy DiGGer requirements. |
Factor Alias Prefix |
Mandatory |
Prefix used to find the factor for the trial design parameter while importing trial design from the output file generated by the trial design software. |
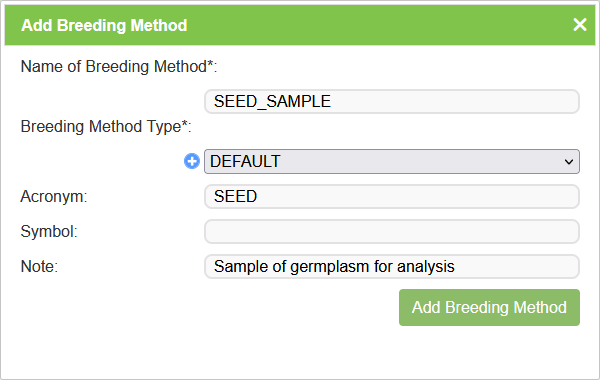
Breeding Method
A breeding method is an additional descriptor of a specimen which complements pedigree information and caters for a controlled vocabulary.
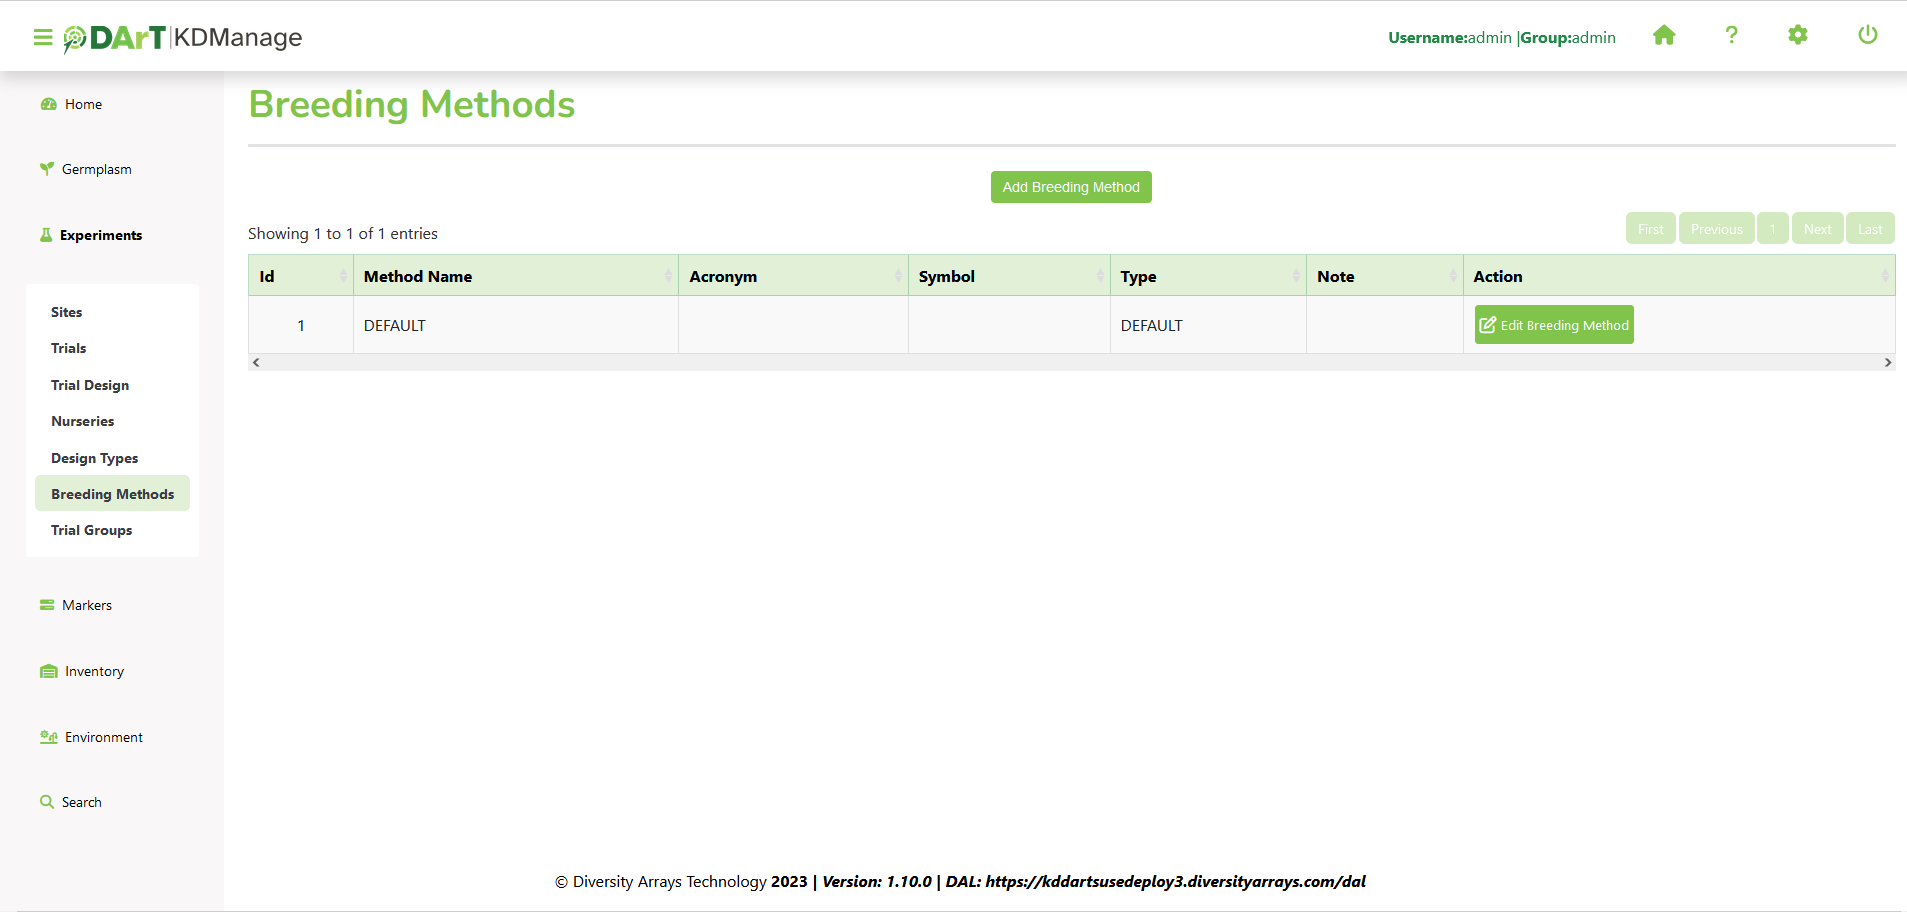
A new breeding method can be added by selecting the Add Breeding Method Button which will display the Add Breeding Method Window. The window, along with a table explaining its fields can be found below:
Field |
Mandatory? |
Description |
|---|---|---|
Name of Breeding Method |
Mandatory |
Name of the breeding methodology. |
Breeding Method Type |
Mandatory |
Type of breeding method. A new breeding method type can be created by selecting the Add Button. |
Acronym |
Acronym for the name of the breeding method. |
|
Symbol |
Symbol to represent the breeding method. |
|
Note |
A short description of the breeding methodology. |
Note
Where it is not important to specify a Breeding Method use the ‘Default’ Breeding Method.
Trials
Trials are the equivalent to field or nursery experiments that are performed within a Site.
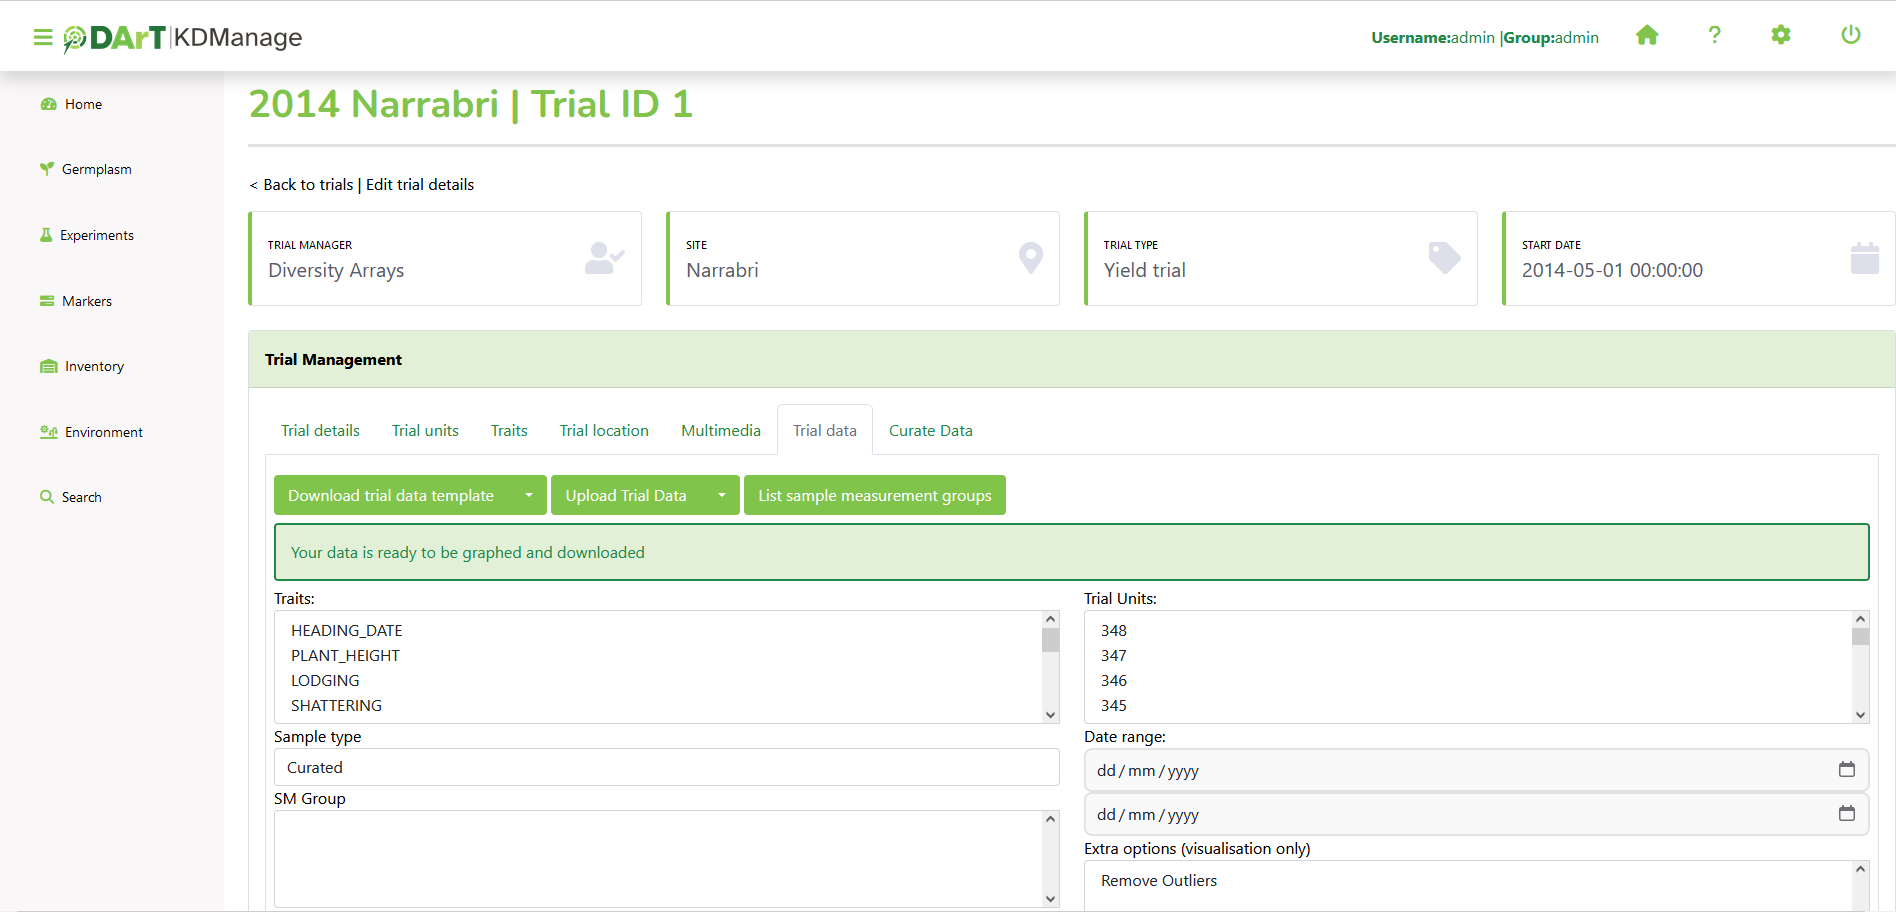
The Trials Page displays the list of defined trials which the user/group has permission to view as shown in the following image:
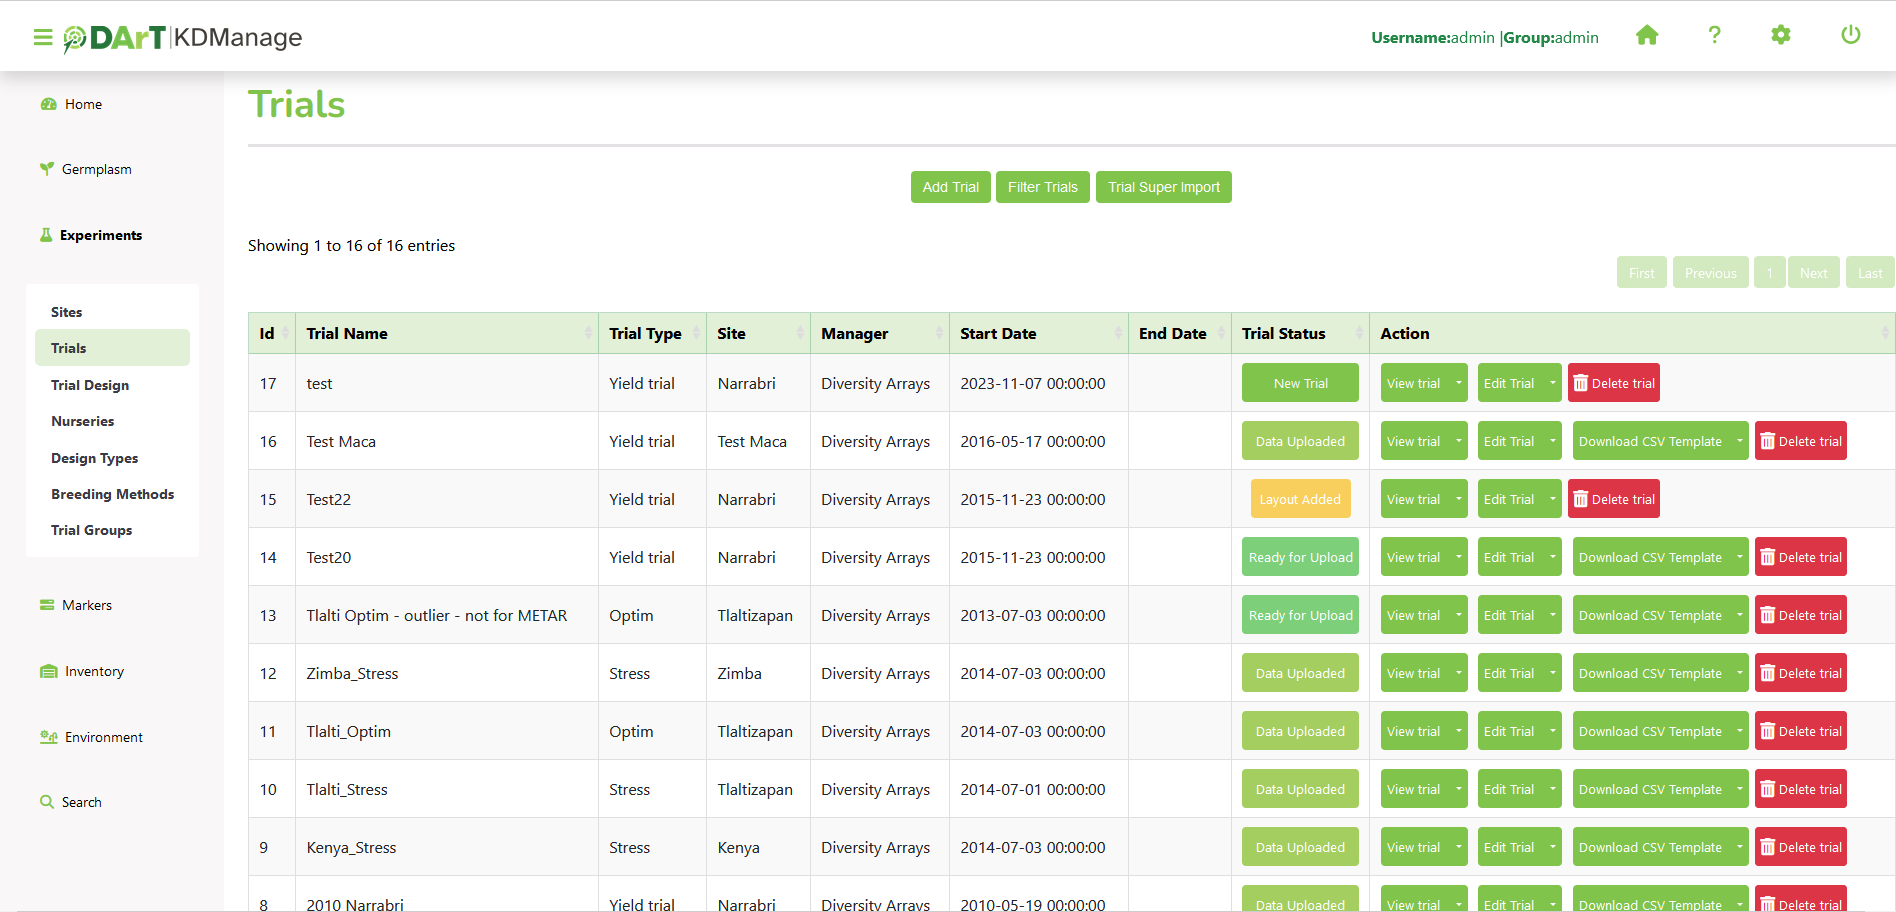
In the image above, the Trials Page shows several trial records. Each record contains a trial’s ID in KDDart as well as its name and available actions.
Trial Actions
The following table lists all the actions that can be performed for the selected Trial in KDManage.
Note
The presence of action types is dependent upon the trial state - not all action types will be available for all trials.
Action |
Description |
Parent Button |
|---|---|---|
Add Trait to Trial |
Add a trait to the trial. |
Edit Trial |
Download |
Download trial data. |
Download CSV Template |
Edit Trial |
Edit the trial. |
|
Download CSV Template |
Down the CSV template for the trial. |
|
List Trait for Trial |
List the traits for the selected trial. |
View Trial |
Import CSV Scoring Data |
Import a data file for trial |
Download CSV Template |
Display Trial Unit for Trial |
Display the trial units/layout for the selected trial. |
View Trial |
Upload File |
Uploads files to this trial. |
View Trial |
List files for Trial |
List all files that have been uploaded to this trial |
View Trial |
Delete Trial |
Delete this trial. This can only be done if there is no trial data uploaded to this group and this trial is not part of an existing trial group. Users can also choose to clear the trial of trial units and trial traits if they wish. |
Three of the actions are relevant to KDSmart. These are:
Download Trial Data - produces a CSV file for importing into KDSmart which contains a trial’s trait results.
Download CSV Template - produces a CSV file for importing into KDSmart without any of a trial trait’s results.
Import CSV Scoring Data - loads data back into KDDart from scoring in KDSmart.
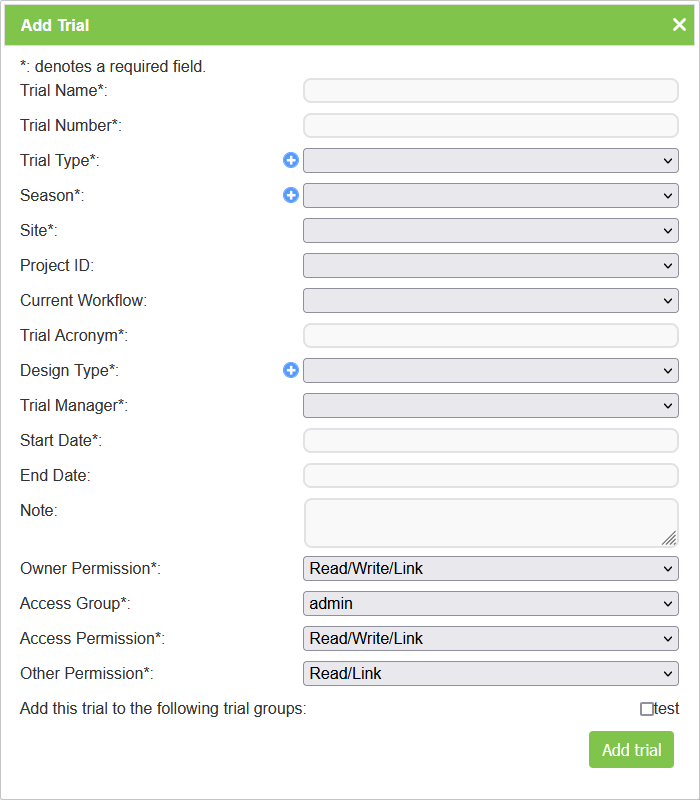
Adding Trials
New trials can also be created in KDManage. To add a new trial, select the Add Trial Button which will display the Add Trial Window. The window, along with a table that explains the relevant fields can be found below:
Field |
Mandatory? |
Description |
|---|---|---|
Trial Name |
Mandatory |
The name of the trial. A naming convention is suggested (e.g. a concatenation of site, type, date, number). |
Trial Number |
Mandatory |
The Number of the trial, which could be sequentially assigned. |
Trial Type |
Mandatory |
Select from the list of trial types (A general type as opposed to design type which is a trial specific definition). |
Season |
Mandatory |
Season that the trial is taking place. |
Site |
Mandatory |
Select from the list of sites to specify where the trial is to occur. |
Project ID |
Select from a list of projects. |
|
Current Workflow |
Select a related workflow from the list. |
|
Trial Acronym |
Mandatory |
An alternative abbreviated name for the trial. |
Design Type |
Mandatory |
Select a design type that identifies the trial design. |
Trial Manager |
Mandatory |
Someone currently managing the trial and defined in contacts although they are not necessarily a system user. |
Start Date |
Mandatory |
The date the trial commenced (Format YYYY-MM-DD). |
End Date |
Mandatory |
The date the trial has/will end (Format YYYY-MM-DD). |
Note |
Mandatory |
Descriptive notes for the trial. |
Access Fields |
Mandatory |
Access and permissions. See the Access Settings and Permissions topic. |
Note
Before a trial can be added, the site to be used must exist. When defining the trial Location, the trial must be contained within the boundaries defined for the Site.
Trial Design
The trial design page allows data visualisation (e.g specimens) with XYZ dimensions.
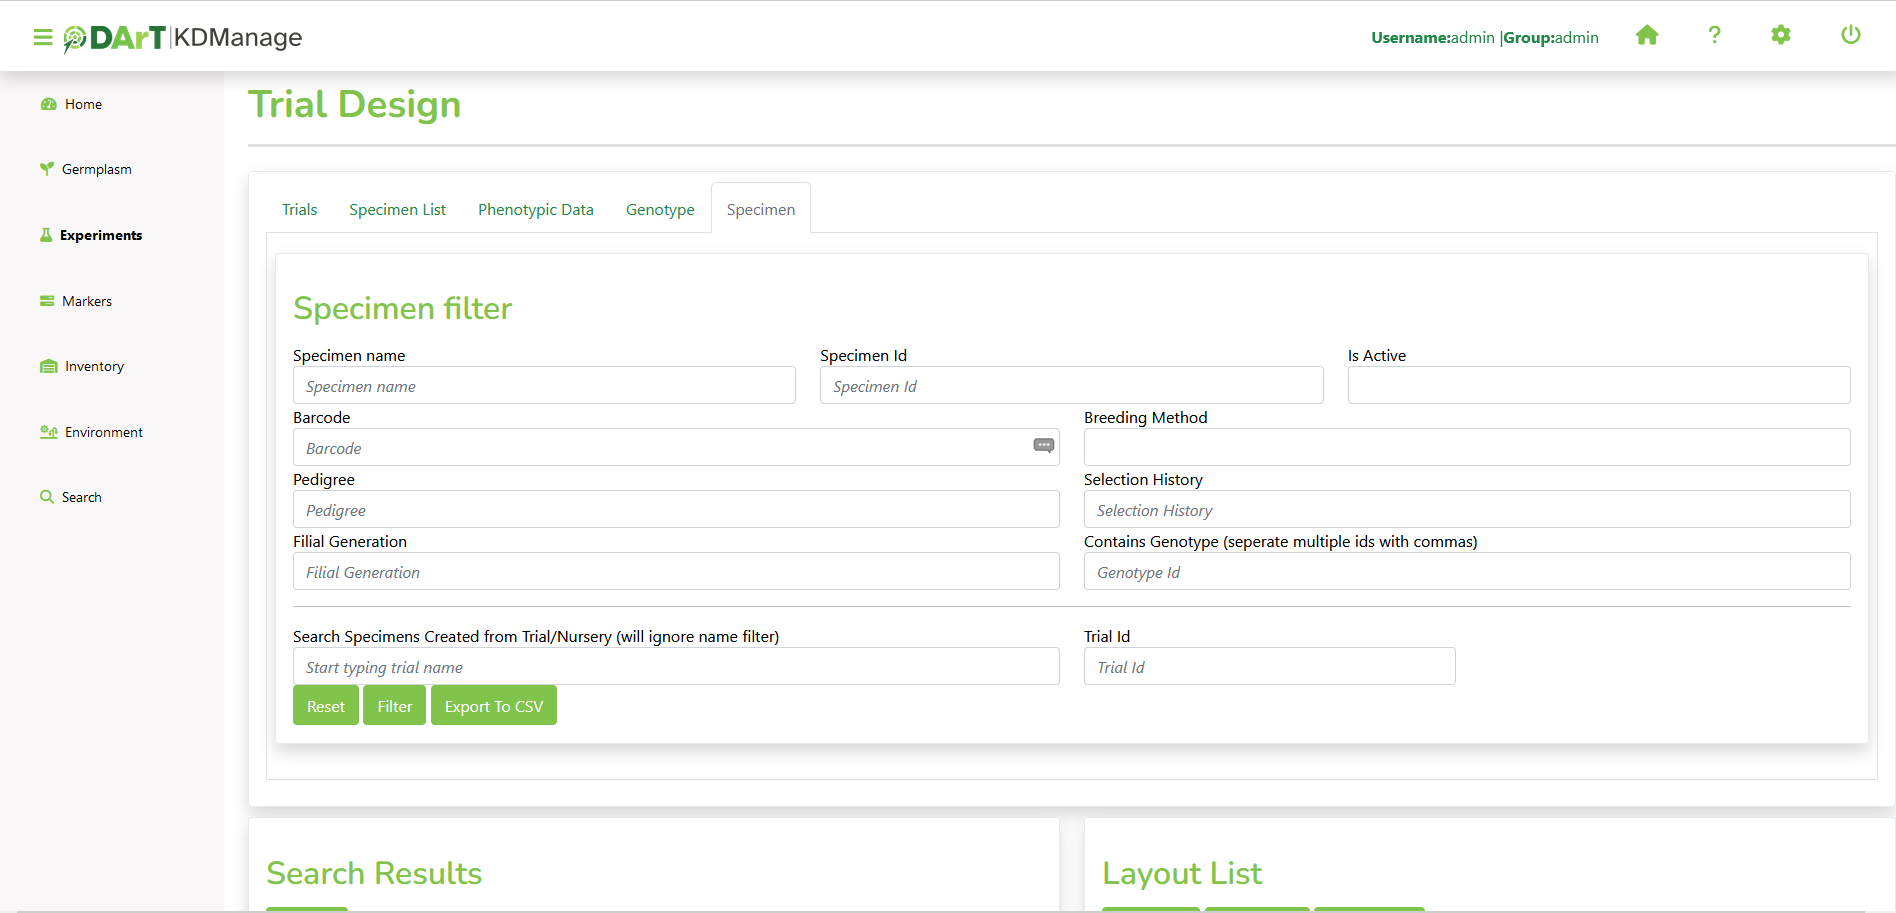
To add the data to map, select from the search results (scroll down, underneath the filters) and click on the button Add Specimens to Design. Data added will show in the Layout List and can be removed by clicking Remove Specimen.
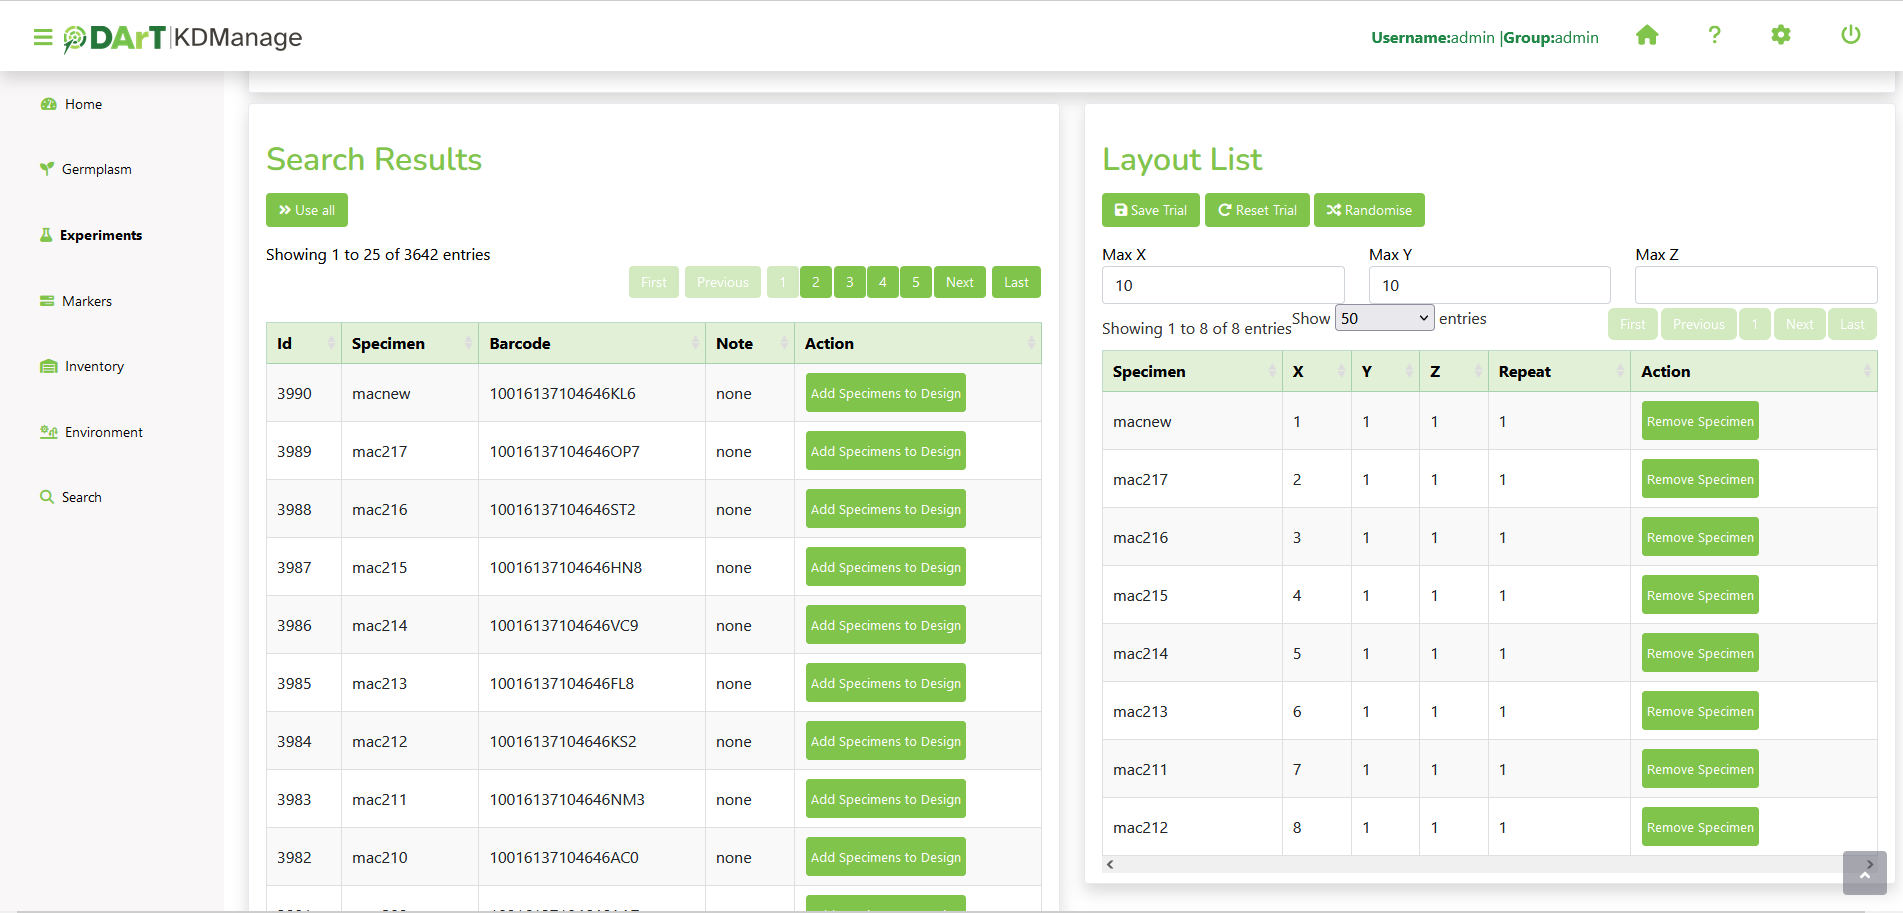
The map will be displayed in the New Layout Visualised section using XYZ dimensions. Each unit comes with the drag and drop function and can be adjusted with the following settings:

Field |
Description |
|---|---|
Max X |
Maximum units show in a row. |
Max Y |
Maximum rows show in a block. |
Max Z |
Maximum blocks show in the map. |
Map Size |
Size of the map (e.g. 10x10, 20x20, 50x50, 100x100). |
Orientation |
View Direction either from top left, top right, bottom right and bottom left. |
Zoom In |
Enlarge the size of the map/ specific zone of the map. |
Zoom Out |
Reduce the size of the map. |
There are also list of actions that can be performed to the map including:
Save Trial - Save the current arrangement of the map for future use.
Reset Trial - Start over again from initial stage of trial design page.
Randomise - Shuffle the arrangement of layout.
Recolour - Colour the units based on the frequency of a specimen has been used.
Rotate - Change the view direction of the map.
Trial Super Import
Prerequisite: Before the Trial Super Import can be used, a .csv file containing the relevant data must be prepared. This .csv should contain the columns listed within the Trial Super Import form.
This function allows the user to upload trial units for multiple trials with a single .csv file.
Where a trial already exists, it will update the existing trial. Otherwise, a new trial will be created with the given information within the csv. Similarly, existing trial units will be updated or created as necessary.
There are also flags that can be set in this super import function that will prevent certain actions:
Allow creation of Specimens/Genotypes - determines whether specimens and genotypes that don’t exist should be created.
Update existing Trial Information - determines whether an existing trial should be updated with given information.
Update existing Trial Units/Plots - determines whether existing trial units/plots should be updated with given information.
Generally, it is useful to prevent these actions where it is certain that the data is uploaded exclusively for updating existing trials/ trial units. This way, spelling and other administrative errors will be caught instead of automatically added as a new trial/trial unit/ specimen/ genotype.
To use the Trial Super Import, select the Trial Super Import button to display the Trial Super Import window.
The following illustration shows the Trial Super Import window, displaying the fields which represent the columns required for the super import to run. There are in total 4 steps:
Step 1: Trial Information

Field |
Mandatory |
Description |
|---|---|---|
Trial Data File |
M |
The prepared .csv file containing the columns below. |
Trial Name Column |
M |
The column that contains the trial names. |
Site Column |
M |
The column that contains the sites for each trial. |
Trial Start Date Column |
M |
The column that contains the Trial Start Date for each trial. |
Trial Manager Name Column |
M |
The column that contains the manager for each trial. |
Trial Type |
M |
The column that contains the Trial Type for each trial. |
Update existing Trial Information |
M |
Flag to determine whether the super import should update existing trial information with given data. |
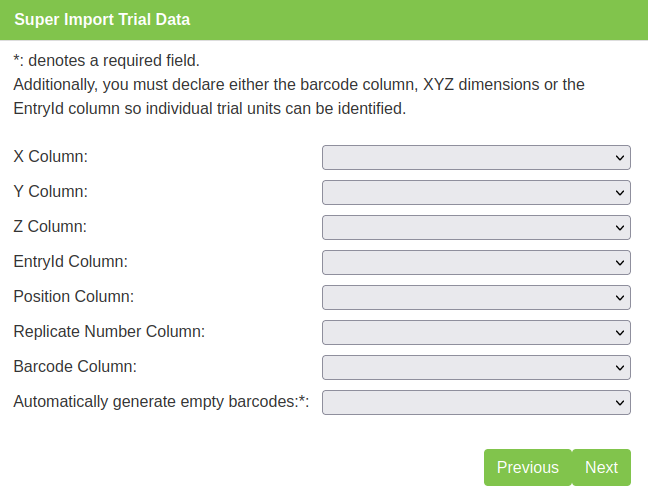
Step 2: Trial Unit Dimensions
Field |
Mandatory |
Description |
|---|---|---|
X Column |
(!) |
One of the trial dimension columns as part of XYZ which will be added to new trials, to create new trial units and to identify existing trial units. |
Y Column |
(!) |
One of the trial dimension columns as part of XYZ which will be added to new trials, to create new trial units and to identify existing trial units. |
Z Column |
(!) |
One of the trial dimension columns as part of XYZ which will be added to new trials, to create new trial units and to identify existing trial units. |
EntryId Column |
(!) |
One of the trial dimension columns which will be added to new trials, to create new trial units and to identify existing trial units. |
Position Column |
(!) |
(NOT CURRENTLY IN USE) One of the trial dimension columns which will be added to new trials, to create new trial units and to identify existing trial units. |
Replicate Number Column |
The column where the replicate number is listed for the Trial Unit. |
|
Barcode Column |
(!) |
One of the trial dimension columns which will be added to new trials, to create new trial units and to identify existing trial units. |
Use Barcode for Update |
M |
Flag to determine whether the super import should update existing trial units barcode with given data. |
Automatically generate empty barcodes |
M |
Flag to determine whether the super import should generate random barcodes for trial units. |
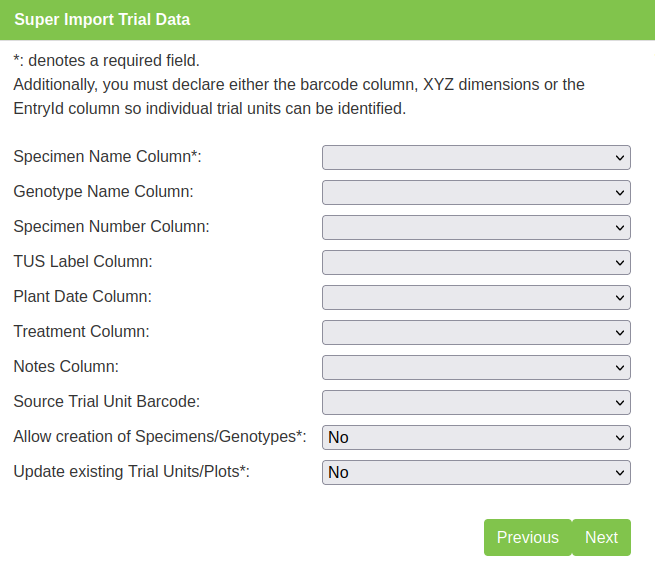
Step 3: Specimen & Genotype & Trial Unit
Field |
Mandatory |
Description |
|---|---|---|
Specimen Name Column |
M |
The column where the specimen names within each trial unit are listed. For existing trial units, these will just be used to validate the correctness of the .csv file. The specimen number column is the primary identification of specimens within trial units. |
Genotype Name Column |
The column where the specimen’s genotype is defined and will be added to the specimen. For new genotypes, they will be created automatically. |
|
Specimen Number Column |
The column where a specimen’s number within a trial unit is defined. For existing trial units, these values will be used as the primary identification of specimens within trial units. |
|
TUS Label Column |
The column where label for the Trial Unit Specimen are given. |
|
Plant Date Column |
The column where the plant dates are given. |
|
Treatment Column |
The column where an existing treatment name is listed for the Trial Unit. |
|
Notes Column |
The column where descriptive notes for the Trial Unit are given. |
|
Source Trial Unit Barcode |
The column where the source trial unit’s barcode is listed for the Trial Unit. |
|
Allow creation of Specimens and Genotypes |
M |
Flag to determine whether the super import should automatically create new specimens and genotypes. |
Update existing Trial Units/Plots |
M |
Flag to determine whether the super import should update existing trial units with given data. |
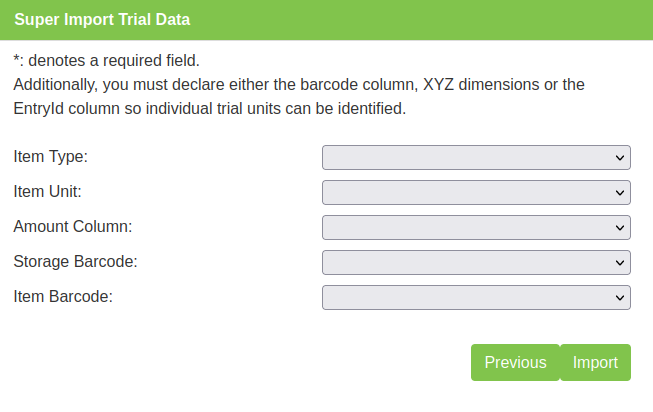
Step 4: Item Information
Field |
Mandatory |
Description |
|---|---|---|
Item Type |
The column that contains the Item Type for each item. Also, a flag to determine whether ths super import should create new items and add to specimen. |
|
Item Unit |
The column that contains the Item Unit for each item. |
|
Amount Column |
The column that contains the Item Amount for each item. |
|
Storage Barcode |
The column that contains the Storage Barcode for each item. |
|
Item Barcode |
The column that contains the Item Barcode for each item. |
Note
(!) in the mandatory column denotes that at least one of these fields must be given.
Once the .csv file has been uploaded under Trial Data File, an additional view will be generated in the window that contains all the columns of the .csv file.
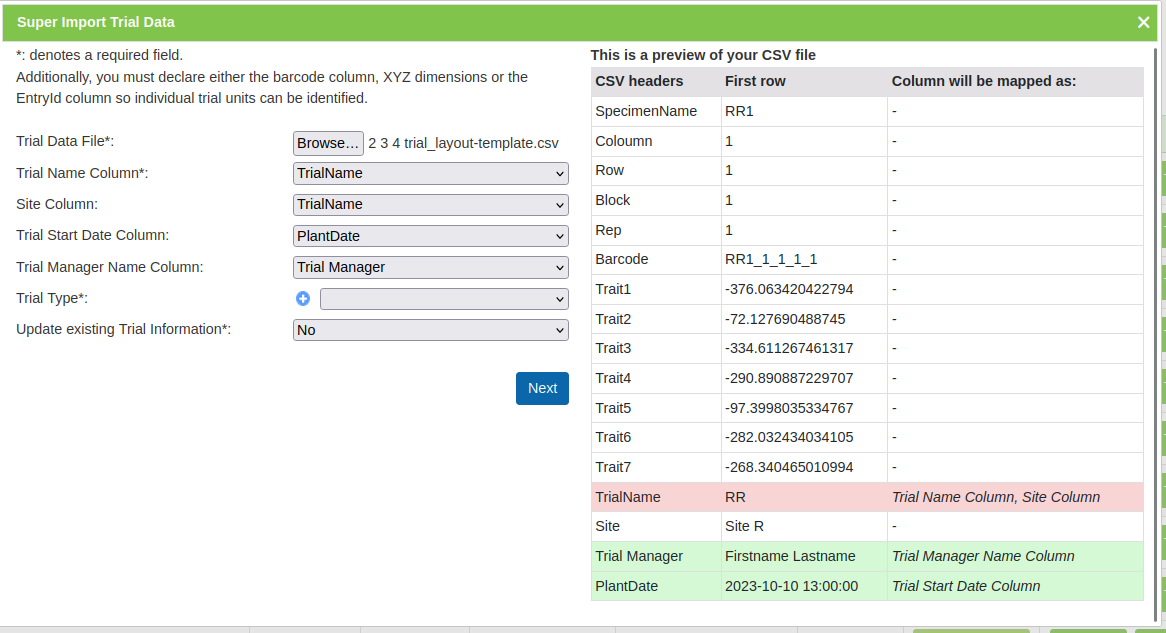
Now, the remaining fields can be selected using the dropdowns to match the requisite columns to the columns that exist within the uploaded file.
The existing columns on the right will turn green when they have been selected once, and turn red if they have been incorrectly selected more than once.
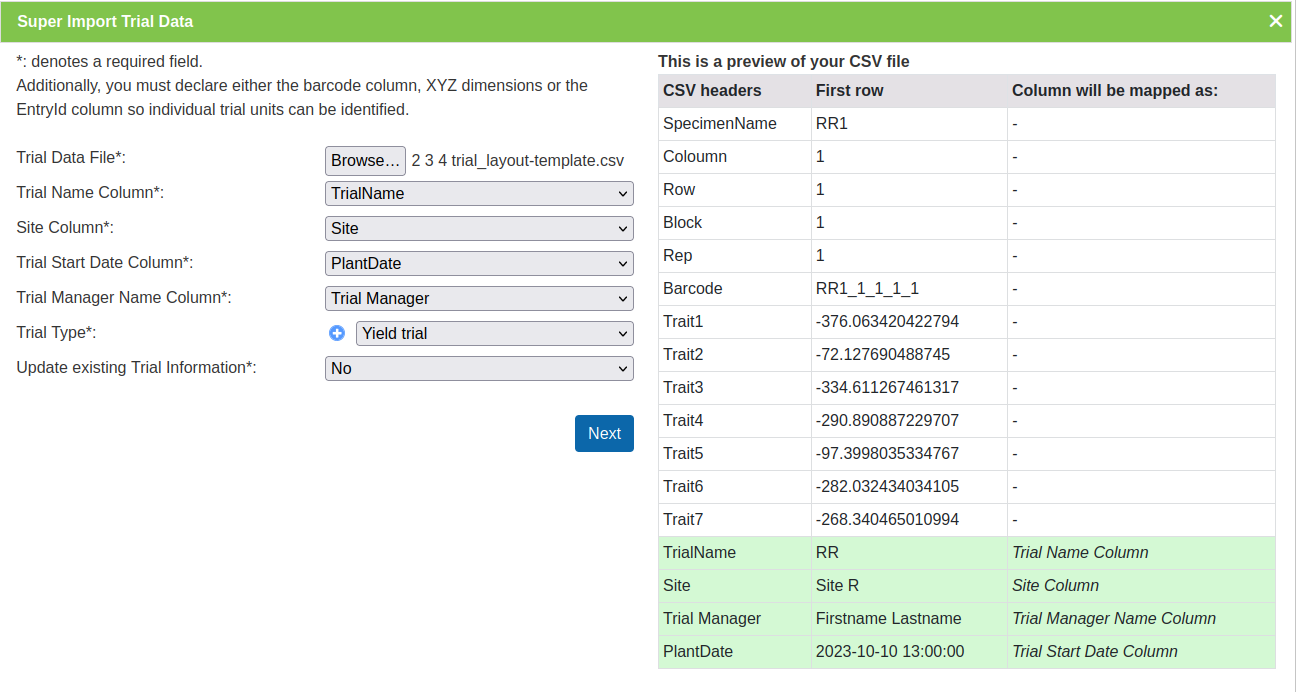
Once all the needed columns have been selected, select the Import button to run the super import. When the super import completes, a prompt should be shown with some statistics on the super import.
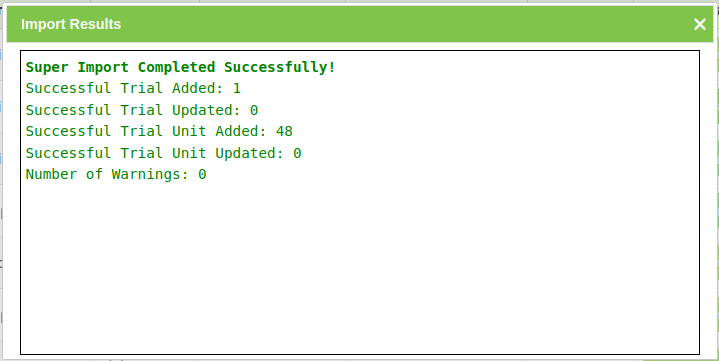
The general statistics are displayed at the top, while all the warnings will are printed in yellow below.
Add Traits to a Trial
Selecting Add a Trait to Trial (under Edit Trial dropdown) adjacent to the selected Trial will display the following Add Trial Trait window. The Trait is selected from a list of predefined Traits (refer to the Traits topic).
When the Compulsory field is set to ‘yes’ the capturing of the trait will become mandatory when recording Trial data.
Trials need traits added to them before they can be measured in the field. To add traits to a trial, select the Add Button (adjacent to the relevant trial) which will display the Add Trial Trait Window which can be seen in the image below:
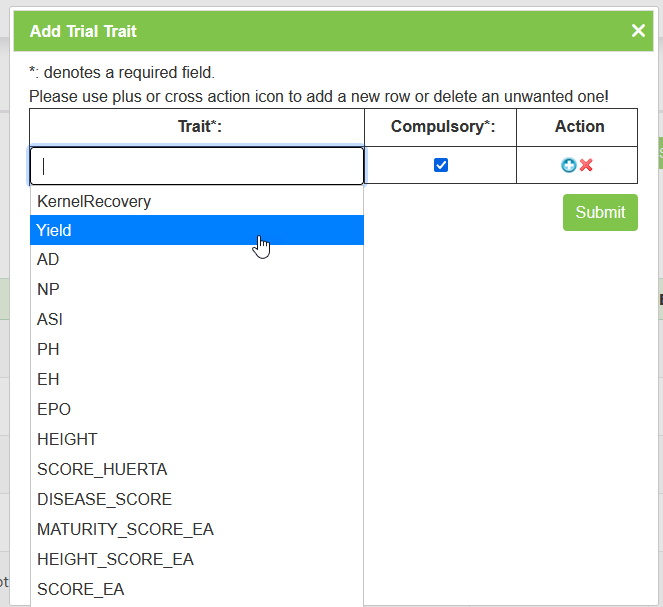
The trait is selected from a list of predefined traits (refer to the Traits topic).
When the Compulsory Checkbox is set to yes, the capturing of the trait will become mandatory when recording trial data.
More traits can be added by selecting “Add Trait to trial” (under the Edit Trial dropdown) from the Action Column.
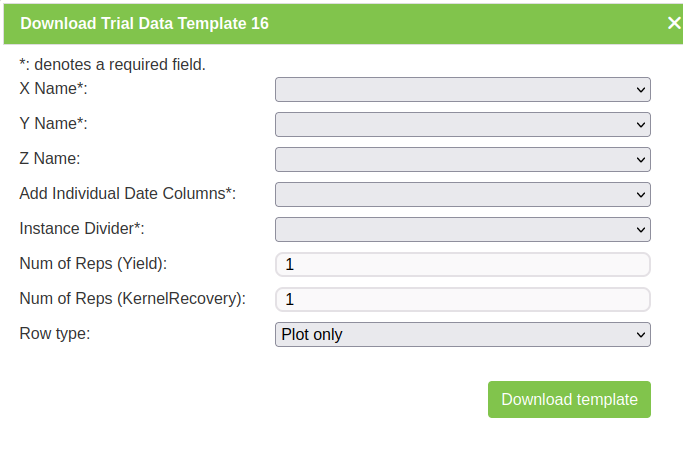
Downloading Trial Data
To download trial data in CSV format, select the Download CSV Template button for the required trial and then the Download Trial Data option. This will display the Download Trial Data Window (seen below) which provides some options for data to download. The file can be downloaded in one of three formats: KDManage format, KDSmart format or Direct DAL format.

Editing Trials
To edit an existing trial select the Edit Trial Button to display the Update Trial Window as seen in the image below:
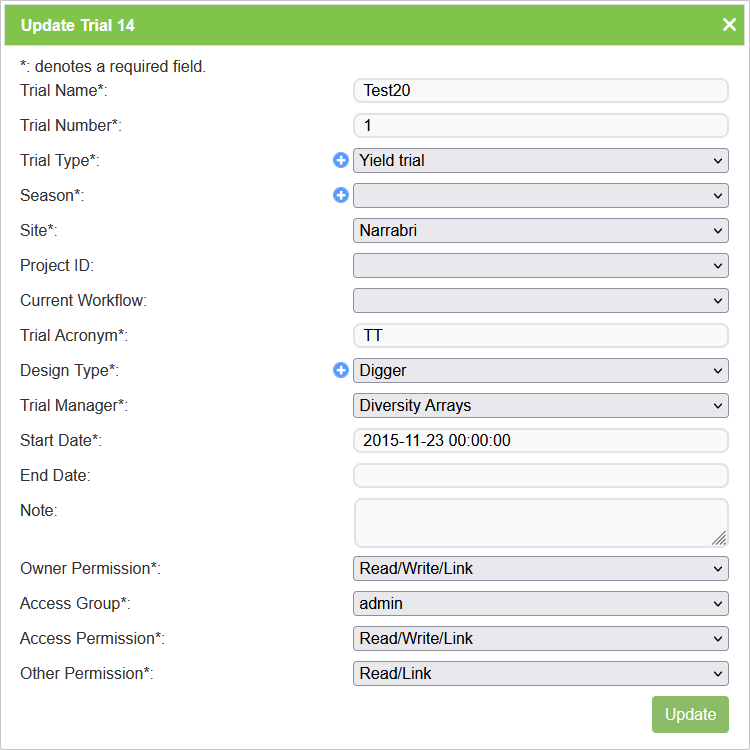
Note
This window is the same as the Add Trial Window so the fields are described in the Adding Trials section.
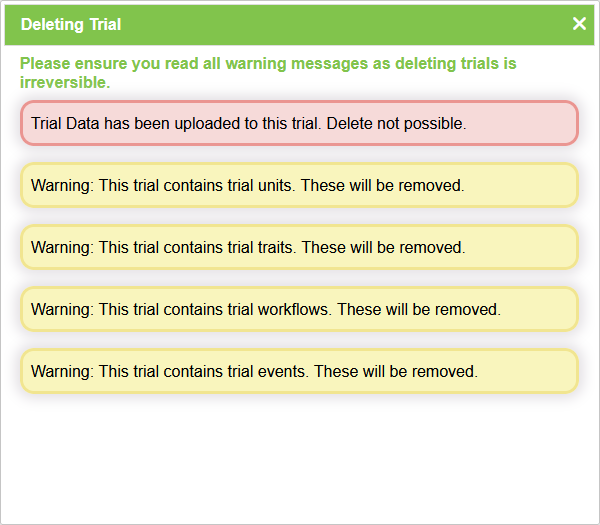
Deleting Trials
KDManage can be used to delete trials from a KDDart database by selecting the ||kdmanage-button-deletetrial|| Delete Button for the relevant trial.
Trials will not be able to be deleted if any of the conditions apply: - Trials that contain trial data/sample measurements; - Trials that are part of a trial group.
Trials may be deleted if they contain trial units, traits, and uploaded multimedia. However, these will be removed and will not be retrievable.
Users may also wish to delete trial units and trial traits from a trial. This effectively resets the trial for use. This is only possible if there is no trial data in the trial.
If any of the above criteria is not met, the selection of the Delete Button will display a warning message such as the one pictured below:
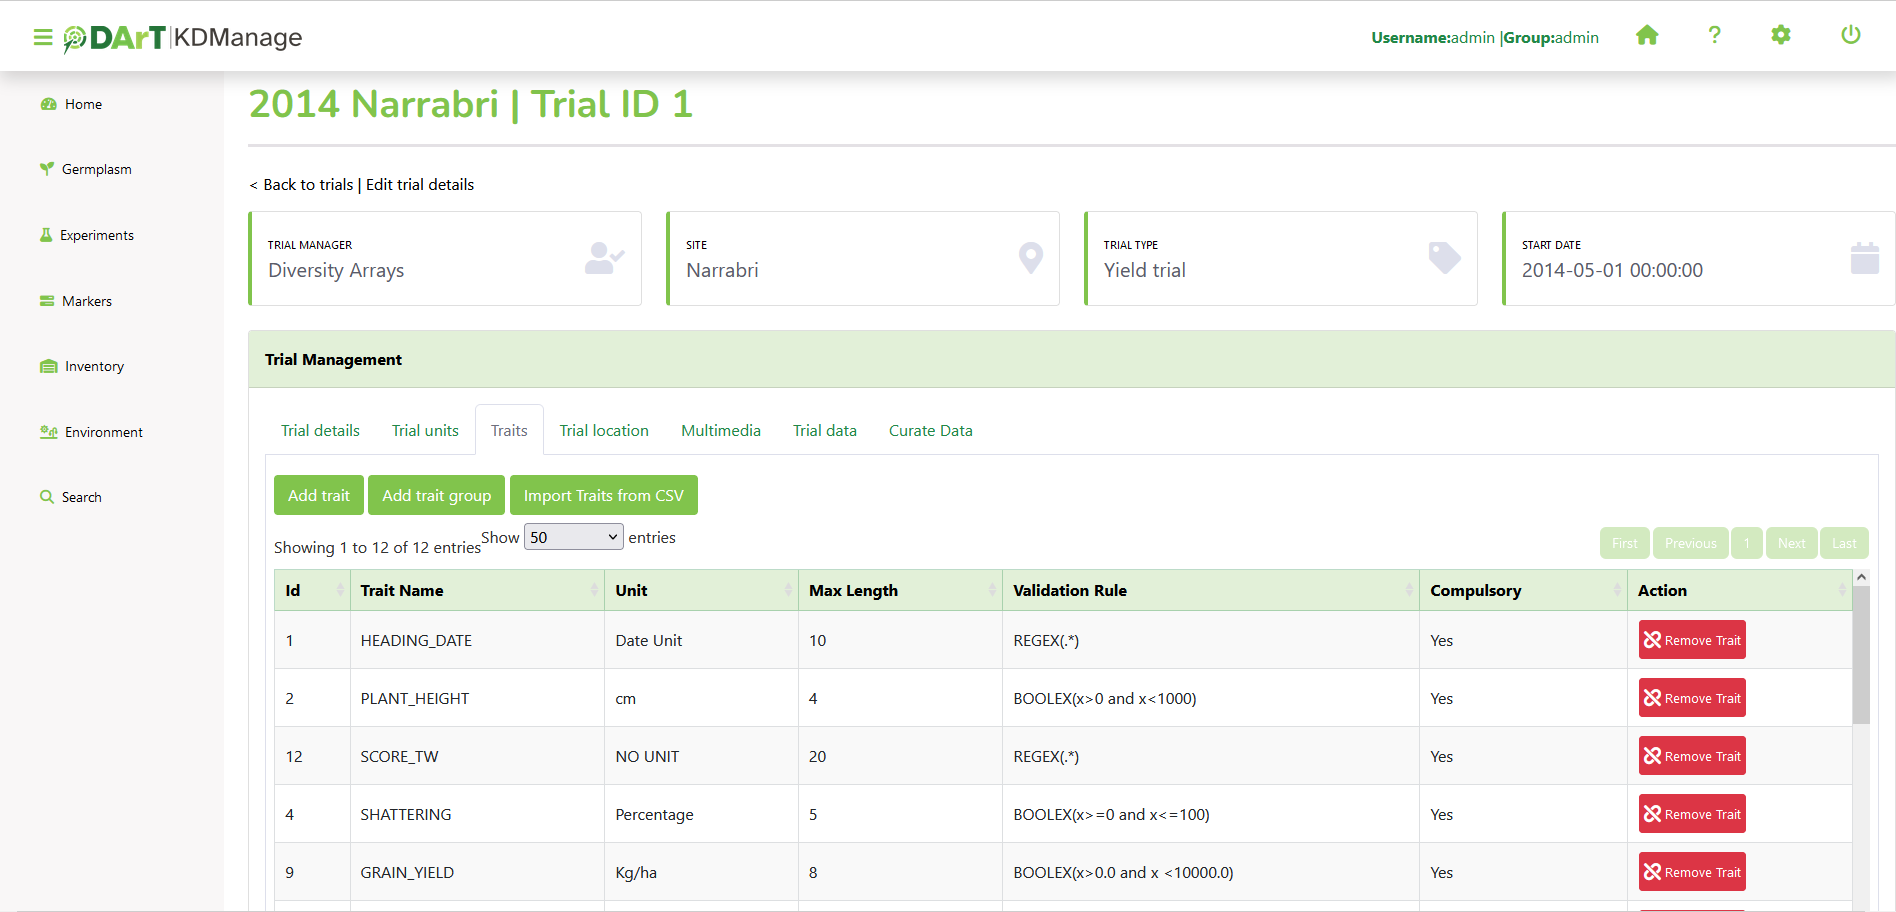
List Traits
To display the traits for a trial, select the View Trial button and then the Traits tab.
Trial Data CSV Format
KDManage can accept trial data (sample measurements) in the following three formats:
KDManage CSV Format
This is the standard format where each row points to either trial data for the plot or specific specimens in the plot (i.e. sub-plot data). Multiple instances of traits are separated in different columns and can be paired with the proceeding column for the date.
For trait column headers, different instances are identified by a ‘:’(colon). For example, YIELD:3 indicates the third instance point of the trait YIELD of the line. If date columns are used, the date columns match to the trait columns before it (i.e. if YIELD:1 is column 3, column 4 will be used as DATE-YIELD__1).
KDSmart CSV Format
This is the standard format for the KDSmart Android application. Each row corresponds to a single plot with each instance of each specific specimen or subplot data is identified by separate columns. Dates can be paired with the proceeding column.
Each trait column header name must be in the following formats:
Plot data: [TRAITNAME]:[INSTANCENUMBER]
Sub-plot data: [TRAITNAME]:[INSTANCENUMBER]#[SPECIMENNUMBER]
Dates are formatted by :
Plot data: Date-[TRAITNAME]:[INSTANCENUMBER]
Sub-plot data: Date-[TRAITNAME]:[INSTANCENUMBER]#[SPECIMENNUMBER]
For example, PlANT_HEIGHT:3#4 will correspond to the third instance of PLANT_YIELD of Specimen 4 (which is stored as 0 in DAL). YIELD:3 will correspond to the third instance of YIELD of the plot.
Note
The instance divider can also be set to “__” (double underscore) in import.
Direct DAL CSV Format
This is also called the sample measurement format and is the format that uses the Database ID identities (including TrialUnitId, TrialUnitSpecimenId and TraitId) to directly upload data to the database. This is only recommended for advanced users as it requires a good understanding of the KDDArT database schema.
For best examples, use the following feature to download a scoring template for a correctly formatted CSV.
Exporting a CSV Template
A CSV template can be used to enter data into so that it can be imported into KDSmart and KDManage. The Export Template Button will open a window that provides options for exporting either a KDManage CSV template or a KDSmart CSV template (both options seen in the images below). The KDSmart format can be loaded into the KDSmart application for scoring trials in the field.
The download requires entry of the unit position for the row and column, and for each trait, the number of repetitions to be entered (default is one). When a trait is not required, zero should be entered to suppress the trait from the download file.
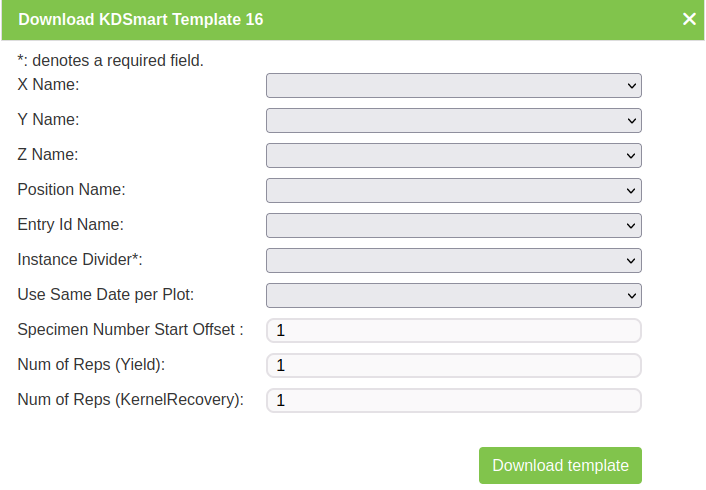
For the KDManage format, users will be given the choice to add date/time columns per trait instance per plot/sub-plot row.
For KDSmart format, users will be given the option to offset the specimen number. This should normally set to 0 unless legacy trials have specimen number 0.
Note
The trial template file contains empty trait columns, without results.
Importing CSV Data
To import trial data from a CSV file, select “Import CSV Scoring Data” (under  dropdown) in the Action Column for required trial (or select the Import Trial Data Button in the Trial Map Tab in the Trial View Page) and then choose the format of the CSV file that you want to import. See the section below for more information on each format.

Importing CSV Data - KDManage Format
When selecting the Upload with KDManage Format option from the Choose Trial Data Format Window, the Import Trial Data Window will look like the image below.
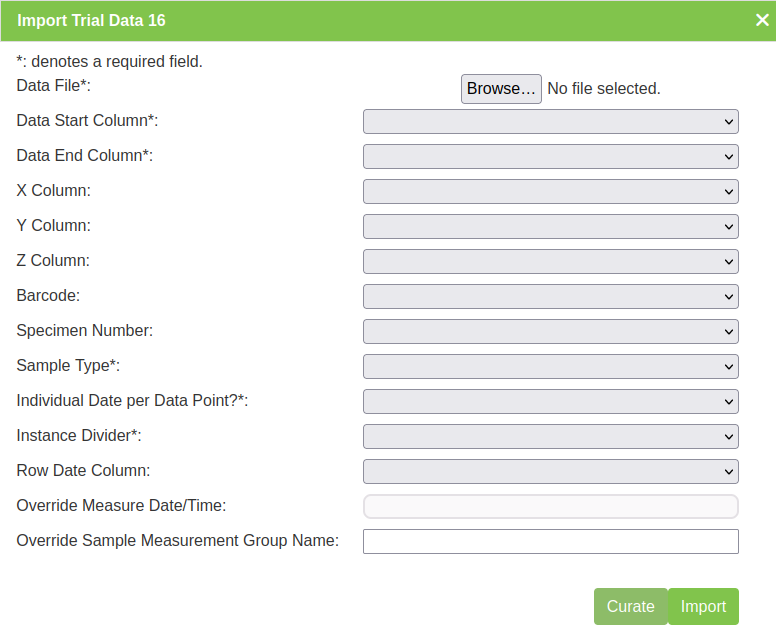
The table below outlines the fields that are present in this version of the Import Trial Data Window:
Field |
Description |
|---|---|
Data File |
Browse to locate and select the appropriate CSV file for import. |
Data Start Column |
The first column in the CSV file containing data for import. |
Data End Column |
The last column in the CSV file containing data for import. |
X Column |
The column that contains the X position of the plot. |
Y Column |
The column that contains the Y position of the plot. |
Z Column |
The column that contains the Z/block position of the plot. |
Barcode Column |
The column that contains the barcode of the plot. |
Specimen Number Column |
The column that contains the specimen number of the plot. For rows that that correspond to plot data, the number can be empty or ‘PLOT’. |
Sample Type |
The type of sample, as defined in type definitions. |
Individual Date per Data Point? |
Whether if the trial data has individual columns for dates per trait instance. If trial data does not contain individual date columns, the uploaded sample measurements will use the current date/time as measured date/time. |
Instance Divider |
Choose the character set that identifies the instance number of scored data |
Note
For referencing the CSV file contents, column numbering commences with zero.
Importing CSV Data - KDSmart Format
When selecting the Upload with KDSmart Format option from the Choose Trial Data Format Window, the Import Trial Data Window will look like the image below.
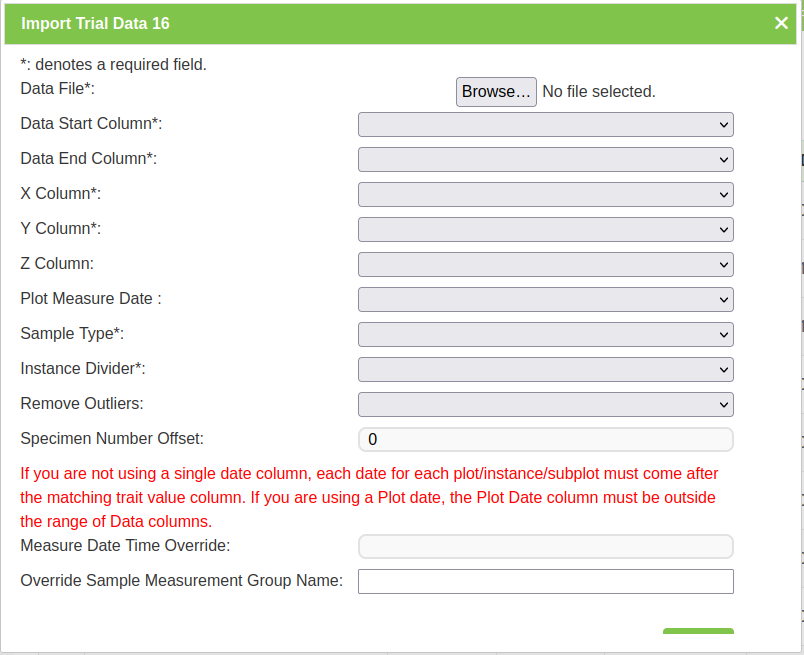
The table below outlines the fields that are present in this version of the Import Trial Data Window:
Field |
Description |
|---|---|
Data File |
Browse to locate and select the appropriate CSV file for import. |
Data Start Column |
The first column in the CSV file containing data for import. |
Data End Column |
The last column in the CSV file containing data for import. |
X Column |
The column that contains the X position of the plot. |
Y Column |
The column that contains the Y position of the plot. |
Z Column |
The column that contains the Z/block position of the plot. |
Plot Measure Date |
If used, all measurements will use a single date defined in the Plot Measure Date Column. |
Sample Type |
The type of sample, as defined in type definitions. |
Instance Divider |
The character on how different instances are marked out in the trait columns |
Remove Outliers |
Option to remove outliers with given method. |
Specimen Number Offset |
Use if KDSmart and KDDart specimen numbers are misaligned. This will add the offset from KDSmart CSV to match KDDart specimen number. |
Note
For referencing the CSV file contents, column numbering commences with zero.
Importing Sample Measurements
To import sample measurements from a CSV file, select the Import Sample Measurements Button in the Trial Data Tab in the Trial View Page. This will display the Import Sample Measurements Window which can be seen in the image below along with a table that describes the related fields:
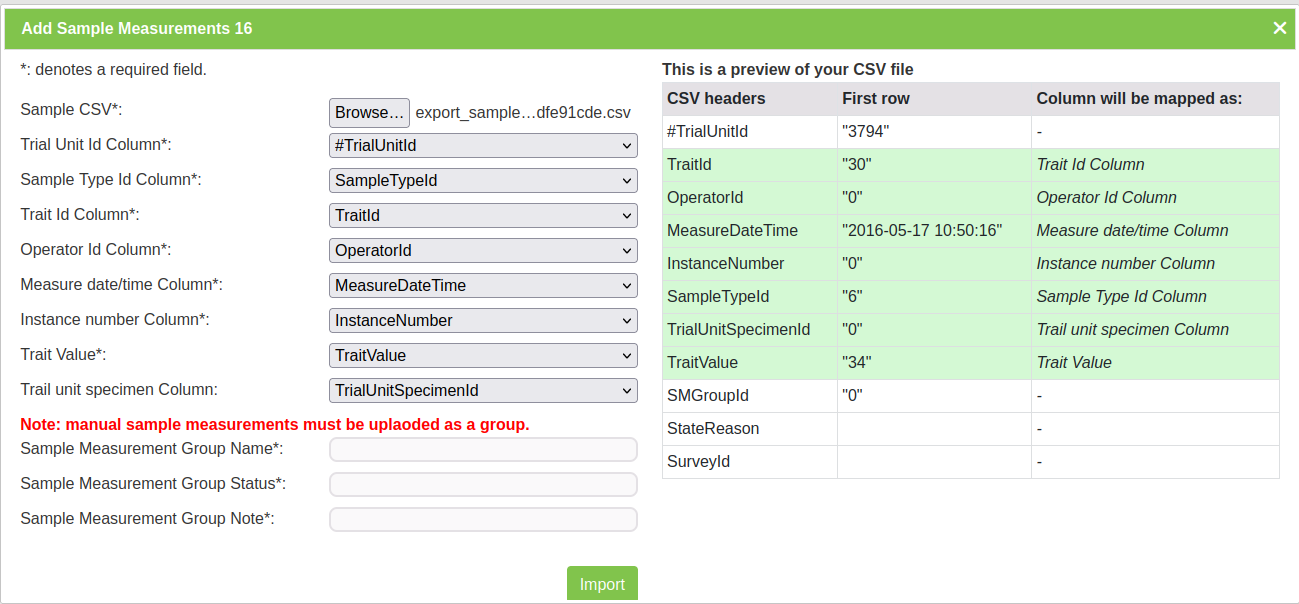
Note
For referencing the CSV file contents, column numbering commences with zero.
Field |
Mandatory |
Description |
|---|---|---|
Data File |
Mandatory |
Browse to locate and select the appropriate CSV file for import. |
Trial Unit ID Column |
Mandatory |
The column in the CSV that contains trial unit IDs of each sample measurement. |
Sample Type ID |
Mandatory |
The column in the CSV that contains sample type IDs of each sample measurement. |
Trait ID |
Mandatory |
The column in the CSV that contains trait IDs. These traits must be included in the trial as trial traits (see List Traits ) |
Operator ID |
Mandatory |
The column in the CSV that contains the user IDs of each sample measurement. |
Measure Date/Time Column |
Mandatory |
The column in the CSV that contains date/time of each sample measurement. |
Instance Number |
Mandatory |
The column in the CSV that contains an instance of each sample measurement. |
Trait Value |
Mandatory |
The column in the CSV that contains a trait value (or measured value of trait) of each sample measurements |
Trial Unit Specimen |
The column in the CSV that contains the trial unit specimen ID of each sample measurement, if applicable. |
If required, sample measurements can also be uploaded and added to a new sample measurement group.
Field |
Mandatory |
Description |
|---|---|---|
Sample Measurement Group Name |
Mandatory |
Name for new sample group measurement. New sample measurements cannot be added to existing groups so these names must be unique. |
Sample Measurement Group Status |
Status for sample measurement group |
|
Sample Measurement Group Note |
Note for sample measurement mroup |
Listing Sample Measurements Groups
To list all sample measurement groups in a trial, select the List Sample Measurement Groups Button in the Trial Data Tab of the Trial View Page. This will display the Sample Measurement Groups List Window which can be seen in the image below:
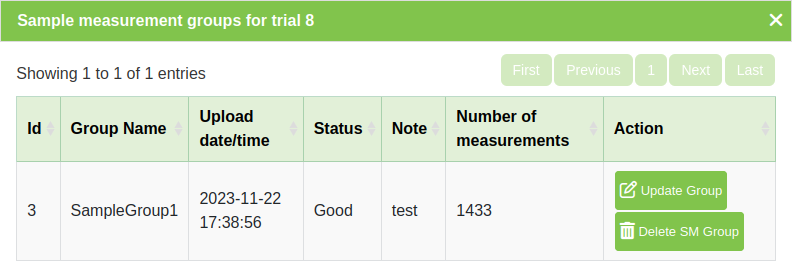
The following table lists all the actions that can be performed for the selected sample measurement groups in KDManage.
Action |
Description |
Parent Button |
|---|---|---|
Update SM Group |
Edit name, note and/or status of the sample measurement group. |
|
Delete SM Group |
Delete sample measurement group and all sample measurements in the group. |
Note
Deleting sample measurement groups is irreversible.
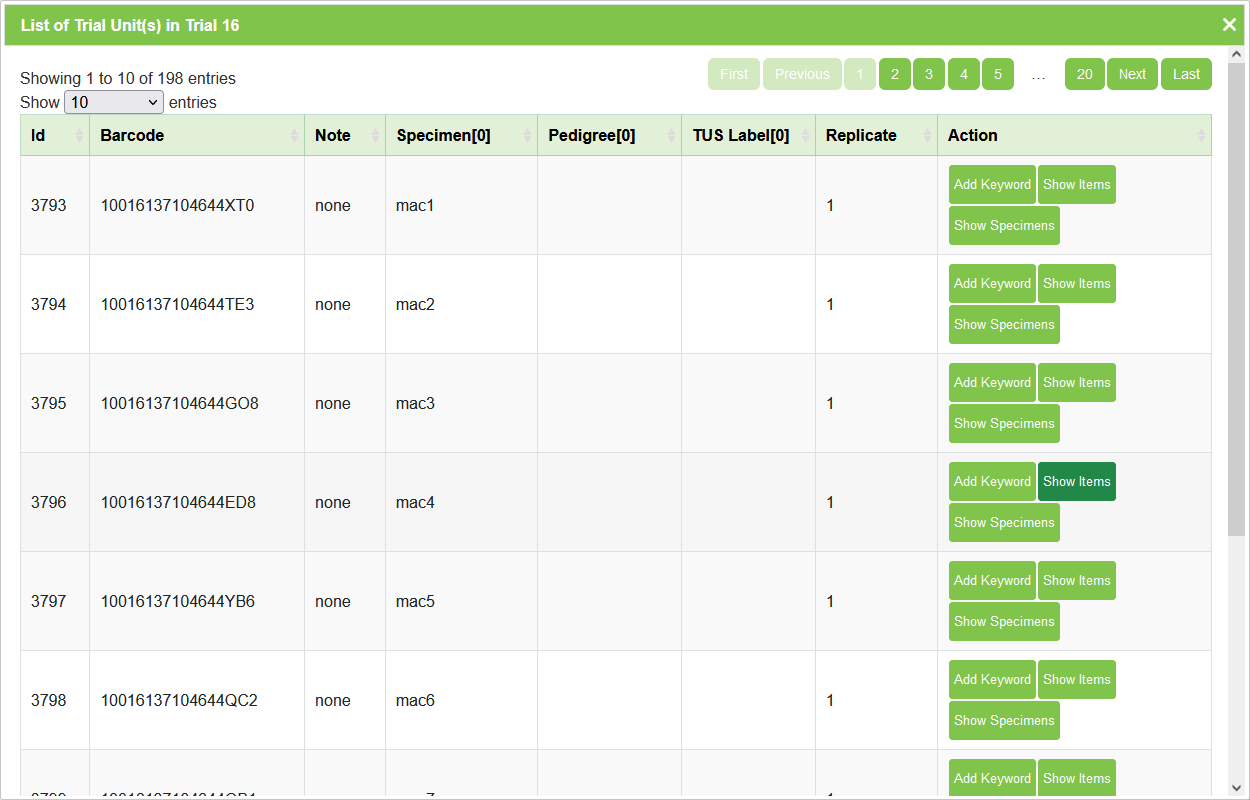
Displaying Trial Unit Layouts
To view the trial units of a trial, select Display Trial Layout for Trial under the View Trial dropdown in the Action Column to display the List of Trial Units Window:
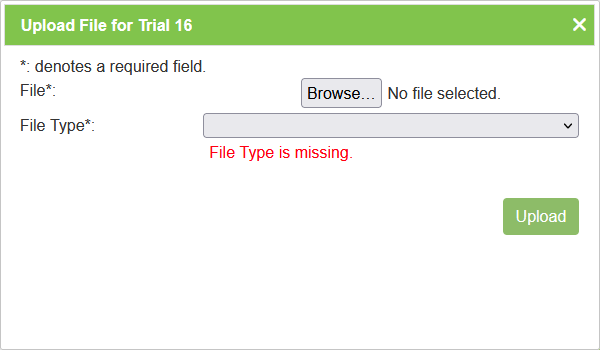
Uploading a File to a Trial
To add a file to a trial, select Upload file (under the View Trial dropdown button)in the Action Column to display the Upload File Window (below image). File types are defined in the Types page.
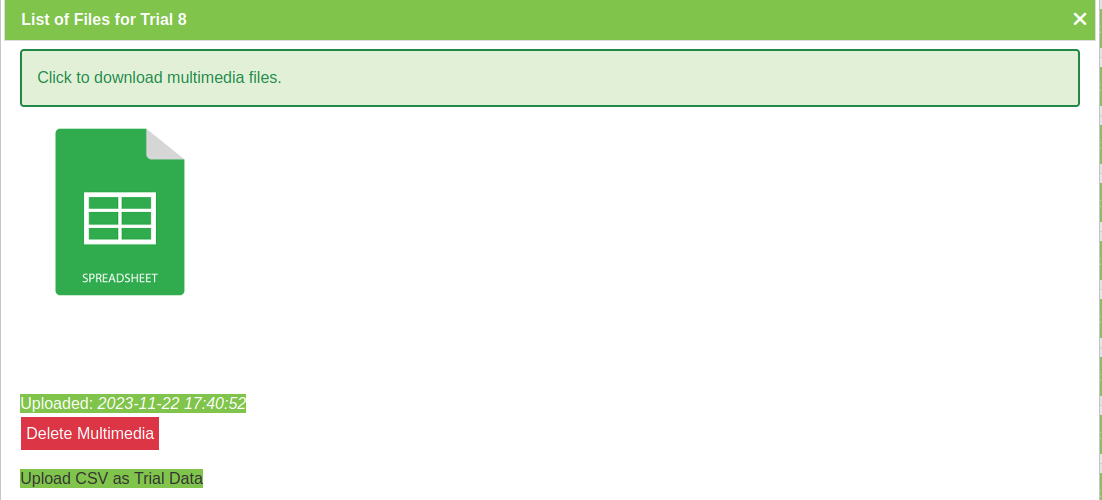
To view all files that have been uploaded, select List files for Trial (under the View Trial dropdown button) which will display the List of Files Window as seen in the image below:
Adding a Trial Event
To add a trial event to a trial, select the + Button and then Add Trial Event in the Trial Data Tab of the Trial View Page.
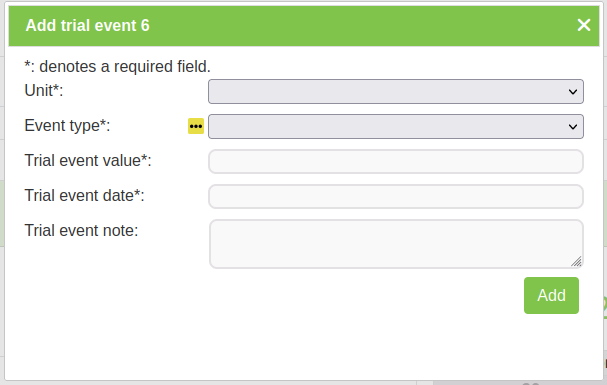
Field |
Mandatory |
Description |
|---|---|---|
Unit |
Mandatory |
Unit of trial event. |
Event Type |
Mandatory |
The type of event, as defined in type definitions. |
Trial Event Value |
Mandatory |
Value of trial event. |
Trial Event Date |
Mandatory |
Date of trial event. |
Trial Event Note |
Note of trial event. |
Adding a Trial Location
Once a site has been added to a trial, a geographic location can also be added.
Note
Please note that a trial must have a site with geometry before a location can be added. See the Site section for more information.
To add a trial location, first go to the Trial Location tab.
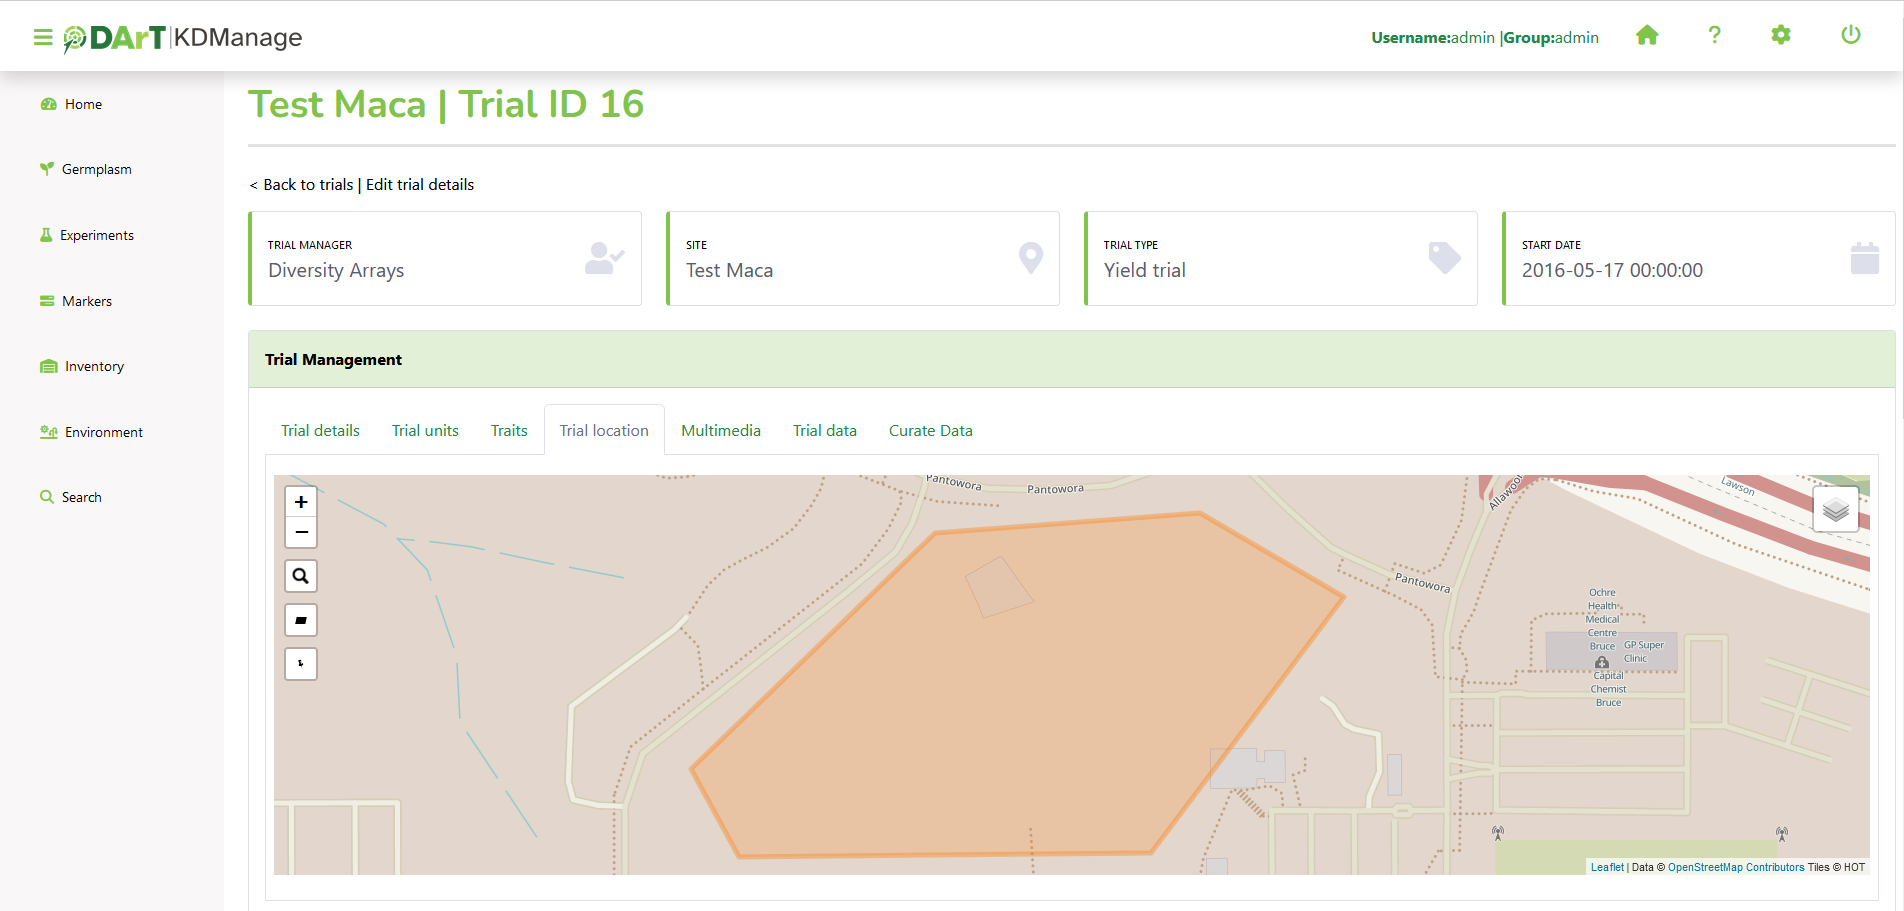
When the map shows the required are, define the trial area by selecting the Create New Polygon Button and select on the boundary corners of the area. In the following image, the trial location has been defined and is highlighted in a darker yellow:
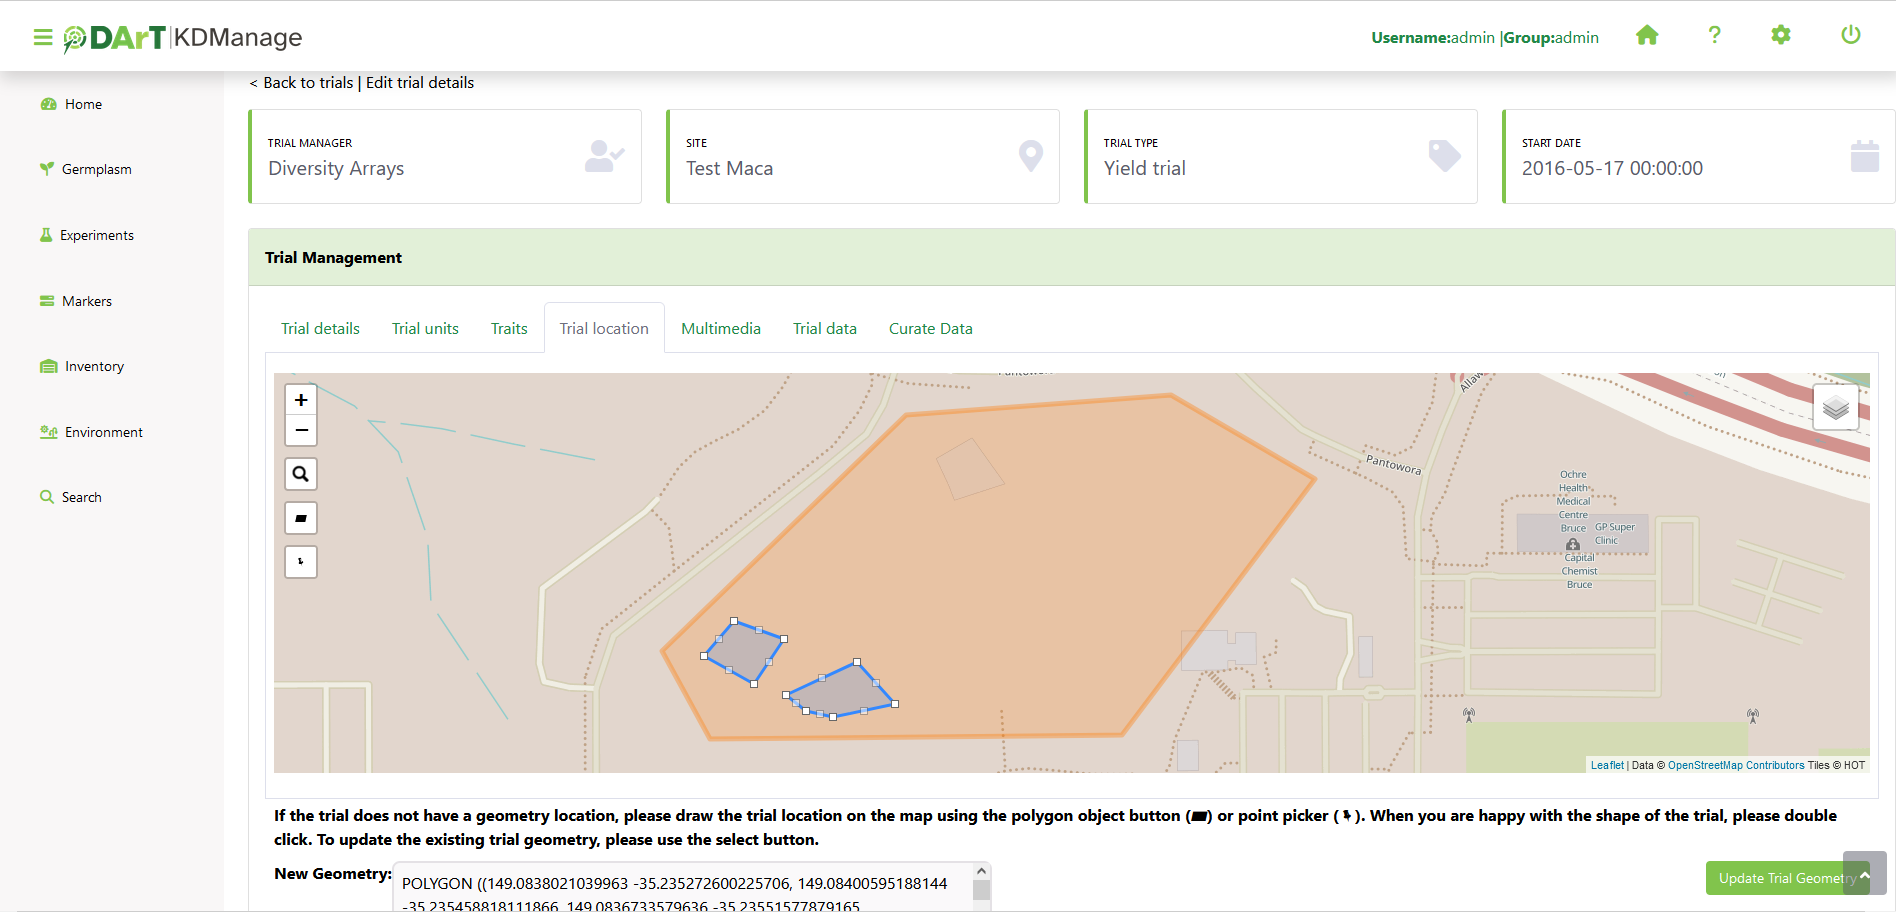
Note
Double-click on the last point of a polygon to set the points and complete the shape.
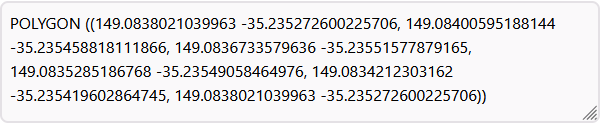
The text box which appears above the map will contain the coordinates for the area that has been selected for the trial location as shown next.
The location field data is also listed in the text area below the map as seen in the image below:
Adding Trial Unit Layouts
A trial unit layout can be added to a trial by There are two ways to add trial unit layouts:
via CSV format; and
via KDCompute method (if configured).
Adding Trial Units Layouts via CSV Format
A trial unit layout can be added to the trial with the CSV method by selecting the  Add Trial Unit Layout Button which will open the Add Trial Layout Window. The window, along with a table that outlines its fields can be seen below:
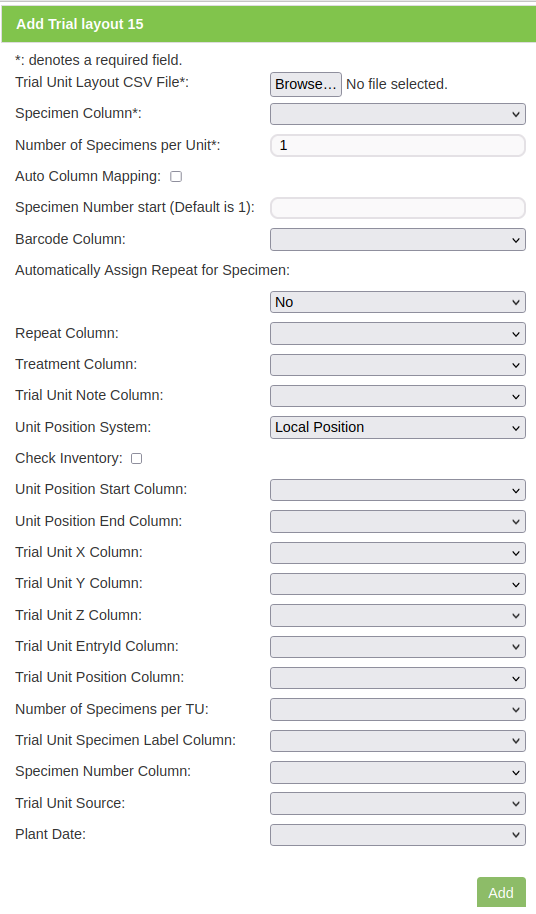
Field |
Mandatory |
Description |
|---|---|---|
Plant Date |
Mandatory |
Date the specimen was planted in the trial unit (YYYY-MM-DD format). |
Trial Unit Layout File |
Mandatory |
Browse and select the CSV import file. |
Specimen Column |
Mandatory |
The specimen name column in the input file. It may be automatically provided using the auto column mapping feature or manually entered. |
Number of Specimens per Unit |
Mandatory |
Define the number of copies of the same specimen that will be added per trial unit. |
Auto Column Mapping |
When a file is chosen this box will be selected if ‘Specimen’ is found in the header. This can be deselected if it is not the desired column. |
|
Barcode Column |
Barcode column in the input file. If this is left blank and a barcode configuration has been created for trial units, a barcode will be automatically generated. |
|
Automatically Assign Repeat for Specimen |
Automatically assign repetition number based on reoccurrence of specimen name. |
|
Treatment Column |
Treatment column in the input file. |
|
Trial Unit Note Column |
Trial unit note column in the input file. |
|
Unit Position System |
Type of position label of trial unit to be used. |
|
Unit Position Start Column |
Mandatory |
The unit position start column in the input file, numbered from zero. |
Unit Position End Column |
Mandatory |
The unit position end column in the input file, numbered from zero. |
Trial Unit X |
Mandatory |
Define the column that reflects X coordinates for a trial unit layout. This column must fall within the unit position start and end column ranges. |
Trial Unit Y |
Mandatory |
Define the column that reflects Y coordinates for a trial unit layout. This column must fall within the unit position start and end column ranges. |
Trial Unit Z |
Mandatory |
Define the column that reflects Z coordinates for a trial unit layout. This column must fall within the unit position start and end column ranges. |
Trial Unit EntryID |
Mandatory |
Define the column that reflects the EntryID for trial unit layout. This column must fall within the unit position start and end column ranges. |
Note
X, Y, Z and EntryID columns must all be unique columns.
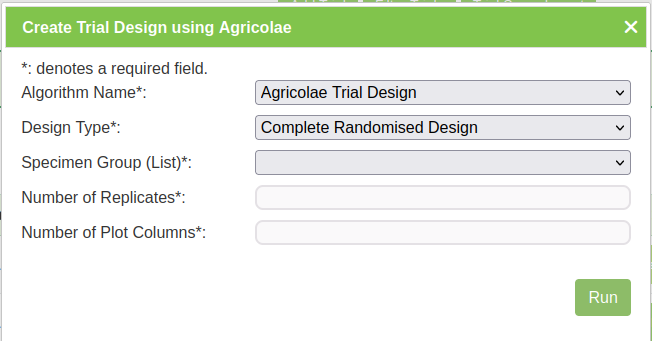
Adding Trial Unit Layouts via KDCompute
The Add Trial Unit Layout via KDCompute window:
Note
KDCompute method requires a working installation of KDCompute attached to your KDManage and specific set up for trial design plugins.
Adding a Keyword to a Trial Unit
Keywords can be added or assigned to trial units.
To add a Keyword to a Trial Unit perform the following:
Step |
Action |
|---|---|
1. |
From the Trial window, at the required Trial, select the Display Trial Layout Action button |
2. |
At the required Trial Unit select the “Add keyword” |
3. |
Select the Keyword from the dropdown List. |


Trial View Page
When a trial is selected from the Trials Page, it will be displayed in a Trial View Page (see the image below). The Trial View Page provides all details and data of the selected trial including trial units, trial location, traits, etc. There are also tools available such as data curation.
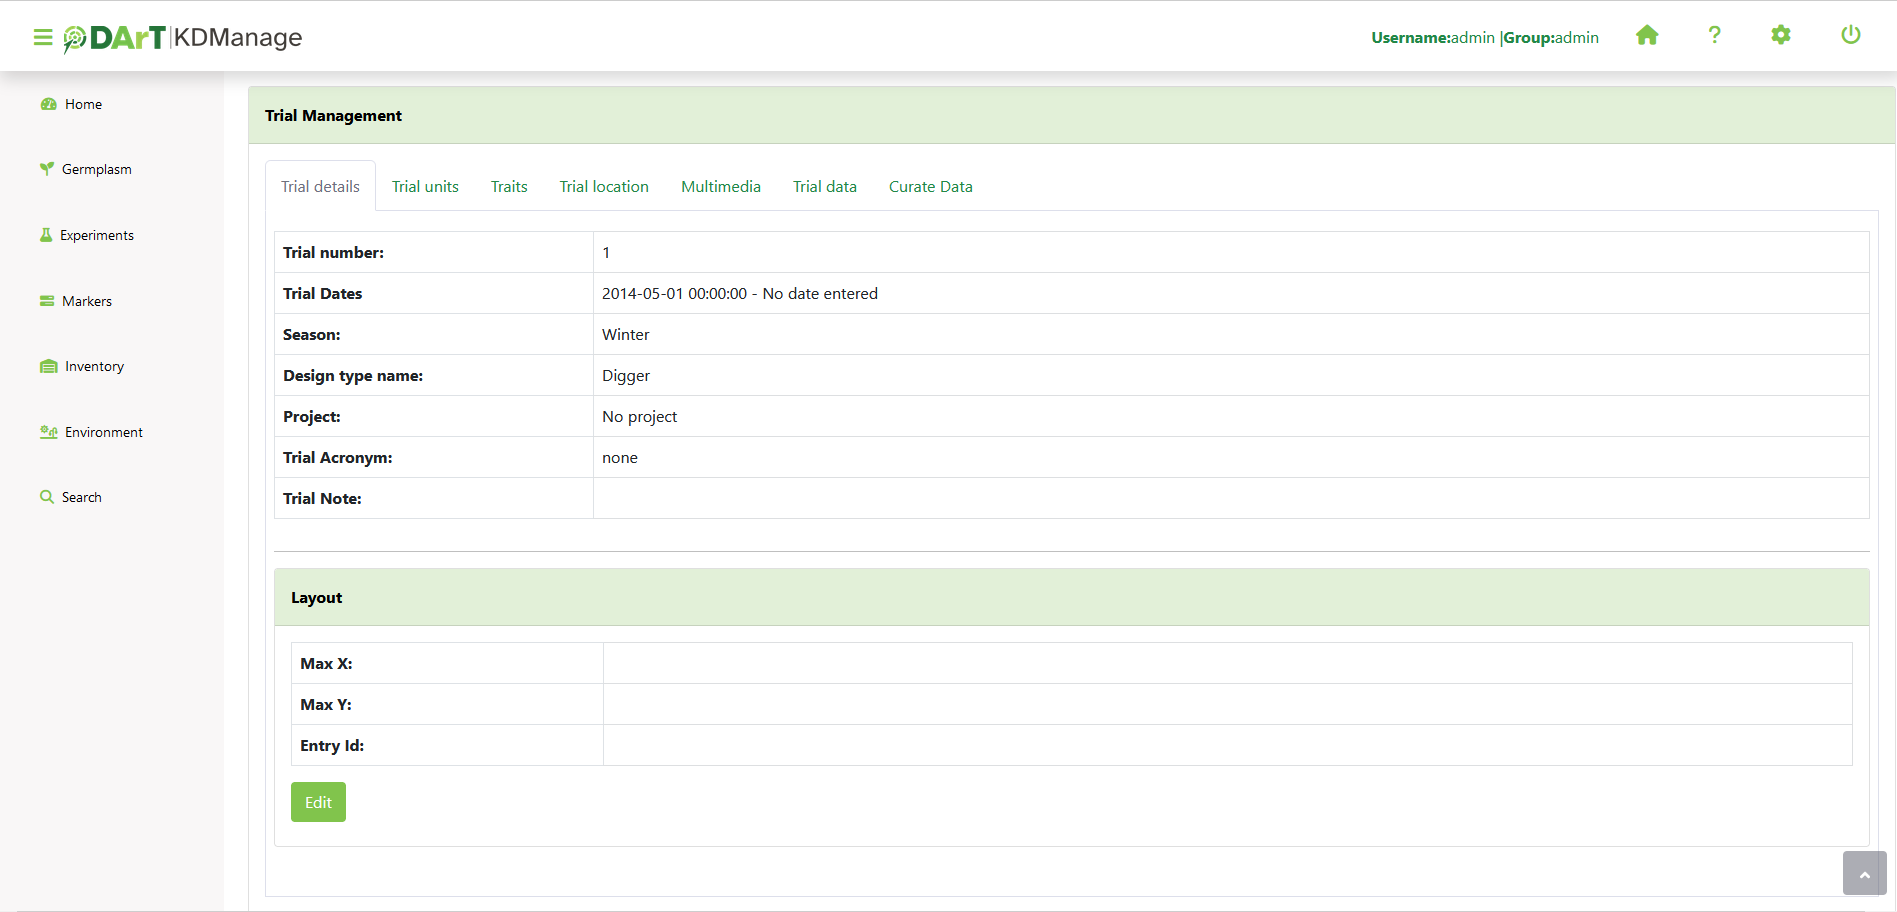
A Trial Workflow Panel and a Trial Events Panel will always be visible on the Trial View Page, regardless of the selected tab.
The following sections will outline each of the tabs.
Trial Details Tab
The Trial Details Tab is the default tab of the Trial View Page (see the image in the above section) which shows details about the selected trial.
To edit trial details select the Edit Trial Details Button, below the trial title and ID on the top of the page. This will open the Update Trial Window which is pictured below:
Trial Units Tab
Trial units can be added and viewed on the Trial Unit Tab.
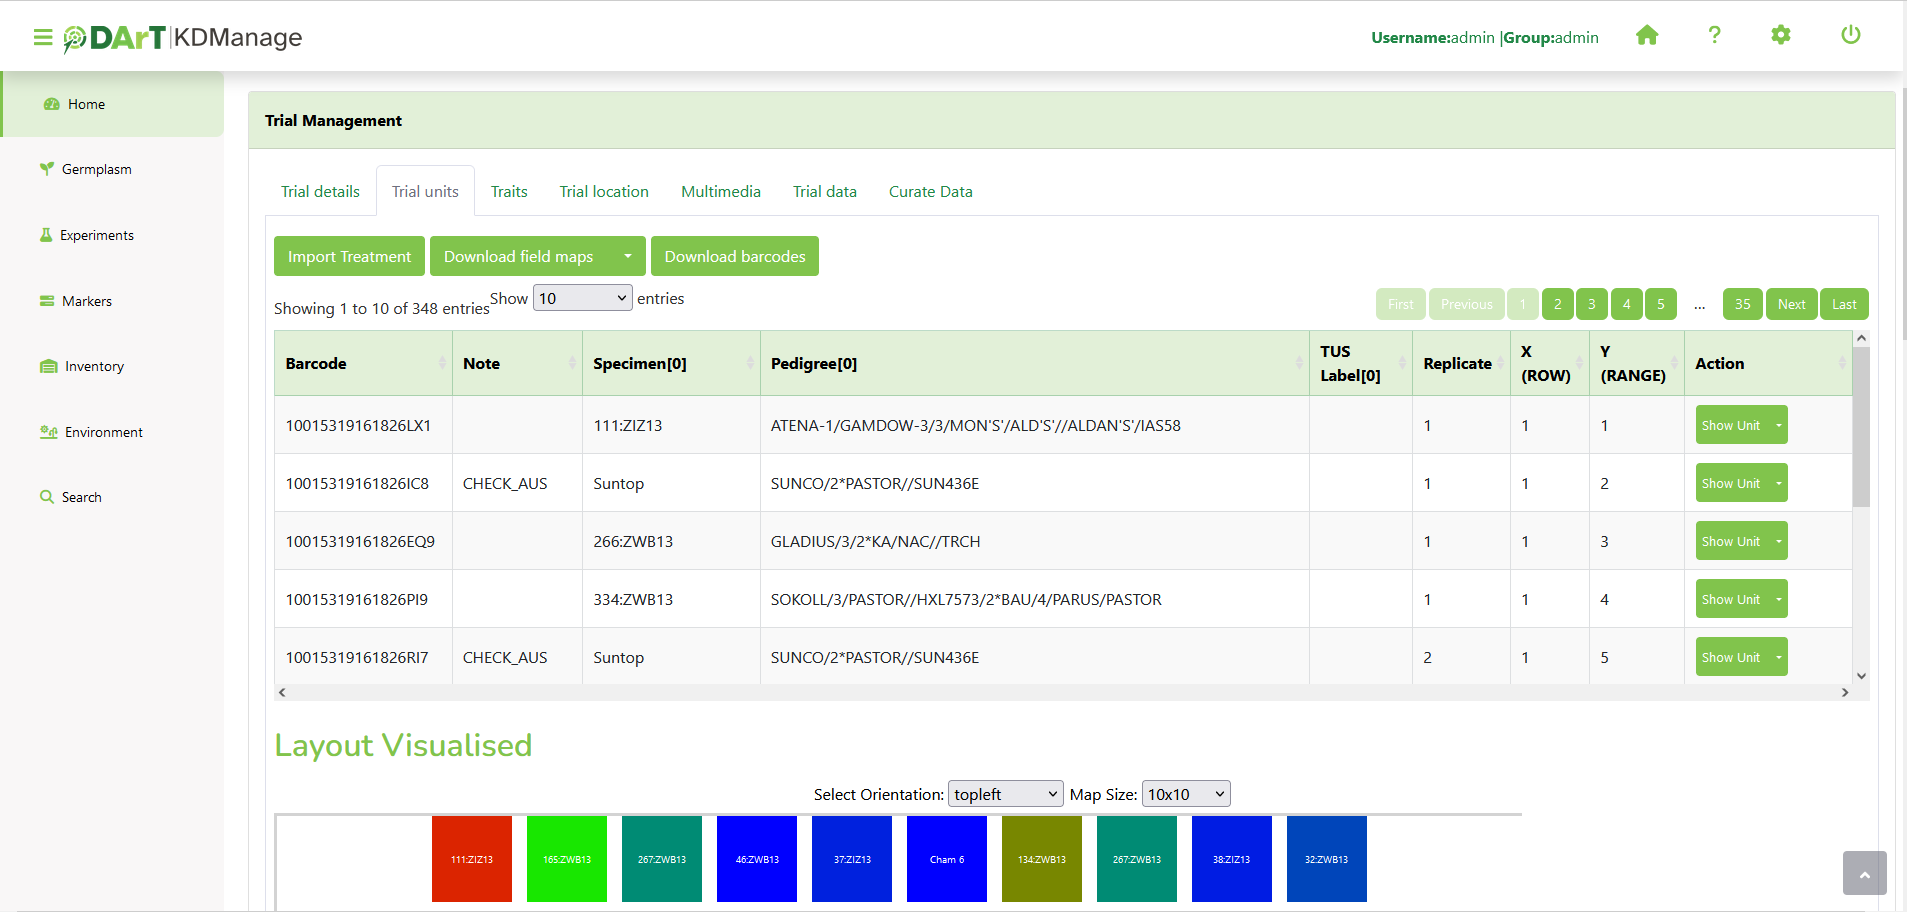
Newly created trials can have trial unit layouts added via CSV or KDCompute methods (see Adding Trial Unit Layouts).
After a trial unit layout is added, users may view the table of trial units.
Users can then also download a trial field map in SVG format by selecting the  Download Field Maps Button and or a set of printable barcodes by selecting the
  Download Barcodes Button.
Traits Tab
Trial traits can be added and viewed on the Trial Trait Tab.
Trial traits can be added individually or in the Trait Groups page.
Trial Location Tab
The trial location can be updated and viewed on the Trial Location Tab (see the Adding a Trial Location page).
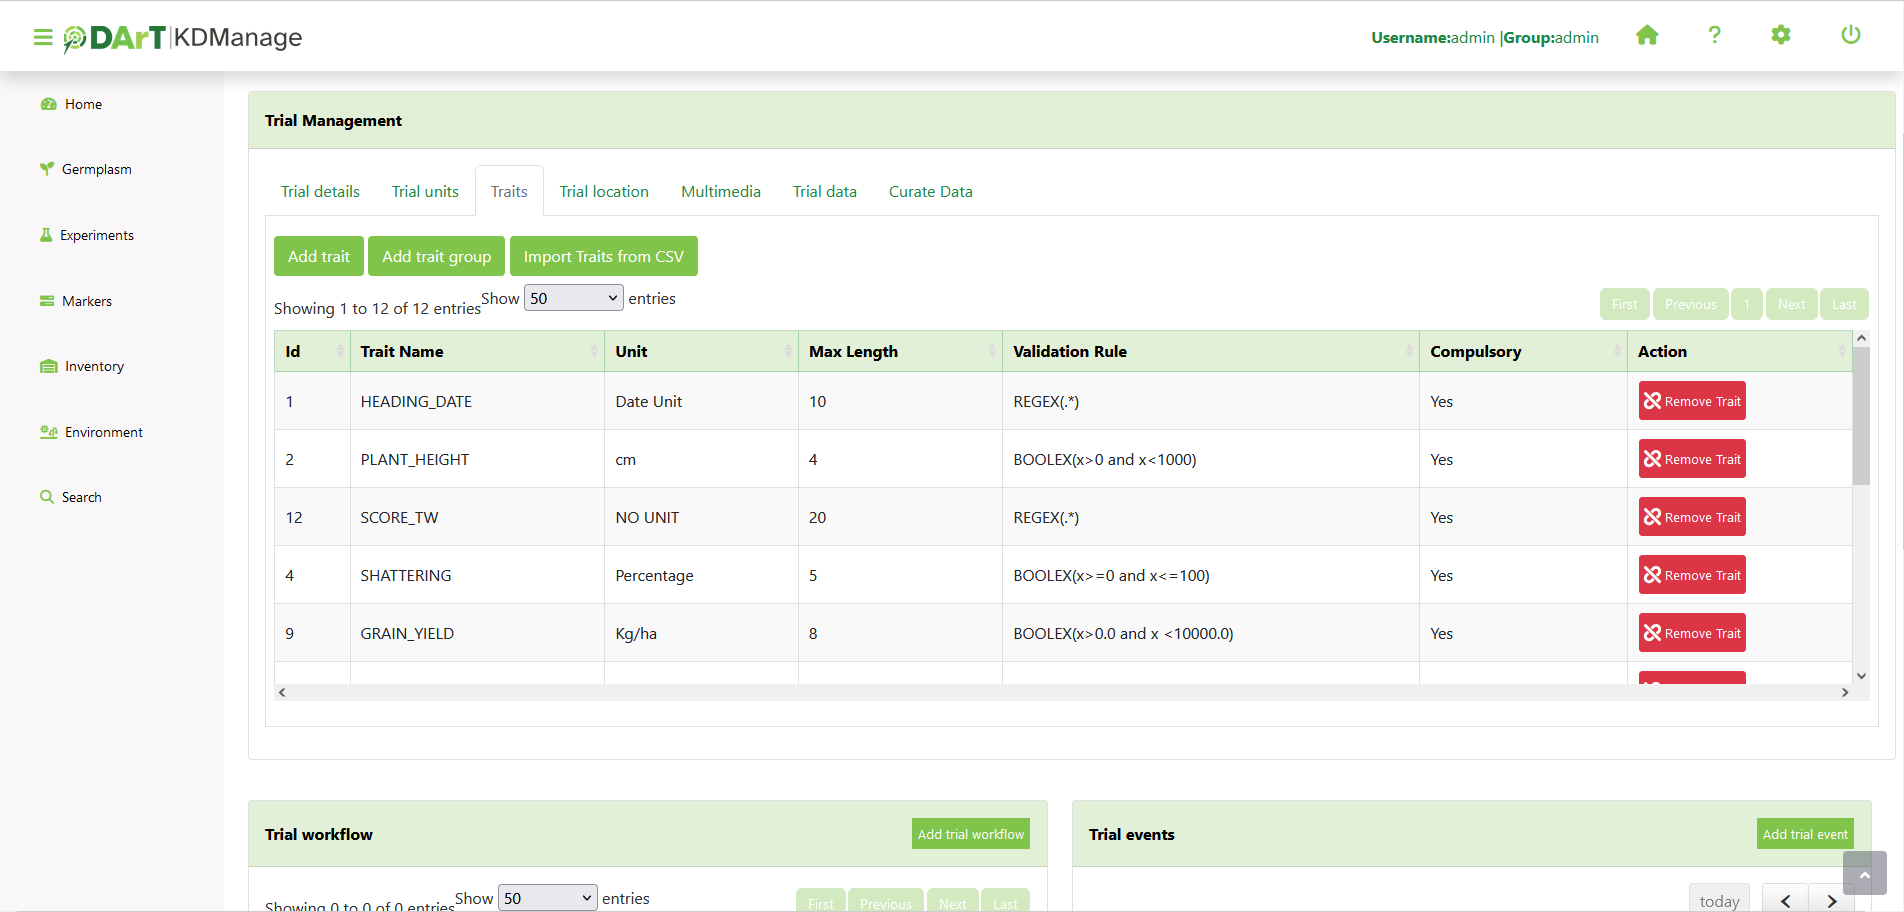
Multimedia Tab
Trial multimedia can be updated and viewed on the Trial Multimedia Tab (see Uploading a File to a Trial).
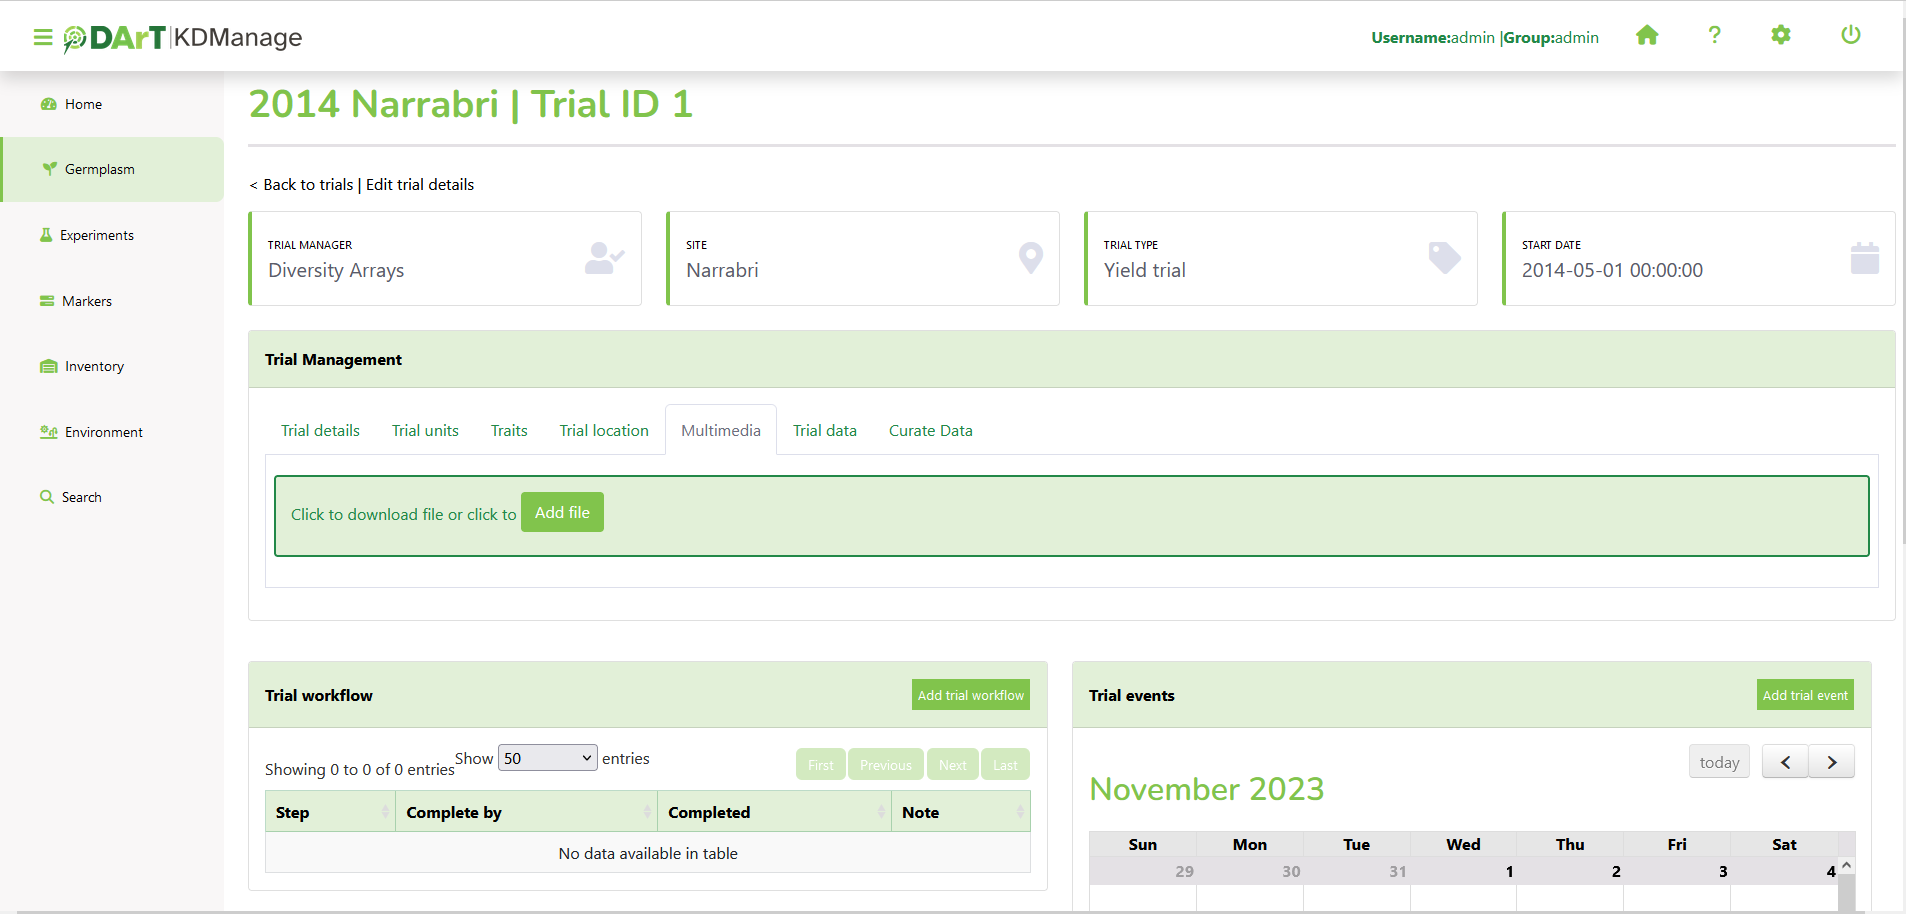
Trial Data Tab
Trial data can be uploaded, viewed and downloaded in the Trial Data Tab.
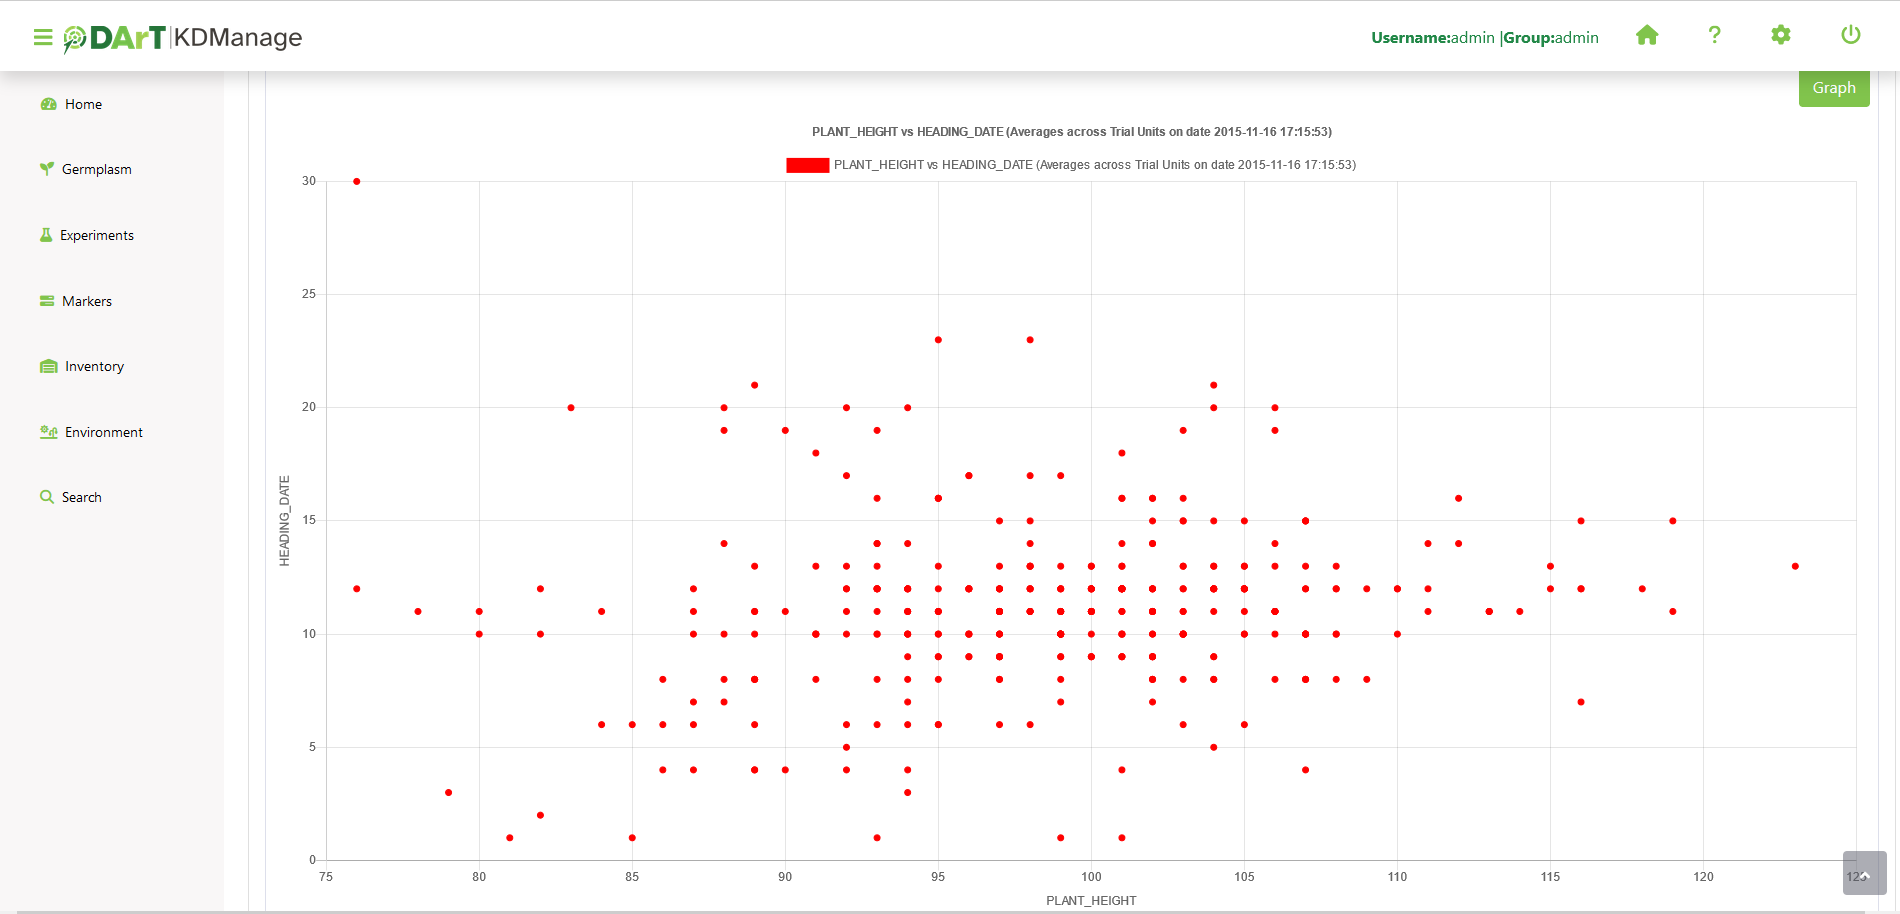
Trial data can be viewed in a graph which shows selected traits and value:
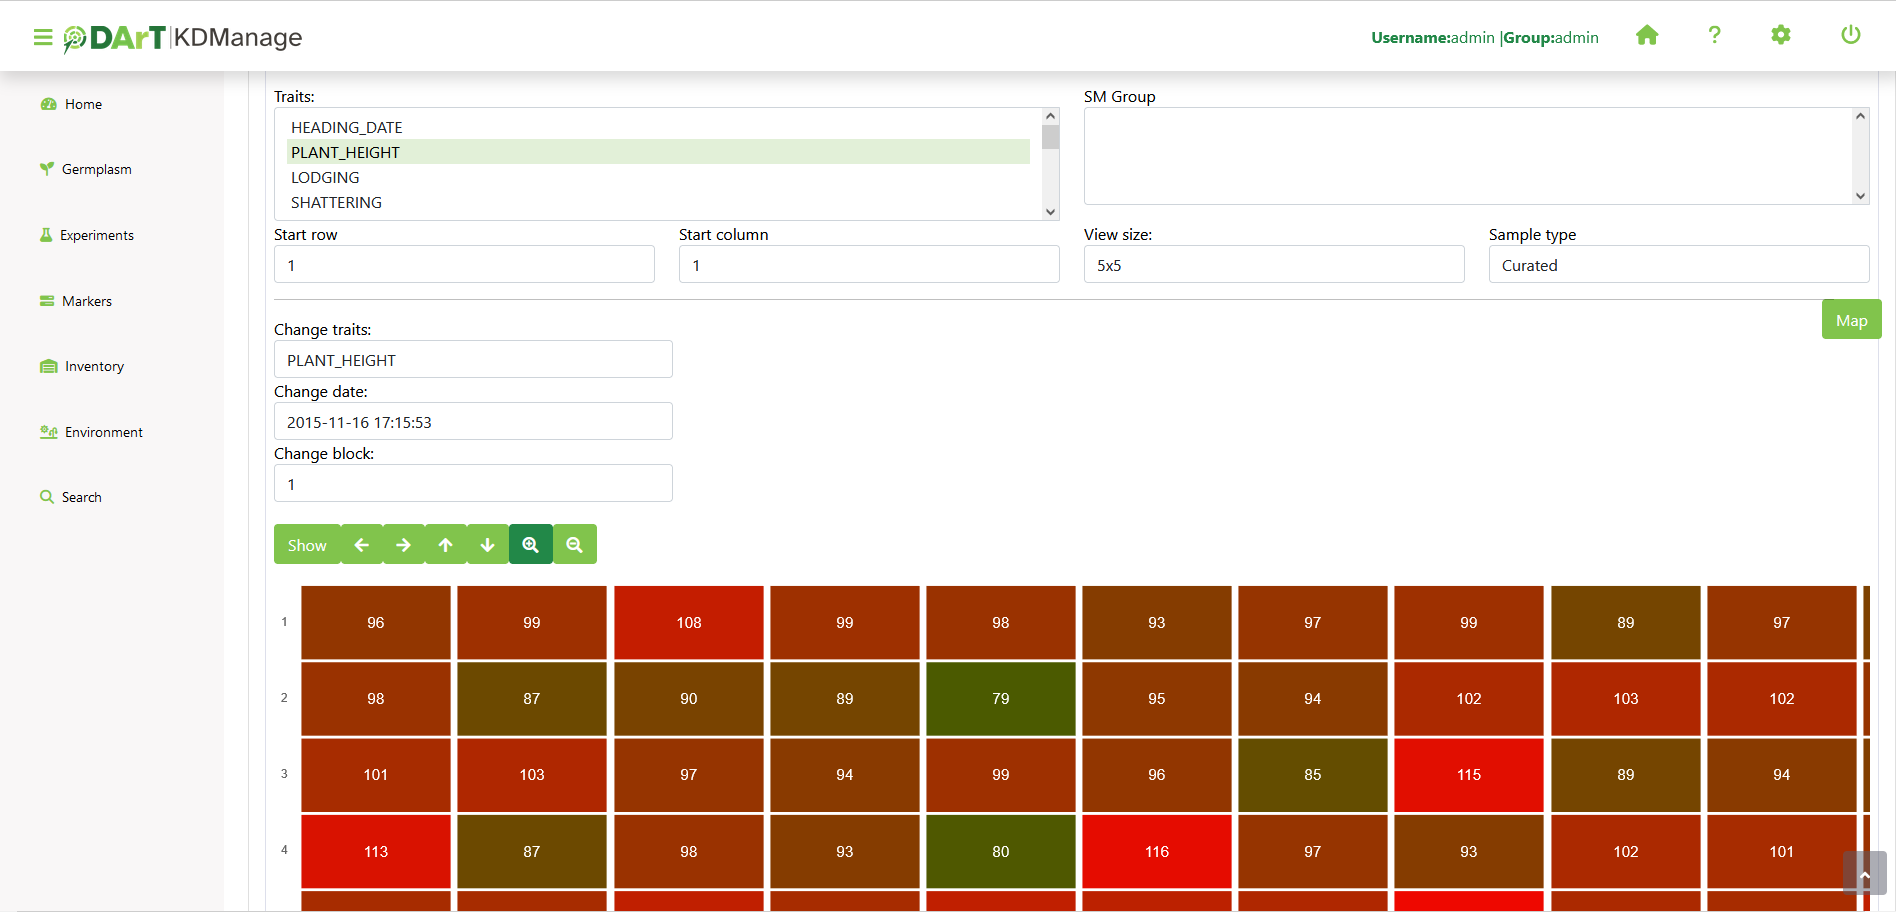
A trial data map is a heat map based on trial unit dimensions. Red specifies higher values while blue specifies lower values:
Curate Data Tab
The Curate Data Tab provides options for curating data that has been collected.
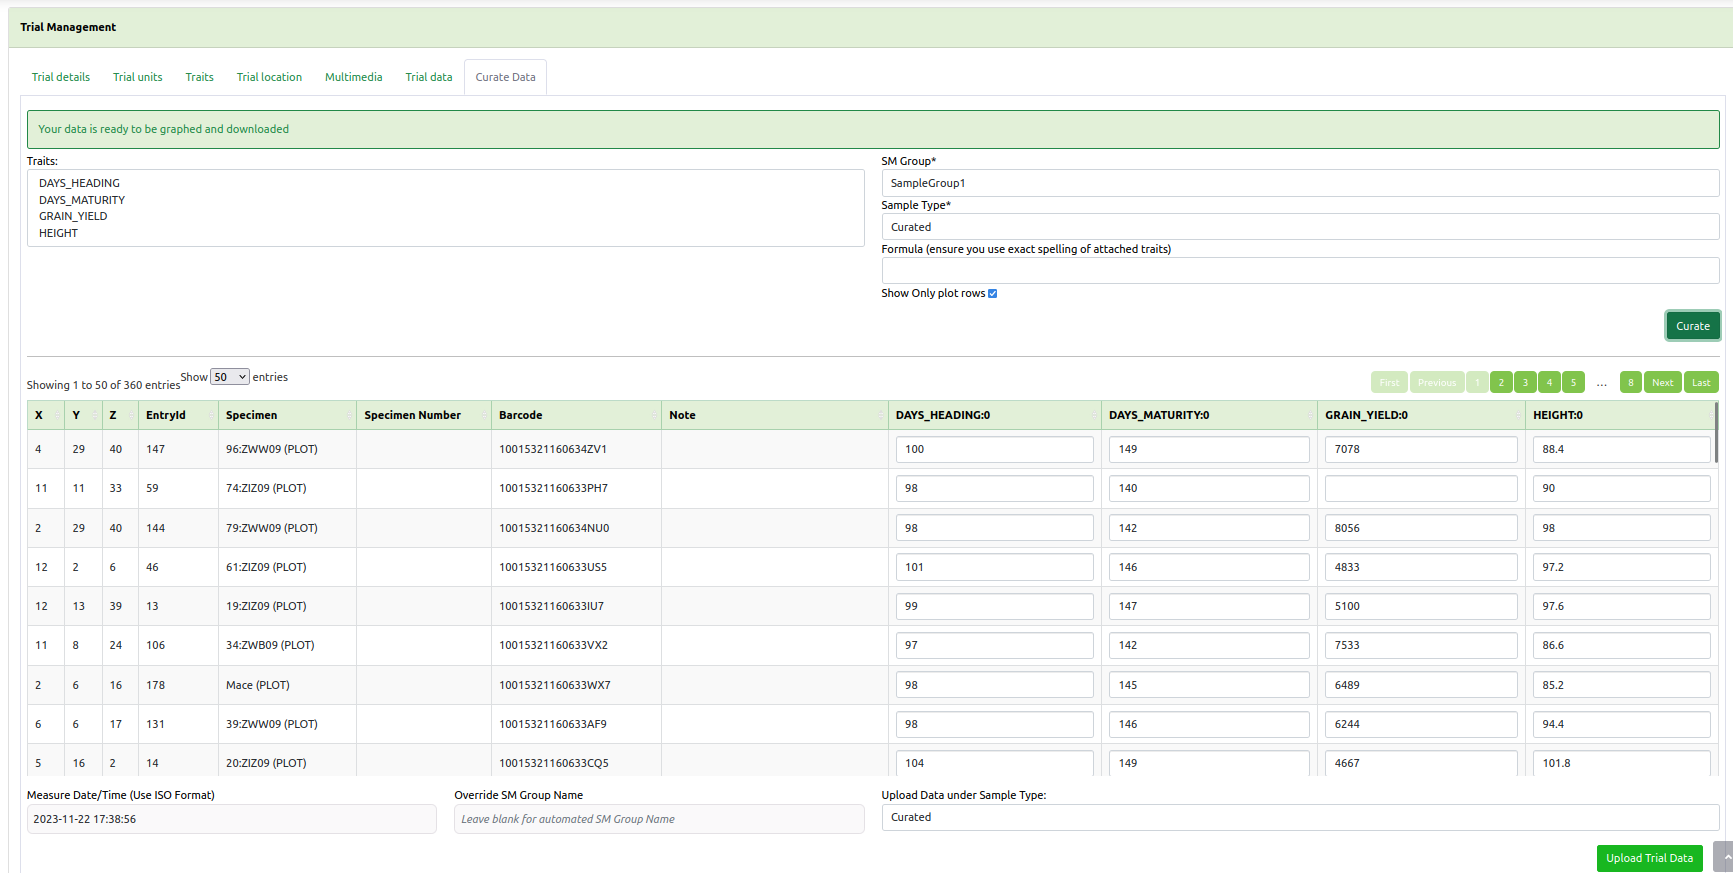
Existing trial data can be curated and imported as a separate instance in the Curate Data Tab.
Tip
Curated data will not always be imported as the same instance. Instances are determined on a per trait basis.
Nurseries
Nurseries can be defined and set up to allow for new crossings to be added.
The Nurseries Page lists defined nurseries which the user/group has permission to view, as shown in the following image:
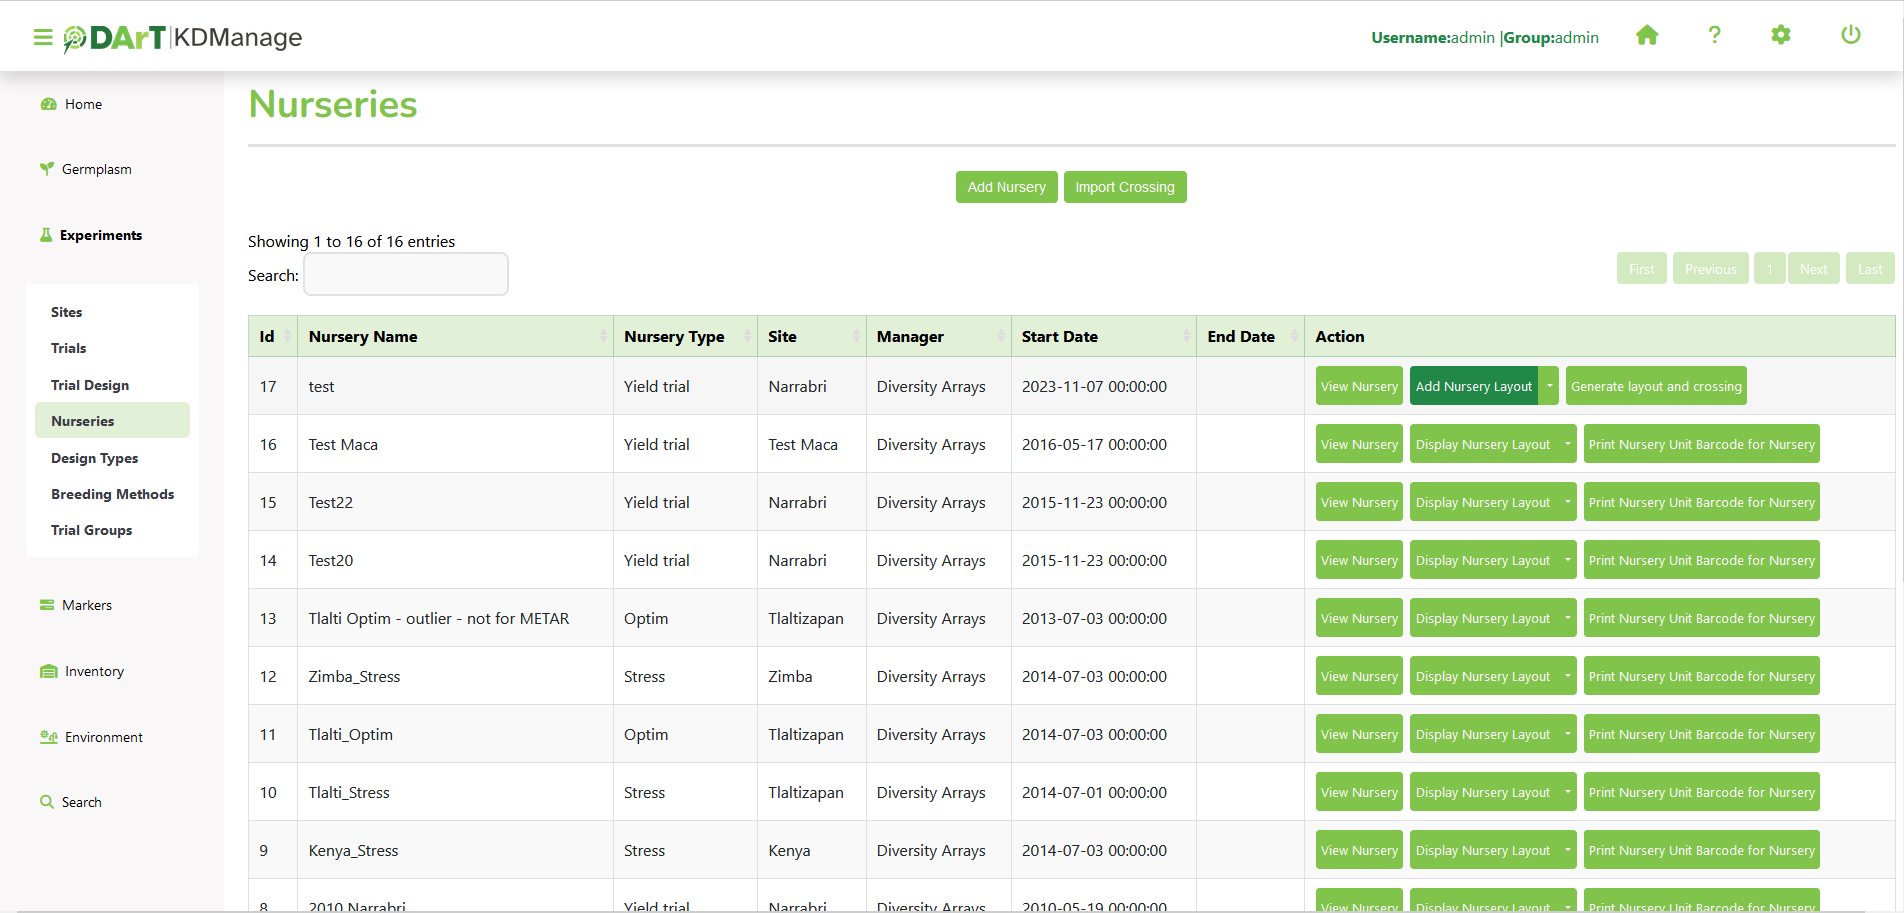
The following table describes the contents of the list in the Nursery Page:
Field |
Description |
|---|---|
ID |
A unique system identifier of the nursery. |
Nursery Name |
The user provided name of the nursery. |
Nursery Type |
The selected nursery type (user defined specific trial types to be nursery types). |
Site |
The site of the nursery. |
Manager |
The manager assigned to the nursery (defined in contacts although they are not necessarily a system user). |
Start Date |
The date the nursery commenced (YYYY-MM-DD format). |
End Date |
The date the nursery ended (YYYY-MM-DD format). |
Action |
The actions that can be performed for the nursery. This is described in the following section. |
Nursery Actions
The following table lists all the actions that can be performed for the selected nursery in KDManage:
Action |
Description |
Parent Button |
|---|---|---|
Generate Layout and Crossing |
Automatically generate layout and crossing, if required, from two specimen lists. See Generating Layouts and Crossings. |
|
Add Nursery Layout |
Import a nursery layout for the nursery. See Displaying Trial Unit Layouts. |
|
Display Nursery Layout |
Display the nursery layout for the nursery. See Displaying Trial Unit Layouts. |
|
Print Nursery Unit Barcode |
Export barcodes for nursery trials for printing. |
|
List Crossings |
List Crossing. |
Display Nursery Layout |
Harvest Crossing |
If layout and crossing are present in the nursery, harvest crossing. See Harvest Crossing. |
Display Nursery Layout |
Show Nursery Info |
Display general information about the nursery including permissions. |
Display Nursery Layout |
Note
The presence of action types is dependent upon the nursery state - not all action types will be available for all nurseries.
Importing Crossings
Crossings can be imported (with a CSV file) into nurseries, which can later be harvested to create new genotype and specimen entries.
To start importing crossings, select the Import Crossing Button which will open the Import Crossing Window. The window, along with a table that describes the relevant fields can be found below:
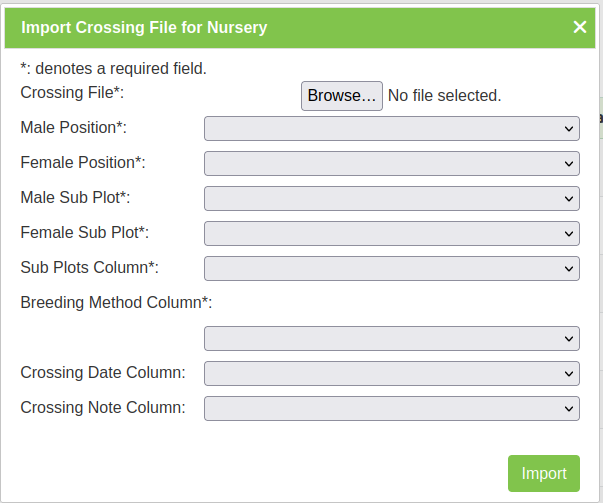
Note
The Import Crossing Window will match column names once users select a file to import.
Field |
Mandatory |
Description |
|---|---|---|
Crossing File |
Mandatory |
Select the input file for the import. |
Trial ID Column |
Mandatory |
Column number for trial ID (nurseries use a trial ID). |
Breeding Method ID Column |
Mandatory |
Column number for breeding method. |
Male Parent ID Column |
Mandatory |
Column number for male parent ID (Use trial Unit Specimen Id) |
Female Parent ID Column |
Mandatory |
Column number for Female Parent Id (Use Trial Unit Specimen Id) |
Crossing Date/Time Column |
Column number for date/time. |
|
User ID Column |
Column number for user ID. |
|
Crossing Note Column |
Column number for Crossing Note |
Note
Entries for male and female parent IDs must be trial unit specimen IDs used inside the nursery.
Generating Layouts and Crossings
A layout and crossing can be automatically generated from two specimen lists.
Note
Additional crossing and algorithm algorithms can only be added by advanced users.
Field |
Mandatory |
Description |
|---|---|---|
Male Specimen Group (list) |
Mandatory |
List of specimens that will be the male in a crossing. |
Female Specimen Group (list) |
Mandatory |
List of specimens that will be the female in a crossing. |
Algorithm Name |
Mandatory |
A choice of algorithm which the layout and crossing will be generated with. |
Make Crossing |
Mandatory |
An option of whether the crossing will be generated following the layout |
Breeding Method |
If a crossing will be generated, then a breeding method must be defined for crossings. |
|
Replicates |
Mandatory |
Number of replicates for crossings. |
Harvest Crossing
Once a nursery has a layout and a crossing set up, users can harvest from crossing and create new genotype and specimens, with appropriate pedigree entries.
To create a harvest crossing, select Harvest Crossing (under the Display Nursery Layout dropdown) from the Action Column of the relevant nursery. This will bring up the Harvest Crossing Window which can be seen in the image below, along with a table that outlines the fields relevant to harvest crossing. Each row refers to a single cross where a new genotype and specimen may be created.
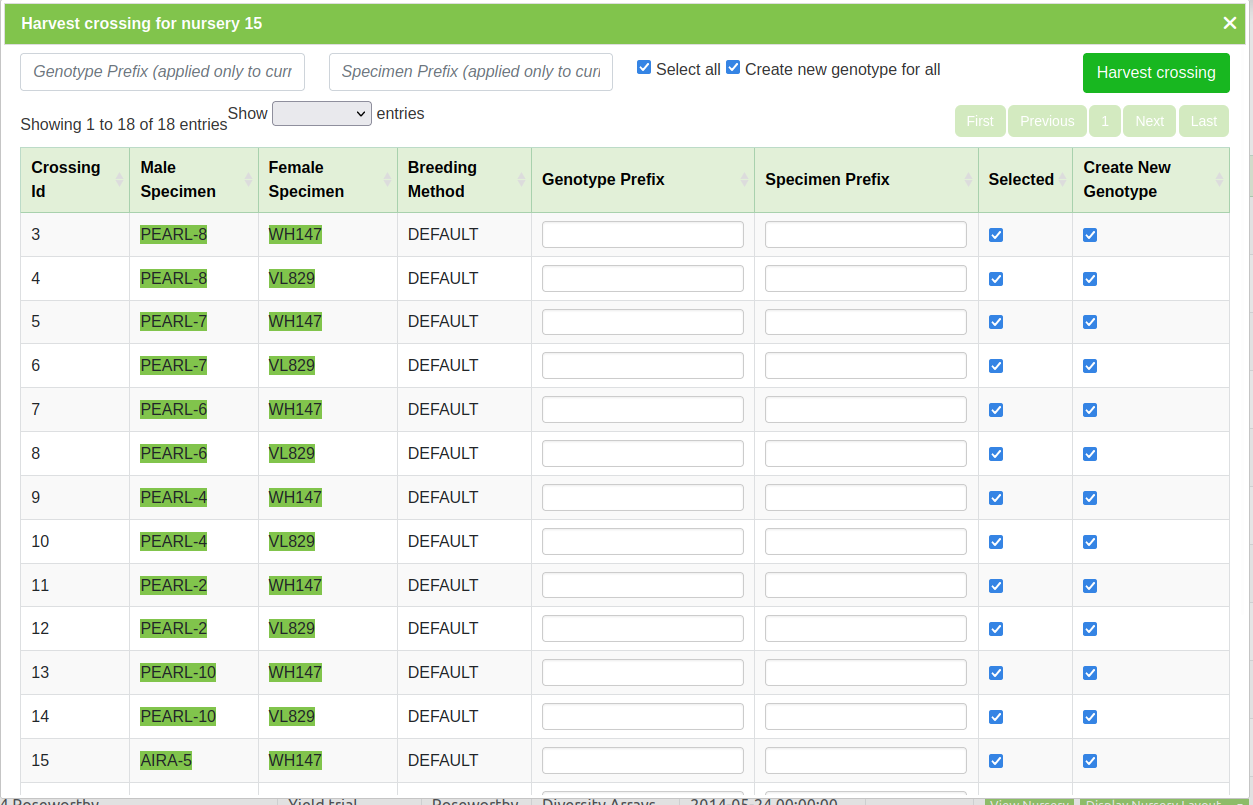
Note
In cases where two specimens have previously been crossed, no genotype will be created and the new specimen will take on the female genotype.
Field |
Mandatory |
Description |
|---|---|---|
Genotype Prefix |
Mandatory |
The prefix for the newly created genotype. A unique number will be generated and appended to the prefix. |
Specimen Prefix |
Mandatory |
The prefix for the newly created specimen. A unique number will be generated and appended to the prefix. |
Selected |
If un-ticked, the corresponding crossing will be skipped. |
|
Create New Genotype |
If un-ticked, the corresponding crossing will not have a new genotype created. |